 FLYSKY FS-ST16 ANT Protocol Remote Control Transmitter

Specifications:
- Model: FS-ST16
- Brand: Flysky
- Battery Type: Supports 18650 and LiPo batteries
- Power Source: USB Type-C port
Product Usage Instructions
Installing the 18650 Battery:
- Open the battery compartment cover.
- Insert 2 batteries into the compartment, following the marked polarities.
- Close the battery compartment cover.
Installing the LiPo Battery:
- Open the battery compartment cover.
- Insert 2S LiPo batteries into the compartment.
- Plug the battery wiring of the LiPo battery into the appropriate connector.
- Close the battery cover, ensuring no pinching of the wiring.
Note: You can also power the transmitter using a USB Type-C cable.
Charging:
This transmitter supports charging of installed batteries via the USB Type-C port. Use a 5V/2A or higher USB power adapter for charging. Connect the USB Type-C cable to the power source and transmitter port.
Caution: Use only the standard charging cable to prevent damage to the battery.
Powering On:
- Ensure batteries are fully charged and installed correctly.
- Press and hold the power switch to turn on the transmitter.
Thank you for purchasing the products of Flysky! To find out more about our products, visit our website at www.flysky-cn.com. If you encounter any problems during using, please refer to the manual first. If the problem is still not resolved, contact your local dealer directly or contact the customer service staff via Flysky official website.
Precautions
Read the safety messages listed below before operation!
- Do not use the product at night or during bad weather conditions, like rain or thunderstorms. It can cause erratic operation or loss of control.
- Do not use the product when visibility is limited.
- Do not expose the product to rain or snow. Any exposure to moisture (water or snow) may cause erratic operation or loss of control.
- Interference may cause loss of control. To ensure the safety of you and others, do not operate in the following places:

- Do not use this product when you are tired, uncomfortable, or under the influence of alcohol or drugs. Doing so may cause serious injury to yourself or others.
- The 2.4GHz radio band is limited to line of sight. Always keep your model in sight, as a large object can block the RF signal and lead to loss of control.
- Never grip the transmitter antenna during operation. It significantly degrades signal quality and strength and may cause loss of control.
- Do not touch any part of the model that may generate heat during operation or immediately after use. The engine or motor may be very hot and can cause serious burns.
- Misuse of this product may lead to serious injury or death. To ensure the safety of you and your equipment, read this manual and follow the instructions carefully.
- Make sure the product is properly installed in your model. Failure to do so may result in serious injury.
- Make sure that the receiver’s battery is disconnected before turning off the transmitter. Failure to do so may lead to unintended operation and cause an accident.
- Ensure that all servos operate in the correct direction. If not, adjust the direction first.
- Make sure that the model stays within range to prevent loss of control.
CAUTION! - RISK OF EXPLOSION IF BATTERY IS REPLACED BY AN INCORRECT TYPE. DISPOSE OF USED BATTERIES ACCORDING TO THE INSTRUCTIONS.
Transmitter Overview
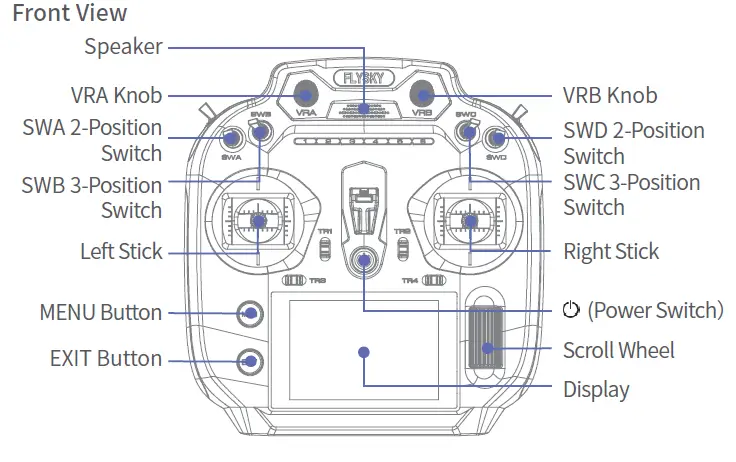
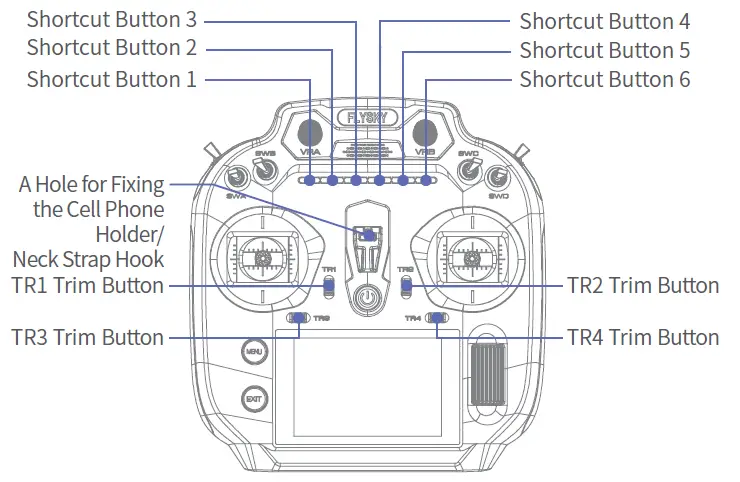
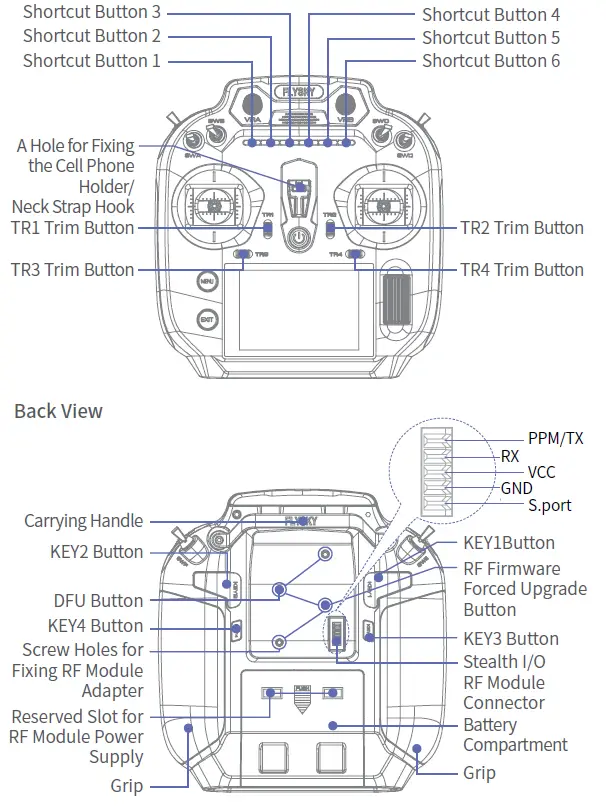
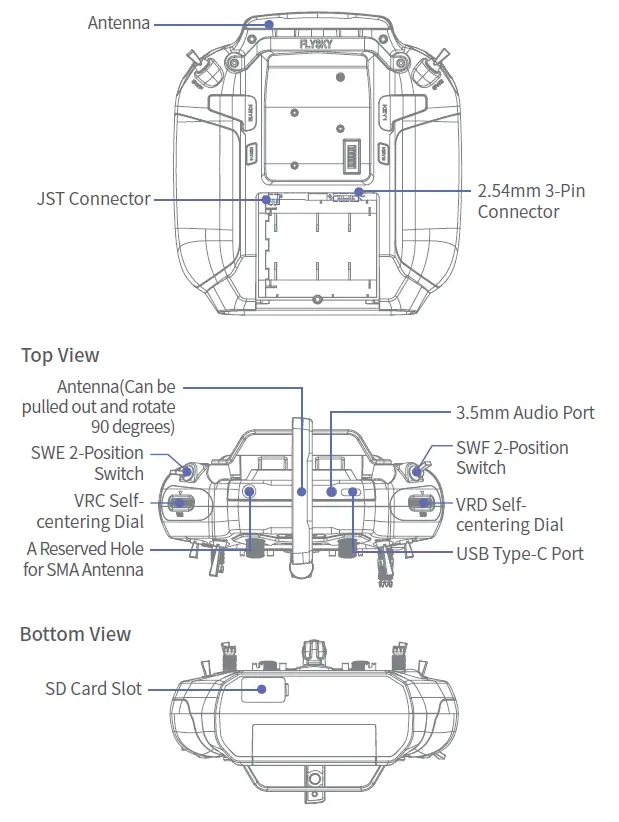
Basic Operations
Installing the 18650 Battery
Follow the steps below to install the 18650 battery:
- Open the battery compartment cover.
- Insert 2 batteries into the compartment. Make sure that the batteries are well set according to the polarities marked on the battery compartment.
- Close the battery compartment cover.
Installing the LiPo Battery
The transmitter supports LiPo batteries and has one JST connector and one 2.54mm 3-Pin connector for battery wiring. Follow the steps below to install the LiPo batteries:
- Open the battery compartment cover.
- Insert 2S LiPo batteries into the compartment.
- Plug the battery wiring of the LiPo battery into the JST connector or 2.54mm 33-pin connector accordingly.
- Close the battery cover, being careful to avoid pinching the battery wiring.
Note: Additionally, you can also use a USB Type-C cable to connect the transmitter’s USB Type-C port for power.
Charging
This transmitter is compatible with charging of 18650 batteries or LiPo batteries installed in the transmitter via the USB Type-C port. Pay attention to that a 5V/2A or 2A or higher USB power adapter is required for charging.
Connect one end of the USB Type-C cable to the power source and the other end to the transmitter USB Type-C port.
Please use the standard charging cable of this transmitter to charge it. Improper use may ause damage to the battery and affect its service life.
Powering on
Follow the steps below to turn on the transmitter:
- Check to make sure that the batteries are fully charged and installed correctly.
- Press and hold until the LED indicator is solid on and the FLYSKY logo displays on the LCD screen, indicating that the transmitter has powered on.
Note: If SWA/SWB/SWC/SWD switches are not at their high positions, and the throttle stick is not at its low position when the transmitter is powered on. A pop-up menu will appear to remind you to put these switches and the throttle stick in their proper positions. The transmitter will launch after these switches and the throttle stick are in their proper positions.
Powering Off
Follow the steps below to turn off the transmitter:
- Turn off the receiver first.
- Press and hold the Power Switch until the screen turns off, indicating that the transmitter is powered off.
Make sure to disconnect the receiver power before turning off the transmitter. Failure to do so can result in out-of-control. Unreasonable setting of the Failsafe may cause accidents.
Calibration
Use this function to correct for the mechanical deviation of the sticks, VRA knob and VRB knob, for example, deviation occurred in the self-centering or maximum minimum travel. The calibration is completed before leaving the factory, by default. If you need to calibrate again, enter System Settings > Stick Calibration, and follow the prompts to perform the corresponding operations:
- Enter the calibration function, and move the stick to the center position as prompted, then scroll the Scroll Wheel to select [Start] and press the Scroll Wheel to enter the next step.
- Follow the prompts, move the sticks, VRA and VRB to the maximum/minimum travel respectively, scroll the Scroll Wheel to select Calibration and press the Scroll Wheel to start. If the calibration is successful, a prompt interface pops up indicating successful calibration; otherwise, scroll the Scroll Wheel to select Restart and press the Scroll Wheel to start recalibration, or select Cancel to cancel the stick calibration.
LED
The transmitter LED includes a power indicator (at the power button), a main ambient light (at the assembly seat), and a secondary ambient light (at the KEY button).
Power Indicator
The power indicator can be set to on or off. It is set to on by default.
Setup:
Scroll the Scroll Wheel to select System > Settings > Power Indicator, then scroll the Scroll Wheel to select On or Off and press the Scroll Wheel.
Primary Ambient Light
The primary ambient light can be set to he color type and brightness, as well as whether to turn off the primary ambient light, or be set to indicate the battery indicator, or the throttle position.
- Battery Indicator: When the light is green, it means the battery voltage is equal to or greater than the alarm value; when it is lower than the alarm value, it is red.
- Throttle Position Indicator: When the light is blue, it means the stick is in the throttle neutral range, and red in other positions.
- Ambient Light Color: It can be set to red, green, blue, yellow, cyan, purple, white, or colorful.
- Brightness: It is 50%, by default, and the adjustment range is from zero to 100%.
Setup:
- Scroll the Scroll Wheel to select System > Settings > Primary Ambient Light>Blue, and press the Scroll Wheel.
- Select the appropriate function item and press the Scroll Wheel.
- Select the Brightness, and scroll the Scroll Wheel to set to a desired value, then press the Scroll Wheel.
Secondary Ambient Light
The functions of the secondary ambient light are the same as those of the primary ambient light, except that it cannot indicate the throttle position.
Binding
The transmitter and the receiver have been pre-bound before delivery. If you are using another receiver, follow the steps below to bind the transmitter and the receiver. The transmitter supports two-way binding and one-way binding, and two-way binding is the default setting. The transmitter will display the information returned from the receiver after the two-way binding is completed.
- Scroll the Scroll Wheel to navigate to the RX SETUP and press the Scroll Wheel to enter the RX SETUP menu. Then, scroll the Scroll Wheel to navigate to the BIND and press the Scroll Wheel to enter. Scroll the Scroll Wheel to navigate to the START and press the scroll wheel to put the transmitter into bind mode.
- Put the receiver into binding mode.
- The binding is finished when the LED of the receiver is solid on.
- Check to make sure the transmitter and receiver are working correctly, if there are any issues or unexpected operation arise, follow the steps above to bind again.
Notes:
- If the transmitter that has its radio frequency set to 1WAY enters bind mode, put the transmitter to exit binding state when the status of the receiver LED changes to slow flash, and at the same time, the receiver LED is solid on, indicating that the binding is completed.
- The binding mode may vary according to the receiver model. Visit the Flysky official website to check the receiver manual or other relevant information.
Failsafe
The fail-safe function is used when the receiver loses signal and is out -of -control. The receiver performs channel output according to the set fail-safe value to protect the safety ofthe model and personnel.
- For the i-BUS/PPM/PWM signal. It can be set to ON or OFF.
- OFF: There is no output for the i-BUS/PPM/PWM channel.
- ON the i-BUS/PPM/PWM channel output, respectively, by the set value.
Namely, you can set a value respectively for channel1 to channel16. By default, this value is the reading of the current channel output value. You can toggle the corresponding control to the desired position and hold it. After pressing EXIT to return, the setting is saved.
Notes:
- Because the S.BUS signal information contains failsafe flag bits, the failsafe information can be transmitted to the subsequent devices by the failsafe flag bits ruther than by OFF state. The subsequent devices gives response according to the analysed information for the failsafe flag bits.
- For the signal PWM/PPM/i-BUS without failsafe flag bits, it supports the setting of the output signal to OFF in case of failsafe, transmitting the failsafe information to the subsequent devices by the OFF state.
- If no failsafe setting has been set, then the receiver will not output when the signal is lost.
Firmware Update
To put the transmitter into an updating state. In case of updating the firmware of the transmitter, use this function to put the transmitter into updating mode first, then upgrade the transmitter’s firmware.
Warning
- Do not unplug the USB Type-C cable while the firmware is updating.
This firmware can be updated via he following two ways.
- The firmware of this receiver can be updated through the Flysky Assistant (The firmware of Flysky Assistant is available on the Flysky official website).
- Or update it by following the steps below:
- Download and open the latest official software.
- Connect the transmitter to the computer via USB Type-C first.
- Select Firmware Update, a prompt screen pops up, and select Yes to enter the updated status.
- After completing the above steps, click Update in the computer update software window to start the update.
Attention
After a firmware update, the receiver may not be connected. If this is the case, the receiver firmware needs to be updated.
Receiver Firmware Update
FS-SR8 receiver firmware update must be finished through FlySky Assistant which only version 3.0 and later are supported, the firmware of Flysky Assistant is available on the Flysky official website (www.flysky-cn. com).
This receiver can be updated in the following two ways:
- Mode Ⅰ: After the binding between the transmitter and the receiver (the LED of the receiver is solid on), connect the transmitter to the computer, then open the FlyskyAssistant on the computer to update the firmware.
- Mode Ⅱ : Connect the transmitter to the computer. Then put the receiver to enter the forced update mode by referring to the following three ways (The LED of the receiver operates in three-flash-one-off manner repeatedly). Afterwards, open the FlyskyAssistant on the computer to update the firmware.
- Power on the receiver while pressing and holding the BIND button for more than ten seconds, until the LED of the receiver operates in three-flash-one-off manner repeatedly, then release the BIND button.
- Power on the receiver first, then press and hold the BIND button for more than ten seconds, when the LED of the receiver operates in three-flash-one-off manner repeatedly, then release the BIND button.
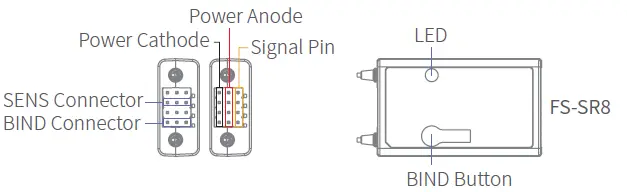
- Connect the signal pin of the BIND connector to the signal pin of the SENS connector, then power on the receiver.
- Note: Different receivers may have different ways of entering the firmware update status. Please refer to the instructions of the relevant receivers.
Specifications
- Product Model: FS-ST16
- Compatible Receivers: Receivers with ANT protocol, such as FS-SR8
- Compatible Models: Fixed-wing aircraft, cars, or boats, etc.
- Number of Channels: 16
- RF: 2.4GHz ISM
- Maximum Power: < 20dBm (e.i.r.p.) (EU)
- RF Protocol: ANT
- Resolution: 4096
- Data Connector: USB Type-C
- Antenna: Two antennas(One built-in antenna and one external folding antenna)
- Input Power: 18650*2PCS/2S Lipo
- Distance: Greater than or equal to 1500m (Air distance without interference)
- Display: 3.5 inch 320*480 full dot color non-touch IPS screen
- Online Update: Yes
- Temperature Range: -10℃ ~ +60℃
- Humidity Range: 20% ~ 95%
- Color: Black
- Dimensions: 189.3x180x93.5mm
- Weight: 665g
- Charging Jack: Yes
- Certifications: CE, FCC ID: 2A2UNST1600
Certifications
FCC Compliance Statement
This device complies with Part 15 of the FCC Rules. Operation is subject to the following two conditions: (1) this device may not cause harmful interference, and (2) this device must accept any interference received, including interference that may cause undesired operation.
Warning: Changes or modifications not expressly approved by the party responsible for compliance could void the user’s authority to operate the equipment.
This equipment has been tested and found to comply with the limits for a Class B digital device, under Part 15 of the FCC Rules. These limits are designed to provide reasonable protection against harmful interference in a residential installation. This equipment generates, uses, and can radiate radio frequency energy and, if not installed and usedbyh the instructions, may cause harmful interference to radio communications. However, there is no guarantee that interference will not occur in a particular installation.
If this equipment does cause harmful interference to radio or television reception, which can be determined by turning the equipment off and on, the user is encouraged to try to correct the interference by one or more of the following measures:
- Reorient or relocate the receiving antenna.
- Increase the separation between the equipment and receiver.
- Connect the equipment to an outlet on a circuit different from that to which the receiver is connected.
- Consult the dealer or an experienced radio/TV technician for help.
EU DoC Declaration
Hereby, [ShenZhen FLYSKY Technology Co., Ltd.] declares that the radio equipment type[FS-ST16] complies with Directive 2014/53/EU. The full text of the EU declaration
of conformity is available at the following internet address: www.flyskytech.com/infodetail/10.html
Environmentally Friendly Disposal
Old electrical appliances must not be disposed of together with the residual waste, but have to be disposed of separately. The disposal at the communal collecting point via private persons is free. The owner of old appliances is responsible for bringing the appliances to these collection points or similar collection points. With this little personal effort, you contribute to recycling valuable raw materials and the treatment of toxic substances.
CAUTION
RISK OF EXPLOSION IF BATTERY IS REPLACED BY AN INCORRECT TYPE. DISPOSE OF USED BATTERIES ACCORDING TO THE
RF Exposure Statement
This equipment complies with FCC radiation exposure limits set forth for an uncontrolled environment. This transmitter must not be co-located or operating in conjunction with any other antenna or transmitter.
These requirements set a SAR limit of 4 W/kg averaged per ten gram of tissue. The highest SAR value reported under this standard during product certification for use when properly worn on the limbs.
CE SAR statement
This equipment complies with Directive 2014/53/EU radiation exposure limits set forth for an uncontrolled environment. End user must follow the specific operating instructions for satisfying RF exposure compliance. This transmitter must not be co-located or operating in conjunction with any other antenna or transmitter.
The portable device is designed to meet the requirements for exposure to radio waves established by the European Union market(France). These requirements set a SAR limit of 4W/kg averaged over
ten grams of tissue. The highest SAR value, 1.149W/kg reported under this standard during product certification for use when properly worn on the limbs.
FCC SAR statement
- The radiated output power of this device is below the FCC radio frequency exposure limits. Nevertheless, the device should be used in such a manner that the potential for human contact is minimized during normal operation.
The exposure standard for wireless devices employs a unit of measurement known as the Specific Absorption Rate, or SAR. The SAR limit set by the FCC is 1.6 W/Kg. Tests for SAR are conducted using standard operating positions accepted by the FCC, with the device transmitting at its highest certified power level in all tested frequency bands. Although the SAR is determined at the highest certified power level, the actual SAR level of the device while operating can be well below the maximum value. This is because the device is designed to operate at multiple power levelstoo use only the power required to reach the network. In general, the closer you are to a wireless base station antenna, the lower the power output. To avoid the possibility of exceeding the FCC radio frequency exposure limits, human proximity to the antenna should be minimized.
For body worn operation, this model phone has been tested and meets the FCC RF exposure. Guidelines when used with an accessory designated for this product or when used with an accessory that Contains no metal and that positions the handset a minimum of 0mm from the body. - The maximum SAR value is 1.509 W/kg when the phone is used 0mm away from the user.
CAUTION
- Replacement of a battery with an incorrect type that can defeat a safeguard (for example, in the case of some lithium battery types);
- disposal of a battery into fire or a hot oven, or mechanically crushing or cutting a battery, which can result in an explosion; leavinga a battery in an extremely high temperature surrounding environment that can result in an explosion or the leakage of flammable liquid or gas; and
- a battery subjected to extremely low air pressure that may result in an explosion or the leakage of flammable liquid or gas.

- Http:www.flyskycn.com
- Copyright © 2024 Flysky Technology Co., Ltd. Release date: 2024-06-15
- FCC ID: 2A2UNST1600
- Manufacturer: ShenZhen FLYSKY Technology Co., Ltd.
- Address: 16F, Huafeng Building, No. 6006 Shennan Road, Futian District, Shenzhen, Guangdong, China
Frequently Asked Questions
Q: Where can I find more information about Flysky products?
A: Visit our website at www.flysky-cn.com for more details on our products.
Q: What should I do if I encounter problems while using the transmitter?
A: Refer to the manual first. If issues persist, contact your local dealer or reach out to customer service via our official website.
Documents / Resources
 |
FLYSKY FS-ST16 ANT Protocol Remote Control Transmitter [pdf] User Guide FS-ST16 ANT Protocol Remote Control Transmitter, FS-ST16, ANT Protocol Remote Control Transmitter, Protocol Remote Control Transmitter, Remote Control Transmitter, Control Transmitter |