1. Tuote ohiview
The Excelvan Wireless Weather Station (Model AOK-5061A) is designed to provide accurate indoor and outdoor temperature and humidity readings, along with weather forecasts and an alarm clock function. It features a large, colorful LCD display with LED backlight for easy readability.
Tärkeimmät ominaisuudet:
- Indoor/Outdoor Temperature and Humidity Measurement
- Weather Forecast with 5 Icons (Sunny, Partially Sunny, Cloudy, Rain, Heavy Rain)
- DCF Radio-Controlled Clock with Manual Setting
- Alarm with Snooze Function
- Large Color LCD Display with LED Backlight
- DST (Daylight Saving Time) Automatic Update
- Wireless Outdoor Sensor with up to 50m range

Kuva 1: Etuosa view of the Excelvan Wireless Weather Station main unit, displaying weather forecast, outdoor/indoor temperature and humidity, and time.
2. Asennusopas
2.1 Pakkauksen sisältö
Before proceeding with the setup, ensure all items are present in the package:
- 1 x sääaseman pääyksikkö
- 1 x Langaton kaukosäädin
- 1 x verkkolaite
- 1 x Käyttöohje

Figure 2: The complete package contents, including the main weather station unit, wireless remote sensor, power adapter, and user manual.
2.2 Pääyksikön virran kytkeminen
- Akun asennus (valinnainen): Open the battery compartment on the back of the main unit. Insert 3 x 1.5V AA batteries (not included), ensuring correct polarity. The LED backlight will stay on for 5 minutes when powered by batteries.
- AC Power Adapter (Recommended): For continuous backlight, connect the provided AC power adapter (4.5V, 150mA) to the main unit's power input and then plug it into a wall outlet.

Kuva 3: Takaosa view of the main unit showing the battery compartment with the cover removed, ready for battery insertion.

Kuva 4: Takaosa view of the main unit with the AC power adapter connected, illustrating the power input port.
2.3 Powering the Wireless Remote Sensor
- Open the battery compartment of the wireless remote sensor.
- Aseta 2 x 1.5 V AAA-paristoa (eivät sisälly toimitukseen) varmistaen oikean napaisuuden.
- Sulje paristolokero kunnolla.

Figure 5: The wireless remote sensor, showing its display and the battery compartment on the back.
2.4 Anturin sijoitus
- The main unit is intended for indoor use only.
- Place the wireless remote sensor outdoors in a sheltered area, away from direct sunlight and rain, to ensure accurate readings.
- Ensure the sensor is within 50 meters (open space) of the main unit for optimal signal reception.
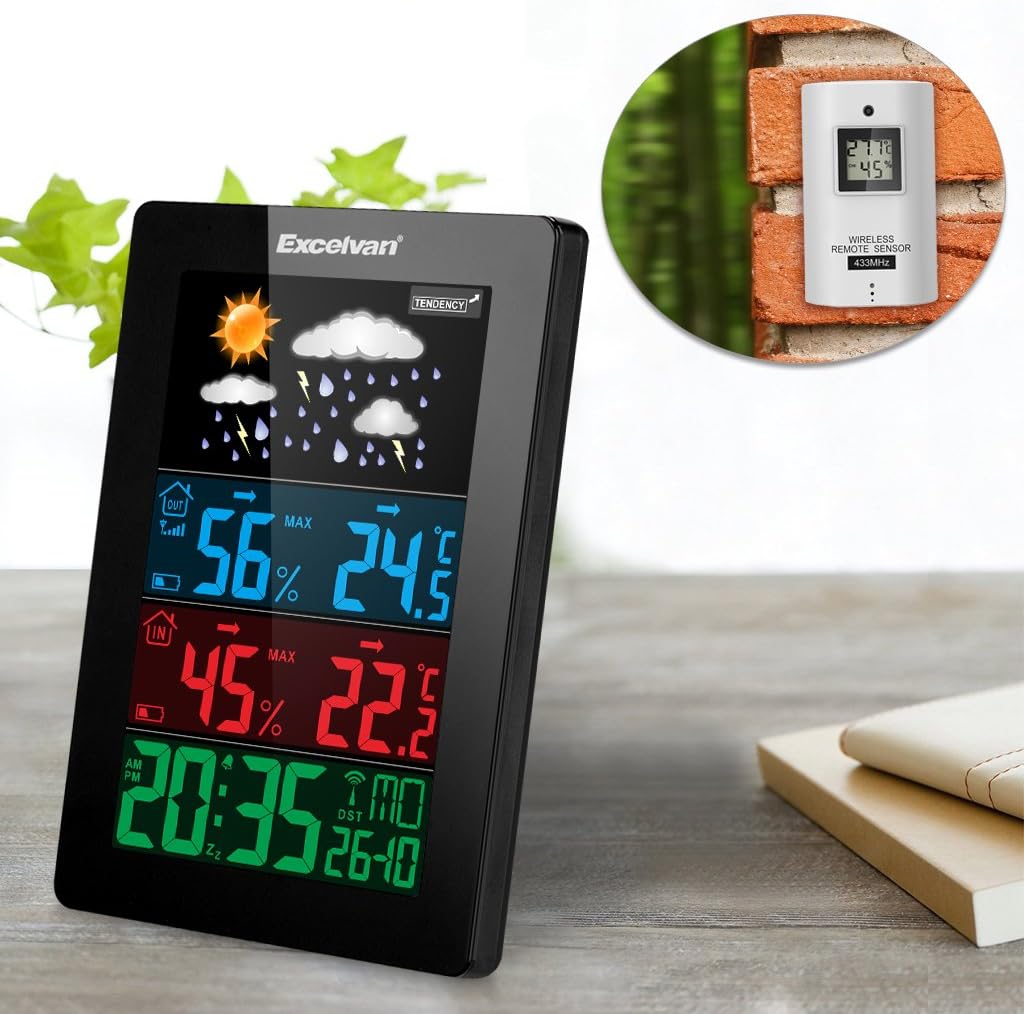
Figure 6: An illustration showing the main weather station unit indoors and the wireless remote sensor mounted on an outdoor wall.

Figure 7: A diagram highlighting the effective wireless transmission distance of 50 meters between the main unit and the remote sensor.
3. Käyttöohjeet
3.1 Alkuperäinen synkronointi
After powering both units, the main unit will automatically attempt to synchronize with the remote sensor and receive the DCF radio-controlled time signal. This process may take a few minutes.
3.2 Näytön loppuview
The large LCD display shows various information:
- Yläosio: Weather forecast icons (sunny, cloudy, rainy, etc.) and weather tendency indicator.
- Middle-Top Section (Blue): Outdoor humidity and temperature.
- Middle-Bottom Section (Red): Indoor humidity and temperature.
- Bottom Section (Green): Current time (12/24 hour format), day of the week, and date.
Figure 8: Close-up of the main unit's display, illustrating the different data sections for weather, outdoor/indoor conditions, and time.
3.3 Kellonajan ja päivämäärän asettaminen manuaalisesti
While the unit is radio-controlled, manual adjustments can be made:
- Paina MODE button to cycle through display modes.
- Pidä kiinni MODE button for a few seconds to enter time setting mode.
- Käytä + ja - painikkeita säätääksesi arvoja.
- Paina MODE again to confirm and move to the next setting (e.g., hour, minute, year, month, day, language for day of week).
3.4 Hälytys- ja torkkutoiminto
- Paina HÄLYTYS -painiketta view tai aseta herätysaika.
- Pidä kiinni HÄLYTYS button to enter alarm setting mode. Use + ja - säätää.
- Voit aktivoida/deaktivoida hälytyksen painamalla HÄLYTYS -painiketta lyhyesti. Näyttöön tulee/katoaa hälytyskuvake.
- Kun hälytys soi, kosketa SNOOZE / VALO button on top of the unit to activate the snooze function. The alarm will sound again after a few minutes.
- Voit pysäyttää hälytyksen kokonaan painamalla mitä tahansa muuta painiketta.

Figure 9: Top edge of the main unit, highlighting the "SNOOZE/LIGHT" touch-sensitive button for alarm snooze and backlight activation.
3.5 Lämpötilayksikön valinta
Paina - -painiketta vaihtaaksesi Celsius- (°C) ja Fahrenheit- (°F) lämpötilayksiköiden välillä.
3.6 Sääennuste
The weather station predicts weather conditions based on atmospheric pressure changes. The icons (sunny, partially sunny, cloudy, rain, heavy rain) indicate the forecast for the next 12-24 hours, not the current weather.
4. Huolto
- Puhdistus: Pyyhi pääyksikkö ja anturi pehmeällä,amp kangas. Älä käytä hankaavia puhdistusaineita tai liuottimia.
- Akun vaihto: Replace batteries in both the main unit and the remote sensor when the low battery indicator appears on the display. Ensure correct polarity.
- Anturin sijoitus: Periodically check the outdoor sensor's placement to ensure it remains sheltered and within range.
- Varastointi: Jos laitetta säilytetään pitkään, poista kaikki paristot vuotojen estämiseksi.
5. Vianmääritys
| Ongelma | Mahdollinen syy | Ratkaisu |
|---|---|---|
| Ei ulkolämpötilan/kosteuden mittausta. |
|
|
| Virheellinen ajan näyttö. |
|
|
| Näyttö on himmeä tai tyhjä. |
|
|
6. Tekniset tiedot
| Ominaisuus | Yksityiskohta |
|---|---|
| Radio-ohjattu kello | DCF77 |
| Sisälämpötila-alue | 0 ° C - +50 ° C (32 ° F - 122 ° F) |
| Ulkolämpötila-alue | -20 °C - +60 °C (-4 °F - 140 °F) |
| Lämpötilan mittauksen tarkkuus | ±2 °C |
| Sisä-/ulkonäön kosteusalue | 20-90% RH |
| Kosteuden resoluutio | 1 % |
| Wireless Sensor Frequency | 433 MHz |
| Langaton signaalialue | Jopa 50 metriä (avoin tila) |
| Probe Cable Length (for external probe, if applicable) | 1 m |
| Waterproof Level of Sensor | IPX3 |
| Main Station Power | 3 x 1.5V AA batteries (not included) or 4.5V, 150mA AC adapter (included) |
| Kaukosäätimen anturin virta | 2 x 1.5 V AAA paristot (ei sisälly) |
| Main Station Dimensions | 148 × 110 × 30 mm |
| Main Station Weight (without batteries) | 242 g |
| Kaukoanturin mitat | 60 × 100 × 20 mm |
| Remote Sensor Weight (without batteries) | 50 g |
| Day of Week Languages | German, English, Italian, French, Dutch, Spanish, Danish |
7. Takuu ja tuki
For warranty information or technical support, please refer to the documentation provided with your purchase or contact Excelvan customer service through their official websivustosta tai jälleenmyyjältäsi.
Huomautus: Tämä käyttöohje on tarkoitettu vain tiedoksi. Tekniset tiedot voivat muuttua ilman erillistä ilmoitusta.