![]() DBL Quick Start Guide
DBL Quick Start Guide
What’s in the Box:
 DBL Data Logger DBL Data Logger |
 1 AA Lithium Battery 1 AA Lithium Battery |
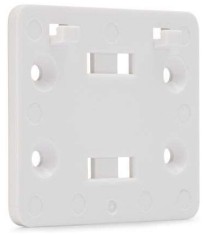 Mounting Bracket & Mounting Hardware Mounting Bracket & Mounting Hardware |
 DicksonWare (non-secure) DicksonWare (non-secure) |
Accessories (not included):
 AC Adapter & Power Cable
Note: DicksonWare Secure, which is 21CFR Part 11 compliant, sold separately
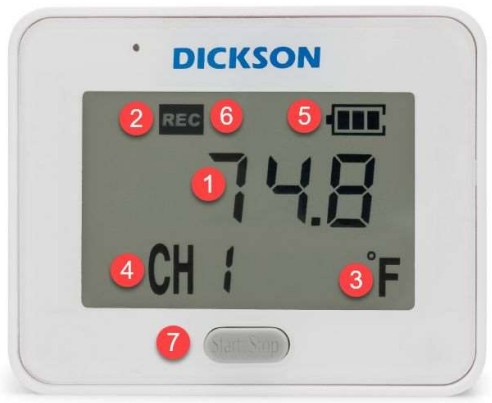
- Recent reading
- Recording indicator
- Temperature units (rotates between any channels on the device)
- Channel number; rotates between CH1 (temperature) and CH2 (relative Humidity, if active)
- Battery indicator
- Alarm Icon (bell, not pictured)
- Start/Stop button used to begin and pause data logging
Getting Started with the DBL
Follow these easy steps to begin logging data quickly:
- Open the rear battery compartment door and add 1 AA battery
- The device will power on and flash the current firmware version on the screen for a few sends
- 4 static dashes along with a wrench icon will appear on the screen
- To configure the DBL, using a USB cable, connect the device to a computer (with DicksonWare 2.0 software installed)
Configuring Device Settings Using DicksonWare 2.0
Install DicksonWare 2.0 (if not already installed)
- Plug the USB stick that contains the file into your computer
- Open the external USB drive to view the installation file
- Click on the Dicksonware installation file to begin downloading
- Once the download is complete
Note: DicksonWare 2.0 Version 20.3.2.0 or greater required
Note: The DicksonWare 2.0 USB includes a manual for DicksonWare 2.0 operation.
Configure Device Settings
Launch DicksonWare 2.0
- Launch the program by clicking the icon on your desktop or by finding it in the Start menu
- Connect the DBL to your computer using the USB cable. The software will recognize the connected device
- Click the “Configure” button at the top of the screen. Give the logger a name
Sample Rate
- On the “Configure” screen of Dicksonware 2.0, go to the “Sample Rate” tab in the sidebar
- Select a sample interval (how often the device takes a reading) from the dropdown
- (NOTE: selecting a faster sample rate will affect battery life.)
- Select whether you want the device to STOP logging when full, or WRAP (overwrite) when full
Note on battery life
The two year battery life specification with a regular AA battery is based on the following assumptions:
- 5 minute sample rate
- 3 second display refresh rate
- 3 Audible/visual alarms per month
- Operating at ambient temperature
Channels
- On the “Configuration” screen of Dicksonware, go to the “Channels” tab in the sidebar
- Adjust the temperature units in Fahrenheit or Celsius
- Humidity channel recording can be turned off/on via this tab
Alarms
- On the “Logger Settings” screen, go to the “Alarms” tab in the sidebar
- For each alarm, select either:
- Min = lower threshold (device alarms when temperature goes below this point)
- Max = upper threshold (device alarms when temperature goes above this point)
- Input the temperature value or humidity % for the threshold
- Click “Save”
- For each alarm, select either:
- Device will sound an alarm when the temperature and/or humidity readings cross the predefined threshold
- The alarm icon will illuminate in the display
- The unit will blink a specific color to indicate the type of alarm:
- Red = Temperature alarm
- Green = Humidity alarm
- Blue Calibration past due
- Alarm will sound for 1 minute until readings fall back within the set range.
- If the DBL continues logging and the device remains in an alarm state after 1 minute then the device will continue to beep twice every 5 minutes.
- Audible/Visual alarm will clear automatically when the current reading no longer exceeds min/max limits
Start Logging
- Once the device is properly configured click Save
- It is now safe to disconnect the device
- 4 flashing dashes will appear on the screen signaling the device is ready to begin logging data
- To begin logging data, hold Start/Stop button for 5 seconds
- “Strt” will appear on the screen to signal that datalogging has begun
- To stop or pause logging, hold the Start/Stop button for 5 seconds. Logging will continue when you again press the Start/Stop button for 5 seconds
Downloading Data
Downloading data from the data logger requires DicksonWare 2.0 or DicksonWare 2.0 Secure and a USB cable, both are sold separately.
To download data from the device:
- Launch DicksonWare 2.0
- Connect the DBL via the USB cable
- On the Dicksonware home screen, click the “Download” button
- Data will automatically start downloading from the device. This may take a few minutes depending on the amount of data stored on the logger
Once download is complete, you will be able to view the data in the interface and select a range
You can extend the battery life up to 6 years by using a Lithium AA battery with the same assumptions above.
Firmware
The DBL comes preloaded with up-to-date firmware. When the unit is powered on, the current version number will flash on the screen. You should not normally have to update the firmware on the unit, but on the rare occasion where a new update is available, you can visit our website for information: https://dicksondata.com/product/compact-data-logger/
For additional support
Visit: support.dicksonone.com
Email: support@dicksonone.com
Call: 630.543.3747
Documents / Resources
 |
DICKSON DBL Data Logger [pdf] User Guide 6345283, 16345283, 16341730, DBL Data Logger, DBL, Data Logger, Logger |