![]()
![]() SAFETY, OPERATIONS
SAFETY, OPERATIONS
& PARTS MANUAL

NEW GENERATION CT & IP SERIES
CHAIN BLOCKS
500kg, 1 tonne, 1.6 tonne, 2 tonne, 3.2 tonne, 5 tonne and 10 tonne model capacities
![]() Complies to AS 1418.2
Complies to AS 1418.2
Preface
Congratulations on your CRANE Chain Block purchase.
The CRANE Chain Block you have chosen, is a top quality & heavy duty hoist, designed to retain its operational features under normal operating conditions. In order to achieve years of satisfactory service from your CRANE Chain Block regular maintenance and lubrication should be applied.
Prior to operation, please read all the contents contained within this manual. At all times only competent and experienced personnel should operate, install or maintain this hoist. Failure to comply with the instructions contained within this manual can result in both physical and/or property damage.
In keeping with statutory requirements, and best use for your CRANE Chain Block we recommended a periodic maintenance check every 12 months.
Initial Set Up Check
Your CRANE Chain Block has been tested, and conforms to Australian Standard AS1418.2 – 1997
On completion of installation, but prior to your CRANE Chain Block being put into regular service, the following procedures should be carried out:
- Check that all joints and fasteners are tight and secure.
- Check operation of hoist brake, under light load and full load conditions.
- Operate the hoist with both no load and full load, and check that the operation is smooth at all times.
Order Information
Replacement parts is your require spare parts for your Chain Block in the future. Simply provide the Model No., Serial No. and the part you require to your local CRANE distributor.
Warning
Operating a unit with obvious external damage may cause load to drop and that may result in personal injury and/or property damage.
To Avoid Injury
Carefully check unit for external damage prior to installation.
Operation Instructions
After mounting and before placing in service, check the Chain Block for proper operation. To operate the Chain Block, pull on the hand chain as indicated.
Operate the Chain Block with no load and then a light load of approximately 20kg.
To make sure it operates properly and the brake holds the load when the hand chain is released, then operate with a rated load as shown on the capacity plate.

Check List to Avoid Injury
- Familiar yourself with chain block operating controls and procedures.
- Make sure the chain block suspension hook is securely attached to a suitable support.
- Maintain a firm footing or be otherwise secured when operating chain block.
- Make sure that load slings or other approved sling attachments are properly sized and seated in the hook saddle
- Make sure that the load is free to move and will clear all obstructions.
- Take up slack chain carefully, check load balance, lift a few centimetres and check load holding action before continuing.
- Make sure that all persons stay clear of the suspended load.
- Avoid swinging of load or load hook.
- Inspect chain block regularly, replace damaged or worn parts and keep appropriate records of maintenance.
- Do Not Lift more than rated load.
- Do Not use the chain block with twisted, kinked, damaged or worn chain.
- Do Not lift a load unless chain is properly seated in chain wheel(s).
- Do Not use load chain as a sling or wrap chain around load.
- Do Not Lift loads over people.
- Do Not use chain block to lift, support or transport people.
- Do Not remove the manufacturers markings or the warnings on the chain block.
- Do Not apply the load to the tip of the hook.
- Do Not operate unless load is centred under chain block.
- Do Not operate chain block with other than manual power.
- Do Not permit more than one operator to pull on a single hand chain at on time.
- Do Not leave a suspended load unattached unless specific precautions have been taken.
- Do Not allow the chain or hook to be used as a earth for welding.
- Do Not allow the chain or hook to be touched by a live welding electrode.
- Do Not adjust or repair a chain block unless qualified to do so.
Safety Procedures
The chain block must always be rigged to lift in a straight line from hook to hook. The chain block must always be free to swivel on the upper hook. Under no conditions should the chain block frame be allowed to bear on any support when in use as this would cause bending of the hook or frame and damage the unit.
| Chain Block Rated Load kg | Hand Chain Pull to Lift Rated Load N |
| 500 | 260 |
| 1000 | 269 |
| 1500 | 375 |
| 2000 | 407 |
| 3200 | 386 |
| 5000 | 402 |
| 10000 | 426 |
| 20000 | 440 x 2 |
Warning
Special note for user:
TWISTING OF CHAIN
3, 5, 10, 20 and 30 tonne CRANE Chain Blocks have multiple falls of load chain. THE LOAD CHAIN MUST BE INSPECTED FOR TWIST PRIOR TO EACH LIFT. If the Chain Block bottom hook has looped through the multi fall of load chain this can create a twist in the load.
Maintenance
Inspection
To maintain continuous and satisfactory operation, a regular inspection procedure must be initiated so that worn or damaged parts can be replaced before they become unsafe. The intervals of inspection must be determined by the individual application and are based upon the type of service to which the chain block will be subjected. The inspection of chain blocks is divided into two general classifications designated as frequent and periodic.
Frequent Inspections
Hook Inspection
Hooks damaged from chemicals, deformations or cracks that have more than a 10° twist from the plane of the unbent hook or excessive opening or seat wear must be replaced.
Also, hooks that are opened and those that allow the latch to disengage the tip, must be replaced. Any hook that is twisted or has excessive throat opening or seat wear must be replaced.

Any hook that is twisted or has excessive throat opening, indicated abuse or over loading of the unit. Other load sustaining components of the chain block should be inspected for damage.
The chart above should be used to determine when the hook must be replaced. To measure throat opening, depress the latch against the hook body as shown above.
| Chain Block Rated Load kg | Replace Hook when Opening is greater than : mm | Deformation Indicator |
| 500 | 29.7 | 38.5 |
| 1000 | 36.3 | 49.5 |
| 1500 | 36.9 | 51.7 |
| 2000 | 40.7 | 57.2 |
| 3200 | 47.9 | 68.8 |
| 5000 | 56.1 | 85.8 |
| 10000 | 70.4 | – |
| 20000 | 90.2 | – |
Also check to make sure that the latch is not damaged or bent and that it operates properly with sufficient spring pressure to keep the latch tightly against the tip of the hook and allow the latch to spring back to the tip when released. If the latch does not operate properly, it should be replaced.
Load Chain
Cleaning and Inspection
First clean the load chain with a non-acid or non-caustic type solvent then slack the chain and make a link by link inspection for nicks, gouges, twisted links and excessive wear or stretching. Worn chain should be gauged throughout its entire length and replaced if beyond serviceable limits.

To determine if load chain should be continued in service, check gauge lengths as indicated below. Chain worn beyond length indicated, nicked, gouged or twisted should be replaced before returning chain block to service. Chain should be clean, free of twists and pulled taut before measuring. In cases where the wear is localised and not beyond serviceable limits, it is sometimes possible to reverse the load chain, end for end and allow a new section to take the wear. Proper installation of the load chain is covered in the section on Reeving Load Chain.
| Chain Block Rated Load kg |
Chain Stock Diameter mm |
No. of Links to Gauge |
Max. Length allowable for Used Chain mm |
| 500 | 5 | 11 | 173.25 |
| 1000 | 6 | 11 | 207.9 |
| 2000 & 3200 | 8 | 11 | 207.9 |
| 5000 to 20000 | 10 | 11 | 346.5 |
| Hand Chain | 5 | 15 | 382.5 |
Note that worn chain can be an indication of worn chain block components. For this reason, the chain block’s chain guide roller and lift wheel should be examined for wear and replaced as necessary when replacing worn chain.
Also load chains are specially heat treated and hardened and should never try to be repaired.
Warning
Using other than CRANE Sales supplied load chain may cause the chain to jam in the chain block and/or allow the chain to break and the load to drop.
Hand Chain
Hand Chain should be cleaned, inspected and gauged in the same manner as load chain.
As received from the factory, the hand chain may contain an unwelded link. This link can be placed in a vice and twisted open to facilitate changing chain length.
Please note that opening and closing of the connecting link more than twice is not recommended. Also, connecting links must not be made by cutting the weld side of a standard hand chain link.
Hand chain should be assembled to hand wheel free from twists with weld on vertical link facing inwards towards hand wheel and weld on horizontal link facing towards the hand wheel side plate.
Care must be taken to assure that there is no twist in the hand chain loop.
Lubrication
Lubricate load chain with a light coat of chain oil or equal lubricant.
Be sure the lubricant reaches the bearing surfaces between the links. Remove excess oil from the chain.
Warning
Used motor oil contain unknown carcinogenic materials.
The chain block normally requires no additional lubricant except for periodically lubricating the load chain as indicated or when the unit is disassembled for periodic inspections, cleaning or repairs.
The brake is designed to operate dry. Do not use any grease or lubricant on the braking surfaces. When lubricating parts adjacent to the brake, do not use an excessive amount of lubricant which could seep onto the brake surface.
Using any grease or lubricant on the braking surfaces will cause brake slippage and loss of load control which may result in injury and/or property damage.
To Avoid Injury
Do not use any grease or lubricant on the braking surfaces. The brake is designed to operate dry.
When the chain block is disassembled for periodic inspections, check the pawl for free movement and apply a light coat of WD40 or similar lubricant to the pawl stud. When the chain blockis disassembled for cleaning or repairs, the following locations should be lubricated using approximately 29.5ml per chain block of suitable grease or equivalent: • gears • liftwheel rollers • gear bearing rollers • chain guide and dead end pin
Note: To assure extra long life and top performance, be sure to lubricate the various parts of the chain block using the lubricant specified above.
Disassembly
Two points of caution to be observed in disassembly are:
- Loose rollers and bearing balls are used in various locations in the units. Care must be taken so as to not lose or misplace these since they may drop from the unit as the various parts are disassembled. The number of rollers or bearing balls used are:
Chain Block Rated Load kg Location Rollers Required 500 Liftwheel 56 each end 1000 Liftwheel 68 each end 1600 to 20000 Liftwheel 60 each end - The latch is secured to the hook (upper & lower) by a rivet.
To remove the latch, it is necessary to remove the head of the rivet by grinding or drilling. For replacement of the latch, refer to paragraph 4 of the Assembly Instructions.
Assembly
Consideration must be given to the following when assembling the chain block:
- Assembly the brake components as shown below. The ratchet teeth must face, as shown and engage the pawl. Do not lubricate the brake surfaces. The brake operates dry. Assemble handwheel to pinion shaft and turn handwheel to seat brake components. Assemble the pinion shaft nut to the shaft until the nut bottoms. Then back nut off at least one but not more than two flats. Insert cotter pin and bend ends to secure same.
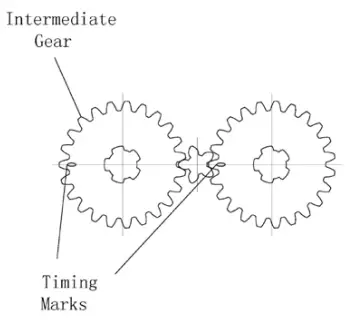
- The intermediate gears have timing marks (letter ‘0’ stamped on one tooth). The gears must be assembled with these marks orientated as shown below.
- For proper operation, the correct number of rollers must be installed at the rotating points of the liftwheel, intermediate gears. Refer to Disassembly Instructions (page 11) for the number of rollers at these locations. Applying grease or equal lubricant to the rollers or bearing balls with help hold them in position during assembly.

- When assembling the latch to the hook, the end of the rivet must be peened over. When peening over the rivet, only apply enough force to form the head and retain the rivet.
Excessive force will deform the latch and make the latch inoperable.
Reeving Load Chain
A. 500, 1000, 1500 and 2000Kg Chain Blocks.
Attach approximately 500mm of soft wire to the loose end of the chain. Pass the wire over the top of the liftwheel and down between the liftwheel and the chain guides. Position the chain so that the first, as well as the third., link stands on edge with the weld away from the liftwheel and the second link lays flat on the liftwheel. After the chain has been started, pull hand chain in the hoisting direction until about 0.6m of chain has passed the liftwheel. The wire should now be
removed from the chain. Remove the cotter pin from the loose end pin and slide the loose end pin to the side into bear housing leaving approximately 12.7mm of the pin protruding from the geared side plate. Loop the chain, making sure there no twists, up to the loose end pin and slide the pin through the last link of the chain. Slide the loose end pin into hole in the handwheel side plate until the cotter pin hole is visible. Secure the loose end pin by reinstalling the cotter
pins and spreading the legs of the cotter pins. 3, 5, 10 and 20 tonne chain blocks have multiple falls and are required to be reeved by an authorised CRANE distributor or by an authorised servicing tester.
Warning
Failure to properly install the load chain between guide and liftwheel may cause the chain to lift out of the liftwheel pockets and allow the load to drop.
To Avoid Injury
Feed load chain between lift wheel and chain guide as shown above before attaching it to the loose end pin.
Exterior Finish
The exterior surfaces of the chain blocks have a durable, scratch resistant finish.
Normally, the exterior surfaces can be cleaned by wiping with a cloth.
Preventative Maintenance
In addition to periodic inspection procedure, a preventative maintenance program should be established to prolong the useful life of the chain block and maintain its dependability and continued safe use. The program should include the periodic inspections with particular attention being paid to the lubrication of various components using the recommended lubricants.
Testing
Before using, all altered, repaired, or used chain blocks that have not been operated for the previous 12 months, should be tested by the user for proper operation. First test the unit without a load and then with a light load of 20Kg to be sure that the chain block operates properly and that the brake holds the load when the hand chain is released. Next test with a load of 100% rated capacity. In addition, chain blocks in which load sustaining parts have been replaced should be tested with 100% of rated capacity by or under the direction of an appointed person and a written report prepared for record purposes.
Exploded view 500 kg to 20 tonne


| Capacity | tonnes | 0.5 | 1 | 1.6 | 2 | 3.2 | 5 | 10 | 20 | |
| No. of Falls | 1 | 1 | 1 | 1 | 2 | 2 | 4 | 8 | ||
| Load Chain | mm | 5 x 15 | 6 x 18 | 8 x 24 | 8 x 24 | 8 x 24 | 10 x 30 | 10 x 30 | 10 x 30 | |
| Pull to Rated Load | N | 219 | 254 | 351 | 405 | 366 | 385 | 426 | 440 x 2 | |
| Proof Load | tonnes | 0.75 | 1.5 | 2.25 | 3 | 4.8 | 7.5 | 15 | 25 | |
| Hand Chain | mm | 5 x 25 x 18 | ||||||||
| Standard Lift | m | 3 | 3 | 3 | 3 | 3 | 3 | 3 | 3 | |
| Net Weight | kg | 7.0 | 10.4 | 15.2 | 16.6 | 23.8 | 38.1 | 64.0 | 145.0 | |
| Gross Weight | kg | 7.3 | 10.7 | 15.7 | 17.0 | 24.2 | 38.8 | 69.2 | 158.9 | |
| Extra Wt. per m | kg | 1.38 | 1.62 | 2.23 | 2.23 | 3.62 | 5.18 | 9.52 | 19.03 | |
|
Dimensions |
a | mm | 125 | 134 | 151 | 157 | 151 | 180 | 180 | 225 |
| b | mm | 130 | 155 | 173 | 185 | 235 | 262 | 365 | 550 | |
| c | mm | 51 | 51 | 64 | 64 | 100 | 126 | 260 | 286 | |
| d | mm | 25 | 30 | 34 | 34 | 56 | 74 | 98 | 123 | |
| e | mm | 27 | 33 | 33.5 | 37 | 43.5 | 52 | 64 | 82 | |
| f | mm | 32 | 40 | 42 | 46 | 52 | 60 | 85 | 110 | |
| g | mm | 35 | 45 | 47 | 52 | 62.5 | 78 | – | – | |
| h | mm | 280 | 306 | 368 | 445 | 520 | 600 | 760 | 1,150 | |
Documents / Resources
 |
CRANE IP SERIES Chain Block [pdf] User Manual IP SERIES Chain Block, IP SERIES, Chain Block, Block |


