C-LITE C-VT-C-LIN4 Series 4 Foot LED Linear Vapor Tight
Specifications
- Model: C-VT-C-LIN4 Series
- Voltage: 120-277V
- Dimming: 0-10V compatible
- Mounting: Surface mount
- Fixture Material: Plastic and Metal
Installation Instructions
- Remove the lens by disengaging the lens clips.
- Rotate the thumb screws to remove the LED panel.
- Drill out appropriate knockouts for cord grips or conduit connectors.
- Attach cord grips or conduit connectors and seal wiring entry points.
- Mount the brackets and attach the fixture securely.
- Wire the fixture per the Electrical Connections section.
- Reassemble the LED panel carefully.
- Replace the lens ensuring proper seating of clips.
- Supply power to the fixture.
Product Usage Instructions
Standard Fixture (120/277V)
- Connect supply ground to fixture ground lead.
- Connect supply common to fixture neutral lead.
- Connect supply Vin to fixture hot lead.
Phase to Phase Wiring (208/240V)
- Connect supply ground to fixture ground lead.
- Connect supply L1 (Hot) to fixture neutral lead.
- Connect supply L2 (Hot) to fixture hot lead.
Dimming
- If using 0-10V dimming, connect positive dimming lead to fixture positive dimming lead.
- If using 0-10V dimming, connect negative dimming lead to fixture negative dimming lead.
Note: Use Class 1 wiring methods for dimming.
FCC Notice
CAUTION: Changes or modifications not expressly approved could void your authority to use this equipment.
FAQ
- Q: Can I use this fixture in wet locations?
- A: Yes, this fixture is suitable for wet locations.
- Q: What should I do if I accidentally touch the LEDs during installation?
- A: Be careful not to touch the LEDs. If they are touched, gently clean them with a soft, dry cloth.
SAFETY INSTRUCTIONS
![]() CAUTIONS
CAUTIONS
IMPORTANT SAFEGUARDS
When using electrical equipment, basic safety precautions should always be followed including the following
READ AND FOLLOW ALL SAFETY INSTRUCTIONS
- DANGER- Risk of shock- Disconnect power before installation.
- This luminaire must be installed under the NEC or your local electrical code. If you are not familiar with these codes and requirements, consult a qualified electrician.
- SUITABLE FOR WET LOCATIONS.
- CONVIENT AUX EMPLACEMENTS MOUILLES.
- SAVE THESE INSTRUCTIONS FOR FUTURE REFERENCE
INSTALLATION
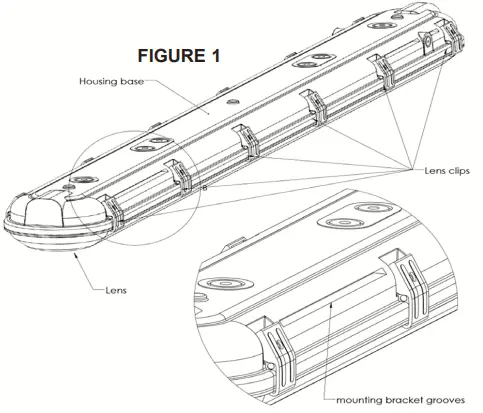
- Remove the lens by disengaging (12) lens clips holding the lens in place. See Figure 1.
- Rotate the (4) thumb screws 90 degrees to remove the LED panel.
- LED panels can be lifted away from the housing base, but will be retained by plastic straps. Do NOT touch LEDs.
- Drill out appropriate knockout(s) at the end(s) of the fixture for attachment of customer-supplied cord grip(s) or conduit connector(s.)
- Attach cord grip(s) or conduit connector(s) into holes opened in Step 3. Make sure wiring entry points are properly sealed with a high-grade caulking material, such as silicone rubber, to prevent water entry.
- Attach the two supplied mounting brackets to the mounting surface using appropriate customer-supplied screws. The bracket spacing is 32″.
- Attach one side of the fixture to both brackets by inserting the bend in the bracket into grooves in the housing base. Secure the fixture by snapping the other side of the fixture onto clips. A “click” should be heard when the second side of the fixture is secured.
- Wire the fixture per the Electrical Connections section.
- Reassemble the LED panel to the housing and secure it by rotating the (4) thumb screws from Step 2. Be careful not to touch LEDs.
- Make sure no leads are pinched.
- Replace the lens. Make sure the (12) plastic lens clips are properly seated when locking the lens in place.
- Supply power to the fixture.
ELECTRICAL CONNECTIONS
ELECTRICAL CONNECTIONS- STANDARD FIXTURE
- The fixture is equipped with a universal volt driver 120-277V (ie. 120V, 208V, 240V or 277V)
PHASE TO NEUTRAL WIRING 120/277V
- Connect supply ground to fixture ground (green or green/yellow) lead.
- Connect supply common to fixture neutral (white) lead.
- Connect supply Vin to fixture hot (black) lead.
- Tuck all wires carefully into the wiring chamber ensuring that no wires are pinched.
PHASE TO PHASE WIRING 208/240V
- Connect supply ground to fixture ground (green or green/yellow) lead.
- Connect supply L1 (Hot) to fixture neutral (white) lead.
- Connect supply L2 (Hot) to fixture hot (black) lead.
- Tuck all wires carefully into the wiring chamber ensuring that no wires are pinched.
DIMMING
- If 0-10V dimming is used, connect supply positive dimming lead to violet positive fixture dimming lead.
- Cap off violet dimming lead if dimming is not used.
- If 0-10V dimming is used, connect the supply negative dimming lead to the grey or pink negative fixture dimming lead.
- Cap off grey or pink dimming lead if dimming is not used.
- NOTE: For dimming, use Class 1 wiring methods only.
FCC
FCC NOTICE Class A
CAUTION: Changes or modifications not expressly approved could void your authority to use this equipment.
This device complies with part 15 of the FCC Rules. Operation is subject to the following two conditions:
- This device may not cause harmful interference,
this device must accept any interference received, including interference that may cause undesired operation.
This equipment has been tested and found to comply with the limits for a Class A digital device, according to part 15 of the FCC Rules. These limits are designed to provide reasonable protection against harmful interference when the equipment is operated in a commercial environment. This equipment generates, uses, and can radiate radio frequency energy and, if not installed and used under the instruction manual, may cause harmful interference to radio communications. Operation of this equipment in a residential area is likely to cause harmful interference in which case the user will be required to correct the interference at his own expense.
- CAN ICES-005 (A)/NMB-005 (A)
- http://lighting.cree.com/warranty
- 8669243645
Documents / Resources
 |
C-LITE C-VT-C-LIN4 Series 4 Foot LED Linear Vapor Tight [pdf] Installation Guide C-VT-C-LIN4 Series, C-VT-C-LIN4 Series 4 Foot LED Linear Vapor Tight, C-VT-C-LIN4 Series, 4 Foot LED Linear Vapor Tight, LED Linear Vapor Tight, Linear Vapor Tight, Vapor Tight, Tight |