BOSS Pod2 Low Level Work Platform

Safety First
Introduction
IMPORTANT: Never use the BoSS Pod2 (Low-level Work Platform) until you have fully read and understood this instruction manual.
- The user should be adequately trained and competent. Any person using the BoSS Pod2 must have a copy of this instruction manual.
- Please note that diagrams are for illustrative purposes only. Instruction manuals are also available to download at bossaccesstowers.com.
- If you need further information, additional instruction manual or any other help with this product, please contact Werner UK Sales & Distribution Limited on +44 (0)1621 745 900 or email uk.customercare@wernerco.com.
- The BoSS Pod2 has been tested and certified to BS 8620:2016.

Safety Checklist
- Is the BoSS Pod2 in good condition?

- The total load (One person plus tools and materials) shall not exceed a maximum 150kg.
- The castor wheel brakes must be locked.
- The stabilisers are deployed correctly.
- The access ladder and platform assembly are located correctly.
- All claws are locked into position.
- The BoSS Pod2 is on flat, level, dry and firm ground.
- The BoSS Pod2 is correctly positioned to avoid overreaching.
Equipment Care, Maintenance, Storage and Transport
- Before using the BoSS Pod2 every time, carry out the 6-point inspection detailed in the following section.
- Never use the BoSS Pod2 if any part is damaged or shows signs of excessive wear.
- Store the BoSS Pod2 somewhere clean, dry and safe.
- Keep the BoSS Pod2 clean, especially the platform and the rungs of the ladder section.
- Do not use excessive force to operate the BoSS Pod2.
- All claws are locked into position.
- The BoSS Pod2 should not be left freestanding in its folded orientation for storage or transportation.
- The gate hinge mechanism should be cleaned and lubricated on a regular basis with a suitable lubricant. The presence of waste, building materials and other debris will hamper the safe operation of the self-closing hinge mechanism.
6-Point Inspection Procedure
- Check all castor assemblies are secure within the framework upright tubes.
- Check all castors operate correctly.

- Check the tubes and aluminium components of the BoSS Pod2. There should not be any cracks or excessive dents or distortion.
- Check there is free movement of all hinge points, particularly checking that the gate moves freely. Refer to the BoSS Pod Inspection Guidance for detailed inspection and maintenance advice, the guidance is available to download at: www.bossaccesstowers.com.
- Check the platform. There should not be excessive contamination, cracking, holes or damage, including any missing or damaged rivet fixings.
- Check that all locking mechanisms are operating and locking correctly, and the two stabiliser clamps operate correctly.
Before Using the BoSS Pod2
- ALWAYS carry out a risk assessment for each job before you start work, to ensure that the BoSS Pod2 is the appropriate method of access.
- ALWAYS consult your work place/activity risk assessment with regard to the need for toe boards.
- ALWAYS check the BoSS Pod2 6-point inspection procedure and follow the instructions in this instruction manual and the labels on the BoSS Pod2. There is a serious risk of injury if you do not follow all the instructions.
- ALWAYS check the BoSS Pod2 for damage before you use it, and complete an inspection report if necessary.
- ALWAYS make sure that you use the BoSS Pod2 on firm and level ground which is capable of supporting the full intended load.
- ALWAYS make sure the castors are locked into position.

- ALWAYS try to position the front of the BoSS Pod2 towards the work for maximum stability.
- ALWAYS wear appropriate personal protective equipment and work wear, including footwear with a flat firm sole and a good grip.
- ALWAYS take safety measures when working close to doorways, openings and other traffic paths, to prevent accidental collisions but never block an emergency exit, fire-path or other escape route.
- ALWAYS store the BoSS Pod2 to prevent unauthorised use.
- When moving the BoSS Pod2 carefully lift the stabilisers so feet are clear of the ground.
- It is recommended that two people are used to carry the BoSS Pod2.
When Using the BoSS Pod2
- Read the instructions.
- Do not use damaged equipment.
- Do not overreach.
- Do not use on loose or slippery surfaces.
- Do not use on sloping or uneven surfaces.
- Never stand on the side protection or use boxes, stepladders or other objects to gain extra height.
- Never more than one person to use the BoSS Pod2.
- Never move when a person is standing on the working platform.
- Never use the BoSS Pod2 as a means of access to another place.
- Never stand on the access ladder to work.
- Never use the BoSS Pod2 to store, support or transport materials or tools.
- Beware of power lines or other live electrical equipment.
- Working platform shall always be levelled.
- Inspect before use.
- Only ascend or descend the BoSS Pod2 using the access ladder provided.
- Face the access ladder when ascending and descending.
- Ensure all brakes are locked.
- Ensure the gate is closed before use.
- Beware of finger traps.
- Ensure all components are present and correctly fitted before use.
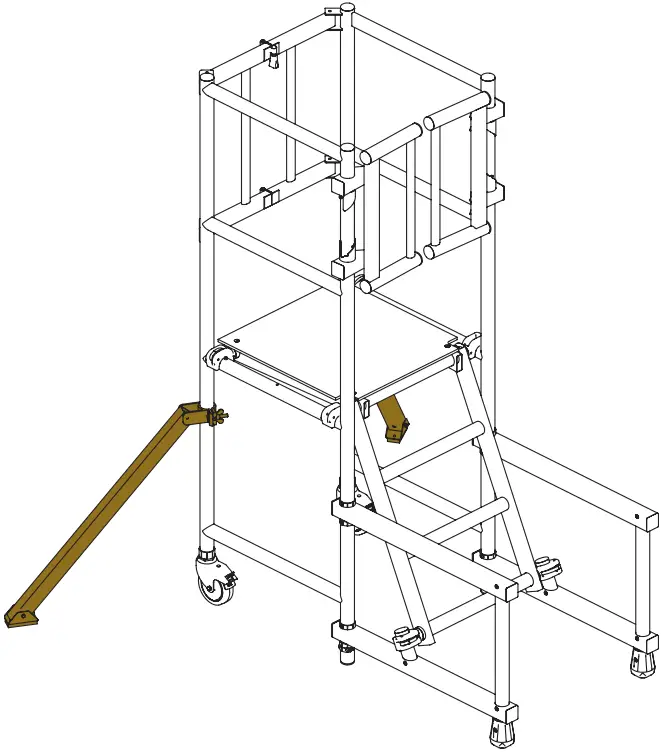
Identification
BoSS Pod2 Parts
The illustration below shows an erected BoSS Pod2.
The BoSS Pod2 1000 (product code: 32051000) weighs 28kg excluding toe boards.
List of Separate Components
| Description | Quantity |
| Main Frame | 1 |
| Platform/Ladder Assembly | 1 |
| Stabiliser Assembly | 2 |
Setup and Use
Setting Up
Move and position
- Move the BoSS Pod2 into the required location.
- Ensure the castors are locked. Release retaining strap.

- Unfold sides of the frame
- Ensure the castors are locked. Release retaining strap.
- Unlock the castors
- Pull the two vertical members on the folding frame side apart as shown Ensure the folding frame is locked. Lock the castors.

- Pull the two vertical members on the folding frame side apart as shown Ensure the folding frame is locked. Lock the castors.
- Pull the two vertical members on the climbing side of the podium apart as shown – beware of injury as the gates release themselves from the stowed position.

- Deploying the climbing side stabilisers
- Rotate the left hand stabiliser frame into position as shown. Rotate the right hand stabiliser frame into position as shown. Ensure the sides of the BoSS Pod2 areparallel and square with the folding frame.

- Fitting the platform and ladder assembly
- Fit the platform in position shown by locating the claws over the cross members on each side of the BoSS Pod2. Ensure the claws on the bottom of the ladder are positioned against the location stubs on the stabiliser frames as shown. Ensure both hooks on the platform are seated and both locking claws are engaged.

- Attaching the ladder
- Rotate the bottom rung of the ladder so that the open face of the claws are aligned with the location stubs on both stabiliser frames as shown. Push both claws onto location stubs. Ensure claws are engaged.

- Fitting detachable stabiliser legs
- Fit the stabilisers on the front upright tubes of left hand and right hand side of the BoSS Pod2. Ensure both stabiliser feet are in firm contact with the ground, and the stabilisers are correctly positioned as per guidance on page 12. Clamp the stabilisers in the correct position by tightening the wing nuts.
Stabiliser Positioning
The BoSS Pod2 should only be used with the stabilisers deployed in the positions shown below. Ensure that you use the deployed position appropriate to the working direction.
Deployed position: working direction front

Deployed position: working direction side
The stabilisers must be correctly deployed, as shown above, before use.
Deployed position: working direction above

| Dimension A | Dimension B |
| 450mm | 491mm |
Fitting the Toe Boards
- Push the front toe board on to the front vertical tubes as shown. Ensure the front toe board is in contact with the surface of the platform. Note: The toe board fits on the inside of the BoSS Pod2 frame.

- Slide the first side toe board into the slot of the front toe board. Push the clip on to the rear vertical tube as shown. Ensure the side toe board is in contact with the surface of the platform. Note: The toe board fits on the inside of the BoSS Pod2 frame.

- Slide the second side toe board into the slot of the front toe board. Push the clip on to the rear vertical tube as shown. Ensure the side toe board is in contact with the surface of the platform.
- Note: The toe board fits on the inside of the BoSS Pod2 frame.

- Note: The toe board fits on the inside of the BoSS Pod2 frame.
Accessing the Platform
The BoSS Pod2 is designed for use by one person only. Always work with both feet firmly on the platform. Note: The gates are always to be closed when working to provide a fully guardrailed working platform. Never secure the gates in the open position. Always enter the unit facing the ladder. Always exit the unit facing the ladder.

Closing the BoSS Pod2
To close the BoSS Pod2 reverse the steps in the setting up section of this instruction manual. A summary is provided below.
- Remove the toe boards.
- Remove the detachable stabiliser legs and carefully store to avoid damage or loss.
- Detach the two locking claws at the base of the ladder.
- Detach the two locking claws on the platform.
- Remove the platform and ladder assembly.
- Rotate the climbing side stabiliser frames into the stowed position.
- Close the climbing side of the BoSS Pod2. Ensure the gates are folded inwards.
- Release the locking pin on the folding frame. Fold the folding frame inwards. Ensure the castors are locked.
- Use the locking strap to secure the BoSS Pod2 in the closed position.

Never leave the unit freestanding where it could fall and cause injury or property damage.
MORE INFORMATION
For further information and support for the BoSS Pod2 or any other products, design advice and services, please contact:
- Werner UK Sales & Distribution Ltd. Blackwater Trading Estate, The Causeway, Maldon, Essex, CM9 4LJ, United Kingdom WernerCo Hungary Kft. 6000 Kecskemét, Szt. Istvan Krt. 19.
- +44 (0)1621 745900
- uk.customercare@wernerco.com
- bossaccesstowers.com
- Werner UK Sales & Distribution Ltd. is a manufacturer member of:
FAQs
- Q: What is the maximum load capacity of the BoSS Pod2?
- A: The maximum load capacity is 150kg, including one person, tools, and materials.
- Q: Where can I find detailed inspection and maintenance guidance for the BoSS Pod2?
- A: Detailed inspection and maintenance guidance can be downloaded from www.bossaccesstowers.com.
Documents / Resources
 |
BOSS Pod2 Low Level Work Platform [pdf] Instruction Manual Pod2 Low Level Work Platform, Low Level Work Platform, Level Work Platform |