
1. Introduction
Thank you for purchasing the Generic ECO CORE AIR FRYER OVEN 36L. This appliance is designed to provide a healthier and more efficient way to cook your favorite meals. Please read this manual thoroughly before operating the appliance to ensure safe and optimal performance. Keep this manual for future reference.
Important Safety Instructions
- Read all instructions before use.
- Do not touch hot surfaces. Use handles or knobs.
- To protect against electric shock, do not immerse cord, plugs, or the main unit in water or other liquid.
- Close supervision is necessary when any appliance is used by or near children.
- Unplug from outlet when not in use and before cleaning. Allow to cool before putting on or taking off parts.
- Do not operate any appliance with a damaged cord or plug, or after the appliance malfunctions or has been damaged in any manner.
- The use of accessory attachments not recommended by the appliance manufacturer may cause injuries.
- Do not use outdoors.
- Do not let cord hang over edge of table or counter, or touch hot surfaces.
- Do not place on or near a hot gas or electric burner, or in a heated oven.
- Extreme caution must be used when moving an appliance containing hot oil or other hot liquids.
- Always attach plug to appliance first, then plug cord into the wall outlet. To disconnect, turn any control to "off", then remove plug from wall outlet.
- Do not use appliance for other than intended use.
- Ensure the appliance is placed on a stable, heat-resistant surface.
- Maintain at least 10 cm clearance on all sides of the appliance during operation.
2. Product Overview
Familiarize yourself with the components of your ECO CORE AIR FRYER OVEN 36L.
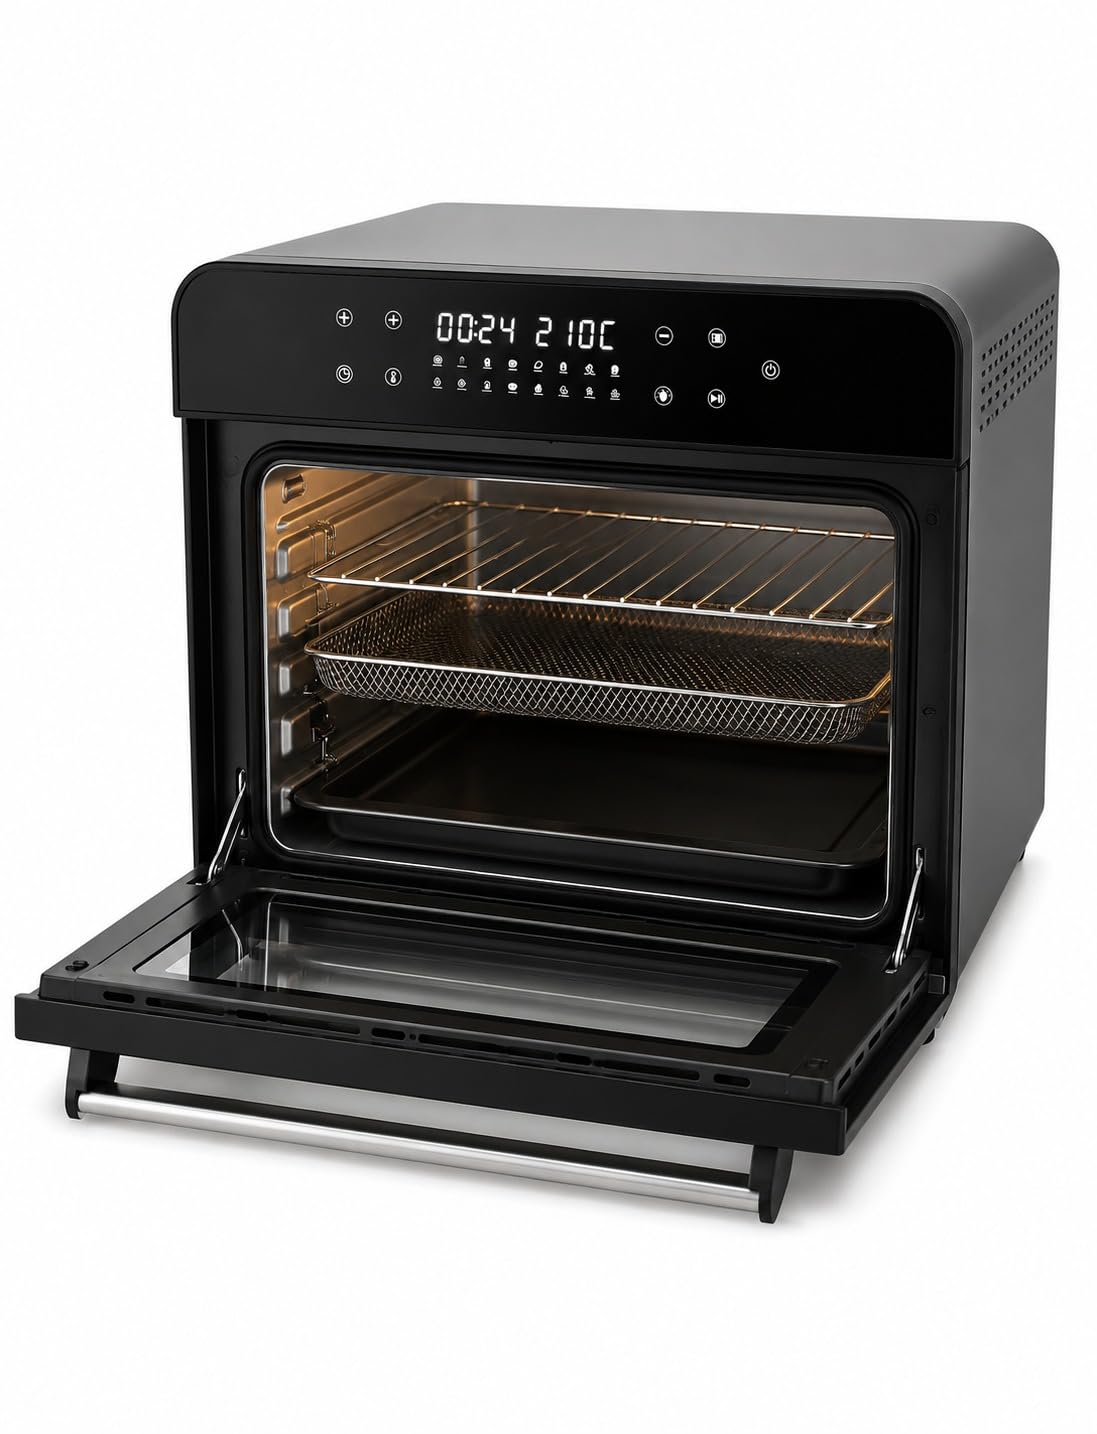
Figure 1: Generic ECO CORE AIR FRYER OVEN 36L. This image shows the front view of the digital air fryer oven, highlighting its sleek design and digital control panel.
Components
- Main Unit: The primary housing with heating elements and control panel.
- Air Fry Basket: Used for air frying smaller items, allowing hot air to circulate evenly.
- Baking Pan: Suitable for baking, roasting, or catching drips.
- Wire Rack: For grilling, toasting, or placing dishes.
- Digital Control Panel: For setting temperature, time, and selecting cooking functions.
3. Setup
Unpacking and Placement
- Carefully remove all packaging materials from the air fryer and its accessories.
- Check for any damage during transit. If damaged, do not operate and contact customer support.
- Place the air fryer on a stable, flat, heat-resistant surface. Ensure there is at least 10 cm of clear space around all sides of the appliance for proper ventilation.
- Do not place the air fryer near flammable materials or heat sources.
Before First Use
- Wipe the exterior of the air fryer with a damp cloth.
- Wash the Air Fry Basket, Baking Pan, and Wire Rack with warm, soapy water. Rinse thoroughly and dry completely.
- Insert the accessories into the air fryer.
- Plug the power cord into a grounded electrical outlet.
- It is recommended to run the air fryer empty for about 10-15 minutes at 200°C (390°F) to burn off any manufacturing residues. A slight odor or smoke may be present during this initial use; this is normal. Ensure good ventilation.
4. Operating Instructions
Basic Operation
- Power On: Plug the appliance into a power outlet. The digital display will illuminate.
- Preheating: For best results, preheat the air fryer for 3-5 minutes at the desired cooking temperature before adding food.
- Loading Food: Place food into the appropriate accessory (Air Fry Basket, Baking Pan, or on the Wire Rack). Do not overfill to allow for proper air circulation.
- Setting Temperature and Time:
- Use the temperature control buttons (usually +/- or a dedicated dial) to set the desired cooking temperature. The range is typically from 80°C to 200°C (175°F to 390°F).
- Use the timer control buttons to set the cooking duration. The timer can usually be set from 1 to 60 minutes.
- Starting Cooking: Press the Start/Pause button to begin the cooking cycle.
- Shaking/Flipping Food: For even cooking, especially with smaller items in the air fry basket, it is recommended to shake or flip the food halfway through the cooking time.
- Monitoring: The transparent door allows you to monitor cooking progress without opening the door, maintaining consistent temperature.
- End of Cycle: The air fryer will beep when the cooking time is complete. Carefully remove the cooked food using heat-resistant tongs or mitts.
- Power Off: Unplug the appliance from the power outlet after use.
Cooking Tips
- Oil Usage: While air frying requires little to no oil, a light spray or toss with a teaspoon of oil can enhance crispiness and flavor for some foods.
- Batch Cooking: For larger quantities, cook in smaller batches to ensure even cooking and crispiness.
- Frozen Foods: Most frozen foods can be cooked directly in the air fryer. Refer to package instructions for recommended temperatures and times, adjusting as needed.
- Homemade Fries: For crispy homemade fries, soak potato sticks in cold water for 30 minutes, pat dry, toss with a small amount of oil, and air fry.
- Recipe Adjustments: Air fryers often cook faster than conventional ovens. Start with slightly lower temperatures and shorter times, then adjust as you become familiar with your appliance.
5. Maintenance and Cleaning
Regular cleaning and maintenance will extend the life of your air fryer and ensure optimal performance.
General Cleaning
- Unplug and Cool: Always unplug the air fryer from the power outlet and allow it to cool completely before cleaning.
- Exterior: Wipe the exterior with a damp cloth and mild detergent. Do not use abrasive cleaners or scouring pads.
- Interior: Wipe the interior with a damp cloth. For stubborn food residue, use a non-abrasive sponge and mild dish soap. Ensure the interior is dry before next use.
- Heating Element: Gently clean the heating element with a soft brush to remove any food particles. Do not use water or liquid directly on the heating element.
Cleaning Accessories
- The Air Fry Basket, Baking Pan, and Wire Rack are dishwasher safe. Alternatively, wash them in warm, soapy water using a non-abrasive sponge.
- For baked-on food, soak the accessories in warm, soapy water for about 15-20 minutes before cleaning.
- Rinse all accessories thoroughly and dry completely before storing or reusing.
Storage
Store the cleaned and dried air fryer in a cool, dry place. Ensure the power cord is neatly wrapped and secured.
6. Troubleshooting
Refer to the table below for common issues and their solutions.
| Problem | Possible Cause | Solution |
|---|---|---|
| Air fryer does not turn on. | Not plugged in; power outlet malfunction; appliance malfunction. | Ensure the power cord is securely plugged into a working outlet. Check the circuit breaker. If still not working, contact customer support. |
| Food is not cooked evenly. | Overcrowding the basket; insufficient shaking/flipping; incorrect temperature/time. | Cook in smaller batches. Shake or flip food halfway through cooking. Adjust temperature and time as needed. |
| Food is not crispy. | Too much moisture; not enough oil (for some foods); overcrowding. | Pat food dry before cooking. Lightly spray or toss with oil. Do not overcrowd the basket. Increase cooking time or temperature slightly. |
| White smoke coming from the air fryer. | Grease/oil residue from previous use; high-fat food cooking. | Clean the air fryer and accessories thoroughly after each use. For high-fat foods, place a piece of aluminum foil under the basket to catch drips. |
| Appliance smells during first use. | Manufacturing residues burning off. | This is normal for initial use. Ensure good ventilation. The smell will dissipate after a few uses. |
7. Specifications
| Feature | Detail |
|---|---|
| Model Name | ECO CORE AIR FRYER OVEN 36L |
| Model Number | GD36BA-K1 |
| Brand | Generic |
| Capacity | 36 Litres |
| Wattage | 1800 Watts |
| Product Dimensions (D x W x H) | 45D x 40W x 40H centimetres |
| Item Weight | 5 Kilograms |
| Color | BLACK & SILVER |
| Included Components | Air Fry Basket, Baking Pan, Wire Rack |
8. Warranty and Support
Limited Warranty
This product is covered by a limited warranty from the date of purchase against defects in material and workmanship. This warranty does not cover damage caused by accident, misuse, abuse, commercial use, or unauthorized modification. Please retain your proof of purchase for warranty claims.
Customer Support
For technical assistance, troubleshooting, or warranty inquiries, please contact your retailer or the manufacturer's customer service. Please have your model number (GD36BA-K1) and proof of purchase ready when contacting support.
Contact information for specific regions may be found on the product packaging or the retailer's website.