
1. Introduction
Thank you for purchasing the Generic ZR302 2.4GHz Digital Video Smart Baby Monitor. This device is designed to help you monitor your baby from another room, providing peace of mind with its night vision camera, two-way intercom, and built-in music player. Please read this manual carefully before use to ensure proper operation and safety.
2. Safety Information
- Keep the monitor and camera units out of reach of children.
- Do not place the camera or cords within 1 meter (3 feet) of the crib or playpen.
- Use only the provided power adapters. Using unauthorized adapters may damage the device and void the warranty.
- Do not expose the units to water, moisture, or extreme temperatures.
- Avoid placing the units near heat sources such as radiators, heat registers, stoves, or other heat-producing appliances.
- Ensure proper ventilation around the units. Do not cover them with blankets or other materials.
- This product is not a medical device and should not be used as a substitute for responsible adult supervision.
3. Package Contents
Please check the package contents upon opening. If any items are missing or damaged, contact your retailer.
- Baby Unit (Camera)
- Parent Unit (Monitor)
- Power Adapter for Baby Unit
- Power Adapter for Parent Unit
- User Manual (this document)
4. Product Overview
4.1 Parent Unit (Monitor)
The parent unit features a display screen to view your baby, along with control buttons for various functions.
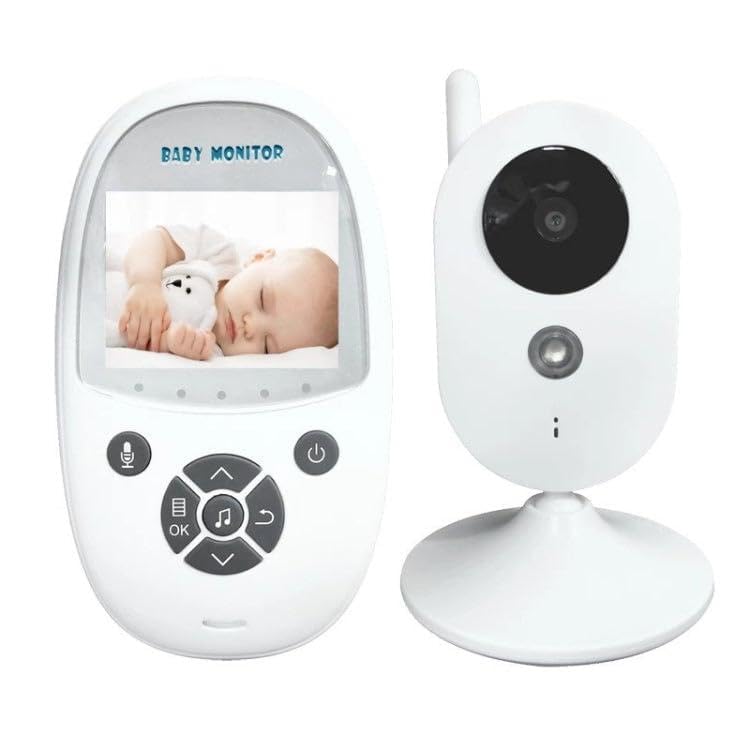
Image: The parent unit (left) with a screen displaying a baby, and the baby unit (right) with a camera lens and antenna. This image shows the overall design of the baby monitor system.
- LCD Display: Shows live video feed from the baby unit.
- Microphone: For two-way intercom function.
- Speaker: For hearing your baby and playing lullabies.
- Power Button: Turns the unit on/off.
- Menu/OK Button: Accesses menu options and confirms selections.
- Navigation Buttons: Up, Down, Left, Right for menu navigation and volume/brightness control.
- Talk Button: Activates two-way intercom.
- Music Button: Plays/stops lullabies.
4.2 Baby Unit (Camera)
The baby unit is equipped with a camera, microphone, and speaker to monitor your baby's room.

Image: The back of the baby unit camera, showing the speaker grille, power input, and antenna. This view highlights the audio output and power connection points.
- Camera Lens: Captures video feed.
- Infrared LEDs: For night vision functionality.
- Microphone: Picks up sounds from the baby's room.
- Speaker: For playing lullabies and two-way intercom audio.
- Power Input: Connects to the power adapter.
- Antenna: For wireless signal transmission.
5. Setup
5.1 Charging the Parent Unit
- Connect the small end of the parent unit power adapter to the DC input port on the parent unit.
- Plug the other end of the adapter into a power outlet.
- The charging indicator will illuminate. Charge the parent unit for at least 8 hours before first use to ensure optimal battery life.
5.2 Powering the Baby Unit
- Connect the small end of the baby unit power adapter to the DC input port on the baby unit.
- Plug the other end of the adapter into a power outlet.
- The baby unit will automatically power on.
5.3 Positioning the Baby Unit (Camera)
Place the baby unit in a location that provides a clear view of your baby's crib or play area. Ensure it is at least 1 meter (3 feet) away from the baby to prevent any cord hazards.

Image: A diagram illustrating the camera's adjustable viewing angles, showing 360 degrees of horizontal rotation and 120 degrees of vertical tilt. This indicates flexibility in camera placement and monitoring.
- Place the camera on a flat surface, such as a dresser or shelf.
- Adjust the camera angle manually to get the best view. The camera offers 360-degree horizontal rotation and 120-degree vertical tilt.
- Ensure the camera's power cord is securely routed and not accessible to the baby.
6. Operating Instructions
6.1 Powering On/Off
- To Power On: Press and hold the Power Button on the parent unit until the screen illuminates. The baby unit powers on automatically when connected to power.
- To Power Off: Press and hold the Power Button on the parent unit until the screen turns off. Unplug the baby unit from the power outlet to turn it off.
6.2 Adjusting Volume and Brightness
- While viewing the live feed, press the Up/Down Navigation Buttons to adjust the volume of the parent unit speaker.
- To adjust brightness, press the Menu/OK Button, then use the navigation buttons to select the brightness option. Press OK to confirm.
6.3 Two-Way Intercom
The two-way intercom allows you to speak to your baby through the baby unit's speaker.

Image: A visual representation of the two-way talk feature, showing a baby near the camera and the parent unit displaying the baby, with speech bubbles indicating communication. This highlights the interactive audio capability.
- Press and hold the Talk Button on the parent unit.
- Speak clearly into the microphone on the parent unit. Your voice will be transmitted to the baby unit.
- Release the Talk Button to hear your baby again.
6.4 Music Player (Lullabies)
The baby unit has built-in lullabies to soothe your baby.
- Press the Music Button on the parent unit to start playing lullabies.
- Press the Music Button again to cycle through the available melodies or to stop playback.
6.5 Night Vision
The baby unit automatically activates infrared night vision in low-light conditions, providing a clear black and white image on the parent unit.

Image: Two views of the parent unit screen, one showing a baby peacefully sleeping and another showing a baby crying. This illustrates the monitor's ability to display the baby's state, including during night vision.
- Night vision engages automatically when the ambient light around the baby unit is insufficient.
- The image on the parent unit will switch from color to black and white.
7. Maintenance
- Cleaning: Wipe the units with a dry, soft cloth. Do not use cleaning sprays or liquid cleaners.
- Storage: If storing the product for an extended period, ensure both units are powered off and unplugged. Store in a cool, dry place.
- Battery Care: For optimal battery life of the parent unit, avoid fully discharging the battery frequently.
8. Troubleshooting
| Problem | Possible Solution |
|---|---|
| No image/sound on parent unit. |
|
| Poor image quality. |
|
| Static or interference. |
|
| Two-way talk not working. |
|
9. Specifications
| Model: | ZR302 |
| Transmission Mode: | 2.4GHz Wireless Point-to-Point (Short-range) |
| Display Definition: | 320x240P |
| Intercom: | Two-way |
| Music Player: | Built-in 3-minute chord music |
| Night Vision: | Automatic Infrared |
| Material: | ABS |
| Approximate Dimensions (Baby Unit): | 5.3 x 3 x 5 cm |
10. Warranty and Support
Specific warranty information is not provided within this manual. For warranty claims, technical support, or further assistance, please contact the retailer or seller from whom you purchased this product. Please retain your proof of purchase for any warranty-related inquiries.