
TrailBuddy 1A
TrailBuddy Trekking Poles Instruction Manual
Introduction
Welcome to your new TrailBuddy Trekking Poles. These poles are engineered from lightweight, aircraft-grade 7075 aluminum, providing a balance of durability and portability for various outdoor activities. They are designed to enhance stability, reduce impact on joints, and improve balance on diverse terrains.
This manual provides essential information on setting up, operating, maintaining, and troubleshooting your trekking poles to ensure a safe and enjoyable experience.

Image: Key features of TrailBuddy Trekking Poles, including aircraft-grade 7075 aluminum construction, lightweight design, lever locks for easy adjustment, threaded foot covers, and interchangeable pole accessories.
What's Included
Your TrailBuddy Trekking Poles package includes the following components:
- 2 x Aircraft-grade aluminum Trekking Poles
- 1 x Carry bag
- 2 x Mud Baskets
- 2 x Snow Baskets
- 4 x Rubber Tips
Setup Instructions
1. Pole Assembly and Collapsing
Your TrailBuddy trekking poles are designed for compact storage and easy assembly. When disassembled, the poles measure 21 inches. When collapsed, they measure 24.5 inches. To assemble, simply extend the sections until they lock into place. To collapse, release the lever locks and slide the sections together.

Image: TrailBuddy trekking poles in disassembled (21 inches) and collapsed (24.5 inches) states, demonstrating their compact size for travel and storage.
2. Adjusting Pole Length
TrailBuddy trekking poles feature lever locks for quick and easy length adjustment. To adjust, open the lever lock, extend or shorten the pole section to your desired height, and then close the lever lock firmly. Ensure the locks are securely fastened before use.
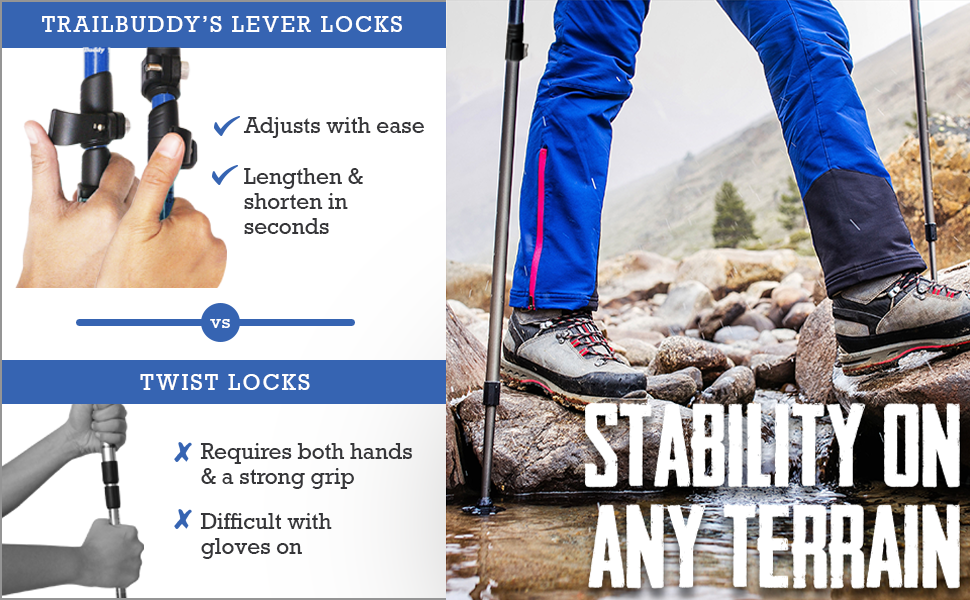
Image: Illustration comparing TrailBuddy's lever locks, which allow for easy one-handed adjustment, to twist locks that require two hands.
Refer to the sizing chart below to determine the ideal pole length based on your height. For general hiking, your arms should form a 90-degree angle at the elbow when holding the poles with the tips on the ground.
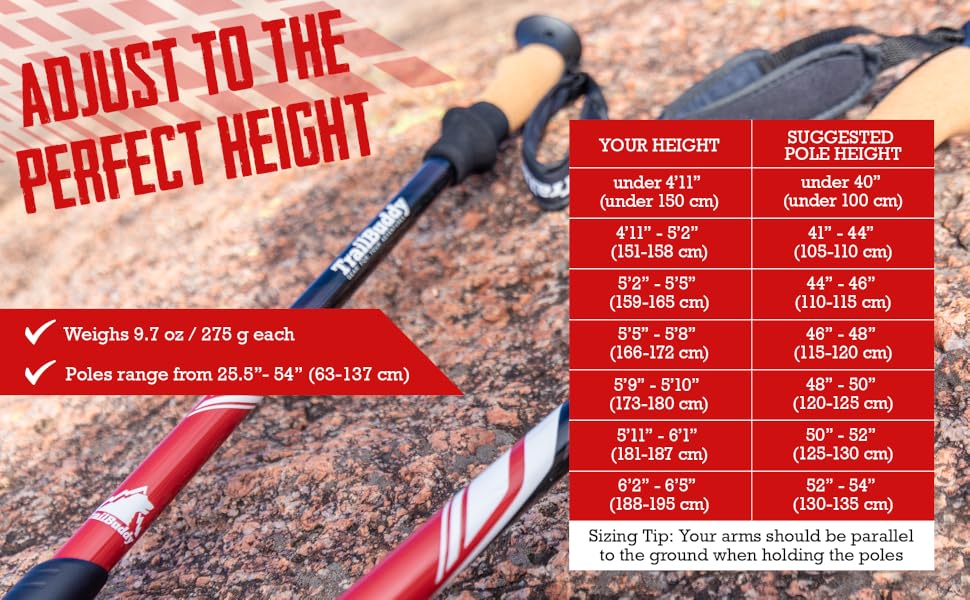
Image: Sizing chart for TrailBuddy trekking poles, providing recommended pole lengths based on user height for optimal comfort and support.
Video: This video demonstrates how to adjust the length of TrailBuddy Trekking Poles using the lever locks, showcasing their ease of use for various activities.
Operating Your Trekking Poles
1. Proper Grip and Stance
Hold the poles with a comfortable grip, ensuring your hands are positioned on the cork handles. The padded straps should be used to provide additional support and prevent chafing. The cork handles are designed to mold to your hand and wick away moisture, maintaining a secure grip.

Image: Detailed view of the cork grip, moisture-wicking handle, and padded straps on TrailBuddy trekking poles, designed for comfort and to prevent hand discomfort.
2. Using Interchangeable Tips and Baskets
Your trekking poles come with various accessories to adapt to different terrains:
- Rubber Tips: Ideal for hard surfaces like pavement, rocks, or indoor use to provide grip and protect the carbide tip.
- Mud Baskets: Prevent poles from sinking too deep into soft ground, mud, or sand.
- Snow Baskets: Larger than mud baskets, these are essential for snowshoeing or hiking in deep snow to prevent the poles from plunging.
- No Tip (Tungsten Carbide): For maximum grip on ice, packed dirt, or very rugged trails where the sharp carbide tip can dig in.
The threaded pole tips ensure that the accessories remain securely attached during use.

Image: Different interchangeable pole accessories including rubber tips, mud baskets, and snow baskets, designed for various terrains and conditions.
Maintenance and Care
- Cleaning: After each use, especially in wet or muddy conditions, wipe down the pole sections with a damp cloth. Ensure all sections are dry before collapsing and storing to prevent corrosion.
- Lubrication: Periodically check the lever locks and internal mechanisms. If they become stiff, a small amount of silicone-based lubricant can be applied.
- Inspection: Regularly inspect the pole sections for any signs of damage, bends, or cracks. Check the tips and baskets for wear and replace them as needed.
- Storage: Store your trekking poles in a dry, cool place, ideally in their carry bag, away from direct sunlight and extreme temperatures.
Troubleshooting
| Problem | Possible Cause | Solution |
|---|---|---|
| Pole sections slip or collapse during use. | Lever locks are not tight enough. | Open the lever lock and tighten the screw on the hinge slightly. Close the lever firmly. Test for security. |
| Difficulty extending or collapsing poles. | Dirt or debris in the pole sections; lever locks too tight. | Clean the pole sections thoroughly. If locks are too tight, loosen the screw on the hinge slightly. |
| Tips or baskets fall off. | Accessories not threaded on securely or worn out. | Ensure accessories are threaded tightly onto the pole tips. Replace worn-out tips or baskets. |
| Pole bends under pressure. | Extreme lateral pressure or impact. | Aluminum poles may bend under extreme pressure but are less likely to snap than carbon fiber. If bent, it may be possible to carefully bend it back. If severely damaged, replacement is recommended. |
Product Specifications
- Brand: TrailBuddy
- Model Number: 1A
- Shaft Material: Aircraft Grade Aluminum 7075
- Tip Material: Tungsten Carbide
- Handle Material: Cork, Moisture Wicking EVA
- Lock Type: Lever
- Collapsed Length: 24.5 inches
- Extended Length: 54 inches
- Item Weight: Approximately 1.2 pounds (for the pair)
- Included Components: 2 Trekking Poles, 1 Carry Bag, 2 Mud Baskets, 2 Snow Baskets, 4 Rubber Tips
Warranty Information
Your TrailBuddy Trekking Poles are backed by a 5-year limited warranty covering defects in materials and workmanship under normal use. This warranty does not cover normal wear and tear, misuse, damage caused by improper storage, or excessive force.
For warranty claims or further details, please refer to the official TrailBuddy website or contact customer support.
Customer Support
If you have any questions, require assistance, or need to report an issue with your TrailBuddy Trekking Poles, please contact TrailBuddy customer support through their official website or the retailer where the product was purchased.
For more information, visit the TrailBuddy Store on Amazon.
Ask a question about this manual
Ask about setup, troubleshooting, compatibility, parts, safety, or missing instructions. Manuals+ will review the question and use this page’s manual context to help answer it.