
Introduction
This manual provides comprehensive instructions for the safe and effective use of your MEEVIZ 2-Bike Hitch Mount Bike Rack, Model MV085. Please read this manual thoroughly before assembly, installation, and operation to ensure proper usage and to prevent damage or injury. Keep this manual for future reference.
Safety Information
Adhere to all safety guidelines to prevent accidents and ensure the longevity of your bike rack and bicycles.
- Always ensure the bike rack is securely installed in the 2-inch hitch receiver before loading bicycles.
- Do not exceed the maximum load capacity of 160 lbs (80 lbs per bicycle).
- Verify that all straps, bolts, and fasteners are tightened before each use and periodically during long trips.
- Ensure bicycles are properly secured in the wheel cradles and with the frame clamps to prevent movement during transit.
- Be aware of the increased length and width of your vehicle when the bike rack is installed, especially when backing up or maneuvering in tight spaces.
- Regularly inspect the rack for any signs of wear, damage, or corrosion. Do not use if damaged.
Setup
Unpacking Components
Carefully unpack all components from the packaging. Verify that all parts listed below are present:
- Bike Rack main assembly
- Wheel Straps (quantity: 4)
- All necessary hardware (bolts, nuts, washers, anti-wobble bolt)
Assembly Steps
Follow these general steps for assembling your MEEVIZ bike rack. Refer to the included assembly diagram for detailed visual guidance.
- Attach the main hitch arm to the platform assembly using the provided hardware. Ensure all bolts are securely tightened.
- Install the vertical support mast onto the platform.
- Mount the adjustable frame clamps onto the vertical support mast.
- Slide the wheel cradles onto the platform arms and adjust their positions as needed for your bicycle's wheelbase.
- Insert the assembled bike rack into your vehicle's 2-inch Class 3 or higher hitch receiver.
- Secure the rack to the hitch receiver using the anti-wobble M16 steel bolt. Tighten the bolt firmly to eliminate any movement between the rack and the hitch.

Image: Fully assembled MEEVIZ 2-Bike Hitch Mount Bike Rack.

Image: Detail of the 2-inch hitch receiver connection and threaded tightening bolt, ensuring stability.

Image: Illustration highlighting the solid, non-folding frame construction with thickened steel tubing and reinforced joints for enhanced durability.
Operating
Loading Bicycles
The MEEVIZ bike rack is designed to securely transport two bicycles with wheel sizes from 17 to 29 inches and tire widths up to 5 inches. It supports a maximum weight of 80 lbs per bike.
- Position the bicycle onto the rack, ensuring its wheels rest firmly in the adjustable cradles.
- Adjust the wheel cradles along the platform arms to match your bicycle's wheelbase (up to 58 inches).
- Secure the wheels using the provided heavy-duty straps.
- Lower the padded frame clamps onto the bicycle's top tube and tighten them to hold the bike firmly in place without frame contact.
- For step-through frames, a crossbar adapter (sold separately) is recommended to ensure proper and secure mounting.
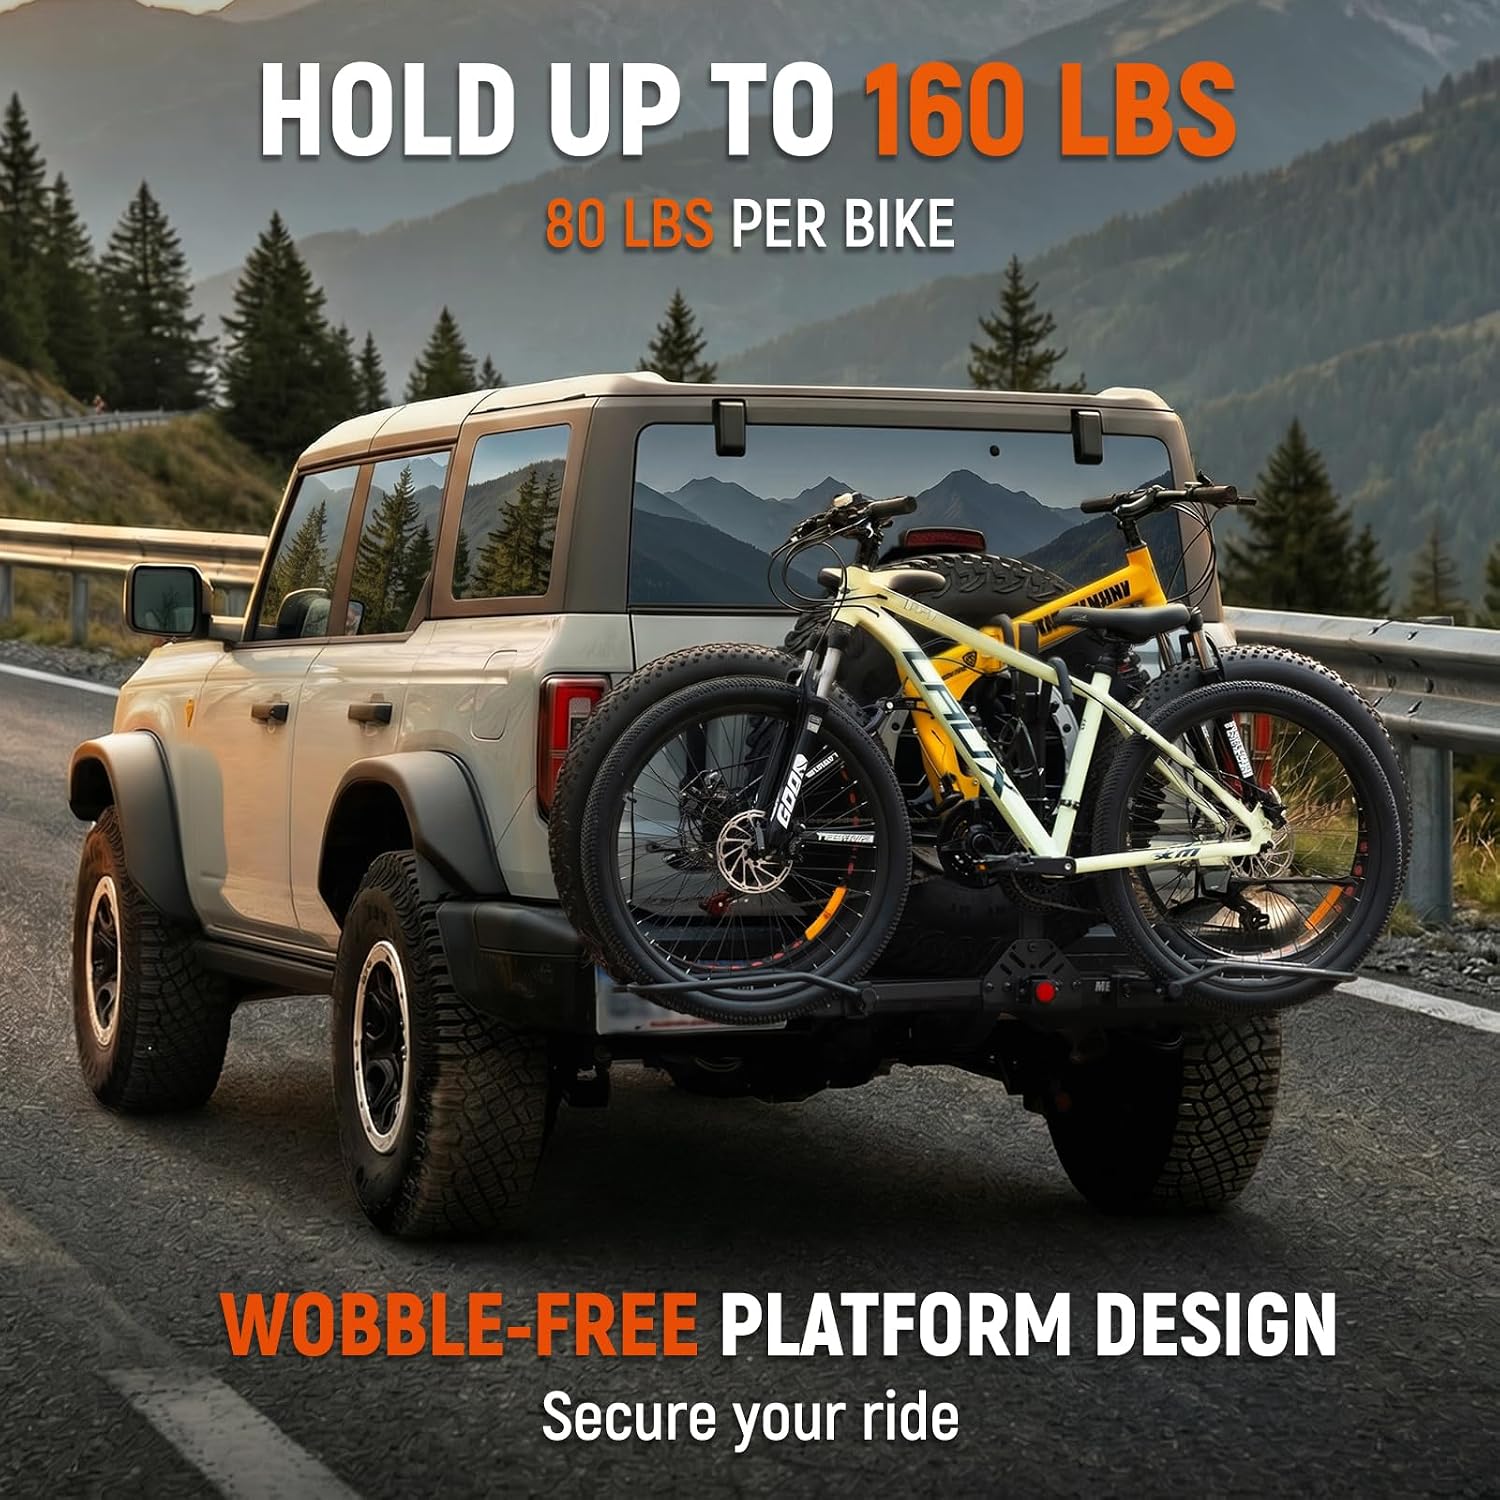
Image: Two bicycles securely loaded onto the MEEVIZ bike rack, attached to an SUV.
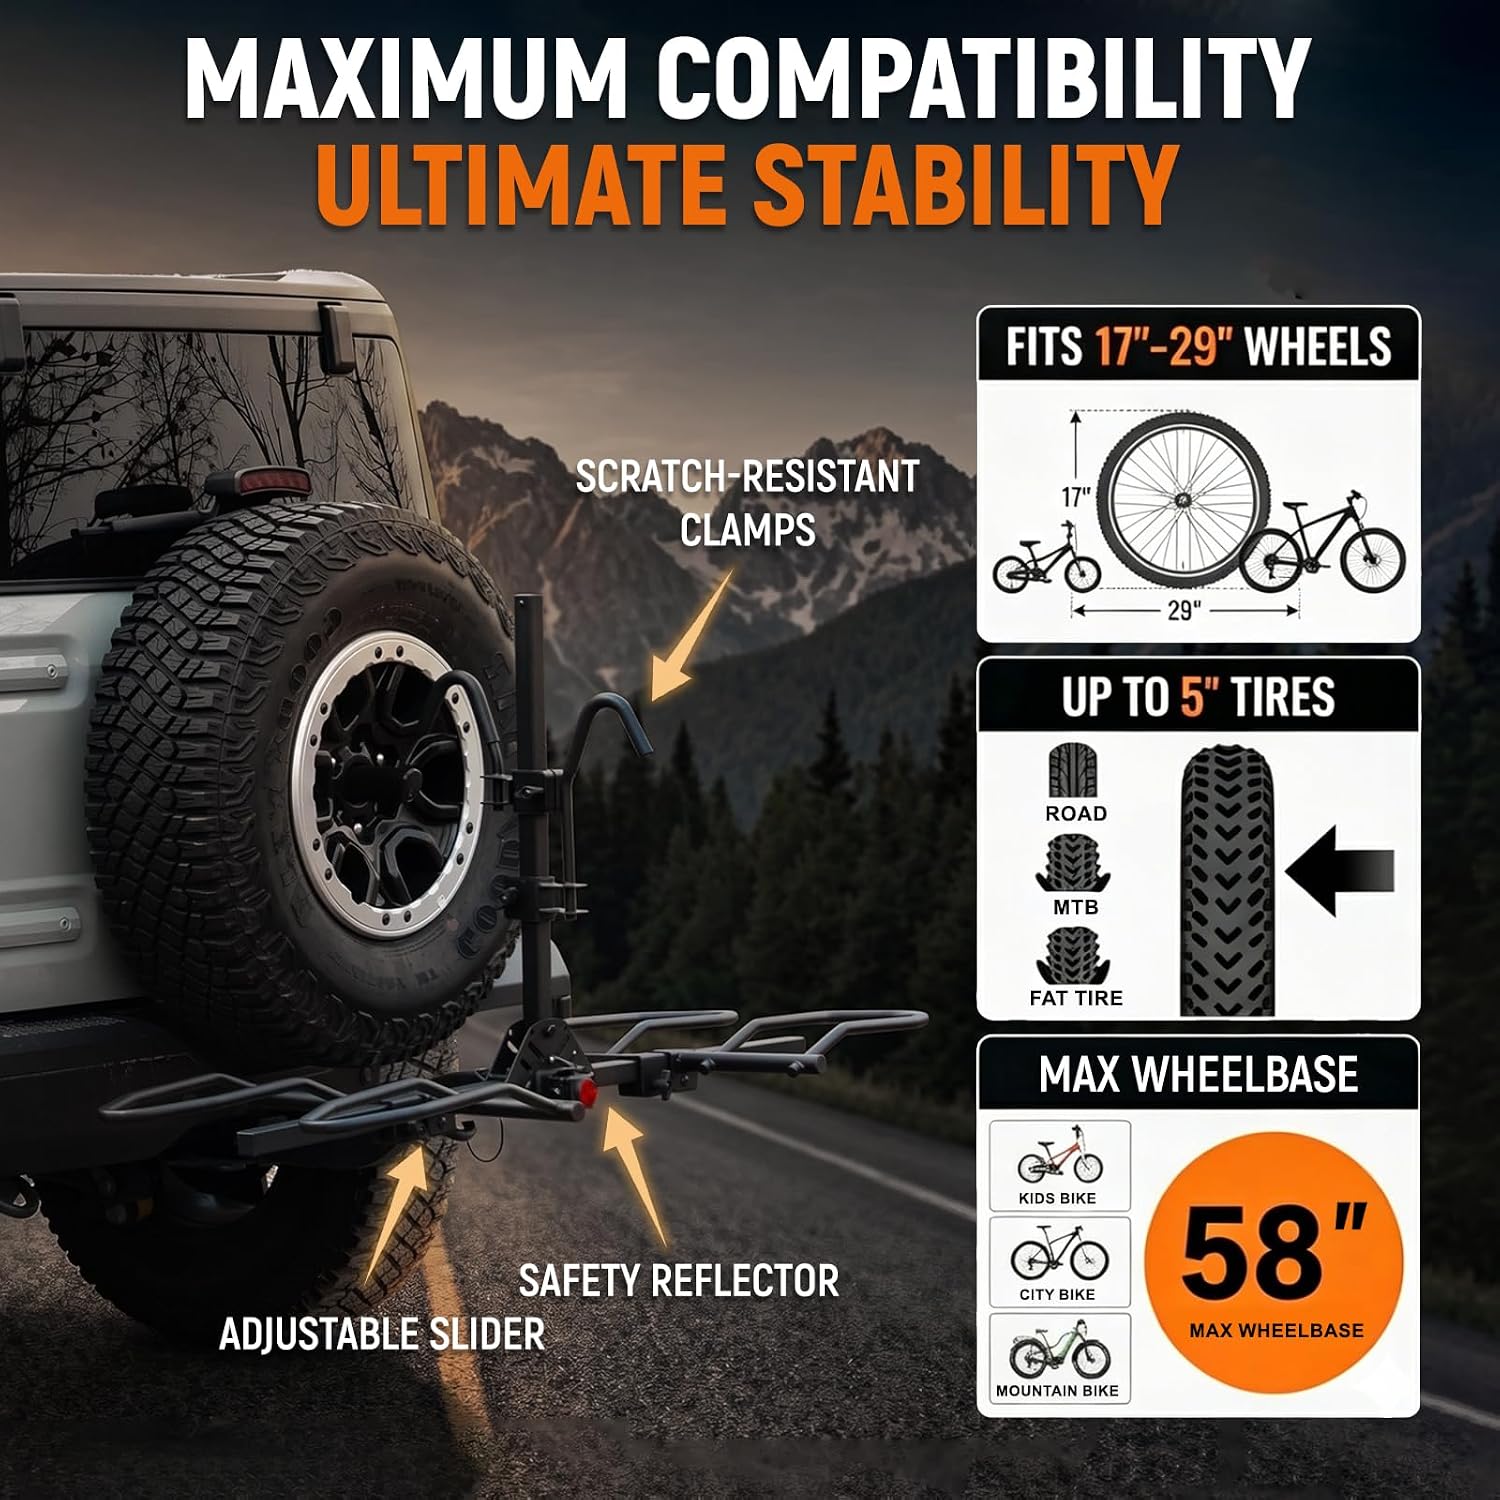
Image: Visual guide detailing the rack's compatibility with various wheel sizes (17-29 inches), tire widths (up to 5 inches), and a maximum wheelbase of 58 inches.
Accessing Vehicle Rear (Smart Tilt Feature)
The smart tilt feature allows access to your vehicle's trunk or tailgate without removing the bicycles from the rack.
- Ensure the vehicle is parked on a level surface and the parking brake is engaged.
- Locate the tilt release mechanism (typically a pin or lever) at the base of the rack.
- Unlock and pull the pin/lever to release the rack.
- Carefully tilt the rack downwards and away from the vehicle until it locks into the tilted position.
- Access your vehicle's rear cargo area.
- To return the rack to the upright position, lift it until it clicks securely back into place. Ensure the locking pin re-engages.

Image: Demonstration of the smart tilt design, illustrating how the rack tilts down to provide clearance for trunk or tailgate access while bikes remain mounted.
Maintenance
Regular maintenance ensures the optimal performance and longevity of your MEEVIZ bike rack.
- Cleaning: Clean the rack regularly with mild soap and water to remove dirt, road grime, and salt. Rinse thoroughly and dry completely to prevent corrosion.
- Inspection: Periodically inspect all bolts, nuts, and fasteners for tightness. Check for any signs of wear, cracks, bends, or corrosion on the frame, straps, and plastic components.
- Lubrication: Apply a light lubricant to moving parts, such as the tilt mechanism, to ensure smooth operation.
- Storage: When not in use, store the bike rack in a dry, protected area to prevent exposure to harsh weather conditions.
Troubleshooting
This section addresses common issues you might encounter with your bike rack.
- Issue: Rack wobbles excessively in the hitch receiver.
Solution: Ensure the anti-wobble M16 steel bolt is fully inserted and tightened firmly. The bolt is designed to eliminate play between the rack and the hitch receiver. - Issue: Bicycles are not stable on the rack.
Solution: Verify that the wheel cradles are adjusted correctly for your bike's wheelbase. Ensure all wheel straps are tightly secured and the frame clamps are firmly holding the bike's top tube. For step-through frames, consider using a crossbar adapter. - Issue: Difficulty tilting the rack.
Solution: Check for any obstructions. Ensure the tilt release mechanism is fully disengaged. Apply a small amount of lubricant to the pivot points if movement is stiff.
Specifications
| Feature | Specification |
|---|---|
| Model Number | MV085 |
| Material | Alloy Steel |
| Color | Black |
| Mounting Type | Hitch Mount (2-inch receiver) |
| Load Capacity | 160 Pounds (80 lbs per bike) |
| Item Weight | 31 pounds |
| Item Dimensions (L x W x H) | 52.4 x 58 x 32.28 inches |
| Compatible Wheel Sizes | 17" to 29" |
| Compatible Tire Widths | Up to 5 inches |
| Max Wheelbase | 58 inches |
| Compatible Vehicle Types | ATV, Car, SUV, Truck, UTV, Van (with 2-inch receiver) |
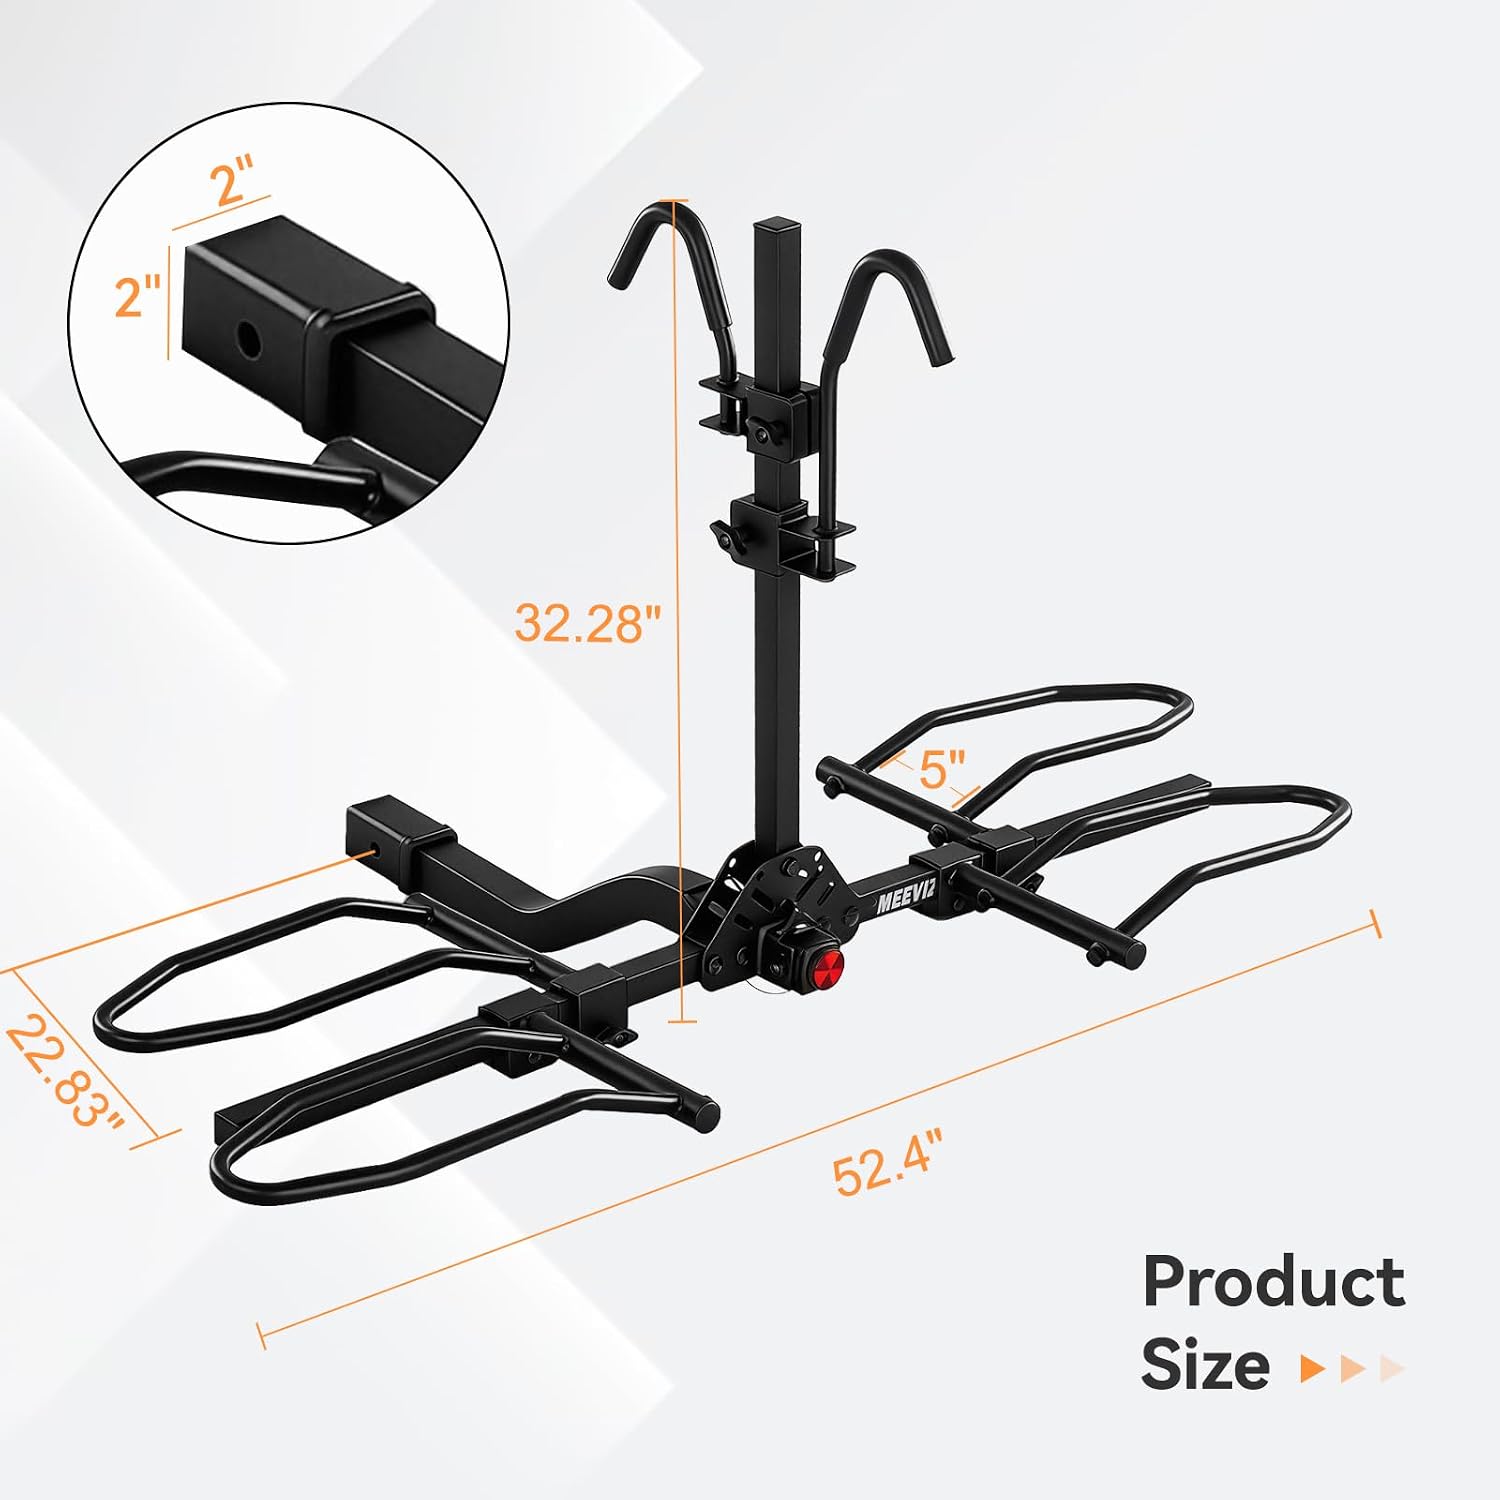
Image: Product dimensions of the MEEVIZ 2-Bike Hitch Mount Bike Rack.
Warranty and Support
The MEEVIZ 2-Bike Hitch Mount Bike Rack comes with a Lifetime Warranty, reflecting our commitment to quality and durability. For any questions regarding assembly, operation, maintenance, or warranty claims, please contact MEEVIZ customer support. Our dedicated team is available to assist you.
