
1. Introduction
Thank you for choosing the Duex DXMO27F360S 27-inch FHD 360Hz Gaming Monitor. This manual provides essential information for setting up, operating, maintaining, and troubleshooting your new monitor. Please read this manual thoroughly before using the product to ensure proper operation and to prevent damage.
2. Important Safety Information
Always follow these basic safety precautions when using your monitor:
- Do not expose the monitor to rain or moisture to avoid fire or shock hazards.
- Do not open the monitor casing. There are no user-serviceable parts inside. Refer all servicing to qualified service personnel.
- Place the monitor on a stable, flat surface to prevent it from falling.
- Ensure proper ventilation. Do not block ventilation openings.
- Use only the power adapter and cables provided by the manufacturer.
- Unplug the monitor from the power outlet during lightning storms or when unused for long periods.
3. Package Contents
Please check that all items are present and in good condition:
- Duex DXMO27F360S 27-inch Gaming Monitor
- Monitor Stand (Base and Neck)
- Power Adapter and Power Cable
- HDMI Cable
- DisplayPort (DP) Cable
- User Manual (this document)
4. Setup
4.1 Assembling the Monitor Stand
- Carefully remove the monitor from its packaging, keeping the screen protected.
- Attach the stand neck to the back of the monitor by aligning the mounting points and securing with screws (if applicable).
- Connect the stand base to the stand neck, ensuring it clicks into place or is secured with the provided screw.
- Place the assembled monitor on a stable, flat surface.
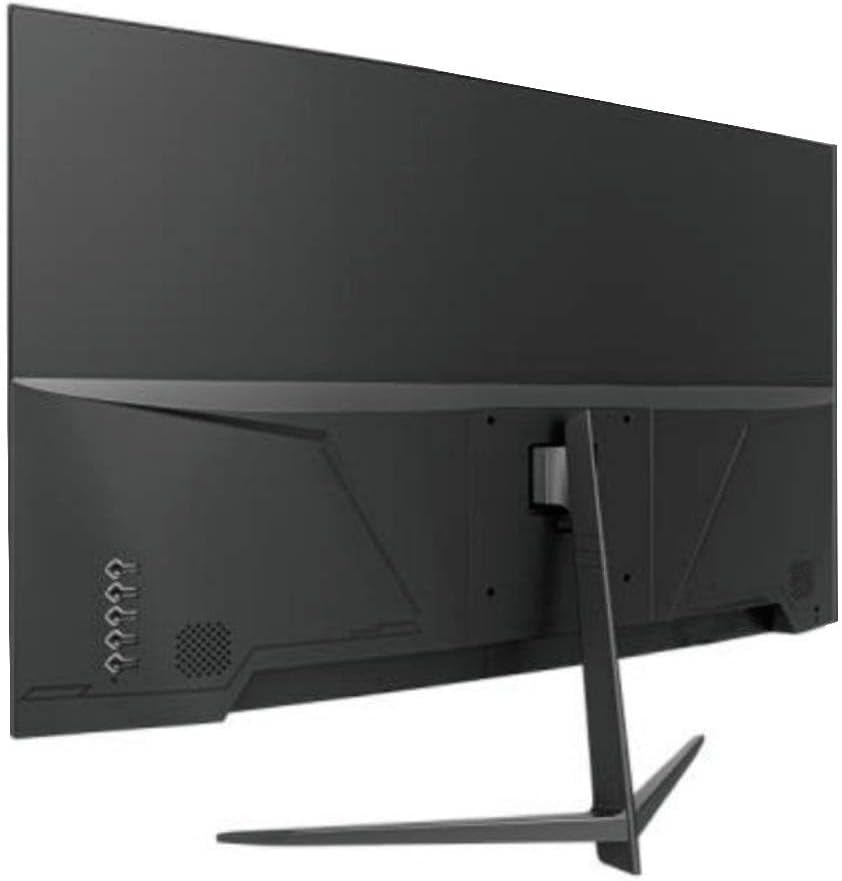
Figure 4.1: Rear view of the monitor showing the stand assembly and port locations. This image illustrates the monitor's back panel where the stand connects and where various input ports are situated.
4.2 Connecting Cables
- Power Connection: Connect the power cable to the monitor's power input, then plug the other end into a power outlet.
- Video Connection: Connect one end of the HDMI or DisplayPort (DP) cable to the corresponding port on your computer's graphics card. Connect the other end to an available HDMI or DP port on the monitor. For optimal performance and 360Hz refresh rate, DisplayPort is recommended.
- Audio (Optional): If you wish to use external speakers or headphones, connect them to the monitor's audio output jack (if available) or directly to your computer. The monitor has built-in speakers.
5. Operating Instructions
5.1 Powering On/Off
- To power on the monitor, press the power button, usually located on the bottom right or rear of the monitor.
- To power off, press and hold the power button for a few seconds until the monitor turns off.
5.2 On-Screen Display (OSD) Menu
The OSD menu allows you to adjust various monitor settings. The control buttons are typically located on the back or bottom edge of the monitor.

Figure 5.1: Side view of the monitor. This image provides a profile view of the monitor, which can help in locating control buttons or understanding its slim design.
Common OSD Menu Options:
- Picture Settings: Adjust brightness, contrast, sharpness, gamma, and color temperature.
- Color Settings: Fine-tune RGB values, select color presets.
- Input Select: Manually switch between HDMI and DisplayPort inputs.
- Audio Settings: Adjust volume for built-in speakers or mute audio.
- Gaming Features: Enable/disable FreeSync/Adaptive Sync, adjust response time (OD), and crosshair overlays.
- OSD Settings: Adjust OSD language, transparency, and timeout.
- Reset: Restore all settings to factory defaults.
5.3 Optimizing Refresh Rate
To achieve the 360Hz refresh rate, ensure your graphics card supports it and that you are using a DisplayPort cable. You may need to adjust the refresh rate setting in your operating system's display settings:
- Windows: Right-click on the desktop > Display settings > Advanced display settings > Display adapter properties > Monitor tab > Screen refresh rate.
- NVIDIA Control Panel: Display > Change resolution > Refresh rate.
- AMD Radeon Software: Display > Refresh Rate.
6. Maintenance
6.1 Cleaning the Monitor
- Always unplug the monitor from the power outlet before cleaning.
- Screen: Use a soft, lint-free cloth lightly dampened with water or a specialized screen cleaner. Do not spray cleaner directly onto the screen. Avoid using alcohol, ammonia, or abrasive cleaners.
- Casing: Wipe the monitor casing with a soft, dry cloth.
6.2 Storage
If storing the monitor for an extended period, unplug it, clean it, and store it in a cool, dry place, preferably in its original packaging to protect it from dust and physical damage.
7. Troubleshooting
If you encounter issues with your monitor, please refer to the following common problems and solutions:
| Problem | Possible Solution |
|---|---|
| No power / Power LED off | Ensure the power cable is securely connected to both the monitor and the power outlet. Check if the power outlet is functional. |
| No signal / Blank screen | Verify that the video cable (HDMI/DP) is correctly connected to both the monitor and the computer. Ensure the correct input source is selected in the OSD menu. Check if the computer is powered on and not in sleep mode. |
| Flickering screen | Check the video cable for damage or loose connections. Try a different video cable. Ensure the refresh rate is set correctly in your operating system. Disable any gaming features like FreeSync/Adaptive Sync temporarily to see if the issue persists. |
| Image is blurry or distorted | Adjust the resolution settings on your computer to match the monitor's native resolution (1920x1080). Perform an OSD menu reset to factory defaults. |
| No sound from built-in speakers | Check the volume settings in the OSD menu and on your computer. Ensure the monitor is selected as the audio output device in your operating system. |
8. Specifications
| Feature | Specification |
|---|---|
| Brand | Duex |
| Model | DXMO27F360S |
| Display Size | 27 inches |
| Resolution | FHD (1920x1080) |
| Refresh Rate | 360Hz |
| Response Time | 1ms |
| Panel Type | IPS |
| Connectivity | HDMI, DisplayPort (DP) |
| Audio | Built-in Speakers |
| ASIN | B0H92DQY24 |
9. Warranty and Support
This Duex monitor comes with a standard manufacturer's warranty. Please refer to the warranty card included in your product packaging or visit the official Duex website for detailed warranty terms and conditions.
For technical support, service inquiries, or further assistance, please contact Duex customer support through their official channels. Contact information can typically be found on the manufacturer's website or on the product packaging.