
Introduction
Thank you for choosing the COMHOMA Outdoor Storage Shed. This manual provides essential information for the safe assembly, operation, and maintenance of your new storage shed. Please read all instructions carefully before beginning assembly and retain this manual for future reference.

Image: The COMHOMA Outdoor Storage Shed (6'x4' Gray) positioned in a garden, demonstrating its compact size and integration into an outdoor space.
Safety Information
WARNING: Failure to follow these safety instructions may result in serious injury or property damage.
- Always wear appropriate personal protective equipment, including gloves and eye protection, during assembly.
- Assembly requires a minimum of 2-3 individuals for safety and ease of construction.
- Ensure the shed is assembled on a level, stable surface. A proper foundation (e.g., concrete slab, treated timber base) is recommended.
- Securely anchor the shed to the ground immediately after assembly to prevent wind damage.
- Keep children and pets away from the assembly area.
- Exercise caution when handling metal panels, as edges may be sharp.
- Do not store flammable liquids or hazardous materials inside the shed unless properly contained and ventilated.
- Regularly inspect the shed for any loose fasteners or damage and address them promptly.
Components and Parts
Before beginning assembly, verify that all parts listed in your packaging contents are present and undamaged. Each component is labeled with a part number for easy identification.
The shed is constructed from high-quality galvanized steel with a protective powder-coated finish, ensuring durability and resistance to weather conditions.

Image: A close-up view of a shed panel with a protective film being peeled off. This film prevents scratches and friction during transport.
Note: Each panel is coated with a protective film. This film should be removed during assembly to ensure proper fit and finish, though some users may choose to leave it on for additional protection during construction.
Setup and Assembly
Follow these general steps for assembling your COMHOMA Outdoor Storage Shed. Refer to the detailed step-by-step manual included in your package for specific instructions and diagrams.
- Site Preparation: Choose a level and stable location for your shed. A solid foundation is crucial for stability and proper door alignment.
- Base Frame Assembly: Assemble the base frame according to the manual. Ensure it is square and level before proceeding.
- Wall Panel Installation: Attach the corner panels and then the side panels to the base frame using the provided screws. Work with 2-3 people to manage the panels.
- Roof Frame Assembly: Secure the roof frame. This step also requires assistance to properly align and fasten.
- Roof Panel Installation: Install the roof panels, ensuring they overlap correctly to prevent water leakage.
- Door Installation: Install the door(s) and secure them with the hinges and latch mechanism. Ensure smooth operation.
- Finishing Touches: Apply plastic protective caps to cover screw heads and prevent scratches. Double-check all fasteners for tightness.
- Anchoring: Securely anchor the shed to your chosen foundation to prevent movement due to wind or other external forces.

Image: A visual guide illustrating the nine key steps for assembling the storage shed, from base frame to final protective caps.
Video: This video demonstrates the lockable door feature of the shed, highlighting its security mechanism.
Operating Instructions
Storage and Organization
The COMHOMA storage shed offers 125 cubic feet of storage capacity. It is suitable for storing various outdoor items such as garden tools, bicycles, lawnmowers, and other equipment.
- Utilize shelving units or pegboards (not included) to maximize vertical storage space and keep items organized.
- Distribute weight evenly to maintain the shed's stability.
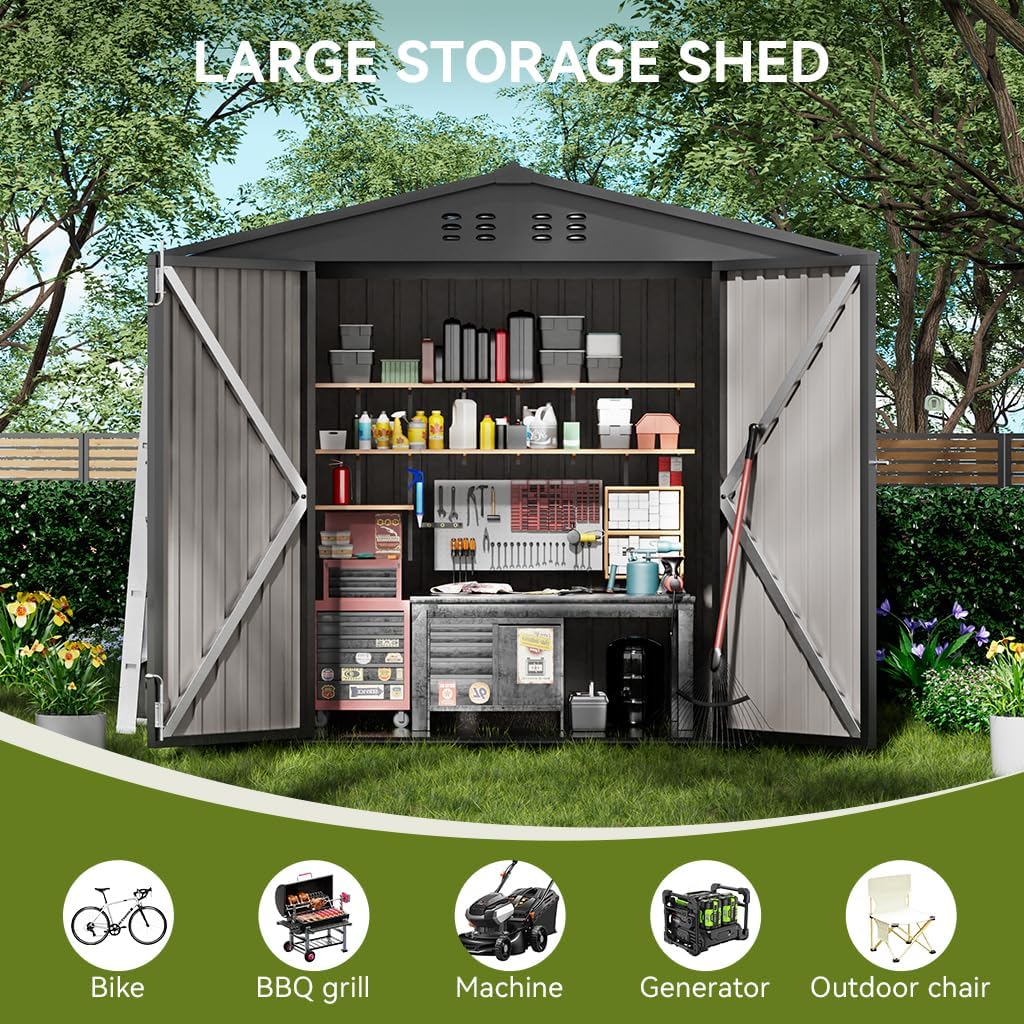
Image: The interior of the storage shed, showcasing its potential for organized storage with shelves and a workbench for various tools and supplies.
Security
The shed features a lockable door mechanism. Use a padlock (not included) to secure your stored items and prevent unauthorized access.

Image: A detailed view of the shed's lockable door, featuring a sturdy bolt latch designed for use with a padlock to enhance security.
Ventilation
Two top vents are integrated into the shed's design to promote airflow, helping to keep the interior cool and reduce odors. Ensure these vents remain unobstructed.

Image: A close-up of the shed's roof section, highlighting the ventilation design with multiple vents to ensure proper air circulation.
Maintenance
- Cleaning: Clean the shed exterior periodically with mild soap and water. Avoid abrasive cleaners or harsh chemicals that could damage the finish.
- Inspection: Regularly inspect all bolts, screws, and connections to ensure they remain tight. Re-tighten any loose fasteners.
- Drainage: Ensure the sloping roof and surrounding area are clear of debris to allow for proper water runoff.
- Door Operation: Lubricate door hinges and the latch mechanism annually to ensure smooth operation.
- Weather Protection: The shed is designed to be windproof, waterproof, UV-resistant, and snowproof. However, in extreme weather conditions, additional anchoring or snow removal from the roof may be necessary to prevent damage. The roof has a weight capacity of 440 lbs.

Image: Four panels depicting the shed's resilience against various weather conditions: wind, rain (waterproof), sun (UV-resistant), and snow (snowproof).
Video: This video highlights the weatherproof features of the 6'x4' shed, demonstrating its ability to withstand outdoor elements.
Troubleshooting
| Problem | Possible Cause | Solution |
|---|---|---|
| Door does not close or align properly. | Uneven foundation; loose frame bolts; bent door panel. | Ensure the shed is on a level surface. Check and tighten all frame bolts. If a panel is bent, attempt to gently straighten it or contact customer support for replacement parts. |
| Water leakage inside the shed. | Improperly installed roof panels; loose roof fasteners; obstructed drainage. | Verify all roof panels are correctly overlapped and secured. Tighten any loose roof fasteners. Clear any debris from the roof and surrounding drainage areas. |
| Shed feels unstable or wobbly. | Inadequate anchoring; loose frame connections. | Ensure the shed is securely anchored to the ground or foundation. Check and tighten all frame bolts and connections. |
| Difficulty assembling parts. | Misalignment; protective film not removed; insufficient assistance. | Carefully review the instruction manual diagrams. Ensure protective film is removed. Confirm parts are oriented correctly. Seek assistance from 2-3 people as recommended. |
Specifications
- Brand: COMHOMA
- Model Number: DF-B106-GY-64FT-VN
- Color: Gray
- Material: Galvanized Steel
- Product Dimensions (D x W x H): 48" x 74.4" x 74.2" (approximately 4'D x 6.2'W x 6.1'H)
- Storage Capacity: 125 Cubic Feet
- Roof Weight Capacity: 440 lbs
- Item Weight: 80 pounds
- Door Width: 45 inches
- Door Height: 64 inches
- Water Resistance Level: Waterproof

Image: A diagram illustrating the precise dimensions of the 6'x4' storage shed, including height, width, and depth measurements.
Warranty Information
Specific warranty details are typically provided with your purchase documentation. Please refer to the warranty card or contact COMHOMA customer support for information regarding warranty coverage and terms.
Customer Support
For assistance with assembly, missing parts, or any other inquiries, please contact COMHOMA customer support. Refer to your purchase receipt or product packaging for contact details.
When contacting support, please have your model number (DF-B106-GY-64FT-VN) and purchase date readily available.