
1. Introduction
Thank you for choosing the FEIFANKE 145A MIG Welder. This 3-in-1 welding machine is designed for Flux MIG, STICK (MMA), and Lift TIG welding processes, offering versatility for various applications. This manual provides essential information for safe operation, setup, maintenance, and troubleshooting to ensure optimal performance and longevity of your welding machine. Please read this manual thoroughly before operating the equipment.

Image 1.1: The FEIFANKE 145A MIG Welder is suitable for diverse welding environments such as garages, farms, construction sites, factories, and automotive repair.
2. Safety Instructions
Always prioritize safety when operating welding equipment. Failure to follow safety guidelines can result in serious injury or death.
- Personal Protective Equipment (PPE): Always wear a welding helmet with appropriate shade, flame-resistant clothing, welding gloves, and safety shoes.
- Ventilation: Ensure adequate ventilation to remove welding fumes and gases from the work area.
- Fire Hazards: Keep a fire extinguisher nearby. Remove all flammable materials from the welding area.
- Electrical Safety: Ensure the machine is properly grounded. Do not operate in wet conditions. Inspect cables for damage before each use.
- Eye and Skin Protection: Welding arcs emit intense UV and IR radiation that can cause severe burns to eyes and skin.
- Work Area: Keep the work area clean and free of clutter.
3. Package Contents
Verify that all items listed below are included in your package. If any items are missing or damaged, contact your supplier immediately.
- 1 x FEIFANKE MIG145 Inverter Welder (110V/220V compatible)
- 1 x MIG Welding Torch
- 1 x Welding Wire Spool
- 1 x Wire Brush
- 1 x Wire Nozzle
- 1 x Silk Feeding Wheel
- 1 x Ground Clamp with Cable (10-25mm², 2.9m)
- 1 x Electrode Holder with Cable (10-25mm², 2.9m)

Image 3.1: Included accessories with the FEIFANKE 145A MIG Welder, ready for immediate use.
4. Product Overview
Familiarize yourself with the components and controls of your FEIFANKE 145A MIG Welder.
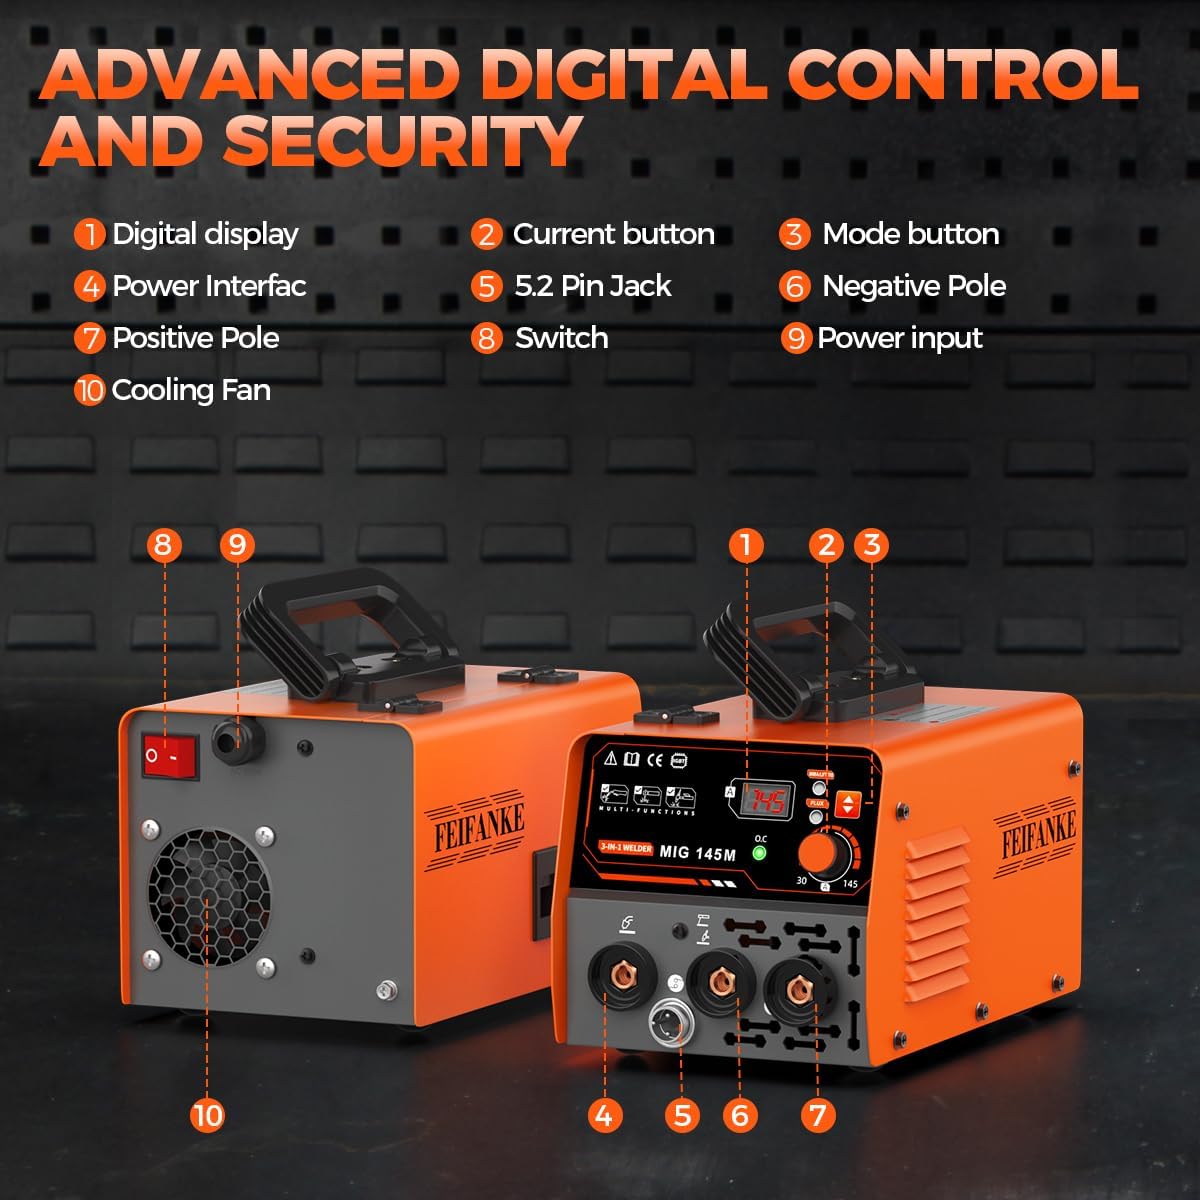
Image 4.1: Detailed view of the welder's control panel and connections.
- Digital Display: Shows current welding parameters.
- Current Button: Adjusts welding current.
- Mode Button: Selects welding process (MIG, STICK, Lift TIG).
- Power Interface: Connection point for welding cables.
- 5.2 Pin Jack: Specific connection for certain accessories.
- Negative Pole: Connection for the ground clamp.
- Positive Pole: Connection for the electrode holder or MIG torch.
- Switch: Main power switch.
- Power Input: Connects to the main power supply.
- Cooling Fan: Ensures proper heat dissipation during operation.
5. Setup
Follow these steps to set up your welding machine for operation.
5.1 Power Connection
- Ensure the main power switch (8) is in the OFF position.
- Connect the power input cable to a suitable 110V AC power outlet. Ensure the outlet can handle the machine's power requirements.
5.2 Ground Clamp Connection
- Connect the ground clamp cable to the Negative Pole (6) on the front panel.
- Securely attach the ground clamp to the workpiece or a clean, bare metal part of the welding table. Ensure good electrical contact.
5.3 Welding Torch/Electrode Holder Connection
- For MIG Welding: Connect the MIG torch to the Positive Pole (7) and the appropriate power interface (4).
- For STICK/Lift TIG Welding: Connect the electrode holder (for STICK) or TIG torch (for Lift TIG) to the Positive Pole (7).
5.4 Wire Installation (MIG Mode)
Refer to the 'Wire Conveyor Structure' section for detailed instructions on loading welding wire.
6. Operating Modes
The FEIFANKE 145A offers three welding modes: Flux MIG, STICK (MMA), and Lift TIG.

Image 6.1: The 3-in-1 functionality of the FEIFANKE 145A MIG Welder.
6.1 Flux MIG Welding
Flux-cored arc welding (FCAW) uses a continuously fed consumable electrode containing a flux. This mode does not require external shielding gas, making it suitable for outdoor use and windy conditions.
- Setup: Ensure welding wire is correctly loaded (see Section 7). Connect the MIG torch.
- Mode Selection: Press the Mode Button (3) until 'MIG' is displayed.
- Parameter Adjustment: Use the Current Button (2) to set the desired welding current. Adjust wire feed speed as needed for your material thickness and wire type.
- Operation: Position the MIG torch, press the trigger to start the arc and wire feed. Maintain a consistent travel speed and arc length.
6.2 STICK (MMA) Welding
Shielded metal arc welding (SMAW), also known as STICK welding, uses a consumable electrode coated in flux to create the weld.
- Setup: Connect the electrode holder to the Positive Pole (7). Insert the appropriate electrode into the holder.
- Mode Selection: Press the Mode Button (3) until 'MMA' (or 'STICK') is displayed.
- Parameter Adjustment: Use the Current Button (2) to set the welding current according to the electrode type and diameter.
- Operation: Strike the arc by lightly touching and then quickly lifting the electrode from the workpiece. Maintain a consistent arc length and travel speed.
6.3 Lift TIG Welding
Lift TIG welding provides precise control and high-quality welds, especially on thinner materials. This machine supports Lift TIG, which initiates the arc by briefly touching the tungsten electrode to the workpiece.
- Setup: Connect a TIG torch (not included in standard set) to the Positive Pole (7). Ensure a sharpened tungsten electrode is installed. A separate gas cylinder and regulator are required for shielding gas.
- Mode Selection: Press the Mode Button (3) until 'TIG' is displayed.
- Parameter Adjustment: Use the Current Button (2) to set the welding current.
- Operation: Open the shielding gas valve. Gently touch the tungsten electrode to the workpiece and lift it slightly to initiate the arc. Maintain a consistent arc length and feed filler rod manually if required.
7. Wire Conveyor Structure (MIG Mode)
Proper installation of the welding wire is crucial for consistent MIG welding performance.

Image 7.1: Exploded view of the wire feed mechanism.
- Open the side panel of the welder to access the wire feed compartment.
- Place the welding wire spool onto the spool holder. Ensure the wire unwinds from the bottom.
- Install the Spool Spacer, Spring, Washer, and Spool Lock in the correct order to secure the spool.
- Feed the end of the welding wire through the wire guide and into the drive roller mechanism.
- Close the drive roller tension arm and adjust the tension appropriately. The wire should feed smoothly without slipping or crushing.
- Feed the wire through the MIG torch liner until it exits the contact tip.
8. Maintenance
Regular maintenance ensures the longevity and reliable operation of your welding machine.
- Cleaning: Periodically clean the machine's exterior with a dry cloth. Use compressed air to blow out dust and debris from inside the machine, especially around the cooling fan (10) and vents.
- Cable Inspection: Regularly inspect all welding cables, ground clamps, and electrode holders for cuts, fraying, or loose connections. Replace damaged components immediately.
- MIG Torch Maintenance: Clean or replace the contact tip and nozzle as needed. Ensure the torch liner is free of kinks and blockages.
- Wire Feed Mechanism: Keep the drive rollers clean and free of wire shavings. Check the tension of the drive rollers.
- Storage: Store the welder in a clean, dry environment when not in use.
9. Troubleshooting
This section addresses common issues you might encounter during operation.
| Problem | Possible Cause | Solution |
|---|---|---|
| No power to the machine | Power switch off, loose power cable, tripped circuit breaker | Turn on power switch, check cable connections, reset circuit breaker |
| Poor or unstable arc | Poor ground connection, incorrect current setting, damp electrodes (STICK), dirty workpiece | Ensure good ground contact, adjust current, use dry electrodes, clean workpiece surface |
| Wire feed issues (MIG) | Incorrect drive roller tension, clogged liner, wrong size contact tip, tangled wire spool | Adjust tension, clean/replace liner, use correct contact tip, untangle wire |
| Machine overheats | Exceeding duty cycle, blocked cooling vents, fan malfunction | Allow machine to cool, clear vents, check fan operation |
If you encounter issues not listed here or if solutions do not resolve the problem, contact FEIFANKE customer support.
10. Specifications
| Feature | Specification |
|---|---|
| Model Number | MIG145 MINI |
| Welding Processes | Flux MIG, STICK (MMA), Lift TIG |
| Input Voltage | 110V AC |
| Power Source | AC/DC Inverter |
| Manufacturer | FEIFANKE |
| Package Dimensions | 12.8 x 9.06 x 8.86 inches |
11. Warranty and Support
For warranty information, please refer to the documentation provided at the time of purchase or contact your retailer. Keep your proof of purchase for any warranty claims.
For technical support or service inquiries, please contact FEIFANKE customer service through the official website or your purchase platform. Provide your model number (MIG145 MINI) and ASIN (B0H5JPVL37) when seeking assistance.