
1. Introduction
Thank you for choosing the ODK Corner Desk. This L-shaped desk is designed to provide a spacious and organized workspace with integrated storage and power solutions. This manual provides detailed instructions for assembly, operation, maintenance, and troubleshooting to ensure you get the most out of your new desk. Please read this manual thoroughly before assembly and use, and retain it for future reference.
2. Safety Information
- Always follow the assembly instructions carefully. Incorrect assembly can lead to instability and potential injury.
- Ensure all screws and fasteners are securely tightened before use. Periodically check and re-tighten as necessary.
- Do not overload the desk. The maximum weight capacity is 50 kg (110 lbs).
- Keep small parts and packaging materials away from children to prevent choking hazards.
- Use the integrated power outlets and USB ports only with compatible devices and within their specified electrical ratings. Do not exceed the maximum power load.
- Avoid placing hot items directly on the desk surface without protection.
- Do not stand or sit on the desk.
- If any parts are missing or damaged, do not proceed with assembly. Contact customer support immediately.
3. Package Contents
Before beginning assembly, please verify that all components listed below are present and undamaged. If anything is missing or damaged, please contact ODK customer service.
- Desk Panels (various sizes for L-shape, monitor stand)
- Steel Frame Components (legs, support beams)
- 4 Fabric Drawers
- Fabric Storage Bag
- CPU Stand
- Power Outlet Unit (with 2 sockets and 2 USB ports)
- Assembly Hardware (screws, bolts, Allen wrench, etc.)
- User Manual
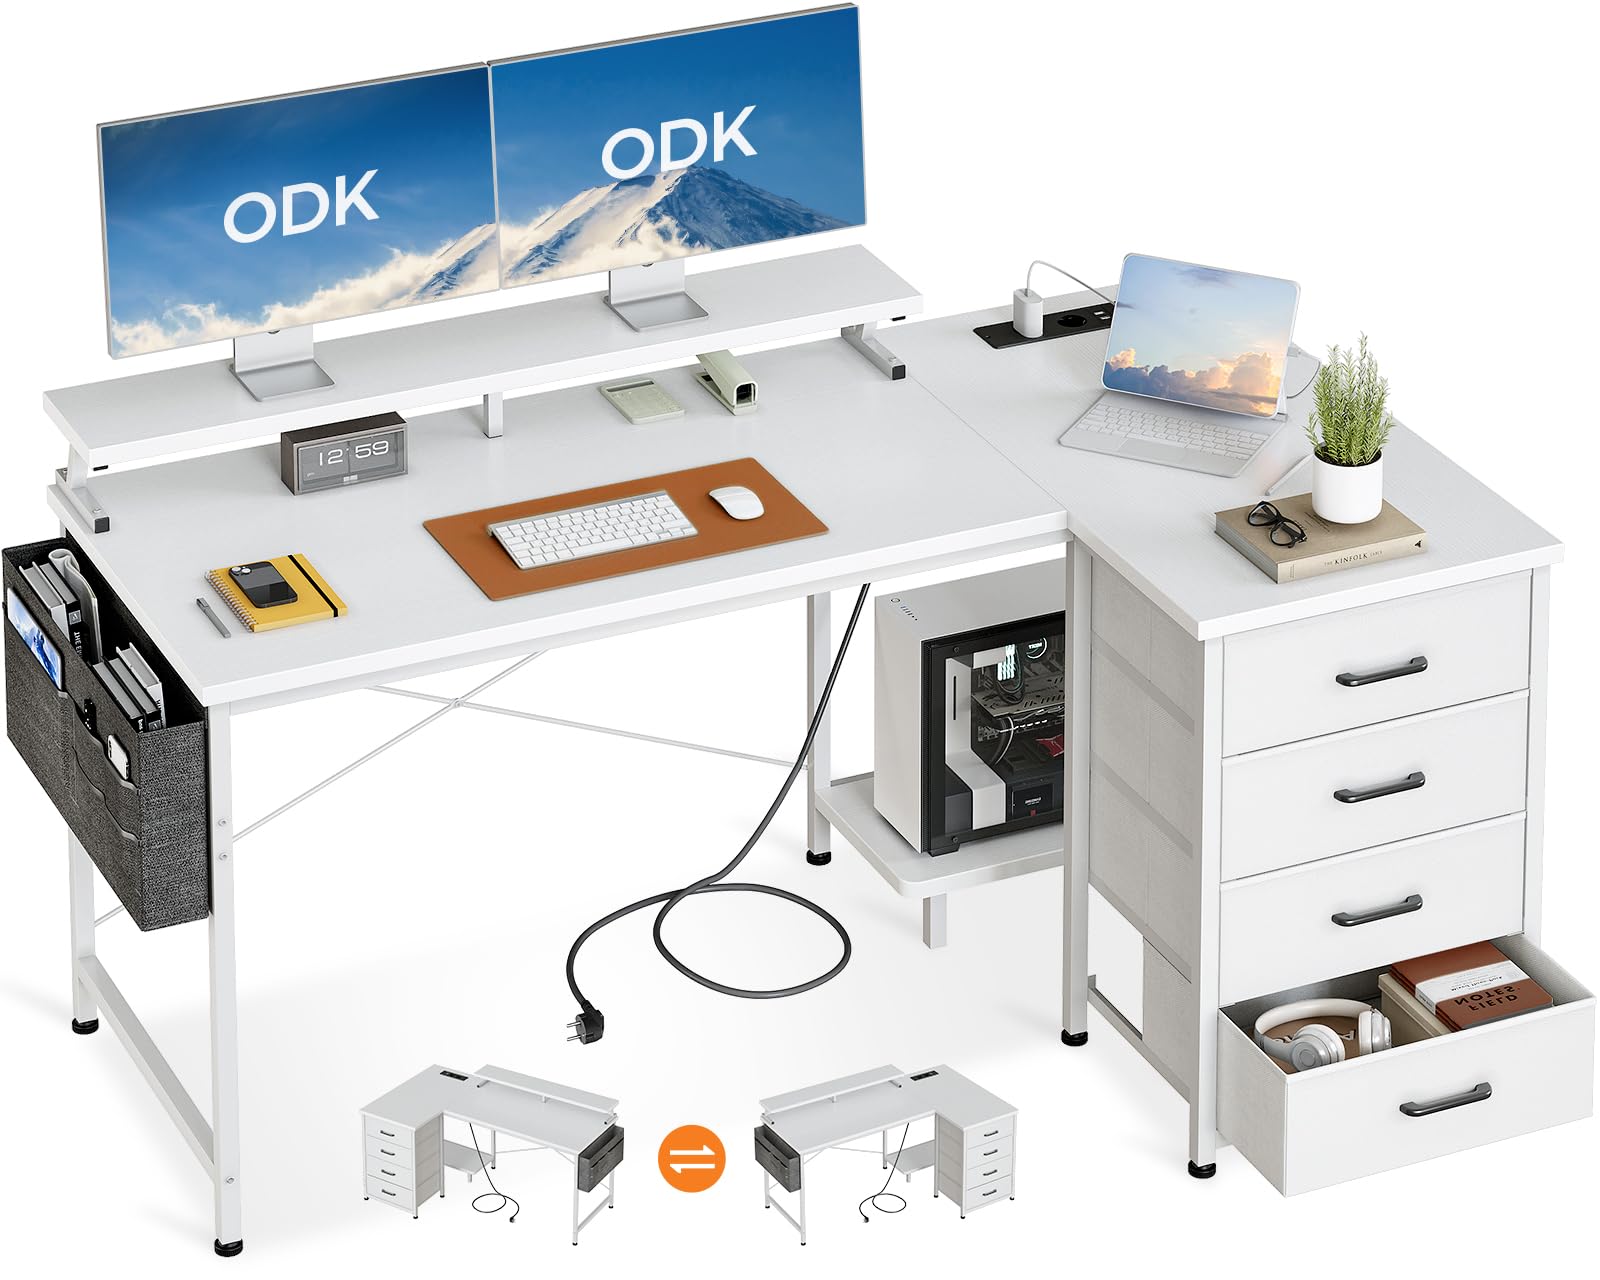
Image 1: Overview of the ODK Corner Desk and its main components. This image illustrates the assembled desk, providing a visual reference for the parts mentioned in the package contents.
4. Setup and Assembly Instructions
Assembly typically requires two people. Please ensure you have enough space and all tools (usually an Allen wrench is included, but a screwdriver might be helpful) before starting.
4.1. Preparing for Assembly
- Clear a spacious area for assembly.
- Lay out all components and hardware, matching them against the parts list.
- Keep the instruction manual handy for reference.
4.2. Step-by-Step Assembly
- Assemble the Frame: Begin by connecting the main steel frame components. Attach the horizontal support beams to the vertical legs using the provided screws and Allen wrench. Ensure all connections are finger-tight before fully tightening.
- Attach Desk Panels: Carefully place the main L-shaped desk panels onto the assembled frame. Secure them using the designated screws from underneath. Note that the L-shape is reversible; decide whether you want the longer side on the left or right before securing.
- Install Monitor Stand: Position the monitor stand on the desired section of the desk. Secure it with the provided fasteners. This stand is 13 cm high, designed to elevate your monitor for ergonomic viewing.
- Integrate Power Outlet Unit: Locate the designated cutout for the power outlet unit. Insert the unit and secure it according to the instructions. Ensure the power cable is routed safely and is accessible.
- Assemble Fabric Drawers: The four fabric drawers are designed for easy assembly. Fold them into shape and insert the bottom panel to make them rigid.
- Place Drawers and Accessories: Slide the assembled fabric drawers into their designated compartments. The drawers can be placed on either the left or right side of the desk, depending on your chosen configuration. Attach the fabric storage bag to the side of the desk using its hooks or fasteners. Position the CPU stand as desired.
- Final Tightening: Once all components are in place, go back and fully tighten all screws and bolts. Do not overtighten.
- Leveling: Adjust the leveling feet at the bottom of the desk legs to ensure the desk is stable and does not wobble on uneven floors.
Image 2: The fully assembled ODK Corner Desk, showcasing its L-shaped design, integrated power outlet, monitor stand, and fabric drawers. This image serves as a visual guide for the completed assembly.
5. Operating Instructions
5.1. Using the Integrated Power Outlet
- Plug the desk's main power cord into a wall outlet.
- The unit provides 2 standard power sockets and 2 USB charging ports.
- Connect your devices (e.g., smartphone, tablet, laptop charger) to the appropriate ports.
- Ensure the total power draw of connected devices does not exceed the unit's maximum rating (refer to the label on the power unit for specifications).
5.2. Utilizing Storage Features
- Fabric Drawers: Use the four fabric drawers for organizing documents, office supplies, or personal items. They are designed to protect privacy and keep dust out.
- Fabric Storage Bag: The side storage bag is ideal for smaller items like pens, notebooks, or headphones, keeping them within easy reach.
- Monitor Stand: The elevated monitor stand provides additional storage space underneath for keyboards, mice, or other peripherals when not in use, helping to keep your desktop clear.
- CPU Stand: Place your computer tower on the dedicated CPU stand to keep it off the floor, improving airflow and protecting it from dust.
5.3. Reversible L-Shape Configuration
The L-shaped design of this desk is reversible. During assembly, you can choose to configure the longer section of the desk to be on either the left or right side, depending on your room layout and personal preference. The fabric drawers can also be installed on either side.
6. Maintenance
- Cleaning: The desk surface is made of melamine coating, which is scratch-resistant and waterproof. Wipe clean with a soft, damp cloth. Avoid abrasive cleaners or harsh chemicals.
- Fabric Components: The fabric drawers and storage bag can be spot cleaned with a mild detergent and damp cloth. Allow to air dry completely. Do not machine wash.
- Hardware Check: Periodically check all screws and bolts to ensure they remain tight. Re-tighten if necessary to maintain stability.
- Power Unit: Keep the power outlet unit clean and free of dust. Do not spill liquids onto the unit.
7. Troubleshooting
| Problem | Possible Cause | Solution |
|---|---|---|
| Desk is wobbly/unstable. | Screws are loose; uneven floor. | Check and tighten all assembly screws. Adjust the leveling feet at the bottom of the desk legs. |
| Power outlets/USB ports not working. | Desk not plugged in; power strip switch off; overloaded circuit. | Ensure the desk's power cord is securely plugged into a live wall outlet. Check if the power unit has an on/off switch. Unplug some devices if overloaded. Test with another device. |
| Fabric drawers do not fit or are misshapen. | Incorrect assembly of drawers; wrong orientation. | Ensure the bottom panel is fully inserted and the drawer is folded correctly. Verify the drawer compartment dimensions. |
| Missing parts during assembly. | Packaging overlooked; manufacturing error. | Double-check all packaging materials. Contact ODK customer support with your purchase details. |
8. Specifications
| Model Number | BA01011228XSDE |
| Brand | ODK |
| Dimensions (L x W x H) | 140 cm x 80 cm x 87.4 cm (55.1 in x 31.5 in x 34.4 in) |
| Weight | 18.7 kg (41.2 lbs) |
| Material | Melamine coated particle board, Steel frame, Fabric drawers |
| Color | White |
| Weight Capacity | 50 kg (110 lbs) |
| Power Outlet | 2 AC outlets, 2 USB ports (Specific electrical ratings should be checked on the unit itself) |
| Monitor Stand Height | 13 cm (5.1 in) |
| Assembly Required | Yes |
9. Warranty and Support
ODK is committed to providing high-quality products and excellent customer service. This product comes with a standard manufacturer's warranty against defects in materials and workmanship. For specific warranty terms and conditions, please refer to the documentation included with your purchase or visit the official ODK website.
If you encounter any issues during assembly or use, or if you have questions about your ODK Corner Desk, please do not hesitate to contact our customer support team. Our team is available to assist you and typically responds within 24 hours.
- Customer Service: Refer to your purchase invoice or the ODK official website for contact information.
- Online Resources: Visit the ODK Brand Store on Amazon for product information and support.


