
1. Safety Information
Please read and understand all instructions before beginning assembly and use. Failure to follow these instructions may result in injury or damage to the product.
- Weight Capacity: The main bed frame supports up to 800 lbs. Do not exceed this weight limit.
- Assembly: Ensure all components are securely fastened before use. Periodically check and tighten all bolts and screws.
- Children: Supervise children around the trundle bed to prevent accidents.
- Electrical Components: Do not expose LED lights or charging ports to water or excessive moisture. Disconnect power before cleaning or maintenance of electrical parts.
- Mattress Thickness: Recommended mattress thickness for the main bed is 6-10 inches.
2. Included Components
Verify that all parts are present before starting assembly. If any parts are missing or damaged, contact customer support.
- Bed Frame (Headboard, Side Rails, Footboard)
- Wood Slats
- Trundle Bed Frame with Slats
- Hardware Pack (bolts, screws, washers, Allen wrench)
- LED Light Strip and Controller
- Power Adapter for LED and Charging Ports
- User Manual (this document)
3. Product Specifications
| Model | Platform Bed DG |
| Brand | FAVSH |
| Size | Full (Main Bed), Twin (Trundle) |
| Color | Dark Gray |
| Main Bed Dimensions (L x W x H) | 83"L x 57.5"W x 40.5"H |
| Trundle Bed Dimensions (L x W x H) | 78.75"L x 41.25"W x 8.75"H |
| Weight Capacity | 800 lbs |
| Recommended Mattress Thickness | 6-10 inches |
| Frame Material | Wood |
| Upholstery Material | Linen |
| Special Features | LED Lights (APP-controlled), USB & Type-C Charging Ports, Pull-Out Trundle |
4. Setup and Assembly
This bed frame requires assembly. It is recommended that two adults assemble the product. Please refer to the detailed assembly instructions provided in the separate user manual included in the packaging for step-by-step guidance.
4.1 Before You Begin
- Clear a spacious area for assembly.
- Unpack all components and verify against the included parts list.
- Gather necessary tools (an Allen wrench is typically included; a Phillips head screwdriver may be needed for some steps).
4.2 Assembly Overview
- Attach the headboard to the side rails.
- Connect the footboard to the side rails.
- Install the main bed slats and secure them.
- Assemble the trundle bed frame and install its slats.
- Insert the assembled trundle bed under the main bed frame.
- Connect the LED light strip and charging port wiring to the power adapter.
- Plug the power adapter into a wall outlet.

Image: Detailed dimensions of the bed frame and trundle.
This diagram illustrates the overall dimensions of the main bed and the pull-out trundle, including the recommended mattress thickness and weight capacity.

Image: The bed frame with the trundle partially extended, showcasing the slat support system.
This image provides a visual reference of the assembled bed frame with the trundle pulled out, highlighting the sturdy wooden slat construction for both the main bed and the trundle.
5. Operating Instructions
5.1 Trundle Bed Operation
The trundle bed is designed for easy access and storage.
- To Extend: Gently pull the trundle bed frame from underneath the main bed. It is equipped with wheels for smooth movement.
- To Retract: Push the trundle bed back into its storage position under the main bed until it is fully concealed.
5.2 LED Lighting Control
The integrated LED lighting system can be controlled via a smartphone application.
- Download App: Scan the QR code provided in the separate LED instruction sheet or search for the specified app in your device's app store.
- Connect: Follow the in-app instructions to pair your smartphone with the bed's LED controller via Bluetooth.
- Customize: Use the app to select from over 20 preset lighting effects and 4 interactive modes. Adjust brightness and color to your preference.
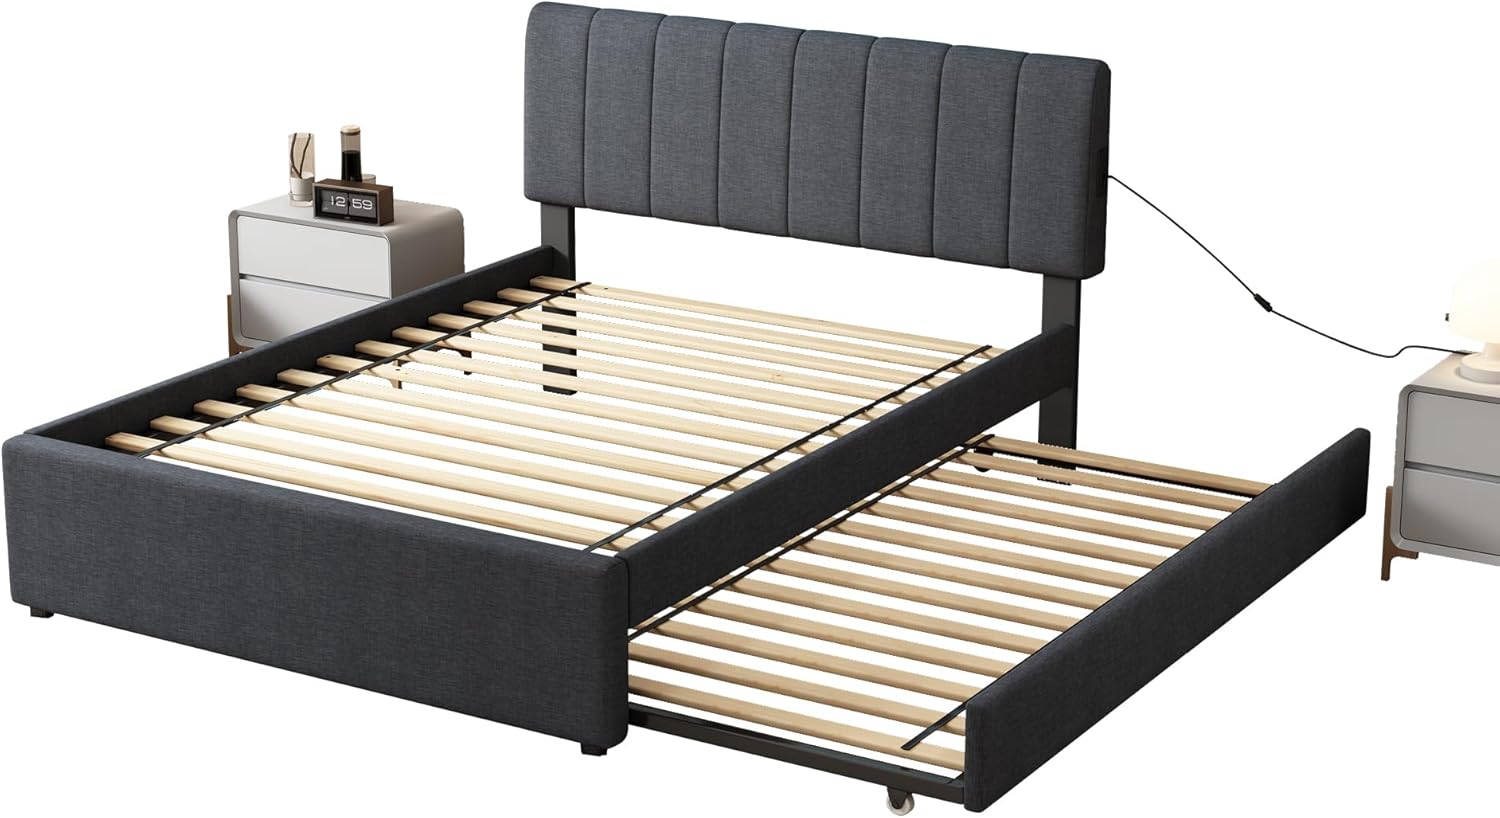
Image: The headboard with its LED lights active, demonstrating the customizable lighting feature.
This image shows the headboard with its LED lights illuminated, indicating the various lighting options available through the app control.
5.3 USB and Type-C Charging Ports
The headboard includes convenient USB and Type-C charging ports.
- Ensure the bed's power adapter is plugged into a functional wall outlet.
- Connect your device's charging cable to the appropriate USB or Type-C port on the headboard.
- Charging will begin automatically.

Image: A close-up view of the headboard's integrated USB and Type-C charging ports, with a smartphone connected for charging.
This image highlights the USB and Type-C charging ports located on the side of the headboard, demonstrating their accessibility for charging electronic devices.
6. Maintenance and Care
- Cleaning Upholstery: For general cleaning, gently vacuum the linen fabric to remove dust. For spills, blot immediately with a clean, dry cloth. For stubborn stains, use a mild fabric cleaner and test on an inconspicuous area first. Do not use harsh chemicals or abrasive cleaners.
- Frame Care: Wipe the bed frame with a soft, damp cloth. Avoid excessive moisture.
- Hardware Check: Periodically (every 3-6 months) check all bolts, screws, and connections to ensure they are tight. Re-tighten as necessary to maintain stability and prevent noise.
- Electrical Components: Keep the LED light strip and charging ports free from dust and debris. Do not attempt to repair electrical components yourself.
7. Troubleshooting
| Problem | Possible Cause | Solution |
|---|---|---|
| Bed frame is wobbly or noisy. | Loose hardware (bolts, screws). | Check and tighten all assembly hardware. Ensure EVA strips are correctly placed to reduce noise. |
| LED lights are not turning on or responding. | Power adapter unplugged, loose connection, app not paired. | Ensure the power adapter is securely plugged into a working outlet. Check all cable connections. Re-pair the app with the LED controller. |
| USB/Type-C charging ports are not working. | Power adapter unplugged, device cable faulty, device not compatible. | Verify the bed's power adapter is plugged in. Try a different charging cable or device to rule out cable/device issues. |
| Trundle bed is difficult to pull out/push in. | Obstruction, wheels jammed, uneven floor. | Check for any objects blocking the trundle's path. Ensure wheels are clean and free of debris. Verify the floor is level. |
8. Warranty Information
This FAVSH product comes with a Limited Warranty. Please refer to the warranty card included in your product packaging for specific terms, conditions, and duration of coverage. The warranty typically covers manufacturing defects under normal use.
Please retain your proof of purchase for any warranty claims.
9. Customer Support
If you have any questions, require assistance with assembly, or need to report missing/damaged parts, please contact FAVSH customer support.
- Website: Visit the official FAVSH website.
- Email: support@favsh.com
- Phone: 1-800-XXX-XXXX
When contacting support, please have your product model number (Platform Bed DG) and proof of purchase ready.