
1. Product Overview
The Orion Motor Tech 3-Way AC Manifold Gauge Set (Model: DMG-1234-3W) is designed for diagnosing, evacuating, and recharging automotive air conditioning systems that use R1234yf, R404a, and R134a refrigerants. This comprehensive kit provides accurate pressure readings and includes all necessary hoses, quick couplers, and can taps for efficient HVAC maintenance.

Figure 1: Orion Motor Tech 3-Way AC Manifold Gauge Set in use.
Key Features:
- Precision Gauges: Features high and low-pressure gauges with oil-filled cores for wear and shock resistance, and dry dials for improved cold-weather performance. Accuracy is within 1.6%.
- Color-Coded Hoses: Three 5-foot PVC hoses with 4 reinforced layers, designed to withstand working pressures up to 600 psi (burst pressure: 3000 psi).
- Wide Application: Compatible with R1234yf, R404a, and R134a refrigerants, suitable for various automotive HVAC systems.
- Durable Construction: Built with an aluminum body and pure copper fittings for long-lasting use and resistance to rust and corrosion.
2. Product Components
The Orion Motor Tech 3-Way AC Manifold Gauge Set includes the following items:
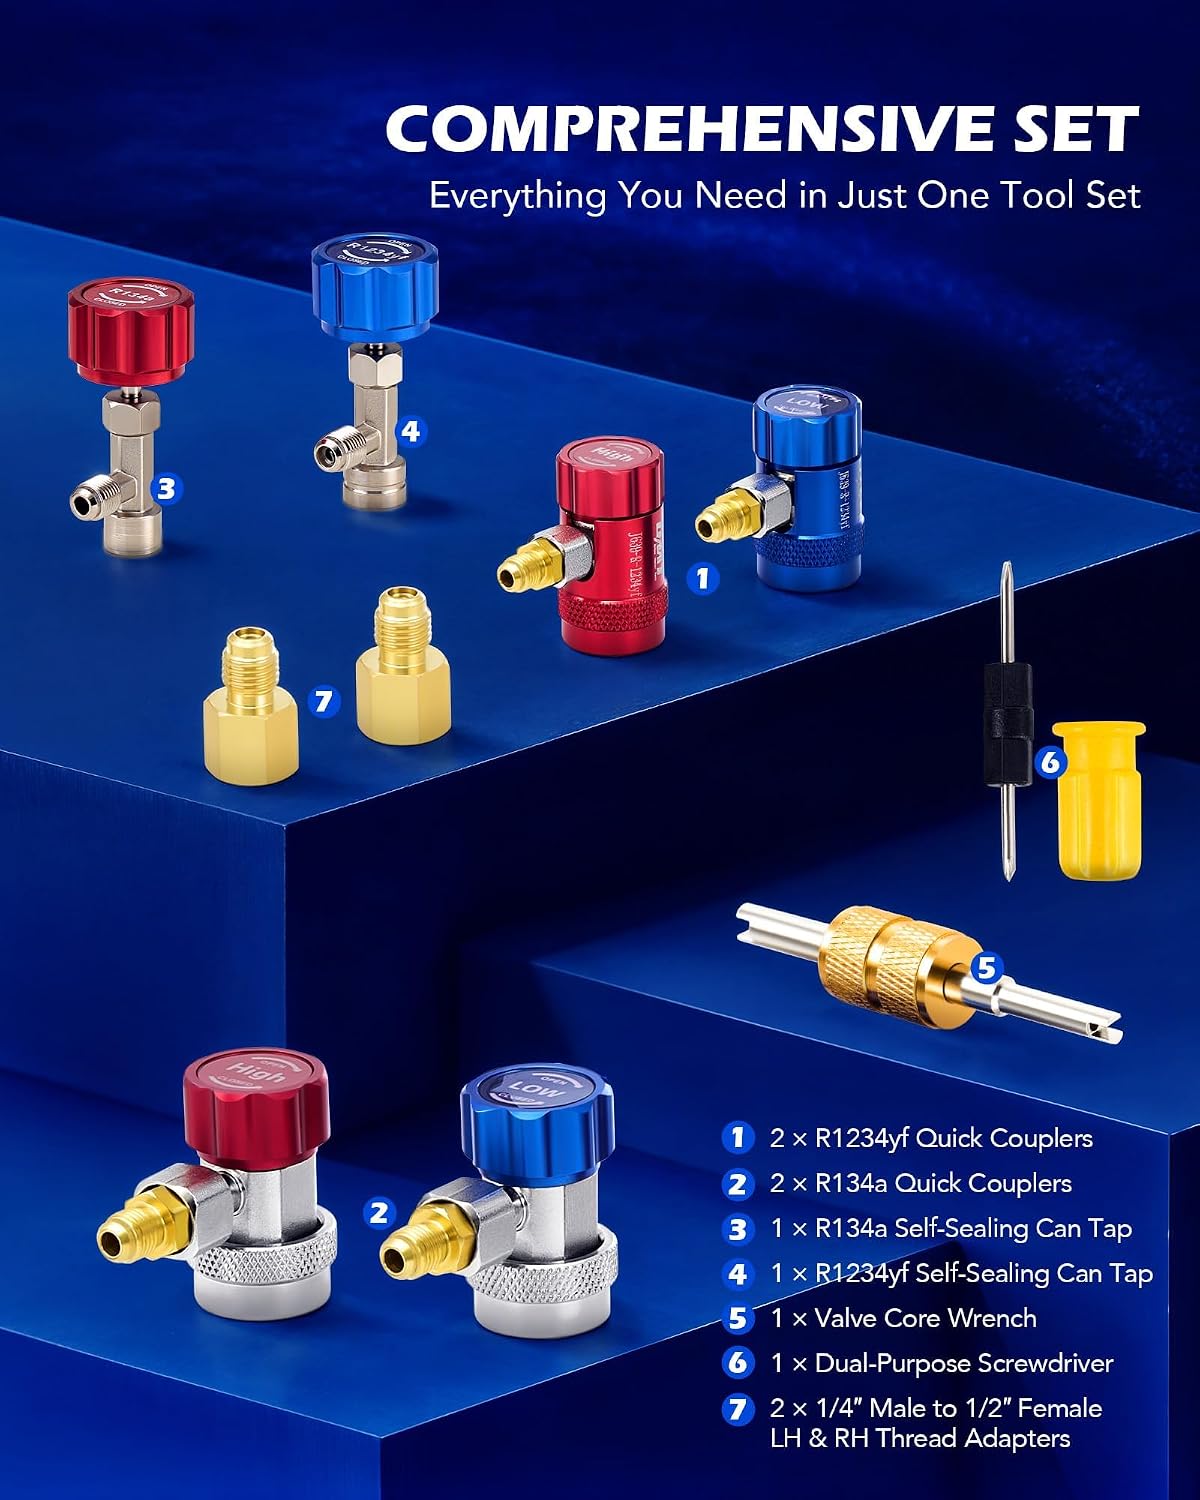
Figure 2: Complete set of components.
- 1 x 3-Way Manifold Gauge
- 3 x 5ft Color-Coded Hoses (Red, Yellow, Blue)
- 2 x R1234yf Quick Couplers (High & Low)
- 2 x R134a Quick Couplers (High & Low)
- 1 x R1234yf Self-Sealing Can Tap
- 1 x R134a Self-Sealing Can Tap
- 2 x 1/4" Male to 1/2" Female Adapters (LH & RH threads)
- 1 x Valve Core Wrench
- 1 x Dual-Purpose Screwdriver
3. Setup Instructions
Before using the manifold gauge set, ensure all components are clean and free from damage. Always wear appropriate personal protective equipment, including safety glasses and gloves, when working with refrigerants.
3.1 Assembling the Gauge Set
- Unpack all components from the carrying case.
- Identify the high-pressure (red) and low-pressure (blue) ports on the manifold gauge.
- Connect the red hose to the high-pressure port on the manifold.
- Connect the blue hose to the low-pressure port on the manifold.
- Connect the yellow (service) hose to the central service port on the manifold.
- Attach the appropriate quick couplers (R1234yf or R134a) to the ends of the red and blue hoses, ensuring a secure fit.
- Attach the correct self-sealing can tap to the end of the yellow hose if you plan to add refrigerant from a can.

Figure 3: Assembled manifold gauge set ready for use.
3.2 Initial Gauge Calibration
Before first use or if accuracy is in question, check the gauge calibration:
- Ensure both high and low-pressure valves on the manifold are closed.
- The needles on both gauges should point to zero.
- If a needle is not at zero, use the small calibration screw located on the face of the gauge (often covered by a rubber plug) and the included screwdriver to carefully adjust the needle to zero.

Figure 4: Gauge calibration screw and sight glass.
4. Operating Instructions
This section outlines general procedures for using the manifold gauge set. Always refer to your vehicle's service manual for specific refrigerant capacities and pressure specifications.
4.1 Safety Precautions
- Always wear safety glasses and protective gloves when handling refrigerants.
- Work in a well-ventilated area.
- Never mix different types of refrigerants.
- Do not overcharge the AC system, as this can cause damage.
- Ensure all connections are tight before opening valves.
4.2 Connecting to the Vehicle AC System
- Locate the high-pressure (larger diameter) and low-pressure (smaller diameter) service ports on your vehicle's AC system. These are typically marked 'H' and 'L' or have different sizes to prevent incorrect connection.
- Ensure both manifold valves (high and low) are closed.
- Connect the blue quick coupler (from the low-pressure hose) to the vehicle's low-pressure service port. Push down firmly until it clicks into place.
- Connect the red quick coupler (from the high-pressure hose) to the vehicle's high-pressure service port. Push down firmly until it clicks into place.
- The gauges will now display the static pressures of the AC system.
4.3 Checking System Pressure
- With the engine off and AC system off, connect the gauges as described in 4.2. Read the static pressures on both gauges.
- Start the vehicle, turn on the AC to maximum cold, and set the fan to high. Allow the system to run for a few minutes.
- Read the dynamic pressures on both gauges. Compare these readings to your vehicle's specifications (usually found on a sticker under the hood or in the service manual).
4.4 Evacuating the AC System (Using a Vacuum Pump)
Evacuation removes air and moisture from the AC system, which is crucial for proper operation.
- Connect the manifold gauge set to the vehicle's AC ports (as in 4.2).
- Connect the yellow service hose to a vacuum pump.
- Open both the high and low-pressure valves on the manifold.
- Start the vacuum pump. The gauges should drop into a vacuum (below 0 psi).
- Run the vacuum pump for at least 30-60 minutes, or longer depending on system size and ambient temperature.
- After evacuation, close both manifold valves, then turn off the vacuum pump.
- Observe the gauges for 15-30 minutes. If the vacuum holds steady, the system is leak-free. If the pressure rises, there is a leak that needs to be addressed before proceeding.

Figure 5: Manifold gauge set applications including diagnostic check with vacuum pump.
4.5 Refrigerant Charging
Only charge the system with the correct type and amount of refrigerant specified by your vehicle manufacturer.
- Ensure the system has been properly evacuated and holds a vacuum.
- Connect the appropriate self-sealing can tap to the refrigerant can and then to the yellow service hose.
- Purge the yellow hose: Slightly loosen the yellow hose connection at the manifold (or can tap) for a second to release any air, then retighten.
- Start the vehicle, turn on the AC to maximum cold, and set the fan to high.
- Slowly open the low-pressure valve on the manifold. The refrigerant will be drawn into the system.
- Monitor the low-pressure gauge and the sight glass on the manifold (if equipped) for refrigerant flow.
- Close the low-pressure valve periodically to check the pressure readings. Do not overcharge.
- Once the desired pressure is reached, close the low-pressure valve and the can tap.
4.6 Disconnecting the Gauge Set
- Ensure both manifold valves are closed.
- Carefully disconnect the quick couplers from the vehicle's service ports. Expect a small hiss of refrigerant as they are removed.
- Disconnect the yellow hose from the can tap or vacuum pump.
Video 1: Official product video demonstrating the AC Gauge Kit for R1234yf, R134a, and R404a refrigerants, showing connection and basic operation.
5. Maintenance
Proper maintenance ensures the longevity and accuracy of your manifold gauge set.
5.1 Cleaning and Storage
- After each use, wipe down the manifold, gauges, and hoses with a clean, dry cloth.
- Store the gauge set in its original carrying case in a cool, dry place to protect it from dust and damage.
- Ensure hoses are coiled neatly without kinks.
5.2 Leak Checks
- Periodically check all hose connections and quick couplers for signs of wear or damage.
- If you suspect a leak in the hoses, they can be tested by pressurizing them with nitrogen and using a leak detection solution.

Figure 6: Detailed view of the anti-burst hose construction.
6. Troubleshooting
Refer to this section for common issues and their potential solutions.
| Problem | Possible Cause | Solution |
|---|---|---|
| Gauges show incorrect readings (not zero when disconnected). | Needs calibration. | Adjust the calibration screw on the gauge face using the included screwdriver. |
| System does not hold vacuum after evacuation. | Leak in the AC system or gauge set connections. | Check all connections for tightness. Use a leak detector on the AC system. Repair any leaks before recharging. |
| Refrigerant not flowing during charging. | Can tap not fully engaged, manifold valve closed, or system pressure too high. | Ensure can tap pierces the can and its valve is open. Open the low-pressure manifold valve. Check system pressure; if too high, diagnose underlying issue. |
| Difficulty connecting quick couplers. | Incorrect coupler size or debris in port. | Ensure you are using the correct quick coupler for the refrigerant type (R1234yf or R134a) and port size. Clean the service ports if necessary. |
7. Specifications
Technical specifications for the Orion Motor Tech 3-Way AC Manifold Gauge Set (DMG-1234-3W).
- Brand: Orion Motor Tech
- Model Number: DMG-1234-3W
- Material: Aluminum, Brass
- Item Dimensions (L x W x H): 12.6 x 12.01 x 3.54 inches
- Item Weight: 7.1 pounds
- Hose Length: 5 feet
- Hose Working Pressure: 600 psi
- Hose Burst Pressure: 3000 psi
- Gauge Accuracy: 1.6%
- Compatible Refrigerants: R1234yf, R404a, R134a

Figure 7: Construction details of the manifold gauge set.
8. Warranty and Support
This Orion Motor Tech product comes with a 1-year warranty from the date of purchase, covering manufacturing defects.
For technical assistance, warranty claims, or to explore other products, please visit the official Orion Motor Tech store or contact customer support:
- Orion Motor Tech Store: Visit Store