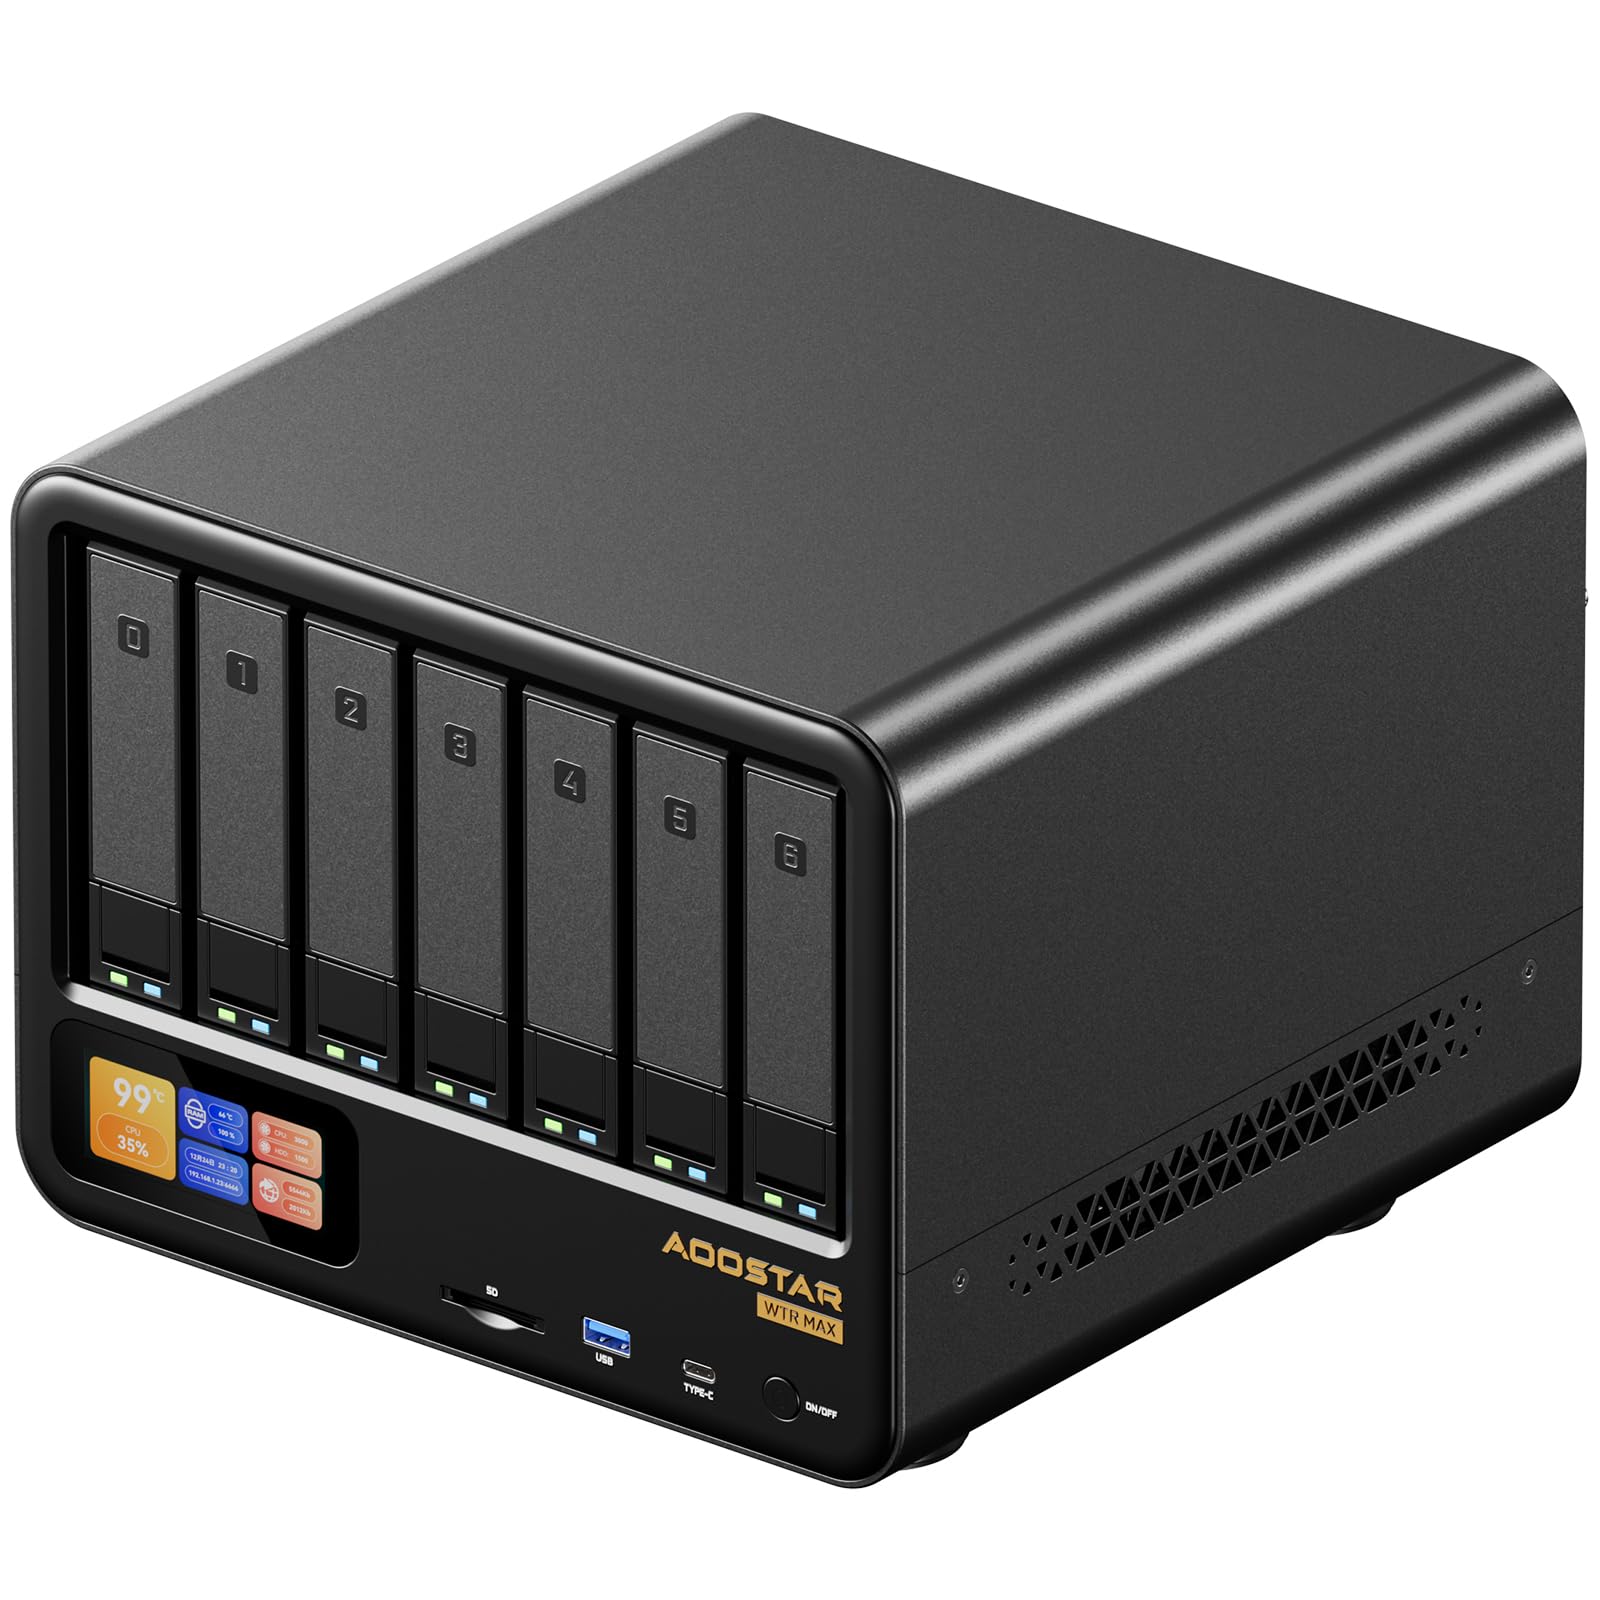
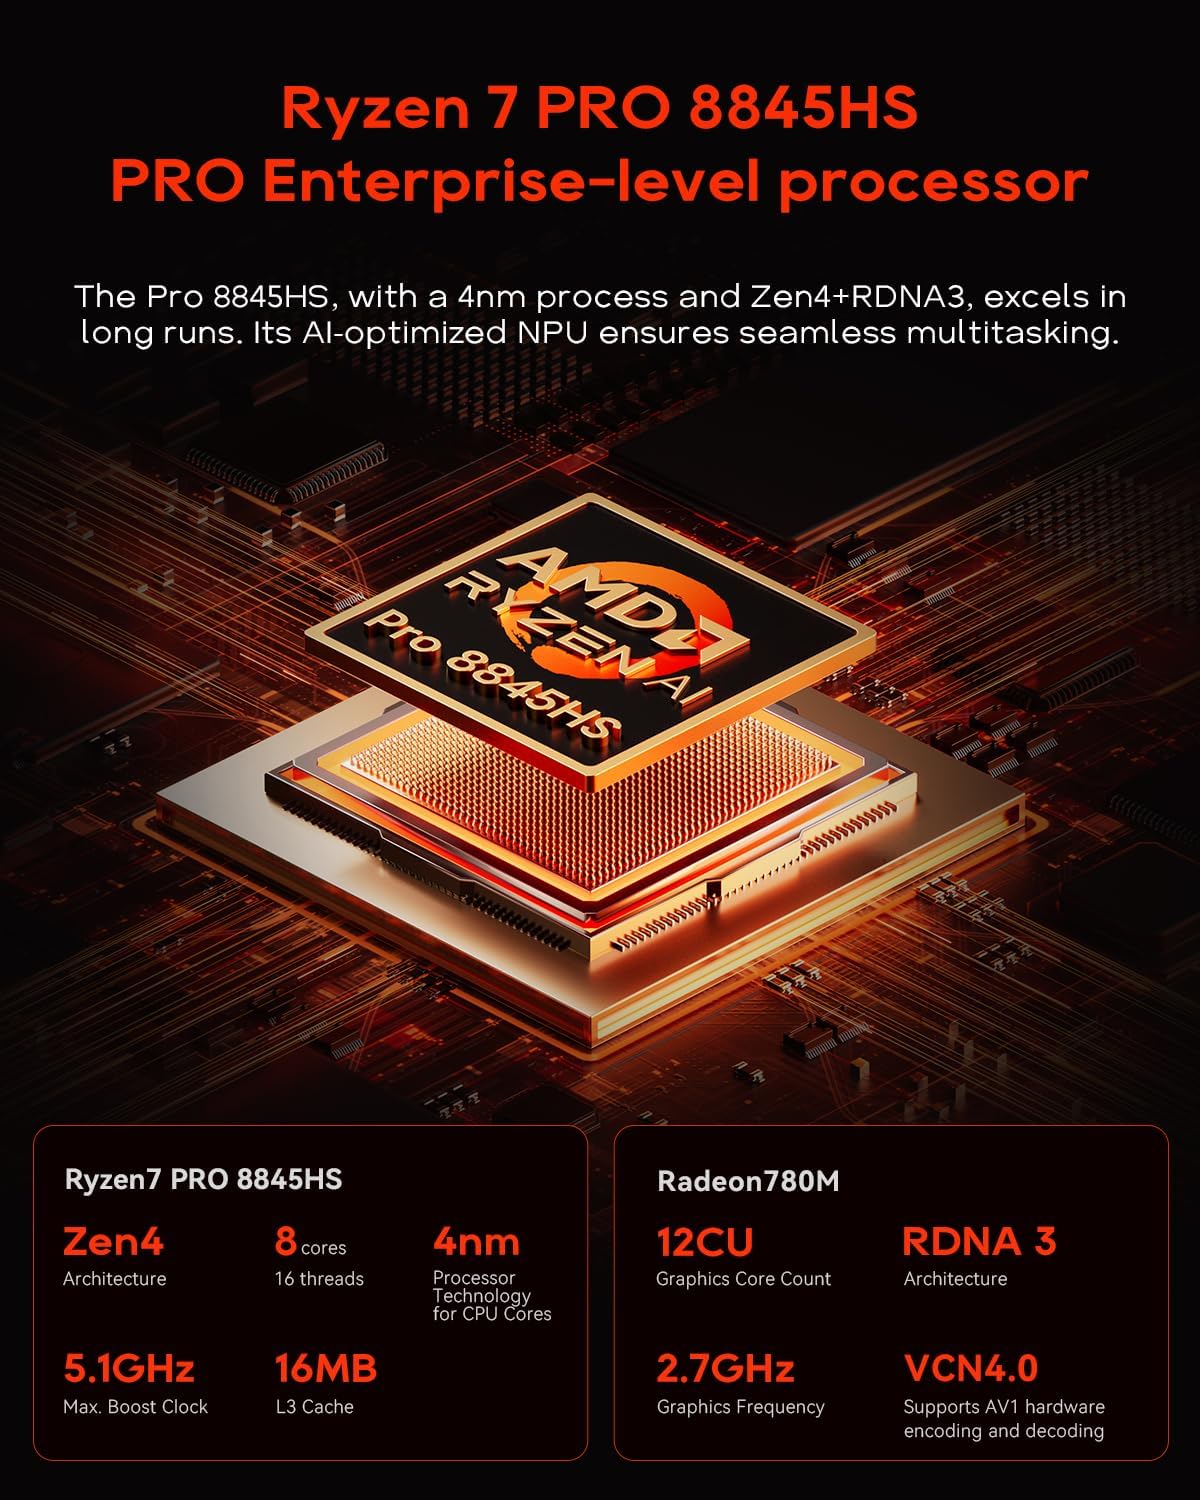
Welcome to the AOOSTAR WTR MAX NAS Mini PC user manual. This document provides essential information for the proper setup, operation, maintenance, and troubleshooting of your new NAS Mini PC. The AOOSTAR WTR MAX is a high-performance, compact computing solution designed for network-attached storage (NAS) applications, featuring an AMD R7 PRO 8845HS processor, extensive storage expansion options, and advanced connectivity. Please read this manual thoroughly before using the device to ensure optimal performance and longevity.
Figure 1: Front view of the AOOSTAR WTR MAX NAS Mini PC, showcasing its compact design.
2. Product Overview
The AOOSTAR WTR MAX is engineered for demanding tasks, offering a robust platform for data storage, virtualization, and high-performance computing.
2.1 Key Features
Processor: AMD Ryzen 7 PRO 8845HS (8 cores/16 threads, up to 5.1GHz) with Radeon 780M graphics.
Storage Expansion: 6 x 3.5" SATA slots and 5 x M.2 2280 NVMe slots (4 x PCIe 3.0, 1 x PCIe 4.0), supporting up to 88TB.
Memory: Dual-channel DDR5 5600 MHz, ECC-compatible, supporting up to 128 GB (barebone system requires separate purchase).
Cooling System: "Glacier Pro 1.0" with 4 fans and a large VC vacuum chamber for efficient heat dissipation.
Real-Time Monitoring: Integrated display and AOOSTAR NAS control software for CPU, GPU, and RAM data.
Expansion: OCuLink interface for external GPU docking stations or additional HDD enclosures.
2.2 Package Contents
Upon unpacking, verify that all items are present:
1x AOOSTAR WTR MAX PRO8845HS Desktop NAS Mini PC
1x HD cable
1x Power adapter
1x User manual (this document)
Note: This is a barebone system. Memory, hard drives, and operating system are not included and must be purchased separately.
3. Setup Instructions
Follow these steps to prepare your AOOSTAR WTR MAX for first use.
3.1 Installing RAM and Storage
The WTR MAX is a barebone system, requiring the installation of RAM and storage devices.
Open the Chassis: Carefully open the chassis of the Mini PC to access the internal components. Refer to the diagram below for component locations.
Install DDR5 RAM: Locate the dual-channel DDR5 memory slots. Insert the DDR5 RAM modules firmly until the clips on both sides lock into place.
Install M.2 NVMe SSDs: Identify the 5 M.2 2280 NVMe slots. Insert the M.2 SSDs at an angle and secure them with the provided screws.
Install 3.5" SATA HDDs: Slide the 3.5" SATA HDDs into the 6 dedicated bays. Connect the SATA data and power cables. Note: Drives are not hot-swappable; ensure the system is powered off during installation.
Close the Chassis: Once all components are installed, carefully close and secure the chassis.
Figure 2: Internal component layout for RAM and storage installation, highlighting M.2, SATA, and DDR5 slots.
Figure 3: Overview of the 11 drive bays for massive storage expansion, including 6 SATA and 5 M.2 slots.
3.2 Connecting Peripherals
Connect your display, keyboard, mouse, and network cables.
Display: Connect your monitor to the HDMI, DisplayPort, or USB4 port using the provided HD cable or a compatible cable.
Network: Connect Ethernet cables to the 2.5G Ethernet ports or SFP+ optical cables to the 10G SFP+ ports for network access.
USB Devices: Connect your keyboard, mouse, and other USB devices to the available USB 3.2 or USB Type-C ports.
Power: Connect the power adapter to the DC-in port on the Mini PC and then to a power outlet.
Figure 4: Rear panel connectivity options, including HDMI, DisplayPort, USB, Ethernet, and OCuLink ports.
Figure 5: Front panel connectivity options, including SD card slot, USB 3.2, and USB Type-C ports.
3.3 Operating System Installation
Since the system does not come with an OS, you will need to install one.
Create Bootable Media: Prepare a bootable USB drive with your preferred operating system (e.g., Windows, Linux, TrueNAS).
Boot from USB: Power on the Mini PC and press the designated key (usually F2, F7, F10, DEL, or ESC) to enter the BIOS/UEFI settings or boot menu. Select your USB drive as the boot device.
Install OS: Follow the on-screen instructions to install the operating system onto your M.2 NVMe SSD or SATA HDD.
Driver Installation: After OS installation, install all necessary drivers, especially for the AMD Ryzen 7 PRO 8845HS processor and Radeon 780M graphics, and network interfaces.
4. Operating Instructions
This section covers general operation and specific features of your AOOSTAR WTR MAX.
4.1 Power On/Off
Power On: Press the power button located on the front panel.
Power Off: Perform a graceful shutdown through your operating system. Alternatively, press and hold the power button for 5 seconds for a forced shutdown (not recommended for regular use).
4.2 Real-Time System Monitoring
The WTR MAX features a built-in display and dedicated AOOSTAR NAS control software (compatible with Windows and Linux) for real-time monitoring of system parameters.
On-Device Display: The front panel display provides immediate feedback on CPU, GPU, and RAM usage, as well as network status.
NAS Control Software: Install the AOOSTAR NAS control software on your operating system to access a customizable dashboard for detailed monitoring and system management.
Figure 6: Real-time data display on the NAS Mini PC, showing CPU, GPU, and RAM statistics.
4.3 Network Configuration
Utilize the multiple high-speed network interfaces for optimal data transfer and connectivity.
2.5G Ethernet: Configure these ports for standard network connections.
10G SFP+ Optical Ports: For high-speed network environments, connect SFP+ transceivers and optical fiber cables. These ports can also be converted to electrical ports with appropriate modules.
Figure 7: High-speed networking ports, including 2.5G Ethernet and 10G SFP+ optical ports.
4.4 Multi-Screen Display
The WTR MAX supports up to three independent displays at 4K@240Hz via USB4, HDMI 2.1, and DisplayPort 1.4.
Connect up to three monitors to the available video output ports.
Configure display settings within your operating system to extend or duplicate your desktop across multiple screens.
Figure 8: Multi-screen display setup, demonstrating simultaneous output to three monitors.
4.5 OCuLink Expansion
The OCuLink port provides flexible expansion options for high-end graphics docking stations or additional hard drive enclosures.
Connect compatible OCuLink devices to expand the system's capabilities.
Note: Hot-plugging is not supported for the OCuLink port. Ensure the system is powered off before connecting or disconnecting OCuLink devices.
Figure 9: OCuLink expansion port, illustrating connection to an external GPU dock and an HDD enclosure.
5. Maintenance
Regular maintenance ensures the longevity and optimal performance of your AOOSTAR WTR MAX.
Dust Cleaning: Periodically clean the exterior and ventilation grilles with a soft, dry cloth. For internal cleaning, power off the device, disconnect it from power, and use compressed air to remove dust from fans and heatsinks.
Software Updates: Keep your operating system, drivers, and NAS control software updated to the latest versions for security and performance improvements.
Data Backup: Regularly back up critical data stored on your NAS to an external drive or cloud service to prevent data loss.
Environmental Conditions: Ensure the Mini PC is operated in a well-ventilated area, away from direct sunlight, heat sources, and excessive moisture.
Figure 10: Exploded view of the Glacier Pro 1.0 Cooling System, detailing its fans and vapor chamber for efficient heat dissipation.
6. Troubleshooting
If you encounter issues with your AOOSTAR WTR MAX, refer to the following common troubleshooting steps.
No Power:
Ensure the power adapter is securely connected to both the Mini PC and a working power outlet.
Verify the power outlet is functional by plugging in another device.
No Display Output:
Check all display cable connections (HDMI, DisplayPort, USB4) to the monitor and Mini PC.
Ensure the monitor is powered on and set to the correct input source.
If running headless (without a monitor), an HDMI dummy plug may be required for the graphics output to remain active for remote access.
Network Connectivity Issues:
Verify Ethernet or SFP+ cables are properly connected to the Mini PC and your network device (router/switch).
Check network settings within your operating system.
Restart your router/switch and the Mini PC.
System Freezes or Reboots Randomly:
Ensure RAM modules are correctly seated.
Check for overheating; ensure ventilation is not obstructed and fans are operating.
Run memory diagnostics to check for faulty RAM.
Update all drivers and the operating system.
Storage Not Detected:
Verify that SATA and M.2 drives are correctly installed and connected.
Check BIOS/UEFI settings to ensure drives are recognized.
Ensure the operating system has the necessary drivers for the storage controllers.
7. Specifications
Detailed technical specifications for the AOOSTAR WTR MAX NAS Mini PC.
Feature
Specification
Brand
AOOSTAR
Model Name
WTR MAX
CPU Model
AMD Ryzen 7 PRO 8845HS
CPU Speed
Up to 5.1 GHz
Graphics Coprocessor
AMD Radeon 780M (Integrated)
RAM Memory Technology
DDR5
Memory Speed
5600 MHz
Max RAM Memory Size
128 GB
Hard Disk Interface
SATA, NVMe (PCIe 3.0/4.0)
Storage Bays
6 x 3.5" SATA, 5 x M.2 2280 NVMe
Video Output
HDMI, DisplayPort, USB4
Max Display Resolution
5120 x 2880 (4K@240Hz supported)
Networking
2x 2.5G Ethernet, 2x X710 10G SFP+
USB Ports
USB4 (40Gbps), USB 3.2, USB Type-C
Other Interfaces
OCuLink, SD Card Slot, 3.5mm Audio Jack
Dimensions
25 x 24.5 x 20 cm
Weight
4.5 kg
Personal Computer Design Type
Barebone
8. Warranty Information
The AOOSTAR WTR MAX NAS Mini PC comes with a manufacturer's warranty.
Warranty Period: The product is covered by a 2-year limited warranty from the date of purchase.
Coverage: This warranty covers defects in materials and workmanship under normal use. It does not cover damage caused by accident, misuse, abuse, unauthorized modification, or improper installation.
Claim Process: For warranty service, please contact AOOSTAR customer support with your proof of purchase.
9. Support
For further assistance, technical support, or inquiries, please contact AOOSTAR customer service.
Online Support: Visit the official AOOSTAR website for FAQs, driver downloads, and support resources.
Email Support: If you have any questions while using the product, you can send us an email or contact us at any time.
Brand Store: You can also visit the AOOSTAR Store on Amazon for additional product information and contact options.
Ask about setup, troubleshooting, compatibility, parts, safety, or missing instructions. Manuals+ will review the question and use this page’s manual context to help answer it.