
Introduction
This manual provides detailed instructions for the assembly, operation, and maintenance of your KINKUNCO Vanity with LED Mirror and Charging Station, Model H01. This versatile furniture piece is designed to enhance your daily routine with its integrated LED lighting, convenient charging ports, and ample storage solutions. Please read this manual thoroughly before assembly and use to ensure safe and optimal performance.

Image: KINKUNCO Vanity (Model H01) in a bedroom setting, showing the closed mirror and overall design.
Safety Information
- Always assemble the vanity on a clean, flat, and soft surface to prevent scratches.
- Ensure all screws and fasteners are securely tightened before use. Periodically check and re-tighten as necessary.
- Do not overload drawers or shelves. Distribute weight evenly.
- Keep electrical components (LED mirror, charging station) away from water and moisture.
- Do not attempt to modify the electrical wiring or components. Contact qualified personnel for repairs.
- Keep small parts and packaging materials away from children to prevent choking hazards.
- Use only the provided power cable for the charging station.
Package Contents
Before beginning assembly, verify that all components listed below are present and undamaged. If any parts are missing or damaged, please contact customer support.
- Vanity main body components (engineered wood panels)
- LED Mirror unit
- Soft Stool
- 6 Drawer units
- Hardware kit (screws, dowels, cam locks, drawer slides, handles)
- Power cable for charging station
- Illustrated Instruction Manual
Setup and Assembly
The KINKUNCO Vanity (Model H01) requires assembly. An illustrated manual with numbered components is included in the package to facilitate a quick and straightforward setup. Please follow the steps precisely as outlined in the provided manual.
- Preparation: Clear a spacious area for assembly. Lay down a blanket or cardboard to protect the furniture pieces and your floor from scratches.
- Identify Components: Unpack all parts and identify them using the numbered labels and the parts list in the instruction manual.
- Follow Illustrated Steps: Refer to the detailed, step-by-step illustrations in the included manual for proper assembly sequence.
- Secure Fasteners: Ensure all screws, dowels, and cam locks are tightened securely at each step. Do not overtighten.
- Electrical Connection: Once the vanity is fully assembled and in its desired location, connect the power cable for the LED mirror and charging station to a suitable power outlet.
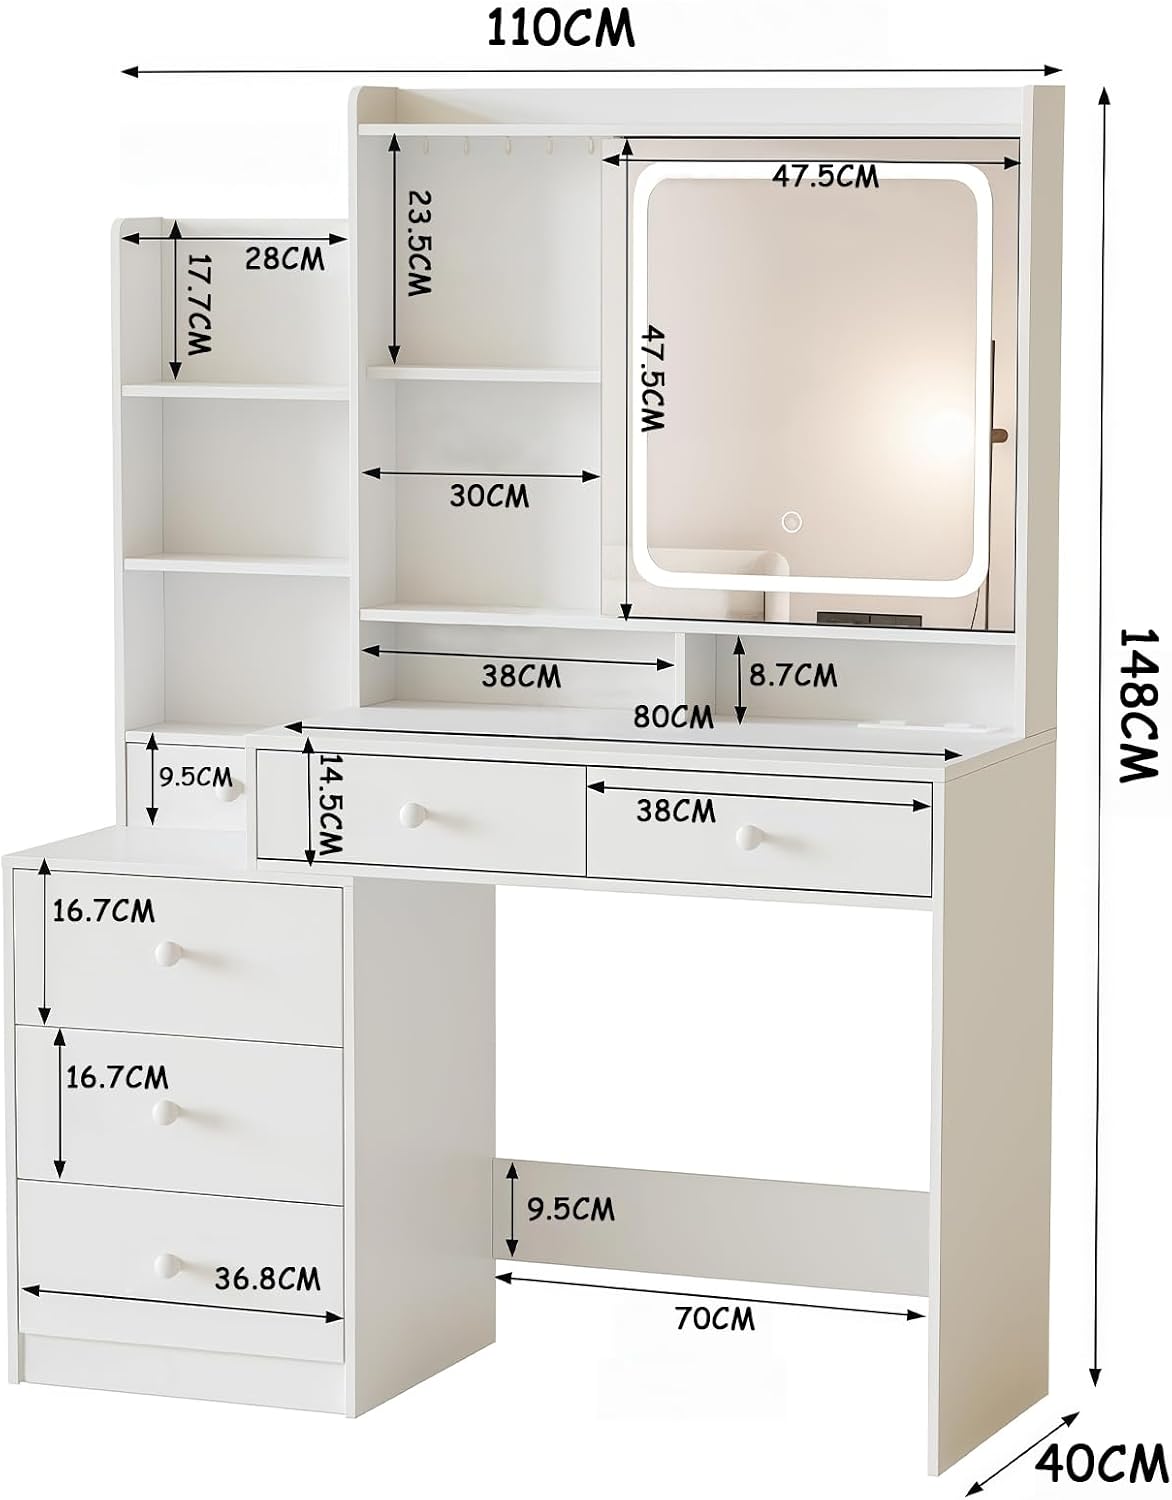
Image: Dimensional diagram of the KINKUNCO Vanity (Model H01), showing overall measurements and internal compartment sizes for assembly planning.
Operating Instructions
LED Mirror Operation
The integrated LED mirror features adjustable lighting to suit various makeup needs and ambient conditions.
- Power On/Off: Touch the power icon on the mirror surface to turn the LED light on or off.
- Change Color Temperature: Short press the color change icon (usually a circle or 'M' symbol) to cycle through three adjustable lighting modes: cool white, natural light, and warm yellow.
- Adjust Brightness: Long press the brightness adjustment icon (usually a '+' or '-' symbol, or the power icon itself) to increase or decrease the light intensity. Release when the desired brightness is achieved.

Image: KINKUNCO Vanity (Model H01) showcasing the LED mirror with three adjustable illumination modes: cool light, natural light, and warm light.
Integrated Charging Station
The vanity includes a built-in charging station for your convenience.
- Power Outlets: Two standard electrical outlets (125V/12A) are provided for powering beauty tools like hair dryers or curling irons.
- USB Ports: Two USB ports (5V/2.1A) are available for charging mobile devices, tablets, or other USB-powered accessories.
- Ensure the vanity is properly connected to a wall outlet for the charging station to function.

Image: Close-up view of the KINKUNCO Vanity's integrated charging station, featuring two electrical outlets and two USB ports, along with small hooks for accessories.
Storage Features
This vanity offers extensive storage options to keep your items organized.
- Drawers: Six spacious drawers provide ample space for cosmetics, accessories, and personal items.
- Open Shelves: Multiple open shelves are available for displaying frequently used items or decorative pieces.
- Hidden Compartments: Two hidden compartments are located behind the mirror, ideal for storing valuable or less frequently used items discreetly.
- Accessory Hooks: Small hooks are integrated for hanging necklaces, bracelets, or other jewelry.

Image: KINKUNCO Vanity (Model H01) with all drawers and shelves open, demonstrating its extensive storage capacity for various items.

Image: KINKUNCO Vanity (Model H01) with the mirror section open, revealing hidden storage compartments behind it.
Maintenance
Proper care will ensure the longevity and appearance of your vanity.
- Cleaning: Wipe surfaces with a soft, damp cloth. Avoid harsh chemicals or abrasive cleaners that could damage the finish.
- Spills: Immediately wipe up any spills to prevent staining or damage to the engineered wood.
- Mirror Care: Clean the mirror surface with a glass cleaner and a lint-free cloth. Do not spray cleaner directly onto the mirror to avoid liquid seeping into the electrical components.
- Electrical Components: Ensure the charging station and LED mirror are unplugged before cleaning. Do not immerse any electrical parts in water.
- Inspection: Periodically check all fasteners and connections to ensure they remain tight.
Troubleshooting
| Problem | Possible Cause | Solution |
|---|---|---|
| LED mirror light does not turn on. |
|
|
| Charging station (outlets/USB) is not working. |
|
|
| Drawers are stiff or do not slide smoothly. |
|
|
Specifications
| Feature | Detail |
|---|---|
| Model | H01 |
| Brand | KINKUNCO |
| Color | White |
| Material | Engineered Wood |
| Overall Dimensions (L x W x H) | 110 x 40 x 145 cm (43.3 x 15.7 x 57.1 inches) |
| Item Weight | 10 Kilograms (22 lbs) |
| Number of Drawers | 6 |
| LED Mirror Features | 3 adjustable light modes (cool, natural, warm), adjustable brightness |
| Charging Station | 2 AC outlets (125V/12A), 2 USB ports (5V/2.1A) |
| Assembly Required | Yes (Illustrated manual included) |
Warranty and Support
KINKUNCO is committed to providing quality products and customer satisfaction. For any questions regarding assembly, operation, or if you encounter any issues with your vanity, please contact our customer support team.
- Technical Support: Our specialized technical service team is available to assist you and aims to resolve inquiries within 24 hours.
- Warranty Information: For specific warranty terms and conditions, please refer to the documentation included with your purchase or contact KINKUNCO customer service directly.
- Contact: Please refer to your purchase receipt or the KINKUNCO brand store on Amazon for contact details.