
1. Setup and Initial Installation
1.1 Package Contents
Verify that all components are present in the package:
- 2.2 Gallon Fish Tank (x1)
- 4-in-1 Filter Pump (x1)
- Power Cord (x1)
- Reusable Filter Pads (x3)
- Decorative Plants (x1 set)
- Filter Stones (x1 set)
- Instruction Manual (x1)

1.2 Assembly Instructions
Follow these steps to assemble your aquarium:
- Unpack all components and place them on a clean, flat surface.
- Assemble the 4-in-1 filter pump according to the visual guide provided. Ensure all connections are secure.
- Place the filter stones at the bottom of the tank.
- Arrange the decorative plants as desired.
- Install the filter pads into the designated compartment within the pump system.
- Carefully place the assembled pump system into the aquarium.

Important Pump Connection Note: When connecting the pump's power cable, ensure proper alignment of the arrows on the connectors. Forcing a connection without correct alignment may damage the pump.

Warm Tip: To ensure proper operation of the pump, please ensure it is fully submerged in water before plugging it in. Refer to the video tutorial for first-time use if available.
2. Operating Instructions
2.1 4-in-1 Circulation System
The aquarium features a 4-in-1 filtration water pump designed for efficient water circulation. This system maintains a clean aquatic environment and provides adequate oxygen for fish. The pump operates quietly (below 30dB).
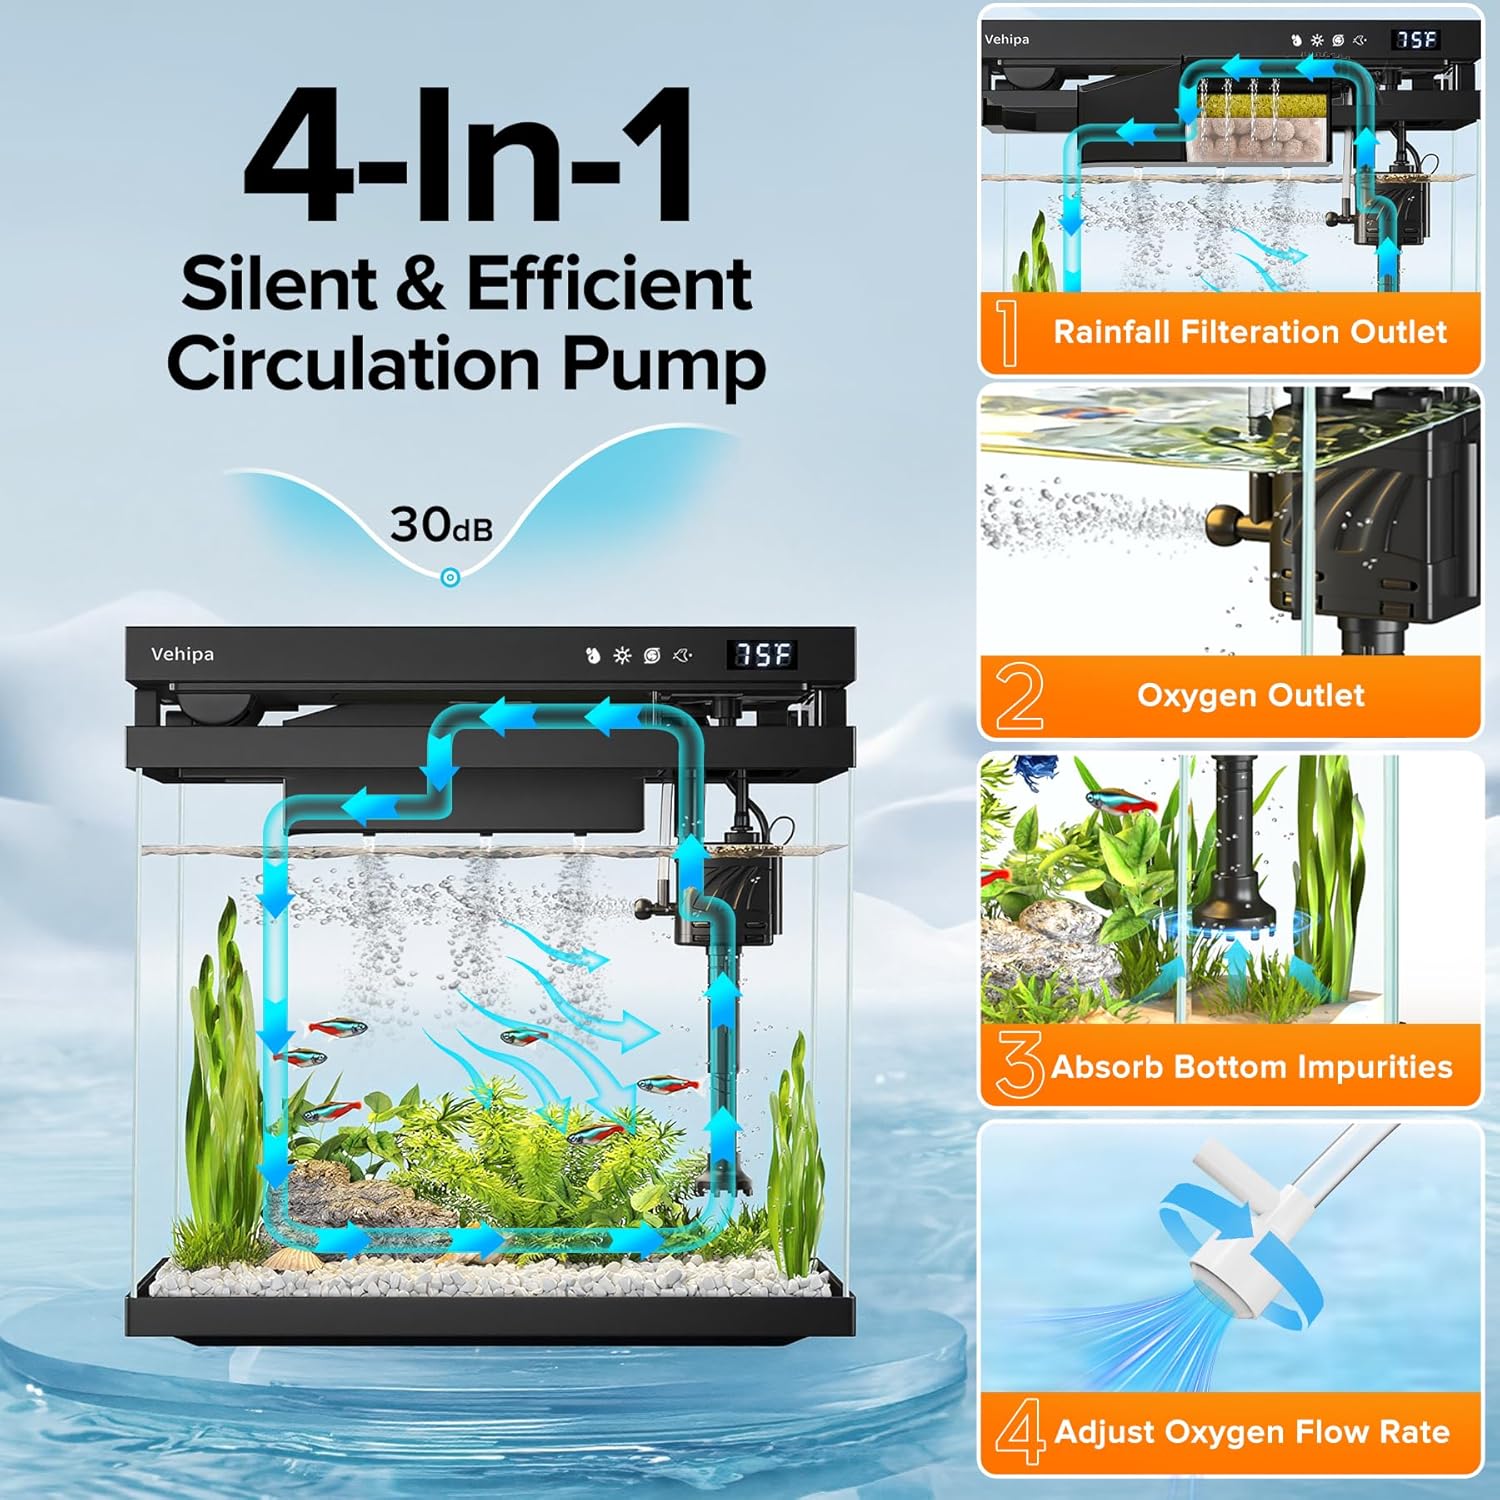
Water Pump Speed Adjustment:
- Click the pump button to cycle through three operating efficiency levels: P1, P2, P3 (P1 > P2 > P3 for water flow velocity).
- Press and hold the pump button to turn off the pump (P0).

2.2 Smart Feeding Function
The aquarium includes an automated timed feeding system with flexible frequency settings.
- Manual Feed: Double-click the feeding button to dispense food once.
- Timed Feeding Mode: Press and hold the feeding button to enter timed feeding mode. After long-pressing, single-click the feeding button to increase the automatic feeding duration, adjustable from 1 to 48 hours.

Loading Fish Food:

2.3 7-Color Adjustable LED Lighting
The aquarium supports 7 freely switchable lighting colors and includes a timer function.
- Switch Colors: Click the light button to cycle through White, Green, Red, Purple, Lake Blue, Navy Blue, Yellow.
- Auto-Cycle Lighting: L8-L10 settings provide automatic light cycling with 1s, 1.5s, or 3s intervals.
- Set Timer: Press and hold the light button for 3 seconds to configure the timer (0H/8H/12H/16H).

2.4 Smart Humidification Design
This aquarium features three adjustable smart humidification modes, allowing customization of humidification times. An independent aromatherapy built-in box allows for adding appropriate amounts of aromatherapy (not included).
- Switch Modes: Press the humidification button to switch between modes (F0/F1/F2/F3). F0 is no spray, F1 is continuous spray, F2 is 1s interval spray, F3 is 2s interval spray.
- Set Timer: Press and hold the humidification button for 3 seconds to set the humidification timer (1 Hour/2 Hours/3 Hours/4 Hours/5 Hours).

2.5 Temperature Display and Unit Switching
The aquarium features an LED display that shows the current temperature, along with indicators for humidification, LED light, water pump, and auto feeder status.

Switching Temperature Units (Fahrenheit/Celsius):
- Press and hold the Humidify button and the Light button simultaneously for 3 seconds to switch between Fahrenheit and Celsius display.

3. Maintenance
3.1 Filter Pad Replacement and Cleaning
The aquarium includes 3 reusable filter pads. Regular cleaning and replacement of these pads are essential for maintaining water quality.
- Remove the filter pads from their compartment in the pump system.
- Rinse the filter pads thoroughly under clean water to remove accumulated debris. Avoid using tap water directly if it contains chlorine; use dechlorinated water or water from the aquarium.
- Replace the cleaned filter pads. If pads are heavily soiled or damaged, replace them with new ones.
- Perform this maintenance weekly or bi-weekly, depending on the aquarium's bioload and water clarity.
3.2 General Aquarium Cleaning
Regular cleaning of the tank and its components helps ensure a healthy environment for your fish.
- Water Changes: Perform partial water changes (25-30%) weekly to remove nitrates and replenish essential minerals. Always use dechlorinated water.
- Algae Removal: Use an aquarium-safe algae scraper to clean the inner surfaces of the tank as needed.
- Substrate Cleaning: Periodically vacuum the gravel or filter stones to remove trapped waste.
- Component Cleaning: Clean the pump impeller and other removable parts of the filtration system during water changes to prevent blockages.
4. Troubleshooting
| Problem | Possible Cause | Solution |
|---|---|---|
| Pump not operating or weak flow | Not fully submerged; clogged impeller; power issue; improper connection. | Ensure pump is fully submerged. Clean impeller. Check power plug and outlet. Verify cable connection alignment (refer to Figure 1.3). |
| Automatic feeder not dispensing food | Food container empty; food jammed; incorrect settings. | Refill food container. Clear any food blockages. Recheck timed feeding settings (refer to Figure 2.3). |
| LED lights not changing colors or timer not working | Incorrect button press; power interruption. | Ensure single click for color change and long press for timer setting (refer to Figure 2.5). Check power supply. |
| Humidifier not producing mist | Water level too low; mist outlet blocked; incorrect mode. | Ensure sufficient water in the tank. Clean mist outlet. Verify humidification mode (refer to Figure 2.6). |
| Temperature display inaccurate or not changing units | Sensor issue; incorrect unit switching procedure. | Ensure temperature sensor is clear. Follow correct procedure for switching between Fahrenheit and Celsius (refer to Figure 2.8). |
If you encounter any issues during use that are not resolved by the troubleshooting steps above, please contact Vehipa customer support for technical guidance services.
5. Product Specifications
- Brand: Vehipa
- Model Number: Vehipa-8l-bk (CX-YG280-B)
- Tank Volume: 2.2 Gallons
- Material: Glass
- Product Dimensions (L x W x H): 13.7" x 7" x 13" (34.8 cm x 17.8 cm x 33 cm)
- Item Weight: 5.51 Pounds (2.5 Kilograms)
- Special Features: Self Cleaning, Transparent, Smart Humidifier, Auto Feeder, Silent Water Pump, Temperature Display, 7-Color Lighting
- Included Components: Filter (4-in-1 pump system)
- Specific Uses: Indoor
- Pet Type: Fish
6. Warranty and Support
For any product-related inquiries, technical assistance, or warranty claims, please contact Vehipa customer support. Our team is available to provide guidance and resolve any issues you may encounter with your Vehipa Smart Aquarium.
Please refer to your purchase documentation for specific warranty terms and contact information.