
Introduction
This manual provides essential instructions for the safe and effective use of your COTAO Aquasis Pressure Washer. Please read this manual thoroughly before operating the device and retain it for future reference. The Aquasis Pressure Washer is designed to connect to a standard garden hose, providing concentrated water pressure for various cleaning tasks.
Product Components
The COTAO Aquasis Pressure Washer consists of the following main components:
- Handle Assembly: Ergonomic grip with trigger for water flow control.
- Wand: Extended metal tube connecting the handle to the nozzle.
- Adjustable Nozzle: Allows for selection of various spray patterns.
- Hose Connector: For attaching to a standard garden hose.
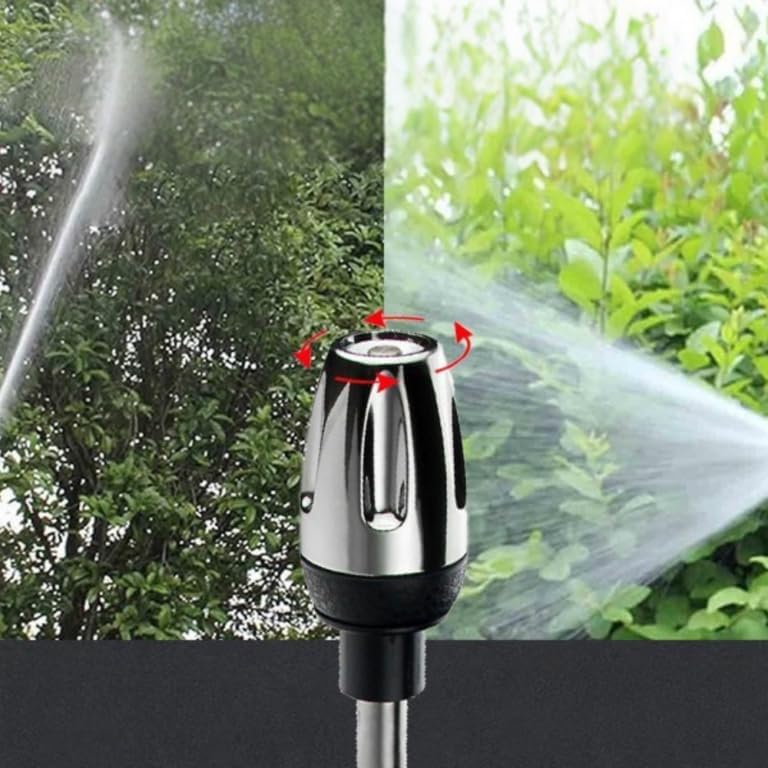
Figure 1: Overview of the Aquasis Pressure Washer, demonstrating its handheld design.
Setup Instructions
Follow these steps to prepare your Aquasis Pressure Washer for use:
- Connect to Water Source: Take your standard garden hose and securely screw its end onto the hose connector located at the base of the pressure washer handle. Ensure the connection is tight to prevent leaks. No additional tools are typically required for this step.
- Turn on Water Supply: Once the hose is connected, slowly turn on the water supply from your spigot. Check for any leaks at the connection point.
- Inspect Nozzle: Ensure the adjustable nozzle is securely attached to the end of the wand.

Figure 2: Proper connection of a garden hose to the pressure washer.
Operating Instructions
Once set up, operate your pressure washer as follows:
- Adjust Spray Pattern: Rotate the adjustable nozzle at the end of the wand to select your desired spray intensity and pattern. You can choose from a concentrated jet for stubborn dirt to a wide fan spray for rinsing larger areas.
- Initiate Water Flow: Aim the nozzle away from yourself and others. Squeeze the trigger on the handle to begin the water flow. Release the trigger to stop the flow.
- Begin Cleaning: Direct the spray towards the surface you wish to clean. Maintain an appropriate distance to avoid damaging the surface. For best results, start with a wider spray and adjust to a narrower jet as needed for tougher spots.

Figure 3: Rotating the nozzle to change the spray pattern.

Figure 4: Examples of various spray patterns achievable with the adjustable nozzle.

Figure 5: Pressure washer in operation, cleaning a patio.
Maintenance
Proper maintenance ensures the longevity and optimal performance of your pressure washer:
- After Each Use: Turn off the water supply and squeeze the trigger to release any remaining pressure in the hose and wand.
- Clean Nozzle: Periodically check the nozzle for any debris or blockages. Clean with a small pin or a soft brush if necessary to maintain consistent spray patterns.
- Storage: Store the pressure washer in a dry, frost-free location. Disconnect the garden hose and drain any water from the unit before storing.
- Inspect Connections: Regularly check all connections for wear or damage. Replace worn gaskets or connectors as needed.
Troubleshooting
If you encounter issues with your Aquasis Pressure Washer, refer to the following common problems and solutions:
- Low Water Pressure:
- Ensure the water supply is fully open.
- Check for kinks or blockages in the garden hose.
- Verify the nozzle is not clogged.
- Water Leaks from Connections:
- Tighten all hose connections securely.
- Inspect rubber gaskets or O-rings for damage and replace if necessary.
- Inconsistent Spray Pattern:
- Clean the nozzle tip to remove any debris.
- Ensure the nozzle is fully rotated to the desired setting.
Specifications
| Feature | Detail |
|---|---|
| Model Number | T8SQ |
| Brand | COTAO |
| Power Source | Hand-powered (relies on garden hose pressure) |
| Product Dimensions (L x W x H) | 10L x 10W x 10H millimeters (approximate) |
| Item Weight | 200 g (approximate) |
| Country of Origin | China |
Warranty and Support
For information regarding warranty coverage, returns, or technical support, please contact the retailer or the manufacturer, COTAO. Retain your proof of purchase for any warranty claims.