
Introduction
Thank you for choosing the Insoma 4-Zone Water Timer. This device is designed to automate your garden watering, providing efficient and flexible irrigation for various applications. Please read this manual carefully before installation and operation to ensure proper use and longevity of your product.
Product Features
- 4 Independent Watering Zones: Customize distinct watering plans for different areas like gardens, greenhouses, lawns, or specific plant types. Zones operate sequentially.
- Automatic Watering: Program start times, watering frequency (1H/3H/6H/12H or 1-30 days), and duration (1-360 minutes). Supports 12-hour or 24-hour time formats.
- Manual Watering Mode: Allows immediate watering without disrupting preset schedules. Duration adjustable from 1 to 360 minutes.
- Rain Delay Function: Pause programmed schedules for 1 to 15 days to conserve water during rainy periods.
- Child Lock: Prevents accidental program changes by children or pets.
- IPX5 Waterproof Design: Constructed with anti-UV coating and anti-rust materials, featuring an upgraded waterproof technology and a sealed battery cover for outdoor use.
- Clear LCD Display: Large screen shows all watering information, including time, frequency, power, and other details for easy readability.
- Brass Inlet & Outlet: Durable brass connections for enhanced reliability.
Setup and Installation
- Battery Installation:
Open the battery compartment on the back of the timer. Insert 4 new AA 1.5V Alkaline batteries (not included), ensuring correct polarity. Close the battery cover securely to maintain the IPX5 waterproof seal.
- Connecting to Faucet:
Ensure the faucet is turned off. Install the brass thread adapter if necessary, followed by the white rubber gasket for a leak-proof seal. Attach the water timer securely to your outdoor faucet. Hand-tighten only to prevent damage.
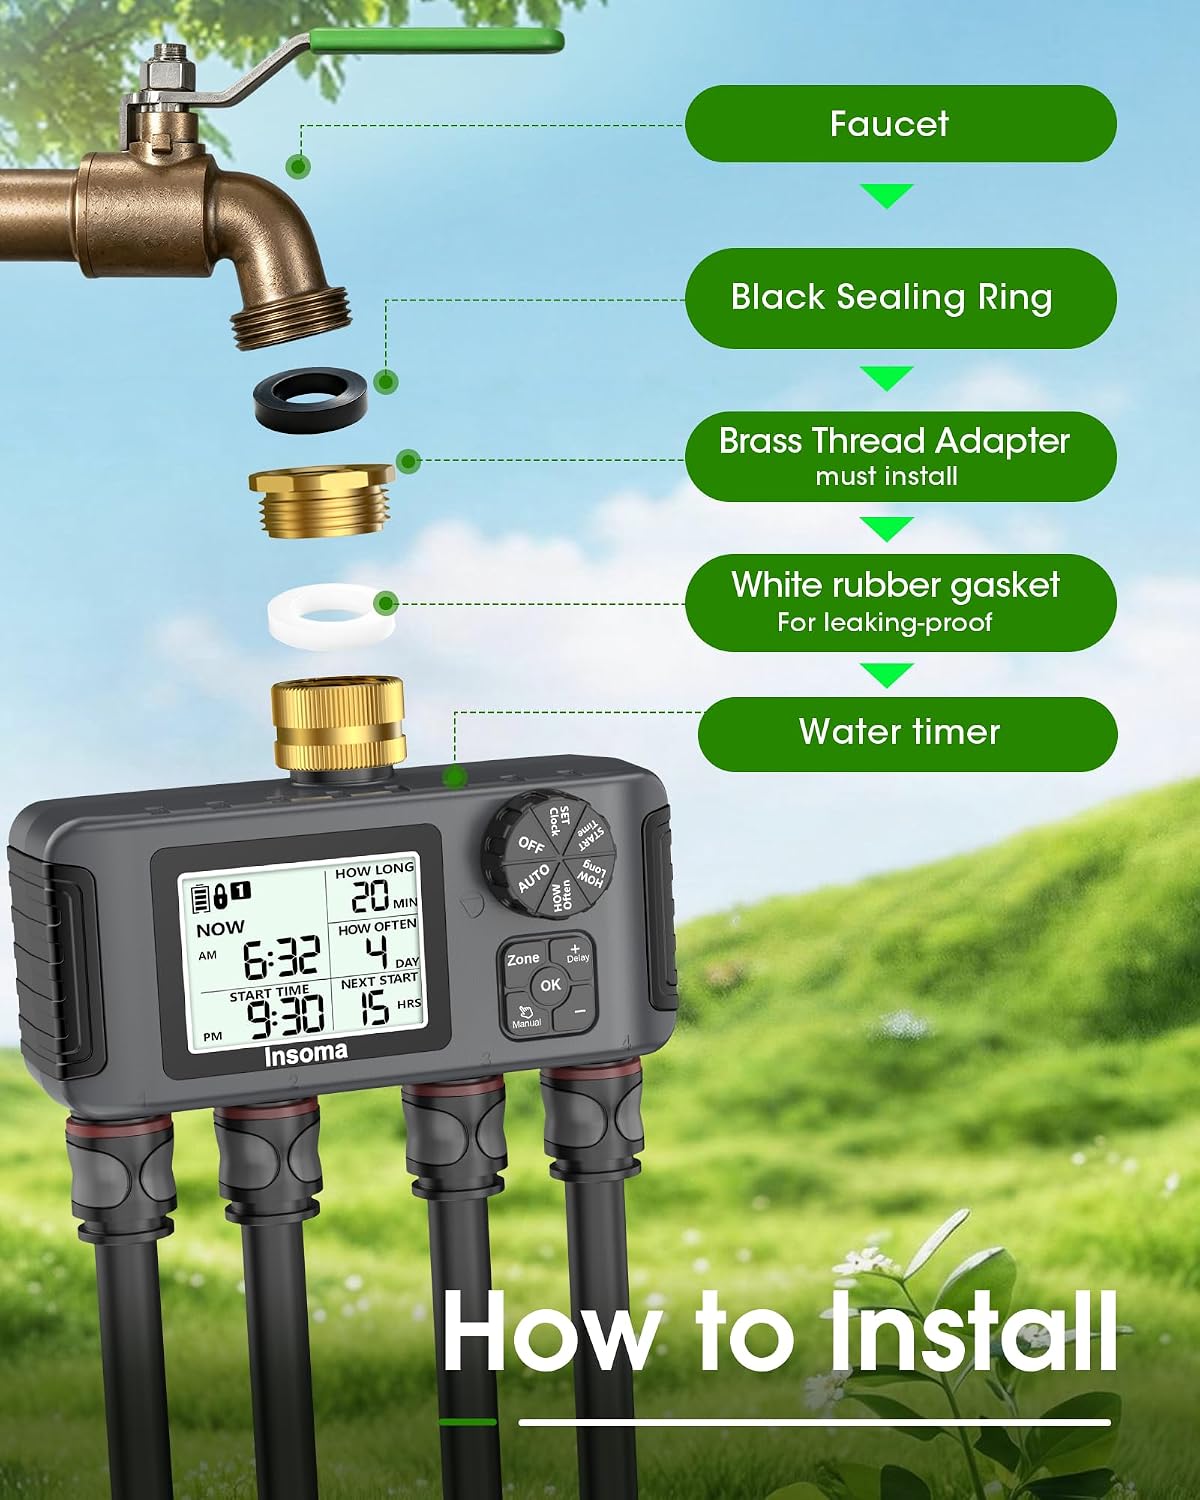
Figure 1: Installation Diagram. This image illustrates the correct sequence for connecting the water timer to a faucet, highlighting the use of a sealing ring, brass adapter, and gasket to prevent leaks.
- Connecting Hoses:
Attach your garden hoses to the four independent outlets at the bottom of the timer. Ensure connections are tight to prevent leaks.
- Initial Power On:
Once batteries are installed, the LCD screen will light up. Set the current time and day as prompted.
Operating Modes
1. Automatic Watering Mode
This mode allows you to set a recurring watering schedule for each zone.
- Set Clock: Use the dial to navigate to "SET CLOCK" and adjust the current time (12-hour or 24-hour format).
- Select Zone: Press the "Zone" button to select the desired watering zone (Zone 1, 2, 3, or 4).
- Set Start Time: Navigate to "START TIME" and set when you want watering to begin for the selected zone.
- Set How Often (Frequency): Navigate to "HOW OFTEN" and choose the watering frequency: every 1H/3H/6H/12H or every 1 to 30 days.
- Set How Long (Duration): Navigate to "HOW LONG" and set the watering duration from 1 to 360 minutes.
- Activate Auto Mode: Turn the dial to "AUTO" to activate the programmed schedule. The zones will water sequentially based on their individual start times.

Figure 2: Programmable Watering Schedule. This image displays the timer's screen with options for setting the clock, start time, watering frequency, and duration.

Figure 3: Four Independent Irrigation Areas. This image illustrates how the 4-zone timer can manage watering for different sections of a garden independently.
2. Manual Watering Mode
Use this mode for immediate, on-demand watering without affecting your programmed schedule.
- Turn the dial to "MANUAL".
- Press the "Zone" button to select the desired zone for manual watering.
- Adjust the watering duration from 1 to 360 minutes using the +/- buttons.
- Press "OK" to start manual watering.
- To stop manual watering, turn the dial to "OFF" or press "OK" again.

Figure 4: Manual Watering Mode. This image shows the timer in manual mode, allowing for immediate watering with a customizable duration.
3. Rain Delay Mode
Pause your automatic watering schedule during rainy weather to prevent overwatering and conserve water.
- Turn the dial to "AUTO".
- Press the "Delay" button.
- Use the +/- buttons to select the delay duration (1 to 15 days).
- Press "OK" to confirm. The timer will resume its programmed schedule automatically after the delay period.

Figure 5: Rain Delay Mode. This image demonstrates the rain delay function, which pauses watering for a set period during rainy conditions, highlighting the timer's IPX5 waterproof rating.
4. Child Lock Function
Activate the child lock to prevent unintended changes to your watering programs.
- To activate: While in any mode, press and hold the "OK" button for 3 seconds until a lock icon appears on the screen.
- To deactivate: Press and hold the "OK" button for 3 seconds again until the lock icon disappears.

Figure 6: Child Lock Function. This image illustrates the child lock feature, which prevents accidental changes to the timer's settings.
Maintenance
- Battery Replacement: Replace batteries every 6 months or when the low battery indicator appears on the screen. Always use new AA 1.5V Alkaline batteries.
- Filter Cleaning: The water inlet features a built-in metal filter. Periodically check and clean this filter to prevent debris from entering the timer and affecting water flow.
- Winter Storage: Before the first frost, remove the timer from the faucet, remove the batteries, and store the unit indoors in a dry, frost-free location.
- Gasket Inspection: Regularly inspect all gaskets and O-rings for wear and tear. Replace if damaged to maintain a watertight seal.

Figure 7: Enhanced Water Inlet. This image highlights the built-in metal filter and the durable, rotatable brass inlet designed for easy installation and maintenance.
Troubleshooting
| Problem | Possible Cause | Solution |
|---|---|---|
| Timer does not turn on or display is blank. | Dead or incorrectly installed batteries. | Replace with 4 new AA 1.5V Alkaline batteries, ensuring correct polarity. |
| Water leaks from the faucet connection. | Loose connection, missing/damaged gasket, or improper adapter installation. | Ensure the connection is tight. Check if the white rubber gasket is properly seated. Verify the brass thread adapter is fully engaged. Add an extra hose connection washer if needed. |
| Water leaks from hose outlets. | Loose hose connection or damaged O-ring in the hose. | Tighten hose connections. Inspect and replace O-rings in hoses if necessary. |
| Timer does not water at scheduled time. | Timer is in "OFF" or "MANUAL" mode, Rain Delay is active, or low battery. | Ensure the dial is set to "AUTO". Check if Rain Delay is active. Replace batteries if low. Verify start time, frequency, and duration settings for each zone. |
| Difficulty setting time or zones. | Unfamiliarity with controls. | Refer to the "Operating Modes" section for detailed instructions on setting the clock, zones, and watering parameters. Practice navigating the menu. |
| Water flow is weak or inconsistent. | Clogged filter or low water pressure. | Clean the built-in metal filter at the water inlet. Ensure adequate water pressure from the faucet. |
Specifications
| Model Number | SGW18-TT-Z1 |
| Brand | Insoma |
| Colour | Black |
| Material | Metal (Brass Inlet/Outlet) |
| Product Dimensions | 13.8D x 20W x 8.2H centimetres |
| Item Weight | 581 g |
| Battery Type | 4 x AA 1.5V Alkaline batteries (not included) |
| Battery Life | Approximately 180 days (6 months) |
| Waterproof Rating | IPX5 |
| Number of Zones | 4 Independent Zones |
Warranty and Support
For warranty information or technical support, please refer to the product packaging or contact Insoma customer service directly. Keep your purchase receipt as proof of purchase.


