
1. Introduction
Thank you for choosing the FORGING MOUNT Single Monitor Arm. This manual provides detailed instructions for the safe and efficient installation, operation, and maintenance of your monitor arm. Please read this manual thoroughly before installation and keep it for future reference.
2. Safety Information
Always follow basic safety precautions when installing and using this product to reduce the risk of injury or damage. Ensure your desk surface is strong enough to support the combined weight of the monitor arm and your monitor. Do not exceed the maximum weight capacity.
- Ensure all components are present and undamaged before assembly.
- Do not overtighten screws, as this may cause damage.
- Keep children and pets away during installation.
- If you have any doubts about installation, consult a qualified professional.
3. Package Contents
Verify that all parts listed below are included in your package. If any parts are missing or damaged, please contact customer support.

Figure 3.1: All components included in the package.
- Upper Arm (x1)
- Lower Arm (x1)
- Base (x1)
- VESA Plate (x1)
- C-Clamp (x1)
- Soft Pads (x3)
- Various Screws (D6, M6x12, M5x30, M5x12, M4x30, M4x12, D5, M6x10)
- Allen Wrenches (4/5 wrench) (x1)
4. Specifications
| Feature | Specification |
|---|---|
| Model Number | FM4578 |
| Screen Size Compatibility | 13-32 inches |
| Weight Capacity | 1-10 kg (2.2-22 lbs) |
| VESA Compatibility | 75x75mm, 100x100mm |
| Mounting Type | Tabletop (C-Clamp or Grommet) |
| Tilt Angle | Up 90°, Down 45° |
| Swivel Angle | 180° |
| Rotation Angle | 360° |
| Material | Steel |
| Max Extension | 57.1 cm |
| Max Height | 44.5 cm |

Figure 4.1: Monitor size and weight compatibility.
5. Setup and Installation
The monitor arm offers two installation methods: C-clamp and Grommet mount. Choose the method suitable for your desk.
5.1. Choose Your Mounting Method
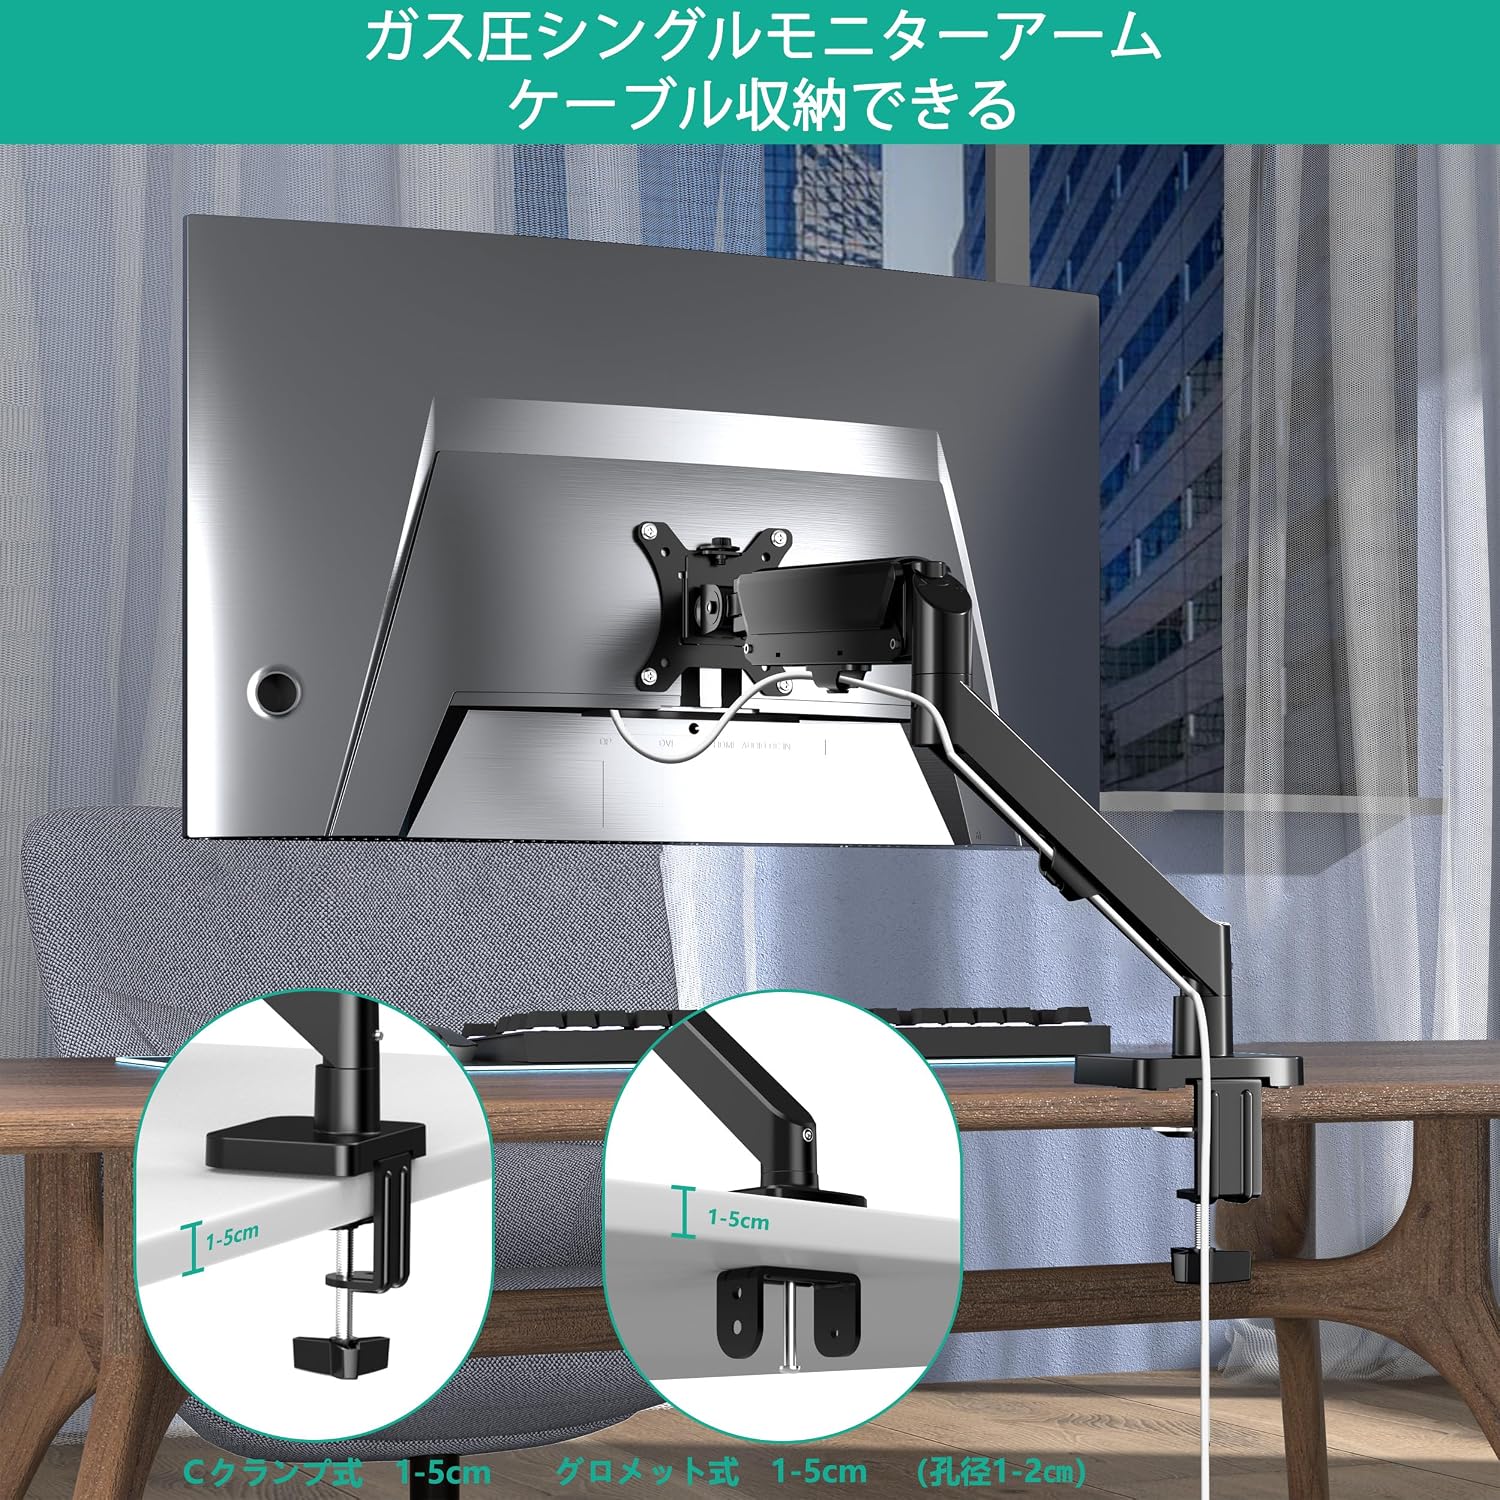
Figure 5.1: C-Clamp and Grommet mounting options.
5.2. C-Clamp Installation
- Attach the C-clamp to the base of the monitor arm.
- Position the C-clamp on the edge of your desk. Ensure the desk thickness is between 1-5 cm.
- Tighten the clamp screw until the base is securely fastened to the desk. Do not overtighten.
5.3. Grommet Installation
- If your desk has a grommet hole (1-2 cm diameter), insert the grommet base through the hole. Ensure the desk thickness is between 1-5 cm.
- Secure the base from underneath the desk using the provided plate and nut.
5.4. Attaching the Monitor
- Attach the VESA plate to the back of your monitor using the appropriate screws (M4x12, M5x12, M6x12, M6x10). Ensure the screws are tightened securely.
- Slide the VESA plate with the attached monitor onto the arm's mounting head.
- Secure the monitor to the arm by tightening the safety screw on the VESA plate.

Figure 5.2: Attaching the VESA plate and monitor.
6. Operating Instructions and Adjustments
The gas spring system allows for smooth and effortless adjustments to your monitor's position.
6.1. Gas Spring Tension Adjustment
The gas spring tension needs to be adjusted according to your monitor's weight for optimal performance.
- Ensure the monitor is attached to the arm.
- Position the arm horizontally.
- Use the provided Allen key to adjust the gas pressure screw located on the arm.
- Turn clockwise (-) to decrease tension for lighter monitors.
- Turn counter-clockwise (+) to increase tension for heavier monitors.
- Adjust until the monitor stays in place when moved and can be repositioned with minimal effort.

Figure 6.1: Gas spring tension adjustment.
6.2. Monitor Position Adjustment
The arm allows for extensive movement to achieve your desired viewing angle and distance.
- Height Adjustment: Gently push or pull the monitor up or down.
- Tilt: Adjust the monitor screen vertically from 90° upwards to 45° downwards.
- Swivel: Rotate the monitor horizontally up to 180°.
- Rotation: Rotate the monitor 360° for landscape or portrait orientation.
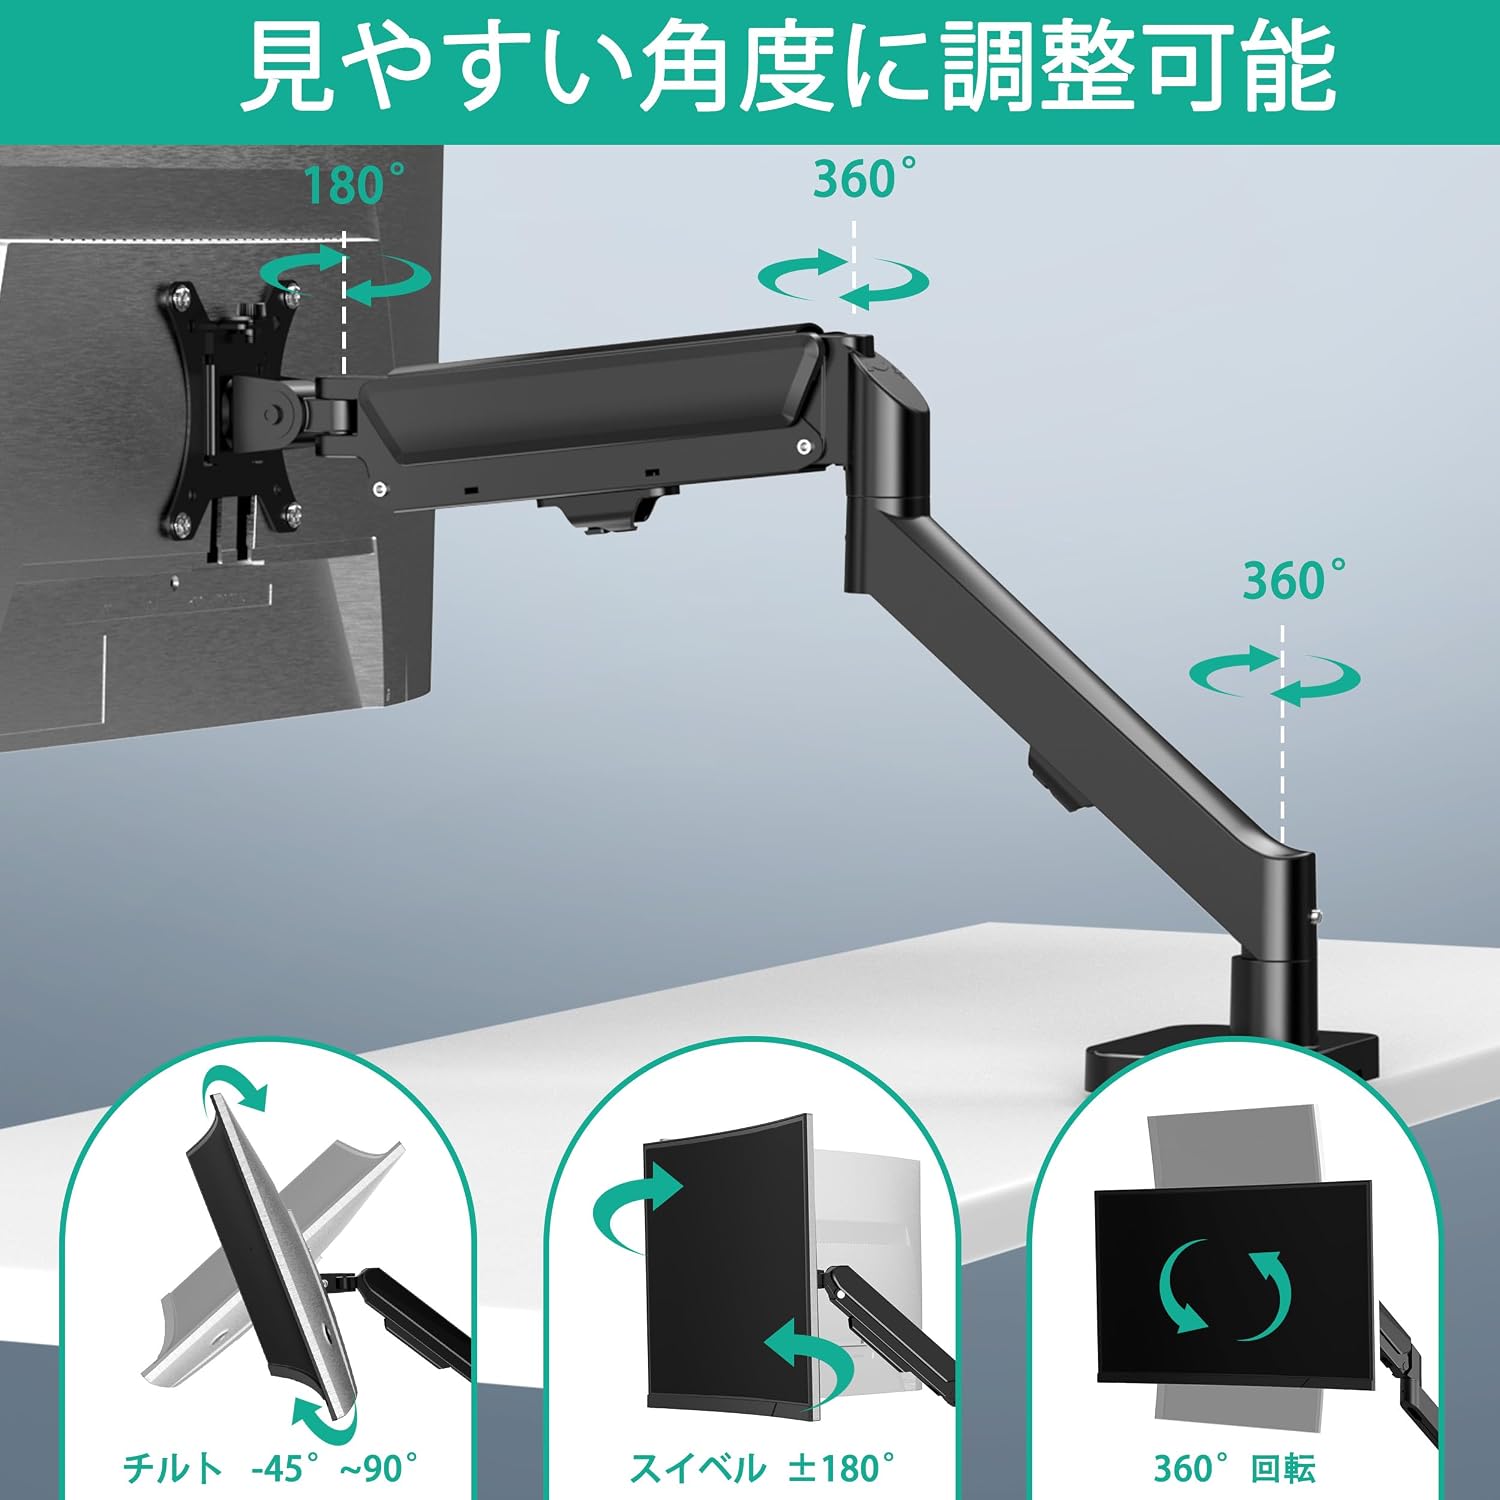
Figure 6.2: Multi-angle adjustment capabilities.

Figure 6.3: Maximum height and extension range.
7. Cable Management
The monitor arm features integrated cable management to keep your workspace tidy.
- Route your monitor cables (power, HDMI, etc.) along the underside of the arm.
- Use the integrated cable clips or covers to secure the cables within the arm structure.
- Ensure cables have enough slack to allow for full range of motion without tension.

Figure 7.1: Cable management system.
8. Maintenance
Regular maintenance ensures the longevity and smooth operation of your monitor arm.
- Periodically check all screws and connections to ensure they are secure.
- Clean the arm with a soft, damp cloth. Avoid abrasive cleaners.
- Do not lubricate the gas spring mechanism unless specifically instructed by the manufacturer.
9. Troubleshooting
If you encounter issues with your monitor arm, refer to the following common problems and solutions:
| Problem | Possible Cause | Solution |
|---|---|---|
| Monitor sags or does not stay in position. | Gas spring tension is too low for monitor weight. | Increase gas spring tension using the Allen key (turn counter-clockwise). |
| Monitor floats up or is difficult to push down. | Gas spring tension is too high for monitor weight. | Decrease gas spring tension using the Allen key (turn clockwise). |
| Arm feels unstable or wobbly. | Desk clamp/grommet mount is not tight enough. | Ensure the C-clamp or grommet mount is securely tightened to the desk. Check all arm connections. |
| Monitor cannot be tilted or rotated. | Adjustment screws are too tight. | Loosen the tilt or rotation adjustment screws slightly. |
10. Warranty and Support
This FORGING MOUNT monitor arm comes with a 1-year manufacturer's warranty from the date of purchase. This warranty covers defects in materials and workmanship under normal use.
The warranty does not cover:
- Damage caused by improper installation or use.
- Damage caused by exceeding the weight capacity.
- Normal wear and tear.
- Unauthorized modifications or repairs.
For warranty claims or technical support, please contact FORGING MOUNT customer service through your retailer or the official website. Please have your purchase receipt and model number (FM4578) ready.


