
1. Important Safety Instructions
When using electrical appliances, basic safety precautions should always be followed to reduce the risk of fire, electric shock, and injury to persons. Read all instructions carefully before operating this appliance.
- Read All Instructions: Familiarize yourself with the appliance's operation and safety features.
- Hot Surfaces: The appliance surfaces become hot during and after operation. Use oven mitts or gloves when handling hot materials. Do not touch hot surfaces directly.
- Electrical Safety: Ensure the voltage rating matches your household power supply. Do not immerse the cord, plug, or appliance in water or other liquids.
- Supervision: Close supervision is necessary when any appliance is used by or near children.
- Proper Placement: Place the appliance on a stable, heat-resistant surface. Ensure adequate clearance (at least 6 inches) on all sides for proper ventilation.
- Avoid Flammable Materials: Do not place any flammable materials (e.g., paper, cardboard, plastic) in or on the appliance.
- Unplug When Not in Use: Always unplug the appliance from the outlet when not in use and before cleaning. Allow it to cool before handling parts.
- Do Not Operate with Damaged Cord: Do not operate any appliance with a damaged cord or plug, or after the appliance malfunctions or has been damaged in any manner.
- Food Safety: Do not overfill the oven. Ensure food is cooked to safe internal temperatures.
2. Product Overview
The OLIXIS 29.6QT Air Fryer Toaster Oven Combo is a versatile countertop appliance designed for various cooking tasks. It features a dual-door design for convenient access and a smart probe for precise temperature monitoring.
Key Features:
- Dual-Door Design: Provides separate access to upper and lower racks, minimizing heat loss.
- 12-in-1 Smart Presets: Includes functions for Broil, Bake, Toast, Bread, Cake, Pizza, Steak, Chicken, Chips, Tart, Fermentation, and Unfreeze.
- Smart Probe: For accurate internal food temperature measurement.
- High Temperature Cooking: Reaches up to 450°F for efficient cooking.
- Large Capacity: 29.6-quart interior suitable for family-sized meals.
- Intuitive Controls: Features a digital display with indicator lights and a control dial.
Included Accessories:
- Rotisserie Set
- Handle
- Fry Basket
- Baking Pan
- Wire Rack
- Smart Probe
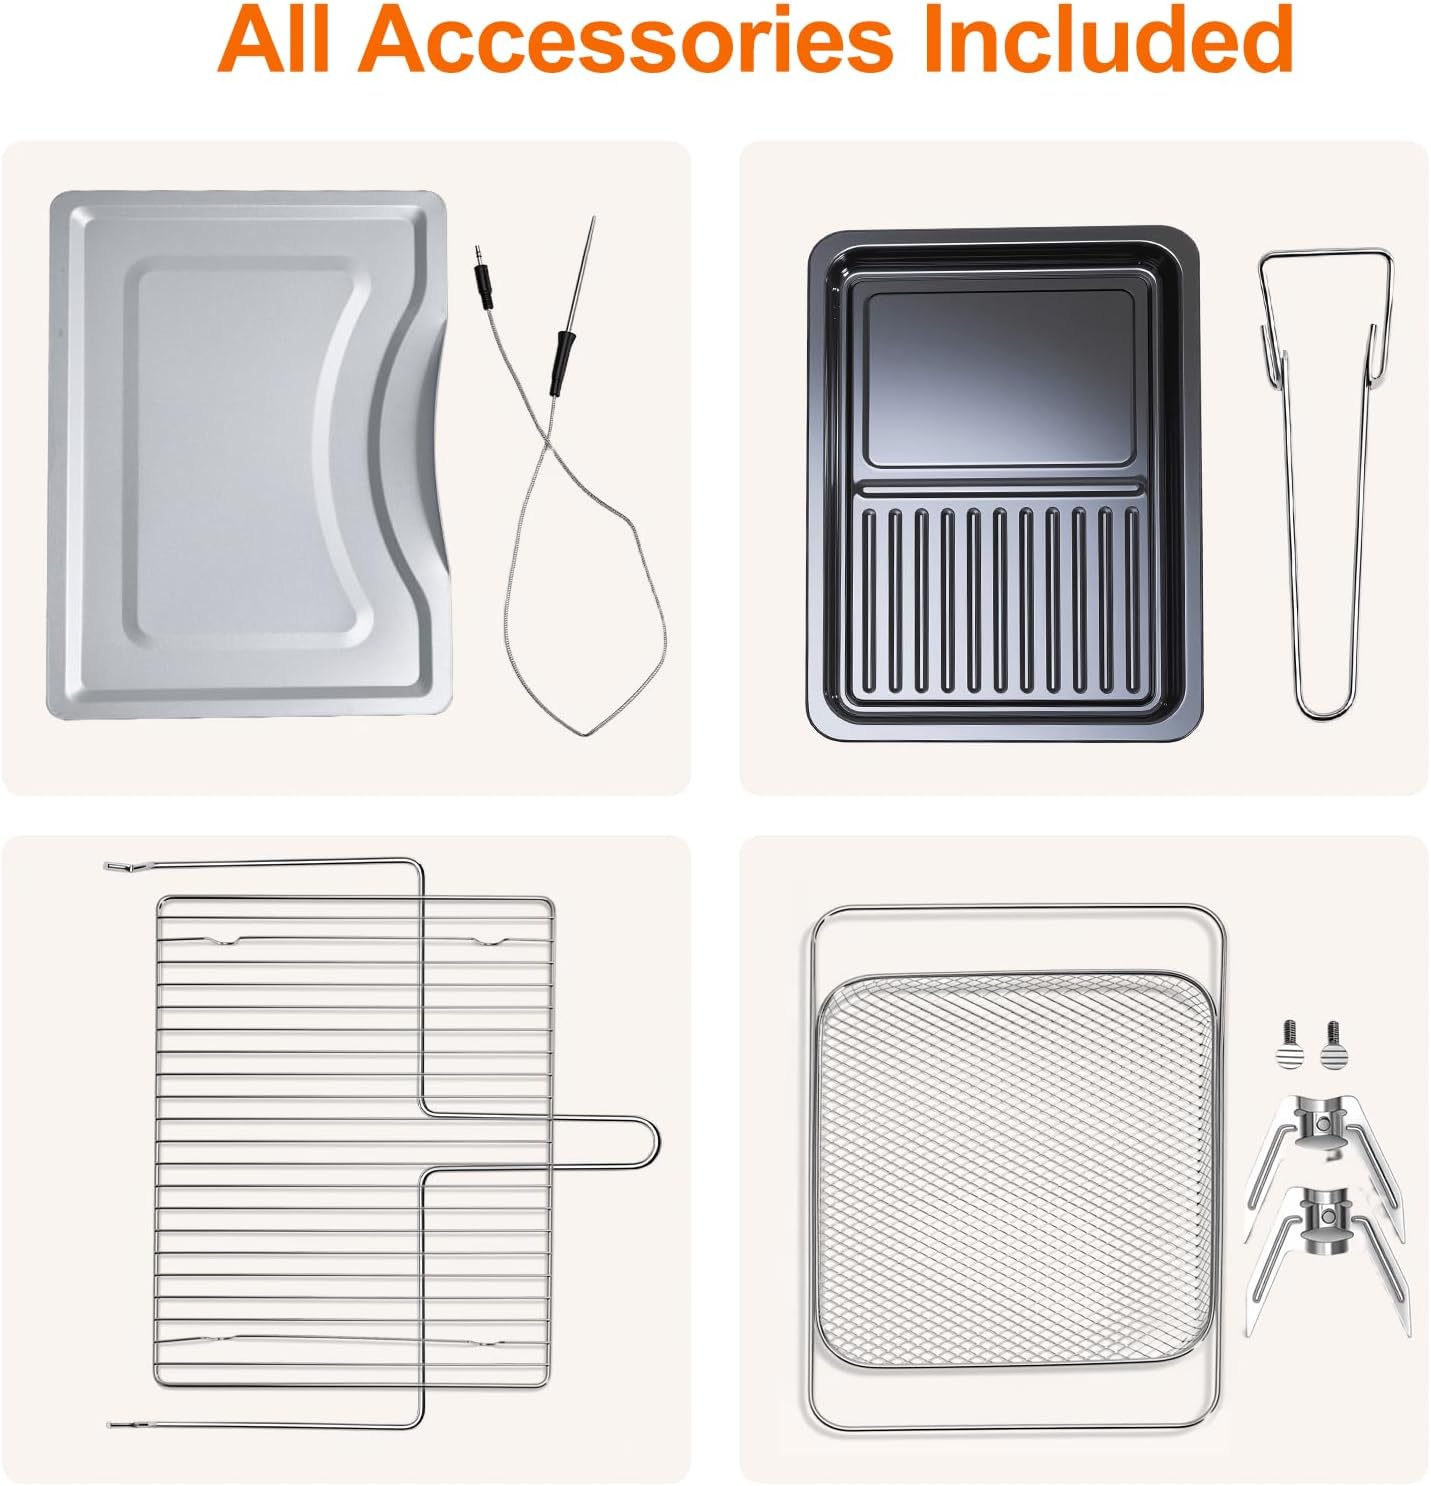
Image: All included accessories, including the rotisserie set, handle, fry basket, baking pan, wire rack, and smart probe.

Image: Close-up views highlighting the HD screen, precise control system, stainless steel construction, and the double door feature of the oven.
3. Setup and First Use
Unpacking:
- Carefully remove the appliance and all accessories from the packaging.
- Remove any protective film, stickers, or packing materials from the appliance.
- Inspect the appliance for any damage. Do not use if damaged.
Placement:
- Place the oven on a flat, stable, heat-resistant surface.
- Ensure there is at least 6 inches (15 cm) of clearance on all sides (top, back, and sides) for proper air circulation.
- Do not place the oven near a wall or under cabinets that are susceptible to heat damage.
Initial Cleaning:
- Wash all accessories (fry basket, baking pan, wire rack, rotisserie set, handle, smart probe) in warm, soapy water. Rinse thoroughly and dry completely.
- Wipe the interior and exterior of the oven with a damp cloth. Do not use abrasive cleaners.
First Use (Burn-Off):
Before cooking food, perform a burn-off cycle to eliminate any manufacturing odors.
- Plug the oven into a grounded electrical outlet.
- Set the oven to the 'Bake' function at 400°F (200°C) for 15-20 minutes.
- Ensure the area is well-ventilated during this process. A slight odor or smoke is normal during the first use.
- After the cycle, turn off the oven, unplug it, and allow it to cool completely.
4. Operating Instructions
Control Panel Overview:

Image: Detailed view of the control panel, showing the digital display, function buttons, and rotary dial for settings adjustment.
- Digital Display: Shows temperature, time, and selected function.
- Function Buttons: Select from 12 preset cooking functions.
- Start/Stop Button: Initiates or pauses cooking.
- Detection Button: Activates the smart probe function.
- Menu Dial: Used to adjust time, temperature, and navigate menu options.
Basic Operation:
- Power On: Plug the appliance into a grounded outlet. The display will illuminate.
- Select Function: Press the desired function button (e.g., Bake, Air Fry, Toast).
- Adjust Settings: Use the Menu Dial to adjust the temperature and cooking time as needed. Press the dial to switch between temperature and time adjustment.
- Start Cooking: Press the Start/Stop button to begin the cooking cycle.
- Pause/Stop: Press the Start/Stop button again to pause or end the cooking cycle.
Using the Smart Probe:
The smart probe ensures food reaches the desired internal temperature.
- Insert the smart probe into the thickest part of the food, avoiding bone or gristle.
- Plug the probe into the designated port on the oven.
- Select a cooking function and press the 'Detection' button.
- Use the Menu Dial to set the target internal temperature.
- Press Start/Stop. The oven will cook until the target temperature is reached, then automatically shut off or switch to a keep-warm function.
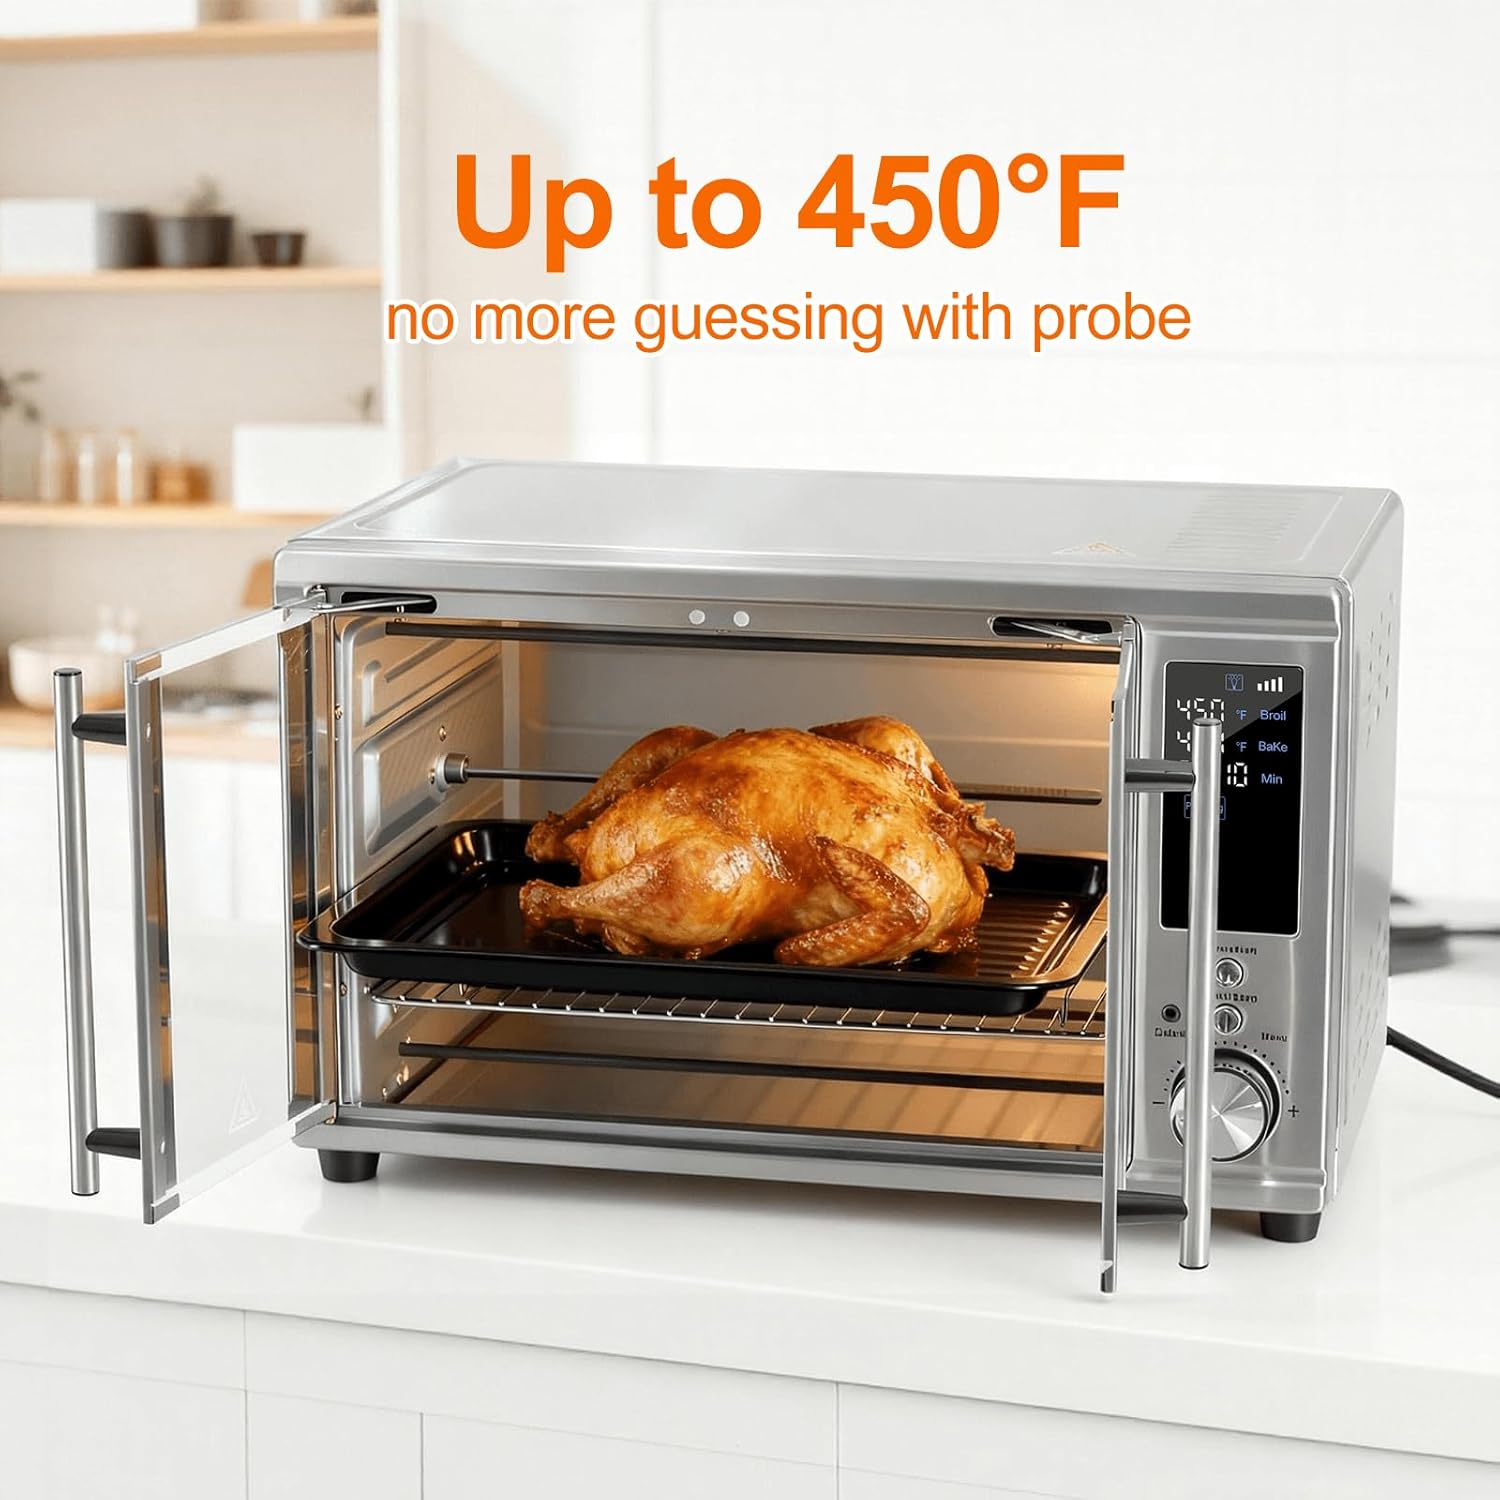
Image: A whole chicken roasting inside the oven, demonstrating the use of the smart probe for precise temperature control. The display shows a temperature of 450°F.
Using the Dual-Door Design:
The dual doors allow for independent access to the upper and lower cooking zones.
- To access the upper rack, open only the top door.
- To access the lower rack, open only the bottom door.
- For full access, open both doors simultaneously. This design helps maintain oven temperature when only one section needs attention.
Video: A brief demonstration of the OLIXIS Air Fryer Toaster Oven Combo, showcasing its dual-door functionality and overall design. This video is provided by the seller, AOSAI TECHNOLOGY (HONG KONG) LIMITED.
5. Maintenance and Cleaning
Regular cleaning and maintenance will ensure the longevity and optimal performance of your appliance.
General Cleaning:
- Always unplug the oven and allow it to cool completely before cleaning.
- Do not use abrasive cleaners, scouring pads, or metal utensils on any part of the oven, as they can damage surfaces.
- Wipe the exterior with a damp cloth and mild detergent. Dry thoroughly.
Interior Cleaning:
- Wipe the interior walls with a damp cloth and mild, non-abrasive cleaner.
- For stubborn stains, a paste of baking soda and water can be applied, left for a few minutes, then wiped away.
- Clean the heating elements carefully with a damp cloth, ensuring they are completely dry before next use.
Accessory Cleaning:
- All removable accessories (fry basket, baking pan, wire rack, rotisserie set, handle, smart probe) are dishwasher safe for easy cleaning.
- Alternatively, wash them in warm, soapy water, rinse, and dry thoroughly.

Image: Various oven accessories, including the fry basket and baking pan, being loaded into a dishwasher, illustrating their ease of cleaning.
Storage:
Ensure the oven is clean and completely dry before storing. Store in a cool, dry place.
6. Troubleshooting
Refer to this section for common issues and their solutions.
| Problem | Possible Cause | Solution |
|---|---|---|
| Appliance does not turn on. | Not plugged in; power outlet malfunction; circuit breaker tripped. | Ensure the power cord is securely plugged into a working outlet. Check your circuit breaker. |
| Food not cooking evenly. | Overcrowding; incorrect rack position; uneven food placement. | Avoid overcrowding the oven. Use the recommended rack position for the selected function. Rotate food halfway through cooking. |
| Smoke or odor during cooking. | Food residue; high-fat foods; first use burn-off. | Clean the oven interior and accessories thoroughly. For high-fat foods, use a drip tray. A slight odor is normal during initial use. |
| Smart probe not working. | Probe not fully inserted; probe damaged. | Ensure the probe is fully inserted into both the food and the oven port. If still not working, contact customer support. |
7. Specifications
| Feature | Specification |
|---|---|
| Model Number | AH-KKX1D01-28SR |
| Capacity | 29.6 Quarts (29L) |
| Product Dimensions (D x W x H) | 19" x 13.8" x 8.3" |
| Wattage | 1600 Watts |
| Temperature Range | Up to 450°F |
| Control Type | Button Control with Rotary Dial |
| Material | Stainless Steel |
| Item Weight | 21 Pounds |
8. Warranty and Support
Warranty Information:
This OLIXIS appliance comes with a limited manufacturer's warranty. Please refer to the warranty card included in your product packaging for specific terms, conditions, and duration of coverage. Keep your purchase receipt as proof of purchase for warranty claims.
Customer Support:
For technical assistance, troubleshooting not covered in this manual, or warranty inquiries, please contact OLIXIS customer support. Contact details can typically be found on the product packaging, warranty card, or the official OLIXIS website.
When contacting support, please have your product model number (AH-KKX1D01-28SR) and purchase date ready.
