
Introduction
This manual provides detailed instructions for the assembly, operation, and maintenance of your Homiflex 71" L-Shaped Electric Standing Desk. Please read this manual thoroughly before assembly and use to ensure safe and efficient operation. Keep this manual for future reference.
Safety Information
WARNING:
- Always ensure the desk is properly assembled and anchored to the floor.
- Do not exceed the weight limit of 165 lbs (75 kg) for the desktop.
- Be cautious when adjusting the desk height to prevent injury.
- For L-shaped desks, ensure proper placement to maintain stability.
- Keep children and pets away from the desk during height adjustment.
- Ensure all cables are managed to prevent entanglement during movement.
Product Overview
The Homiflex 71" L-Shaped Electric Standing Desk is designed to provide a versatile and ergonomic workspace. Key features include:
- Spacious L-Shaped Desktop: A 70.9-inch main desktop combined with a 47.2-inch return for ample workspace.
- Integrated Hutch: A 63-inch tall bookshelf with sliding barn doors for organized storage.
- Electric Height Adjustment: Smooth transition between sitting and standing positions with 4 memory presets (28.3" to 46.5").
- Versatile Storage: Two standard drawers and one large file drawer for A4/Letter size folders.
- Smart Power Management: Built-in charging station with 4 AC outlets, 1 USB port, and 1 Type-C port.
- LED Ambience: Remote-controlled LED strips to customize lighting.
- Sturdy Construction: Engineered wood with a stable frame, supporting up to 165 lbs.

Image: The Homiflex L-shaped electric standing desk, highlighting its large desktop and hutch with sliding doors. A user is seated at the desk, demonstrating its functional layout.
Setup and Assembly
Assembly of the Homiflex L-Shaped Electric Standing Desk requires careful attention to detail. It is recommended to have two people for assembly. Please follow the included assembly instructions provided in the packaging. Ensure all components are present before beginning.
- Unpack Components: Carefully remove all parts from the packaging and lay them out on a clean, soft surface to prevent scratches. Verify all parts against the parts list in the separate assembly guide.
- Assemble Base Frame: Begin by assembling the main desk frame and the electric lifting columns according to the detailed diagrams.
- Attach Desktop Sections: Securely attach the main desktop and the return desktop to the assembled frame.
- Install Hutch and Drawers: Assemble and install the hutch unit, including the sliding doors. Insert the standard and file drawers into their respective compartments.
- Connect Electrical Components: Connect the motor for height adjustment, LED strips, and the power outlet unit. Ensure all connections are secure.
- Cable Management: Organize all cables using the provided cable management solutions to prevent interference with desk movement.
- Final Check: Before use, ensure all screws are tightened, and the desk is stable.
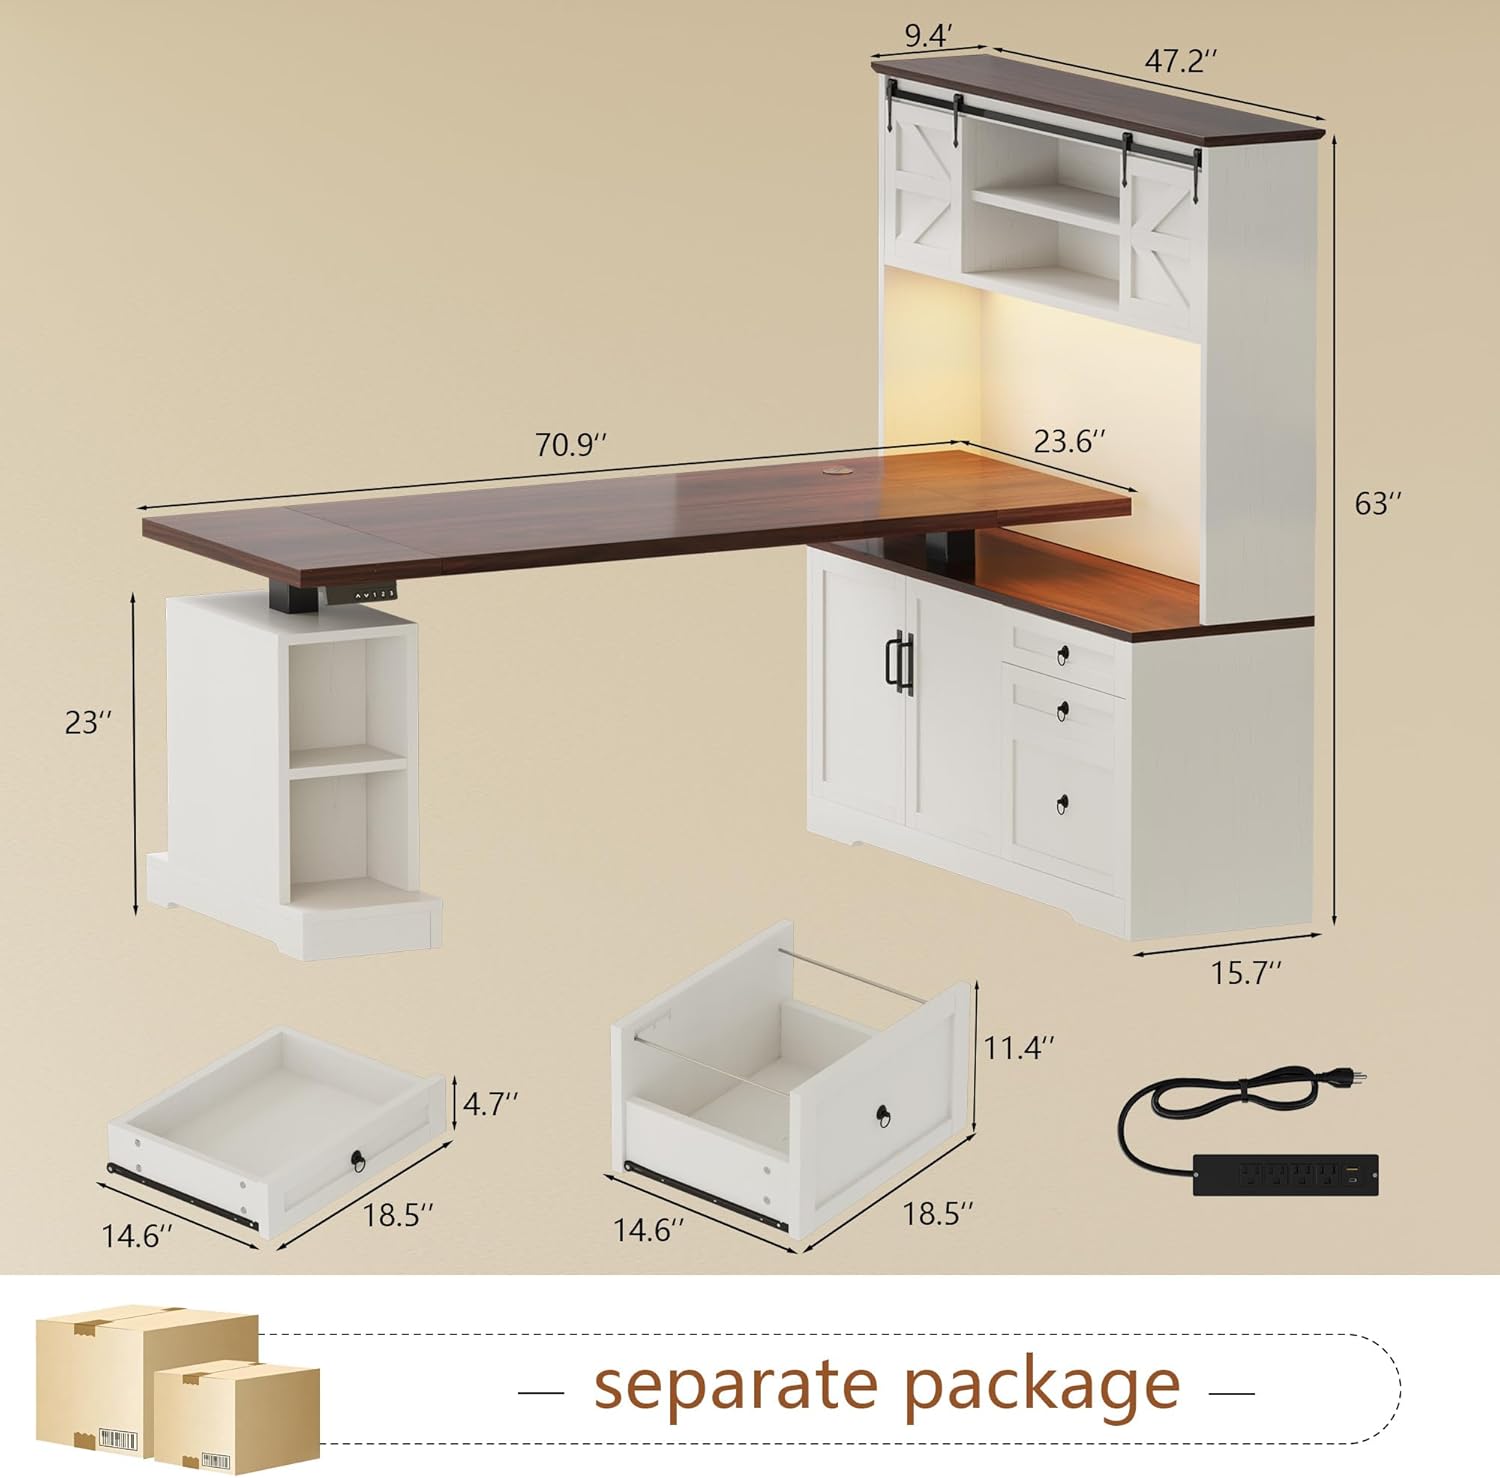
Image: Exploded view of the desk components with measurements, illustrating the main desk, hutch, drawers, and power strip for assembly reference.
Operating Instructions
Electric Height Adjustment
The desk features an electric motor system for smooth height adjustments. Use the control panel located on the desktop to operate.

Image: Close-up of the desk's control panel, showing the LED display, up/down arrows, and three memory preset buttons.
- Adjusting Height: Press and hold the Up or Down arrow buttons to raise or lower the desk to your desired height.
- Setting Memory Presets:
- Adjust the desk to your preferred sitting or standing height.
- Press the "M" button (if available, or a similar memory set button) followed by the desired preset number (1, 2, 3, or 4). The LED display will confirm the setting.
- Recalling Presets: Press the corresponding preset number button (1, 2, 3, or 4) to automatically move the desk to the saved height.

Image: Illustration showing the desk's height adjustment range, with a person sitting at 28.34 inches and another standing at 46.45 inches, demonstrating ergonomic flexibility.
Power Outlets and USB Ports
The desk includes a built-in power strip for convenient device charging and power supply.

Image: Close-up of the integrated power management system, featuring 4 AC outlets, 1 USB port, and 1 Type-C port for charging various devices.
- AC Outlets: Use the 4 AC outlets (120V/12A) to power your computer, monitors, and other electronic devices.
- USB Ports: The 1 USB port (5V/2A) and 1 Type-C port (5V/3A) are suitable for charging smartphones, tablets, and other compatible USB-powered devices.
- Power Cord: The desk is supplied with a 6.56-foot power cord. Ensure it is plugged into a grounded outlet.
LED Lights
The integrated LED strips can be controlled via a Bluetooth remote to customize your workspace ambiance.
- Power On/Off: Use the remote control to turn the LED lights on or off.
- Color and Brightness Adjustment: Select desired colors and adjust brightness levels using the remote. Refer to the separate LED remote control manual for specific functions.
Maintenance
Regular maintenance will ensure the longevity and optimal performance of your desk.
- Cleaning: Wipe surfaces with a soft, damp cloth. Avoid harsh chemicals or abrasive cleaners that may damage the finish.
- Electrical Components: Periodically check all electrical connections for looseness or damage. Do not attempt to repair electrical components yourself.
- Moving Parts: Ensure the lifting mechanism operates smoothly. Do not apply excessive force during height adjustment.
- Weight Distribution: Distribute weight evenly across the desktop to prevent strain on the lifting mechanism and maintain stability.
Troubleshooting
If you encounter issues with your desk, refer to the following common troubleshooting steps:
| Problem | Possible Cause | Solution |
|---|---|---|
| Desk does not move up or down. | Power cable disconnected; motor overload; control panel malfunction. | Check power connection. Unplug and replug the desk after 10 minutes. Reduce weight on the desk. Contact customer support if the issue persists. |
| Uneven height adjustment. | Obstruction; uneven weight distribution. | Remove any obstructions. Redistribute weight evenly. Perform a reset (refer to specific reset instructions in the full manual, if provided). |
| LED lights not working. | Remote battery low; loose connection; LED strip malfunction. | Check/replace remote battery. Ensure LED strip connections are secure. |
| Power outlets not working. | Desk not plugged in; circuit breaker tripped; faulty outlet. | Ensure the desk's main power cord is securely plugged into a working wall outlet. Check your home's circuit breaker. |
For issues not listed here or if solutions do not resolve the problem, please contact Homiflex Customer Support.
Specifications
| Feature | Detail |
|---|---|
| Brand | Homiflex |
| Model Number | MAHflezWKl7 |
| Desk Design | L-Shape Electric Standing Desk with Hutch |
| Product Dimensions (D x W x H) | 23.6"D x 70.86"W x 23"H (Overall desk dimensions) |
| Height Adjustment Range | 28.3" to 46.5" (72-118cm) |
| Number of Height Positions | 4 (Memory Presets) |
| Maximum Weight Recommendation | 165 lbs (75 kg) |
| Material Type | Engineered Wood (FSC-Certified Wood tabletop) |
| Color | White (with brown accents) |
| Number of Drawers | 3 (2 standard, 1 file drawer for A4/Letter size) |
| Power Outlets | 4 AC Outlets (120V/12A) |
| USB Ports | 1 USB (5V/2A), 1 Type-C (5V/3A) |
| Special Features | Built-in USB Outlet, LED Lights with Bluetooth Remote, Hutch with Sliding Doors |
| Item Weight | 160.5 pounds |
Warranty and Support
Homiflex is committed to providing high-quality products. This product may be covered by a manufacturer's warranty. Please refer to the warranty card included in your product packaging for specific terms and conditions, including warranty duration and coverage details.
For technical assistance, missing parts, or any other inquiries, please contact Homiflex Customer Support:
- Online Support: Visit the official Homiflex website for FAQs and support resources.
- Email: Refer to your product packaging or warranty card for customer service email.
- Phone: Refer to your product packaging or warranty card for customer service phone number.
Please have your model number (MAHflezWKl7) and purchase date ready when contacting support.