
Important Safety Information
Please read and understand all instructions before assembling and using this bunk bed. Failure to follow these instructions may result in serious injury.
- Weight Capacity: The maximum safe weight capacity for each bunk is 500 pounds (227 kg). Do not exceed this limit.
- Mattress Requirements: Use only mattresses that are 74-75 inches (188-190.5 cm) long and 37.5-38.5 inches (95.25-97.79 cm) wide for Twin XL. The recommended mattress thickness is 6 inches (15.24 cm).
- Guardrails: The top bunk is equipped with full-length guardrails. Always ensure guardrails are properly installed and secured before use.
- Age Restriction: Do not allow children under 6 years of age on the upper bunk.
- Assembly: Ensure all connections, bolts, and screws are securely tightened before initial use and periodically thereafter. Do not use power tools for assembly as this may overtighten and damage components.
- Ladder Safety: Always use the provided ladder for access to the upper bunk. Do not use substitute ladders or climb on the bed frame.
- Ventilation: Ensure adequate ventilation around the bed.
- Modifications: Do not modify the bed structure in any way. Use only manufacturer-approved replacement parts.
Package Contents
Before beginning assembly, verify that all parts and hardware are present and undamaged. If any parts are missing or damaged, do not proceed with assembly and contact customer support.
- Metal frame components for Twin XL over Twin XL bunk bed
- Guardrails for upper bunk
- Integrated ladder
- All necessary assembly hardware (bolts, nuts, washers, etc.)
- Assembly tools (e.g., Allen wrench)
Setup Instructions
Assembly requires two adults. Clear a spacious area for assembly and keep all small parts out of reach of children.
Step 1: Unpack and Identify Components
Carefully remove all components from the packaging. Lay them out on a soft, clean surface to prevent scratches. Refer to the parts list in your included manual to identify each piece.
Step 2: Assemble the Lower Bunk Frame
Begin by connecting the side rails and end frames for the lower bunk. Hand-tighten all bolts initially. Ensure the frame is square before fully tightening.

Image: Illustration of the lower bunk bed frame components during assembly.
Step 3: Assemble the Upper Bunk Frame
Repeat the process for the upper bunk frame, connecting its side rails and end frames. Again, hand-tighten bolts first.

Image: Illustration of the upper bunk bed frame components during assembly.
Step 4: Connect Upper and Lower Bunks
Carefully lift the assembled upper bunk frame and align it with the posts of the lower bunk frame. Secure them together using the provided bolts and hardware. This step typically requires two people.

Image: Detail of the connection point between the upper and lower bunk frames.
Step 5: Attach Guardrails and Ladder
Install the full-length guardrails on the upper bunk, ensuring they are firmly attached to the frame. Then, attach the integrated ladder to the designated points on the bunk bed. Confirm all connections are secure.
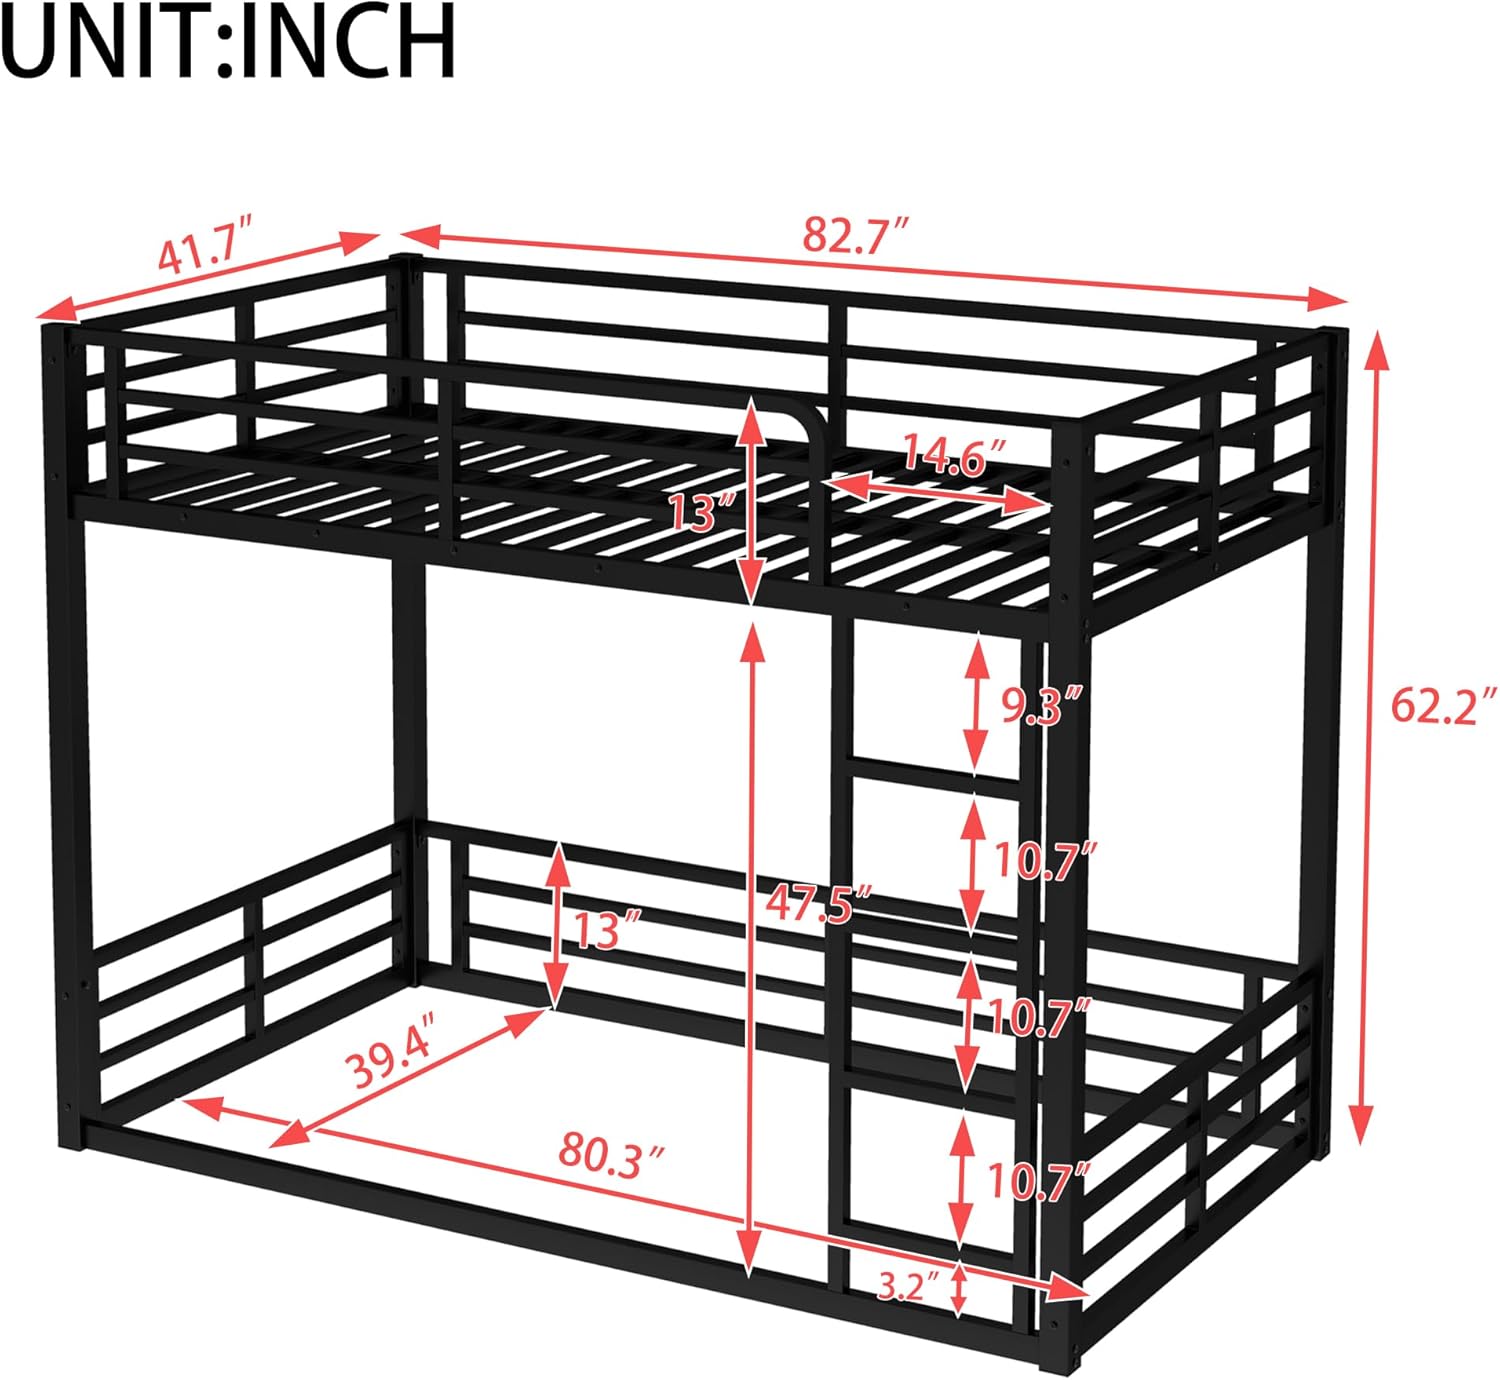
Image: A complete view of the assembled DNYN metal bunk bed, showing the guardrails and integrated ladder.
Step 6: Final Tightening and Inspection
Once all components are in place, go back and fully tighten all bolts and screws using the provided tools. Do not overtighten. Perform a final inspection to ensure the bed is stable, all parts are correctly aligned, and there are no loose connections.

Image: The DNYN metal bunk bed fully assembled and dressed with bedding in a room.
Operating Instructions
- Accessing Upper Bunk: Always use the integrated ladder to access the upper bunk. Face the ladder when climbing up or down.
- Movement: Avoid excessive rocking or jumping on either bunk, as this can compromise the bed's stability and structural integrity.
- Weight Distribution: Distribute weight evenly on the bunks.
- Clearance: Ensure there is adequate head clearance for the person on the lower bunk.
Maintenance
- Cleaning: Clean the metal frame with a dry, soft cloth. Avoid abrasive cleaners or harsh chemicals that could damage the finish.
- Regular Inspection: Periodically (e.g., monthly or quarterly) inspect all bolts, screws, and connections to ensure they remain tight. Re-tighten as necessary.
- Damage Check: Regularly check for any signs of wear, damage, or structural fatigue. Discontinue use if any significant damage is found and contact customer support for replacement parts or advice.
Troubleshooting
| Issue | Possible Cause | Solution |
|---|---|---|
| Bed is squeaking or wobbling | Loose bolts or connections | Inspect and re-tighten all assembly bolts and screws. |
| Ladder feels unstable | Ladder not securely attached | Ensure the ladder hooks or fasteners are fully engaged and tightened to the bed frame. |
| Parts do not align during assembly | Incorrect orientation of parts or overtightened bolts | Loosen previously tightened bolts, re-orient parts as per instructions, then re-tighten. Ensure parts are not forced. |
Specifications
| Feature | Detail |
|---|---|
| Product Type | Metal Bunk Bed |
| Model | Floor Bunk Bed Frame |
| Color | Black |
| Size | Twin XL over Twin XL |
| Material | Metal |
| Overall Product Dimensions (L x W x H) | 82.7" x 41.7" x 62.2" (210 cm x 106 cm x 158 cm) |
| Overall Product Weight | 74.96 LBS (34 kg) |
| Weight Capacity (Each Bunk) | 500 LBS (227 kg) |
| Recommended Mattress Thickness | 6 inches (15.24 cm) |
| Assembly Required | Full Assembly Needed |
| Included Components | Guardrails, Ladder |
Note: All dimensions are approximate and may vary slightly.

Image: A technical diagram illustrating the precise dimensions of the DNYN Twin XL over Twin XL bunk bed in inches.
Warranty Information
This DNYN bunk bed is covered by a Limited Warranty. The warranty covers manufacturing defects under normal use. Please refer to the warranty card included with your purchase or contact DNYN customer support for specific terms and conditions, duration, and claim procedures.
Keep your proof of purchase for warranty claims.
Customer Support
For any questions regarding assembly, missing parts, or product operation, please contact DNYN customer service. Have your product model number and purchase information ready when you call or email.
Contact information for DNYN customer support can typically be found on the packaging, the warranty card, or the official DNYN website.