
1. Product Overview
The TECXERLLON 10.26" Portable Apple CarPlay Screen is designed to integrate modern smartphone connectivity into your vehicle. This device offers wireless Apple CarPlay and Android Auto, a 4K front dash camera, and a 1080P rear backup camera. It supports GPS navigation, voice control, and various mirroring functions. The system is compatible with most 12V-24V vehicles and features a 10.26-inch HD IPS touchscreen display.

Video: TECXERLLON 10.26 inches CarPlay Screen with HD Dual Cam. This video provides an overview of the TECXERLLON CarPlay screen, showcasing its features and dual camera capabilities.
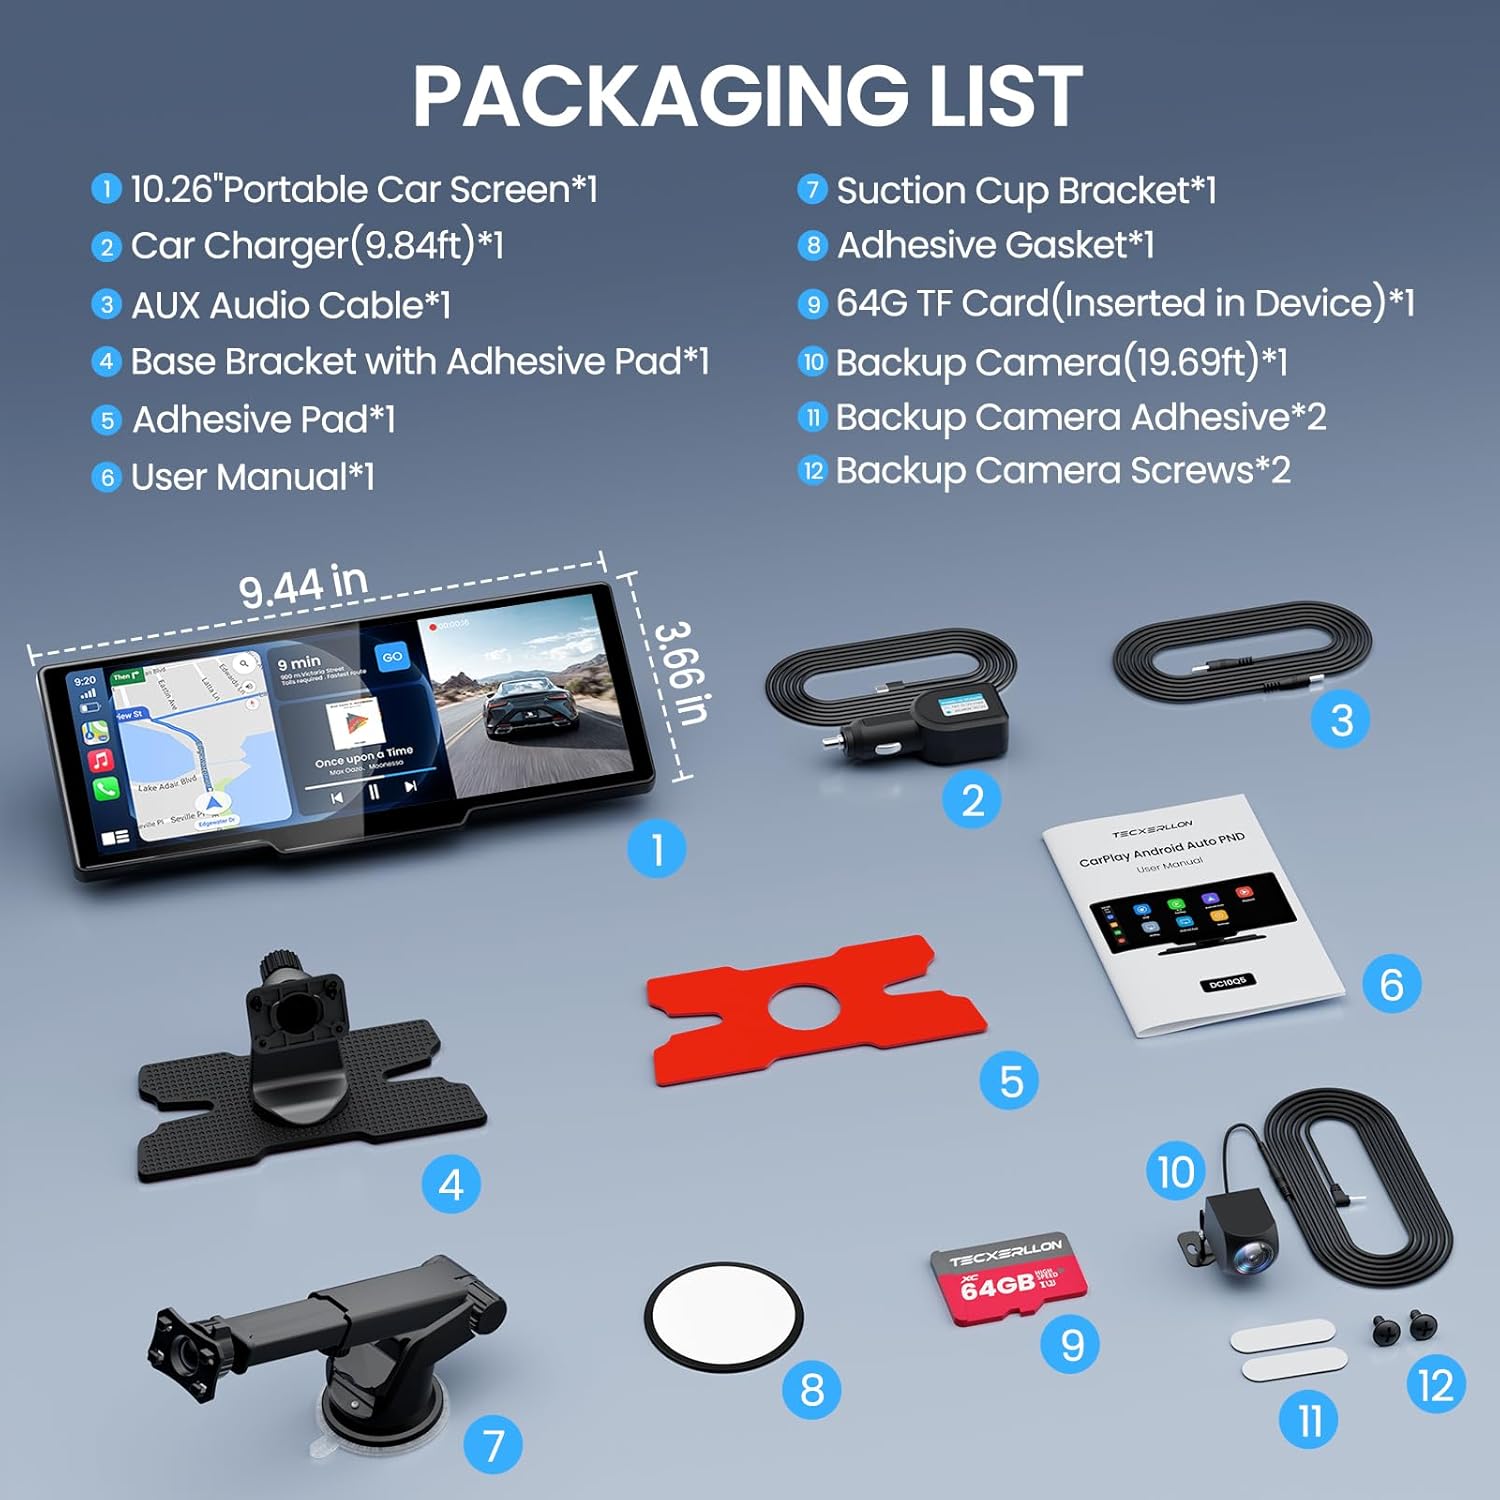
Package Contents
Verify that all items are present in the package:
- 10.26" Portable Car Screen
- Car Charger (9.84ft)
- AUX Audio Cable
- Base Bracket with Adhesive Pad
- Adhesive Pad
- User Manual
- Suction Cup Bracket
- Adhesive Gasket
- 64GB TF Card (Inserted in Device)
- Backup Camera (19.69ft)
- Backup Camera Adhesive (x2)
- Backup Camera Screws (x2)

2. Setup and Installation
Mounting the Device
The device offers two primary mounting options: a dashboard mount (adhesive base bracket) and a suction cup mount (for windshield or dashboard). Choose the method that provides the best visibility without obstructing your driving view.

Adhesive Flexible Rubber Base Bracket Installation:
- Adjust the angle of the bracket as desired.
- Remove the protective film from the adhesive pad.
- Stick the bracket firmly to a clean, flat surface on your dashboard.
- Install the portable CarPlay screen onto the bracket.
Suction Cup Bracket Installation:
- Remove the protective film from the suction cup.
- Stick the suction cup to the dashboard or windshield and press the locking bar to secure it.
- Install the portable CarPlay screen onto the bracket.
- Adjust the angle and tighten the screw to lock it in place.
Important: Clean the mounting area thoroughly before installing the bracket to ensure a secure adhesion.

Video: Mount Installation Tutorial. This video demonstrates the process of installing the mounting bracket for the TECXERLLON CarPlay screen.
Backup Camera Installation
The 1080P backup camera provides a clear rear view when reversing. Professional installation is recommended if you are unfamiliar with vehicle wiring.
- Connect the backup camera cable to the "AV IN" port on the portable CarPlay screen.
- Route the backup camera cable to the rear of your vehicle.
- Connect the red wire of the backup camera to the positive terminal of your vehicle's reversing light. This enables automatic display of the rear view when reversing.
- Mount the backup camera securely at the rear of your vehicle using the provided adhesive or screws.
Warning: If you have no experience in vehicle repair/modification or rear camera installation, please seek professional assistance for installation.

Power Connection
Connect the provided car charger to your vehicle's cigarette lighter socket and then to the portable CarPlay screen's power input. The device will power on automatically with the vehicle's ignition.
Audio Output Options
The device offers multiple ways to output audio to your car's stereo system:
- Bluetooth: Connect the CarPlay screen to your car's OEM stereo via Bluetooth for wireless audio streaming.
- FM Transmitter: Use the built-in FM transmitter to broadcast audio to your car's FM radio. Tune your car radio to the same FM frequency selected on the CarPlay screen.
- AUX Connection: Connect the provided AUX audio cable from the CarPlay screen's AUX output to your car's AUX input.
- Built-in Speaker: The device has an integrated speaker for direct audio output.

3. Operating Instructions
Wireless Apple CarPlay Connection
To connect your iPhone wirelessly to Apple CarPlay:
- Turn on Bluetooth and Wi-Fi on your iPhone.
- On the CarPlay screen, select the corresponding Bluetooth device name for your iPhone.
- Wait approximately 10 seconds, then click "Pair" on your iPhone when prompted.
- Select "Use CarPlay" on your iPhone.
- The connection should be successful after another 10 seconds.

Wireless Android Auto Connection
To connect your Android phone wirelessly to Android Auto:
- Turn on Bluetooth and Wi-Fi on your Android phone.
- On the CarPlay screen, select the corresponding Bluetooth device name for your Android phone.
- Allow the connection on your Android phone when prompted.
- The connection should be successful after approximately 10 seconds.

Video: CarPlay/AirPlay/Android Auto/Android Cast Connection Guide. This video provides a comprehensive guide on connecting various smartphone features to the CarPlay screen.
Mirror Link (AirPlay for iOS / Android Cast for Android)
Mirror Link allows you to display your smartphone's screen content directly on the CarPlay unit.
AirPlay (for iOS):
- Click the iPhone Mirror icon on the CarPlay screen.
- Turn on Wi-Fi on your iPhone.
- Enter the password to connect to the appropriate Wi-Fi device displayed on the CarPlay screen.
- Click "Screen Mirroring" in your iPhone's control center menu.
- Select "Car" to complete screen mirroring.
- The connection is successful.

Android Cast (for Android):
- Click the Android Mirror icon on the CarPlay screen.
- Scan the QR code displayed on the screen and download the mirroring application from http://dl.mirroring.app.sageres.com/jinzhuo/index.html. Grant floating window permission if requested.
- Open your Wi-Fi settings and enter the password to connect to the appropriate Wi-Fi device displayed on the CarPlay screen.
- The connection is successful.
Note: Some streaming applications may not support video mirroring due to app or licensing restrictions (e.g., Netflix, YouTube).

Video: Real User Reviews - Rodin. This video demonstrates the product in use, including its interface and features.
GPS Navigation
Once connected via Apple CarPlay or Android Auto, you can use your preferred navigation applications (e.g., Google Maps, Waze, Apple Maps) directly on the 10.26-inch HD IPS display for real-time traffic updates and route guidance.

Voice Control
Utilize Siri (for Apple CarPlay) or Google Voice Assistant (for Android Auto) to control navigation, make phone calls, play music, and execute other commands hands-free. Ensure your phone's audio output is set to CarPlay/Android Auto for optimal voice command functionality.

Dash Cam and Backup Camera Functions
The device includes a 4K front dash camera and a 1080P rear backup camera. The 64GB TF card is pre-inserted for recording.
- 4K Dash Cam: Records the road ahead in 4K resolution. The dash cam is adjustable for wider viewing angles.
- 1080P Backup Camera: Automatically displays the rear view with parking guidelines when the vehicle is in reverse. It is waterproof (IP67 rated) and offers a 170-degree wide angle.
- Loop Recording: Continuously records video, overwriting the oldest files when the memory card is full.
- G-sensor Emergency Recording: Automatically locks and saves video footage during sudden impacts or collisions, preventing it from being overwritten.


Auto-Brightness Adjustment
The screen features automatic brightness adjustment, adapting to ambient light conditions (daytime, nighttime, tunnels) to maintain optimal visibility without manual intervention.

4. Maintenance
- Cleaning: Use a soft, dry cloth to clean the screen. For stubborn smudges, lightly dampen the cloth with water or a screen-safe cleaner. Avoid harsh chemicals or abrasive materials.
- Software Updates (OTA): The device supports Over-The-Air (OTA) updates to ensure the system remains current and responsive. Check for available updates periodically through the device settings.
- Storage: If storing the device for an extended period, disconnect it from power and store it in a cool, dry place.
5. Troubleshooting
| Problem | Possible Cause | Solution |
|---|---|---|
| Device does not power on. | No power connection or faulty car charger. | Ensure the car charger is securely plugged into the vehicle's cigarette lighter and the device. Check if the vehicle's power outlet is functional. |
| Wireless CarPlay/Android Auto fails to connect. | Bluetooth/Wi-Fi off on phone, incorrect pairing, or interference. | Verify Bluetooth and Wi-Fi are enabled on your smartphone. Ensure the correct device is selected for pairing. Try restarting both the phone and the CarPlay screen. |
| Screen freezes or becomes unresponsive. | Software glitch or temporary system error. | Unplug the power supply from the device and plug it back in to perform a soft reset. If issues persist, consider a factory reset via settings. |
| Poor audio quality via FM Transmitter. | FM interference or incorrect frequency. | Try a different FM frequency on both the CarPlay screen and your car radio to find a clear channel. Avoid frequencies used by local radio stations. |
| Backup camera not displaying. | Incorrect wiring or camera malfunction. | Check all connections, especially the red wire to the reverse light. Ensure the camera cable is securely plugged into the "AV IN" port. |
| Mount is unstable or falls off. | Improper installation or dirty mounting surface. | Clean the mounting surface thoroughly before re-attaching. Ensure the suction cup lock is fully engaged or the adhesive pad is firmly pressed. |
6. Specifications
- Brand: TECXERLLON
- Model Number: DC10Q5
- Screen Size: 10.26 Inches
- Product Dimensions (L x W x H): 9.4" x 1.8" x 3.9"
- Compatible Devices: Smartphone
- Installation Type: Surface Mount
- Connector Type: Car Charger
- Video Capture Resolution: 4K (Front Dash Cam), 1080p (Rear Backup Camera)
- Included Memory: 64GB TF Card (pre-inserted)
- Connectivity: Wireless Apple CarPlay, Wireless Android Auto, Bluetooth 5.0, Wi-Fi, Mirror Link (AirPlay, Android Cast)
- Special Features: OTA Updates, GPS Navigation support, Voice Control, Loop Recording, G-sensor Emergency Recording, Auto-Brightness Adjustment, Parking Guidelines (backup camera)
7. Warranty and Support
The TECXERLLON 10.26" Portable Apple CarPlay Screen comes with a 1-Year Warranty.
For any questions regarding installation, setup, connection, or product use, please contact our support team. We are committed to providing reliable after-sales support for a smooth experience.
Contact information can typically be found in the included user manual or on the manufacturer's official website.