
1. Introduction
This manual provides detailed instructions for the assembly, installation, operation, and maintenance of your new IRONCK 36 inch Bathroom Vanity with Ceramic Sink. Please read all instructions carefully before beginning installation and retain this manual for future reference. This freestanding wood grain sink cabinet features three storage drawers (two standard and one flip-down) and a farmhouse design.
2. Safety Information
- Always ensure all parts are securely fastened before use.
- Do not overload drawers or shelves to prevent tipping or damage. The maximum weight capacity is 44.09 pounds.
- Keep small parts and packaging materials away from children to prevent choking hazards.
- During installation, be careful not to block electrical outlets, light switches, or mirrors.
- Ensure proper ventilation in the bathroom to prevent excessive moisture buildup, which can affect the vanity's longevity.
- This product will be delivered in two separate shipments, which may arrive at different times. Please ensure all packages are received before beginning assembly.
3. Parts List
Before assembly, verify that all components are present and undamaged. Refer to the included assembly instructions for a detailed diagram and list of all parts and hardware.
- Main Cabinet (1)
- Ceramic Sink with Marble-look Countertop (1)
- Storage Drawers (3: 1 flip-down, 2 standard)
- Legs (pre-attached)
- Metal Door Handles
- Toilet Paper Holder (adjustable)
- Hardware (screws, dowels, cam locks, hinges, slides)
- Tools (provided)

Figure 3.1: Front view of the IRONCK 36 inch Bathroom Vanity, showcasing the ceramic sink and three drawers.
4. Setup & Installation
The IRONCK 36 inch Bathroom Vanity is designed for straightforward assembly. Follow these steps for a successful installation.
4.1 Pre-Installation Considerations
- Measure Correctly: Before measuring, ensure bathroom and shower doors are fully open to avoid affecting the opening of vanity doors or drawers after installation. Maintain a minimum 18-inch clearance between the toilet center and the vanity edge.
- Plumbing Compatibility: Choose a vanity that is compatible with your existing plumbing locations to avoid additional costs.
- Vanity Size: Standard widths range from 24 to 84 inches. A height of 32 to 34 inches is suitable for most users. Consider a 34-inch comfort-height vanity for ergonomic use.
- Sink Configuration: Single sinks save space in narrow bathrooms. Double sinks prevent congestion in larger family bathrooms.
- Material Choice: The ceramic sink and countertop are budget-friendly, low-maintenance, and resist scratches and stains.
- Faucet Configuration: Most bathroom basins are configured for single-hole, 4-inch, or 8-inch on-center spacing three-hole arrangements. Verify if the faucet is included with your purchase.
Video 4.1: IRONCK Bathroom Vanity Buying Guide. This video provides essential tips for selecting and planning your bathroom vanity installation, including measuring, sizing, material, and faucet considerations.
4.2 Assembly Steps
- Unpack and Inspect: Carefully unpack all components and compare them against the parts list in the separate assembly instructions. Ensure no parts are missing or damaged.
- Attach Legs: The legs are pre-attached. Ensure they are stable and secure.
- Connect Side and Back Panels: Use the provided dowels and cam locks to connect the side panels to the back panel. Follow the detailed diagrams in the assembly guide.
- Insert Shelves: Place shelves into the pre-drilled holes at your desired height.
- Attach Doors: Secure the doors using the provided hinges and screws. Adjust as necessary for proper alignment.
- Install Drawers: Insert the drawers into their respective slides. Ensure smooth operation.
- Install Sink and Countertop: Carefully place the ceramic sink and countertop onto the cabinet. Ensure it is level and secure. Apply sealant if required by local plumbing codes (sealant not included).
- Install Faucet: Install your chosen faucet into the pre-drilled holes on the countertop.
- Connect Plumbing: Connect the water supply lines and drain according to local plumbing codes. Ensure all connections are tight to prevent leaks.

Figure 4.2: View of the vanity with drawers open, illustrating the internal storage configuration.
5. Operation
Your IRONCK bathroom vanity is designed for convenient daily use with ample and versatile storage.
- Flip-down Drawer: The top drawer features a flip-down mechanism, ideal for small items like toothbrushes or makeup.
- U-shaped Drawer: The middle drawer is U-shaped to accommodate plumbing while maximizing storage for toiletries.
- Deep Drawer: The bottom deep drawer provides generous space for towels, cleaning supplies, or larger items.
- Soft-Close Hinges and Smooth Gliding Drawers: All drawers and doors are equipped with whisper-quiet soft-close hinges and smooth-gliding drawer slides for quiet and effortless operation.
- Adjustable Toilet Paper Holder: The toilet paper holder can be interchanged on the left and right sides of the vanity for personalized convenience.

Figure 5.1: Illustration of the vanity's spacious storage, highlighting the flip-down, U-shaped, and deep drawers.
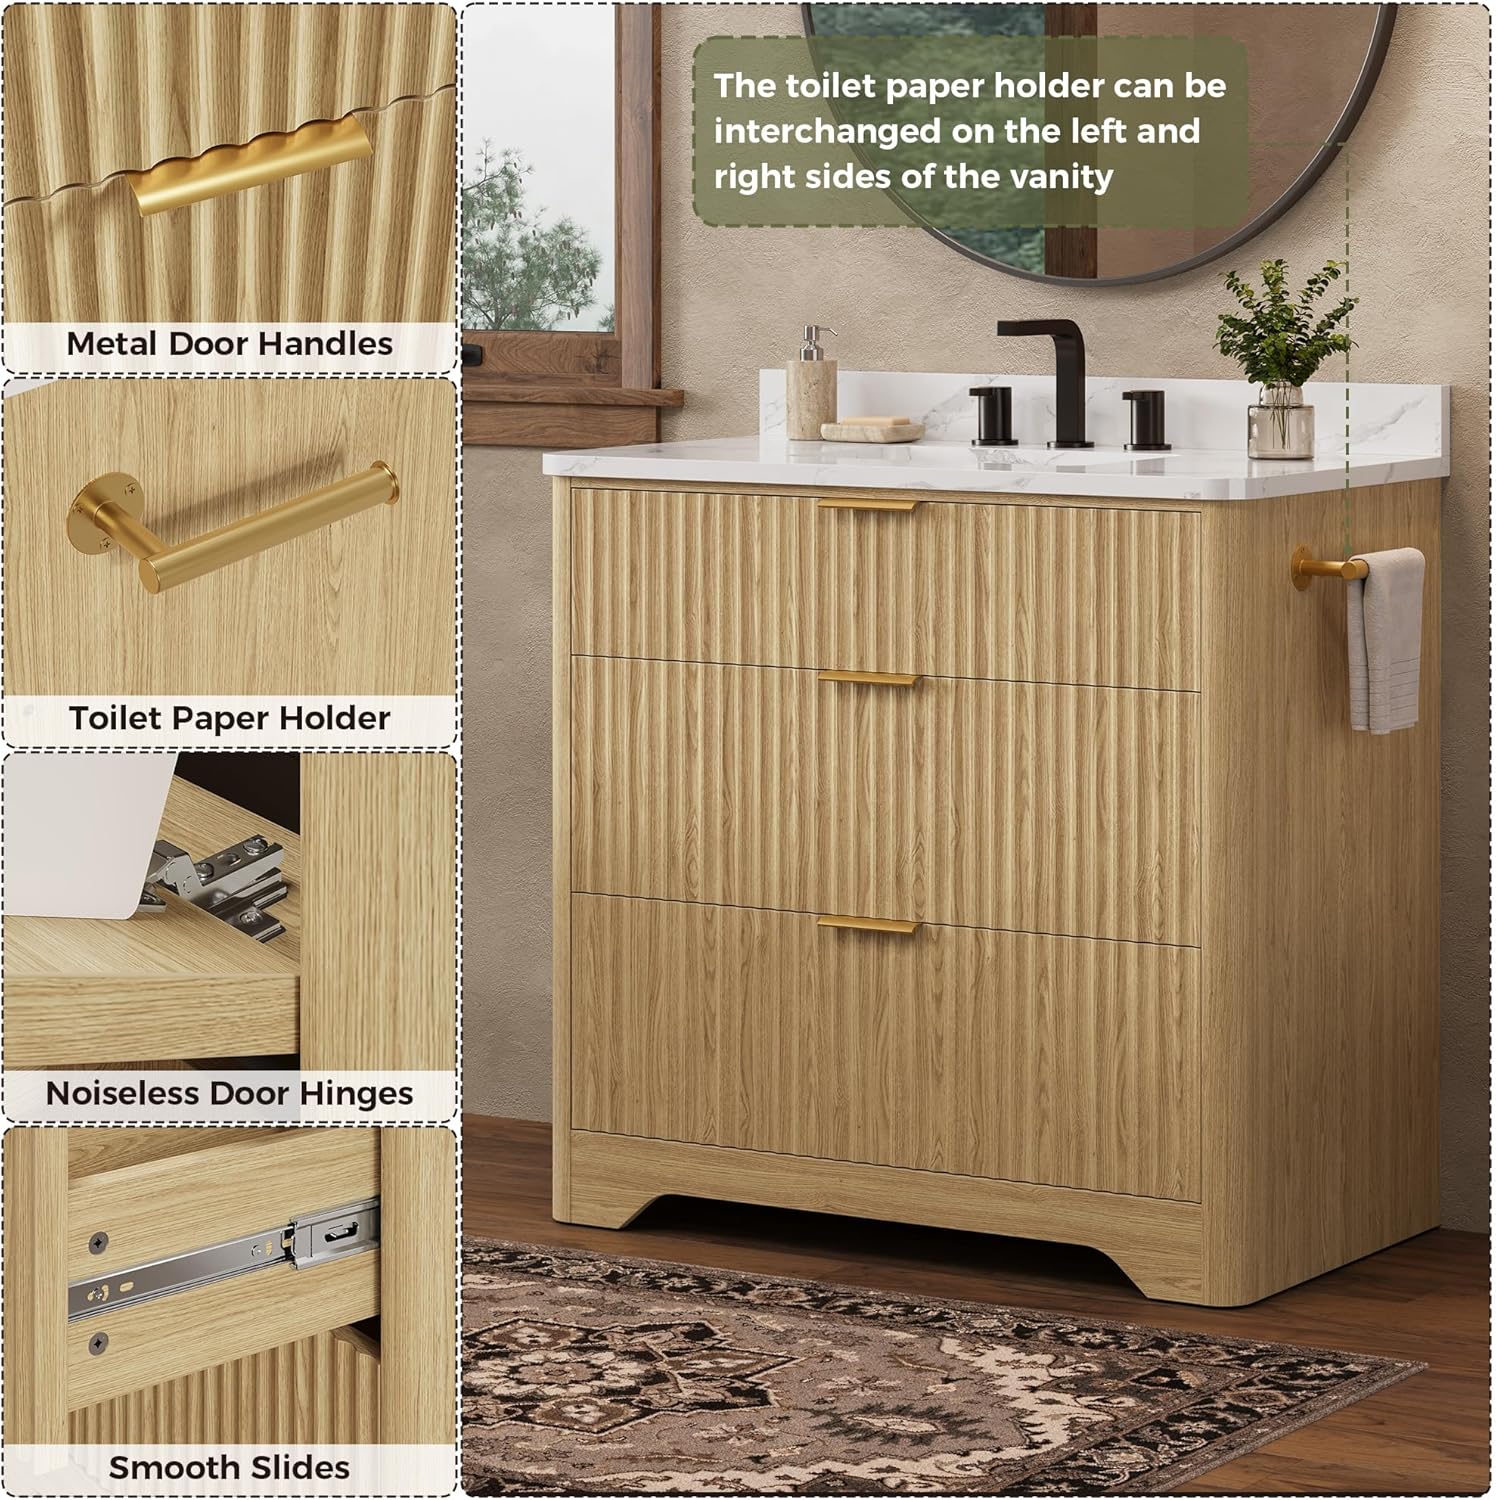
Figure 5.2: Close-up details of the vanity's hardware, including metal handles, toilet paper holder, noiseless door hinges, and smooth drawer slides.
6. Maintenance
Proper care and maintenance will ensure the longevity and appearance of your IRONCK bathroom vanity.
- Cleaning the Vanity Cabinet: The cabinet is crafted from moisture-resistant engineered wood with a textured wood-grain finish. Wipe surfaces with a soft, damp cloth and mild soap. Avoid abrasive cleaners or harsh chemicals that could damage the finish. Dry immediately after cleaning.
- Cleaning the Ceramic Sink & Countertop: The marble-look ceramic countertop is non-porous and resists scratches and stains. Clean with a non-abrasive bathroom cleaner and a soft cloth or sponge. Rinse thoroughly and dry to prevent water spots.
- Moisture Protection: While humid-proof, it is recommended to wipe up spills and excess water promptly to prevent water damage, warping, or mold growth.
- Hardware Care: Periodically check and tighten any loose screws on handles, hinges, or drawer slides. Clean metal hardware with a soft, dry cloth.

Figure 6.1: Detail of the vanity's moisture-proof wood grain finish, highlighting its durability.
7. Troubleshooting
This section addresses common issues you might encounter with your vanity.
| Problem | Possible Cause | Solution |
|---|---|---|
| Drawers do not slide smoothly. | Misaligned slides or debris in the tracks. | Check for obstructions in the drawer slides. Ensure slides are properly aligned and secured. Lubricate if necessary. |
| Doors are misaligned or do not close properly. | Loose or improperly adjusted hinges. | Adjust the door hinges. Most hinges allow for vertical, horizontal, and depth adjustments. Refer to the hinge manufacturer's instructions if available. |
| Water leaks from plumbing connections. | Loose connections or damaged seals. | Turn off the water supply. Check all plumbing connections for tightness. Replace any worn or damaged washers/seals. If the problem persists, consult a qualified plumber. |
| Vanity feels unstable or wobbly. | Uneven floor or loose leg attachments. | Ensure the vanity is on a level surface. Adjust any leveling feet if present. Check that all leg attachment screws are tightened. |
8. Specifications
| Feature | Detail |
|---|---|
| Brand | IRONCK |
| Model Number | HK-XST-12 |
| Product Dimensions (D x W x H) | 20"D x 36"W x 37.1"H |
| Item Weight | 131.8 Pounds |
| Weight Capacity Maximum | 44.09 Pounds |
| Color | Oak |
| Material (Cabinet) | Engineered Wood |
| Top Material Type | Marble-like Stone or Ceramic |
| Installation Type | Freestanding |
| Number of Drawers | 3 |
| Additional Features | Heavy Duty, Moisture Resistant, Scratch Resistant, Soft-close hinges, Smooth-gliding drawers, Adjustable toilet paper holder, Rounded safety edges, Rear splash guard |
| Required Assembly | Yes |
| UPC | 722385450217 |

Figure 8.1: Detailed view of the exquisite ceramic sink and countertop features.
9. Warranty Information
Specific warranty details for the IRONCK 36 inch Bathroom Vanity are typically provided with your purchase documentation. Please refer to the warranty card or contact IRONCK customer support for information regarding coverage, terms, and conditions.
Generally, manufacturers offer a limited warranty against defects in materials and workmanship for a specified period from the date of purchase. Keep your proof of purchase for any warranty claims.
10. Customer Support
If you have any questions, require assistance with assembly, or need to report missing/damaged parts, please contact IRONCK customer support.
- Online Support: Visit the official IRONCK website or the IRONCK Store on Amazon for FAQs and contact options.
- Contact Retailer: For purchase-specific inquiries, please contact the retailer from whom you purchased the vanity.
Remember to have your model number (HK-XST-12) and proof of purchase ready when contacting support.