
Introduction
The JORLAI T402 is a versatile 9-in-1 record player system designed to offer a comprehensive audio experience. It combines classic vinyl playback with modern digital audio capabilities, including Bluetooth connectivity, AM/FM radio, CD player, cassette player, and USB playback. This manual provides essential information for the safe and efficient operation of your device.
Safety Instructions
Please read these safety instructions carefully before using the device and retain them for future reference. Incorrect use may result in electric shock, fire, or other hazards.
- Do not expose the unit to rain or moisture.
- Do not block any ventilation openings.
- Ensure the power cord is not pinched or walked on.
- Unplug the unit during lightning storms or when unused for long periods.
- Refer all servicing to qualified service personnel.
- Keep the unit away from direct sunlight, heat sources, and strong magnetic fields.
Package Contents
Verify that all items listed below are included in your package:
- JORLAI T402 9-in-1 Record Player System
- Remote Control
- 45 RPM Adapter
- User Manual
- Power Adapter
Product Overview
Familiarize yourself with the various components and features of your JORLAI T402 system.

Figure 1: Front view of the JORLAI T402 system highlighting its 9-in-1 capabilities including 3-speed turntable, CD, cassette, built-in speakers, AM/FM radio, Bluetooth, headphone jack, remote control, USB playback, and RCA output.
Turntable Components
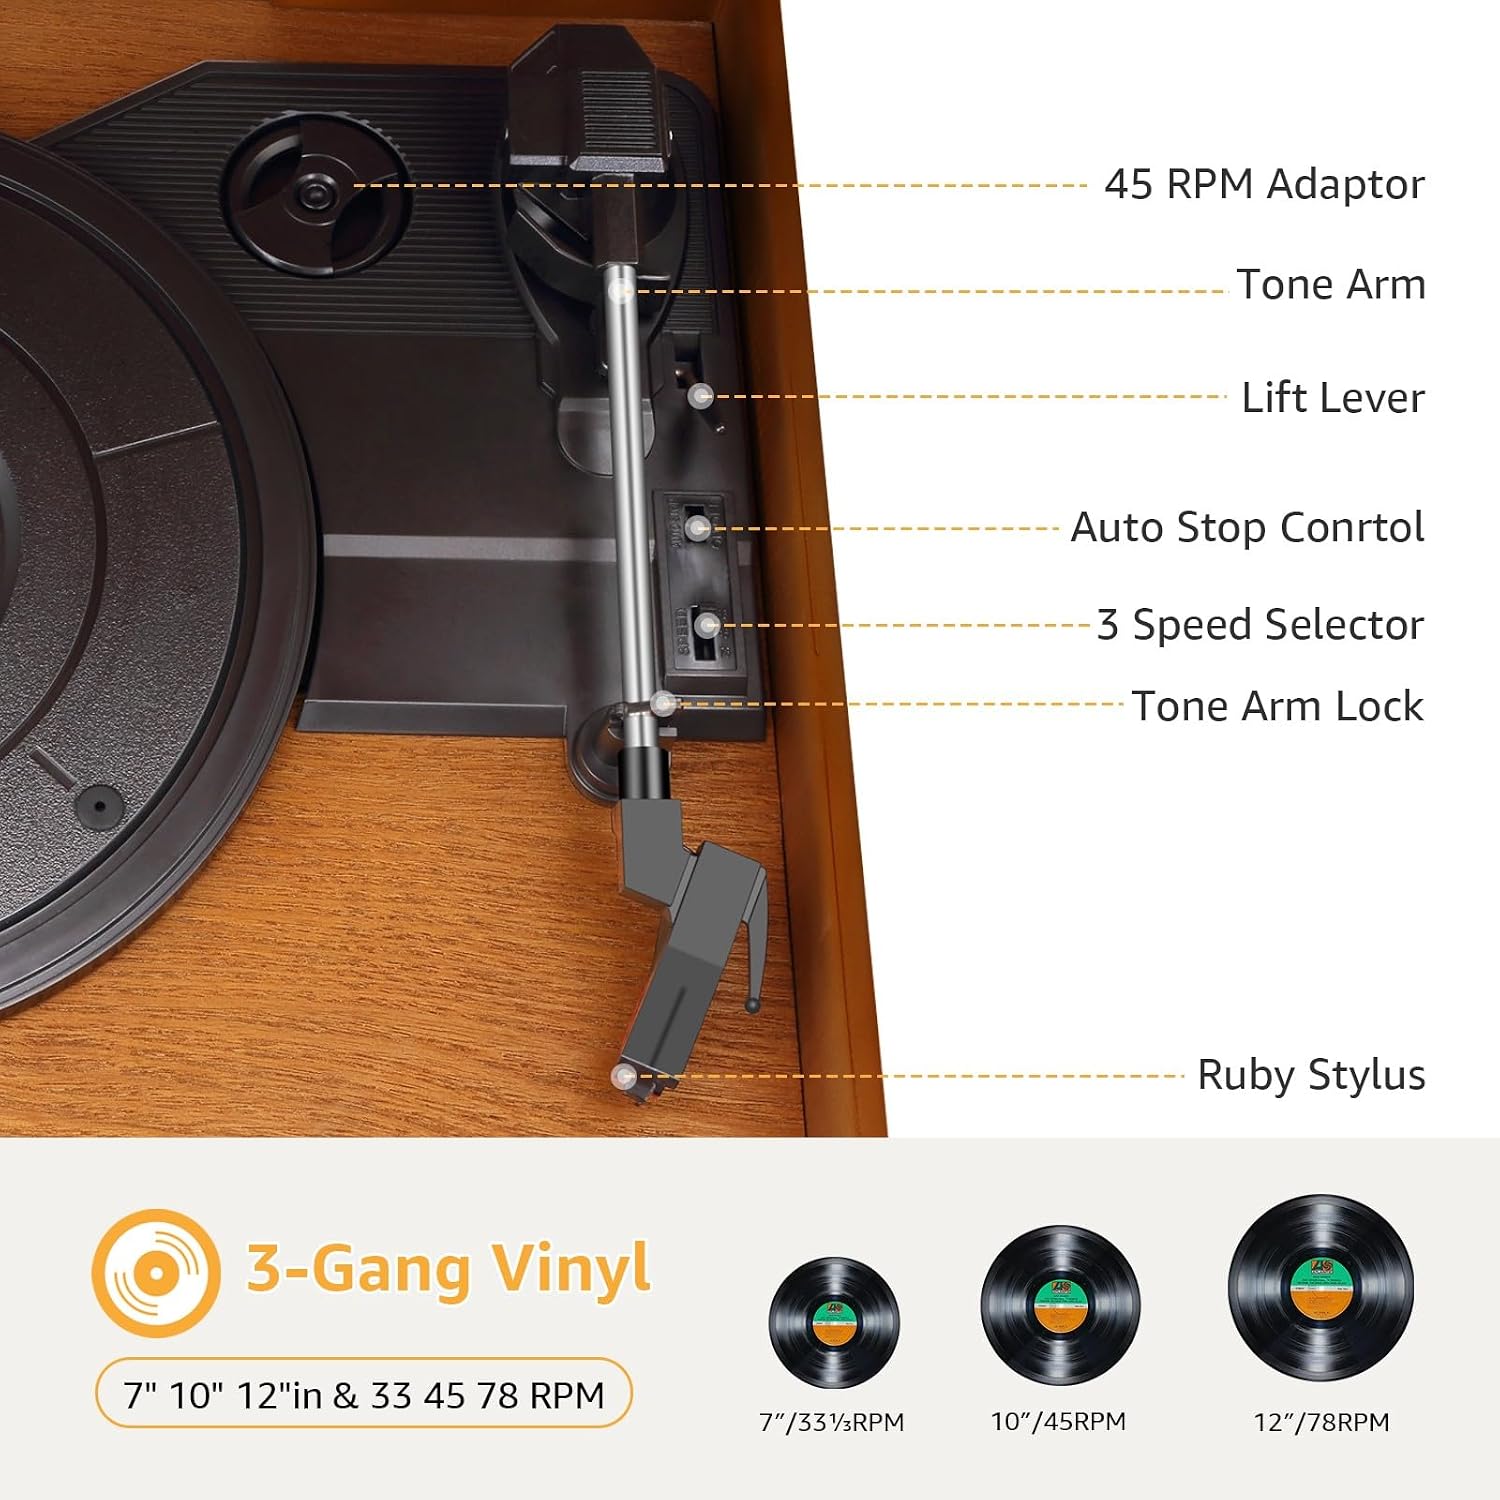
Figure 2: Detailed view of the turntable section, showing the 45 RPM adapter, tone arm, lift lever, auto stop control, 3-speed selector, tone arm lock, and ruby stylus.
- Tone Arm: Holds the stylus and tracks the record grooves.
- Lift Lever: Raises and lowers the tone arm.
- Auto Stop Control: Engages or disengages the automatic stop function for records.
- 3 Speed Selector: Allows selection of 33 1/3, 45, or 78 RPM.
- Tone Arm Lock: Secures the tone arm when not in use.
- Ruby Stylus: The needle that reads the record grooves.
- 45 RPM Adapter: Used for playing 45 RPM records with larger center holes.
Setup
Follow these steps to set up your record player system.
- Unpacking: Carefully remove the unit from its packaging. Retain the packaging for future transport or storage.
- Placement: Place the unit on a stable, level surface away from direct sunlight, heat sources, and excessive dust or vibrations.
- Power Connection: Connect the power adapter to the DC IN jack on the back of the unit, then plug the adapter into a wall outlet.
- Tone Arm Preparation: Gently remove the stylus protector from the stylus. Release the tone arm lock.
Operating Instructions
Record Player Operation
- Open the dust cover.
- Place a record on the turntable platter. If playing a 45 RPM single, place the 45 RPM adapter on the center spindle.
- Select the appropriate speed (33 1/3, 45, or 78 RPM) using the 3 Speed Selector switch.
- Set the Auto Stop Control switch to ON if you want the turntable to stop automatically at the end of the record. Set to OFF for continuous play.
- Lift the tone arm using the Lift Lever.
- Move the tone arm over the desired starting point of the record.
- Gently lower the tone arm onto the record using the Lift Lever. The music will begin to play.
- To stop playback, lift the tone arm using the Lift Lever and return it to the tone arm rest. Secure it with the tone arm lock.
CD Player Operation
- Press the FUNCTION button to select CD mode.
- Open the CD tray by pressing the OPEN/CLOSE button.
- Place a CD with the label side facing up into the tray.
- Close the CD tray. The unit will read the CD, and the track number will display.
- Press the PLAY/PAUSE button to start or pause playback.
- Use the SKIP buttons to navigate between tracks.
Cassette Player Operation
- Press the FUNCTION button to select TAPE mode.
- Insert a cassette tape into the cassette slot.
- Press the PLAY button on the cassette deck to start playback.
- Use the FAST FORWARD and REWIND buttons to navigate the tape.
- Press the STOP/EJECT button to stop playback and eject the tape.
USB Playback

Figure 3: A user inserting a USB drive into the front USB port of the JORLAI T402 system for digital audio playback.
- Press the FUNCTION button to select USB mode.
- Insert a USB flash drive into the USB port.
- The unit will automatically detect and begin playing compatible audio files (e.g., MP3).
- Use the PLAY/PAUSE and SKIP buttons to control playback.
Bluetooth Streaming

Figure 4: A couple enjoying wireless music streaming from a smartphone to the JORLAI T402 system via Bluetooth.
- Press the FUNCTION button to select Bluetooth mode. The display will show "BT" and flash, indicating it's in pairing mode.
- Enable Bluetooth on your smartphone, tablet, or other device.
- Search for "JORLAI T402" (or similar name) in your device's Bluetooth list and select it to pair.
- Once paired, the "BT" indicator will stop flashing, and you can play music from your device through the JORLAI T402.
AM/FM Radio Operation

Figure 5: A man enjoying radio broadcasts using the AM/FM tuner on the JORLAI T402 system.
- Press the FUNCTION button to select AM or FM radio mode.
- Rotate the TUNING knob to search for radio stations.
- Adjust the telescopic FM antenna for optimal reception. For AM, rotate the unit for best reception.
Built-in Speakers and External Audio

Figure 6: An exploded view illustrating the components of the dual stereo built-in speakers within the JORLAI T402 system.
The JORLAI T402 features integrated stereo speakers for direct audio playback. For connecting to external audio systems, use the RCA Line Out jacks on the rear of the unit. Connect these to the audio input of an amplifier or powered speakers.
Remote Control
The included remote control allows convenient operation of various functions from a distance. Functions typically include power on/off, mode selection, volume control, and track navigation for CD/USB/Bluetooth.
Maintenance
Cleaning the Unit
- Wipe the unit with a soft, dry cloth. Do not use abrasive cleaners or solvents.
- Keep the dust cover closed when not in use to prevent dust accumulation on the turntable.
Stylus Care
- Clean the stylus periodically with a soft brush, brushing from back to front.
- Replace the stylus approximately every 200-300 hours of play, or if you notice a decrease in sound quality.
Troubleshooting
If you encounter any issues, refer to the following common problems and solutions.
- No Power: Ensure the power adapter is securely connected to the unit and a working power outlet.
- No Sound: Check the volume level. Ensure the correct function mode is selected. If using external speakers, verify connections.
- Record Skipping: Ensure the record is clean and free of dust. Place the unit on a stable, level surface. Check if the stylus is clean and not damaged.
- Poor Radio Reception: Adjust the FM telescopic antenna. For AM, try rotating the unit. Move away from other electronic devices that may cause interference.
- Bluetooth Pairing Issues: Ensure the unit is in Bluetooth pairing mode. Turn off and on Bluetooth on your device. Ensure your device is within range.
Specifications
- Brand: JORLAI
- Model Name: T402
- Material: Wood
- Power Source: Mains Powered
- Signal Format: Analog
- Included Components: Remote Control
- Special Features: Bluetooth music streaming, AM/FM radio, CD & cassette player, USB playback, vintage design
- Compatible Devices: Speakers, Tablet, Smartphone
Warranty Information
JORLAI products are designed and manufactured to the highest quality standards. For specific warranty details, please refer to the warranty card included with your purchase or contact JORLAI customer support. Keep your proof of purchase for warranty claims.
Support
If you require further assistance or have questions not covered in this manual, please contact JORLAI customer support. Contact information can typically be found on the product packaging or the official JORLAI website.