
Introduction
The airgoo Magnetic 8-Port ARGB Controller (Model AG-DRGB08) is designed to expand and manage your PC's Addressable RGB (ARGB) lighting. This compact hub allows for the simultaneous control of up to eight 5V 3-pin ARGB devices, such as fans, LED strips, and AIO coolers. Each channel supports up to 256 LEDs, enabling independent control for complex and layered lighting configurations. The controller is compatible with popular software platforms like SignalRGB and OpenRGB, offering extensive customization options for your PC's aesthetics.
Key features include SATA power for stable operation, a magnetic fixture for easy installation, and a built-in auto-resetting fuse for component protection.
Package Contents
Please verify that all items are present in the package:
- 1 x airgoo Magnetic 8-Port ARGB Controller (AG-DRGB08)
- 1 x USB 2.0 to Motherboard 9-pin Cable
- 1 x S-ATA Power Cable
Product Overview
The airgoo AG-DRGB08 controller features eight 3-pin ARGB ports, a USB input for data communication with the motherboard, and a SATA power input for stable power delivery.

Image: Diagram of the airgoo AG-DRGB08 controller showing eight ARGB ports (A1-A8), USB input, and Power input.
The compact design of the controller allows for flexible placement within your PC case.

Image: Diagram illustrating the dimensions of the airgoo AG-DRGB08 controller: Length 2.66 inches, Width 1.39 inches, Total thickness 0.47 inches.
Setup and Installation
Follow these steps to install and set up your airgoo AG-DRGB08 controller:
- Software Download: Before connecting the controller, it is essential to download and install either SignalRGB or OpenRGB software on your computer. The controller requires one of these applications for configuration and control of your ARGB devices.
- Magnetic Mounting: Utilize the magnetic fixture on the back of the controller to securely attach it inside your PC case or to any suitable steel surface. This allows for flexible placement and aids in clean cable management.
- Connect USB Cable: Connect the provided USB 2.0 to Motherboard 9-pin Cable from the controller's USB port to an available USB 2.0 9-pin header on your PC motherboard.
- Connect SATA Power: Connect the provided S-ATA Power Cable from the controller's power input to an available SATA power connector from your PC's power supply unit (PSU).
Caution: Ensure your power supply can provide the necessary current on the 5V rails, especially when connecting multiple heavily loaded ARGB devices.
- Connect ARGB Devices: Connect your 5V 3-pin ARGB devices (e.g., fans, LED strips, AIO coolers) to any of the eight ARGB ports (A1-A8) on the controller. Each channel supports up to 256 LEDs.
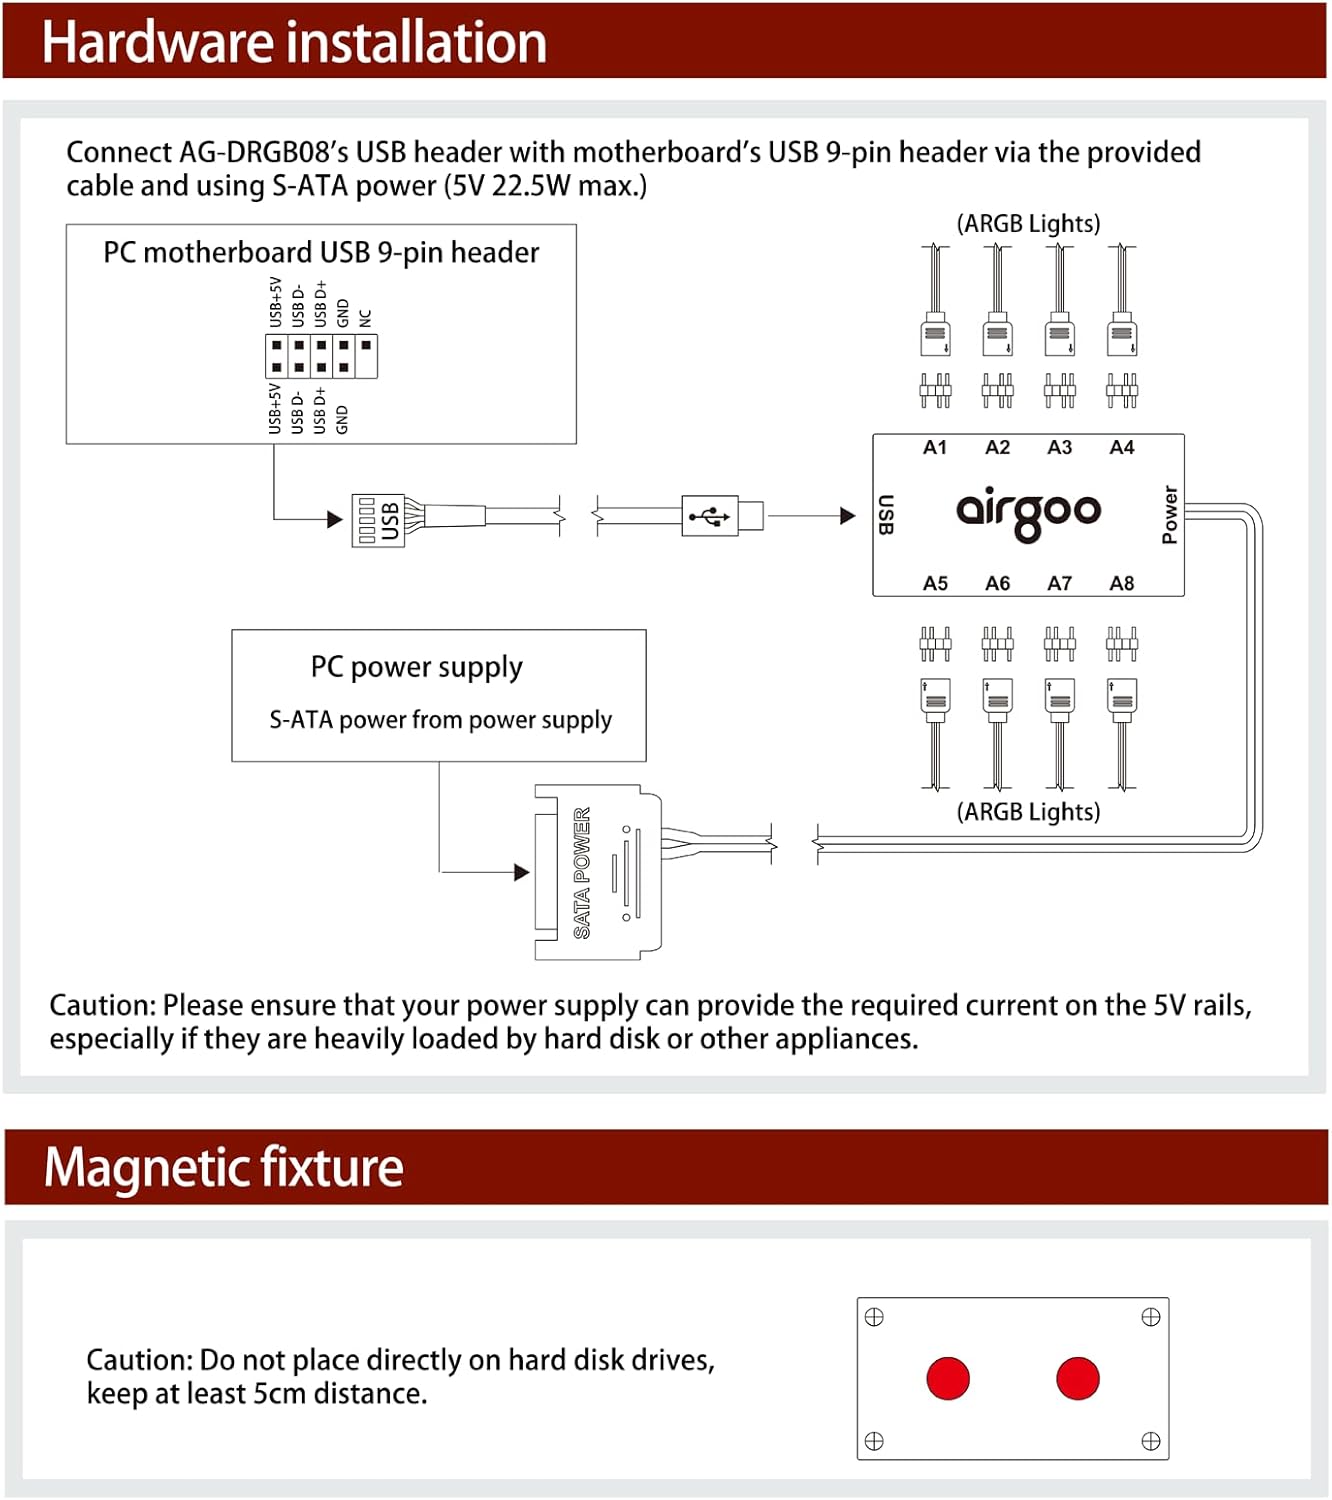
Image: Diagram showing the connection of the airgoo AG-DRGB08 controller to a PC motherboard's USB 9-pin header and a PC power supply's S-ATA power, with ARGB lights connected to the controller's ports.
Operation
Once the controller is physically installed and your PC is powered on, launch the SignalRGB or OpenRGB software that you previously installed. The software will detect the AG-DRGB08 controller, allowing you to configure and synchronize your ARGB lighting effects across all connected devices.
The USB 2.0 connection ensures real-time command execution from the software, and the dedicated SATA power input prevents flickering, even when all eight ports are utilized at maximum load.
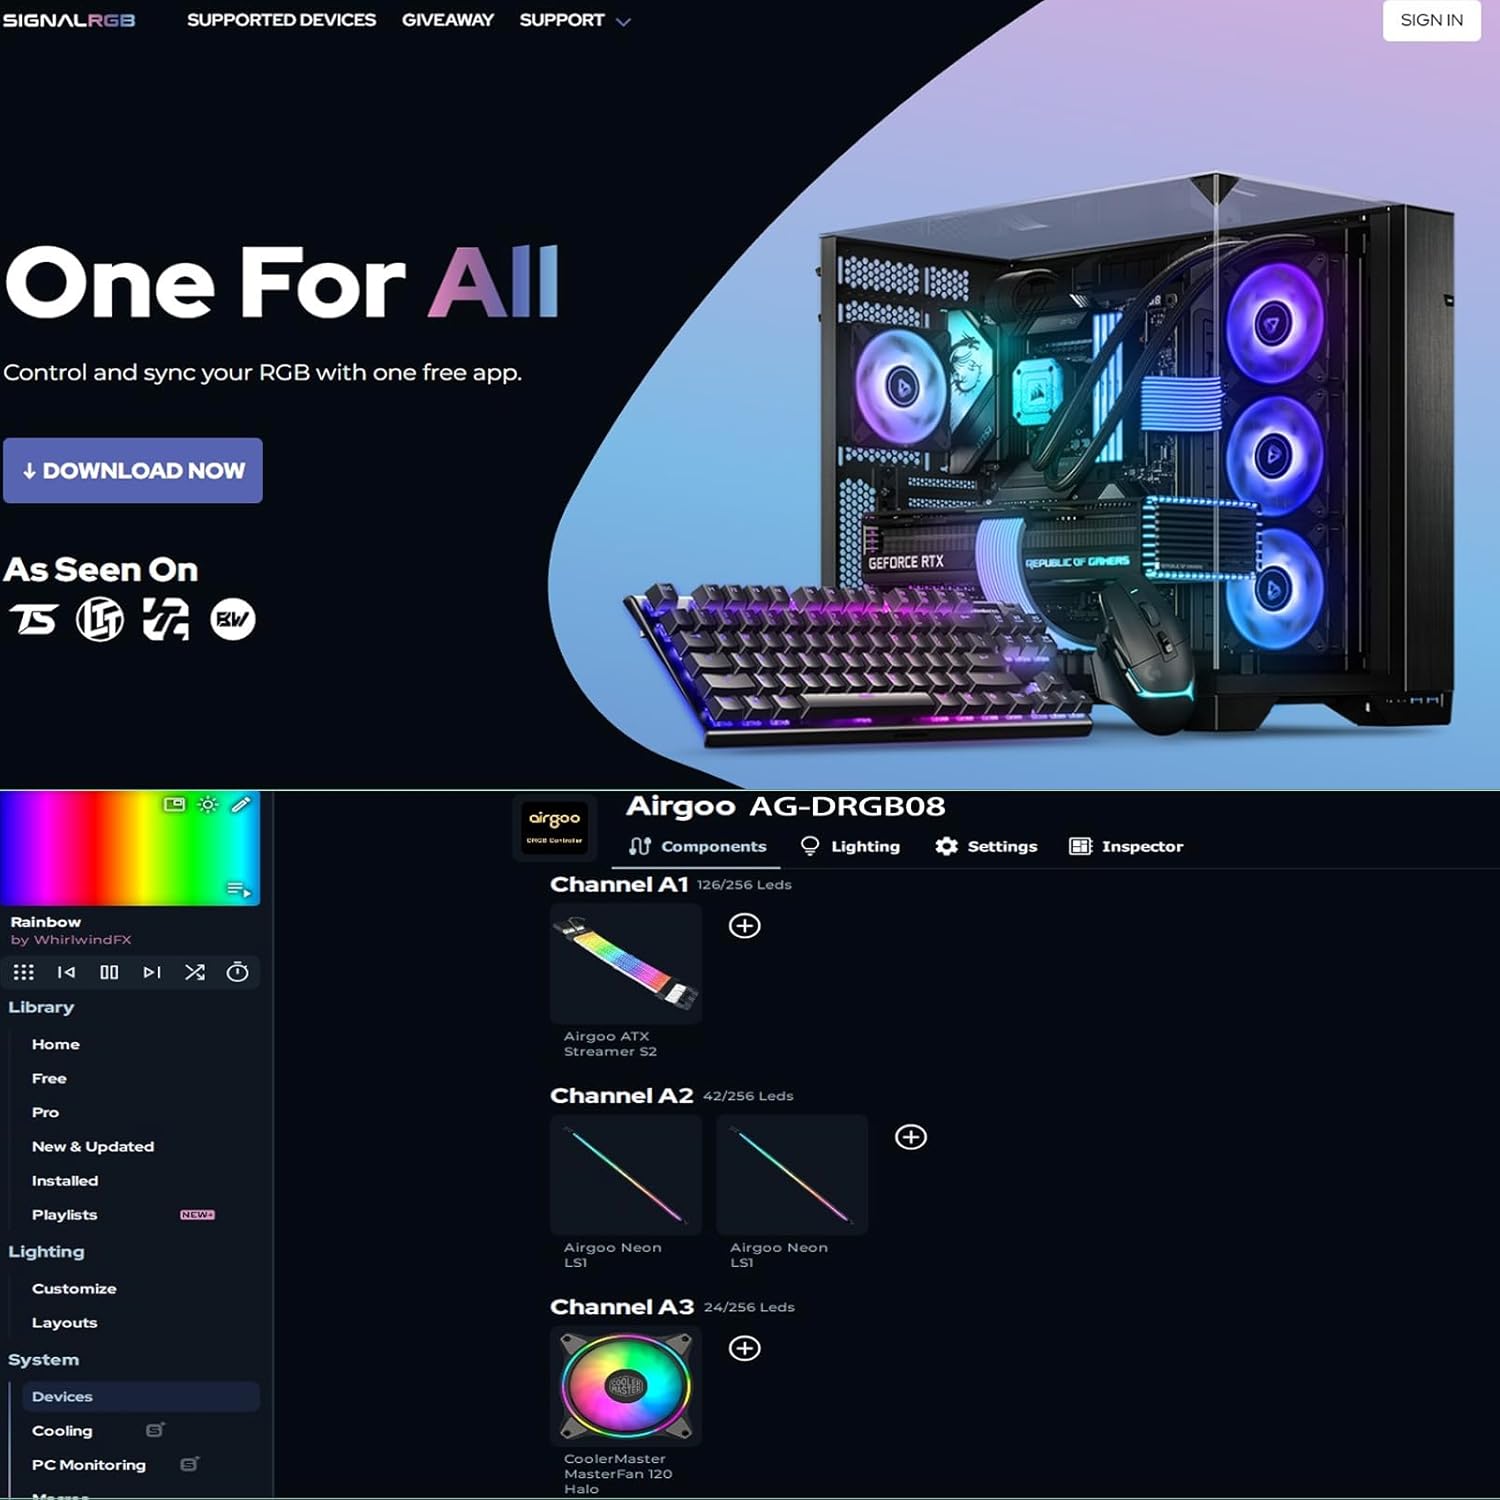
Image: Screenshot of the SignalRGB software interface, showing the detection and management of the airgoo AG-DRGB08 controller with multiple ARGB channels and customization options.
Maintenance
The airgoo AG-DRGB08 controller is designed for minimal maintenance. To ensure optimal performance and longevity:
- Keep the unit free from excessive dust accumulation. Periodically clean your PC case to maintain good airflow.
- Do not attempt to open or modify the controller. Doing so may void the warranty and could cause damage to the device or connected components.
Troubleshooting
If you encounter issues with your airgoo AG-DRGB08 controller, refer to the following common problems and solutions:
Controller Not Detected by Software
- Ensure the USB 2.0 cable is securely connected to both the controller and an active USB 2.0 9-pin header on your motherboard.
- Verify that the SATA power cable is properly connected to the controller and a functional SATA power connector from your PSU.
- Confirm that SignalRGB or OpenRGB software is correctly installed, updated to the latest version, and running.
- Try restarting your computer to refresh USB device detection.
LEDs Flickering or Not Lighting Up
- Check all ARGB device connections to the controller's ports (A1-A8) for secure fitment.
- Ensure the SATA power cable is firmly connected to the controller and the PSU. Insufficient power can cause flickering or non-functional LEDs.
- Verify that your ARGB devices are 5V 3-pin compatible. This controller does not support 12V RGB devices. Connecting incompatible devices can cause damage.
- If flickering persists with many devices, consider reducing the total number of LEDs connected, although each channel supports up to 256 LEDs.
Magnetic Fixture Not Holding
- Ensure the surface you are attempting to attach the controller to is made of steel or a similar ferromagnetic material.
- Avoid placing the controller on non-metallic surfaces or surfaces with thick paint/coatings that may weaken the magnetic hold.
Specifications
| Brand | airgoo |
| Model | AG-DRGB08 |
| Dimensions (L x W x H) | 6.76 x 3.53 x 1.19 cm (2.66 x 1.39 x 0.47 inches) |
| Weight | 110 g |
| Input Power | SATA Power |
| ARGB Ports | 8 (5V 3-pin Addressable RGB) |
| Max LEDs per Channel | 256 LEDs |
| Data Interface | USB 2.0 (9-pin motherboard header) |
| Software Compatibility | SignalRGB (Windows), OpenRGB (Windows, Linux, macOS) |
| Safety Features | Built-in auto-resetting fuse |
Safety Information
- The controller is equipped with a built-in auto-resetting fuse to safeguard against overloads and short circuits, protecting your ARGB components.
- Caution: Do not place the magnetic fixture directly on hard disk drives. Maintain a minimum distance of 5cm (approximately 2 inches) to prevent potential magnetic interference.
- Ensure that only 5V 3-pin Addressable RGB (ARGB) devices are connected to the controller. Connecting 12V 4-pin RGB devices is incompatible and can cause irreversible damage to the controller and the connected components.
- Operate the device within its specified power limits. Overloading the controller with too many LEDs or incompatible devices can lead to malfunction or damage.
Warranty and Support
For information regarding product warranty, technical support, or service inquiries, please refer to the official airgoo website or contact their customer service department directly. Please retain your purchase receipt as proof of purchase for any warranty claims.