
1. Introduction
This manual provides essential information for the safe and efficient operation, installation, and maintenance of your Voltas 1.5 Ton 3 Star Inverter Split AC, model 183INV VERTIS AI ZEST GOLD. Please read this manual thoroughly before using the appliance and retain it for future reference.
2. Safety Information
Important Safety Instructions:
- Ensure the power supply matches the unit's specifications.
- Do not attempt to repair or modify the unit yourself. Contact qualified service personnel.
- Keep the area around the outdoor unit clear of obstructions.
- Do not insert objects into the air outlet or inlet.
- Ensure proper grounding to prevent electric shock.
- This appliance uses R32 refrigerant. Handle with care and ensure proper ventilation during installation and servicing.
3. What's in the Box
Upon unpacking, verify that all components listed below are present and undamaged:
- 1 Indoor Unit
- 1 Outdoor Unit
- 1 Interconnecting Cable (9.84 ft)
- 1 Set (2 nos) Interconnecting Pipe (Copper, 9.84 ft)
- 4 Outdoor Vibration Pads
- 1 Remote Control
- 2 AAA Remote Batteries
- 1 Indoor Mounting Plate
- Plastic Sleeves + Screws for Indoor Mounting Plate
- User Manual (this document)

Figure 3.1: Components included in the Voltas AC package. This image displays the indoor unit, outdoor unit, remote control, insulated copper line set, indoor mounting plate, and small accessories.
4. Setup & Installation
Professional installation is recommended for optimal performance and safety. Refer to the detailed installation guide provided by the installer.
4.1 Unit Dimensions

Figure 4.1: Dimensions of the Indoor and Outdoor Units. The indoor unit measures 92 cm (W) x 31 cm (H) x 23.8 cm (D). The outdoor unit measures 83.5 cm (W) x 55.5 cm (H) x 29.5 cm (D).
- Indoor Unit (IDU): 92 cm (W) x 31 cm (H) x 23.8 cm (D)
- Outdoor Unit (ODU): 83.5 cm (W) x 55.5 cm (H) x 29.5 cm (D)
4.2 Installation Location
Choose a location for the indoor unit that allows for even air distribution and is away from direct sunlight or heat sources. The outdoor unit should be placed in a well-ventilated area, away from obstacles that could impede airflow.
4.3 Electrical Connections
Ensure all electrical wiring complies with local codes and regulations. The unit requires a 230 Volts power supply. A dedicated circuit breaker is recommended.
4.4 Refrigerant Piping
The interconnecting copper pipes facilitate the flow of R32 refrigerant between the indoor and outdoor units. Proper vacuuming and leak testing are crucial during installation.
5. Operating Instructions
5.1 Remote Control Overview
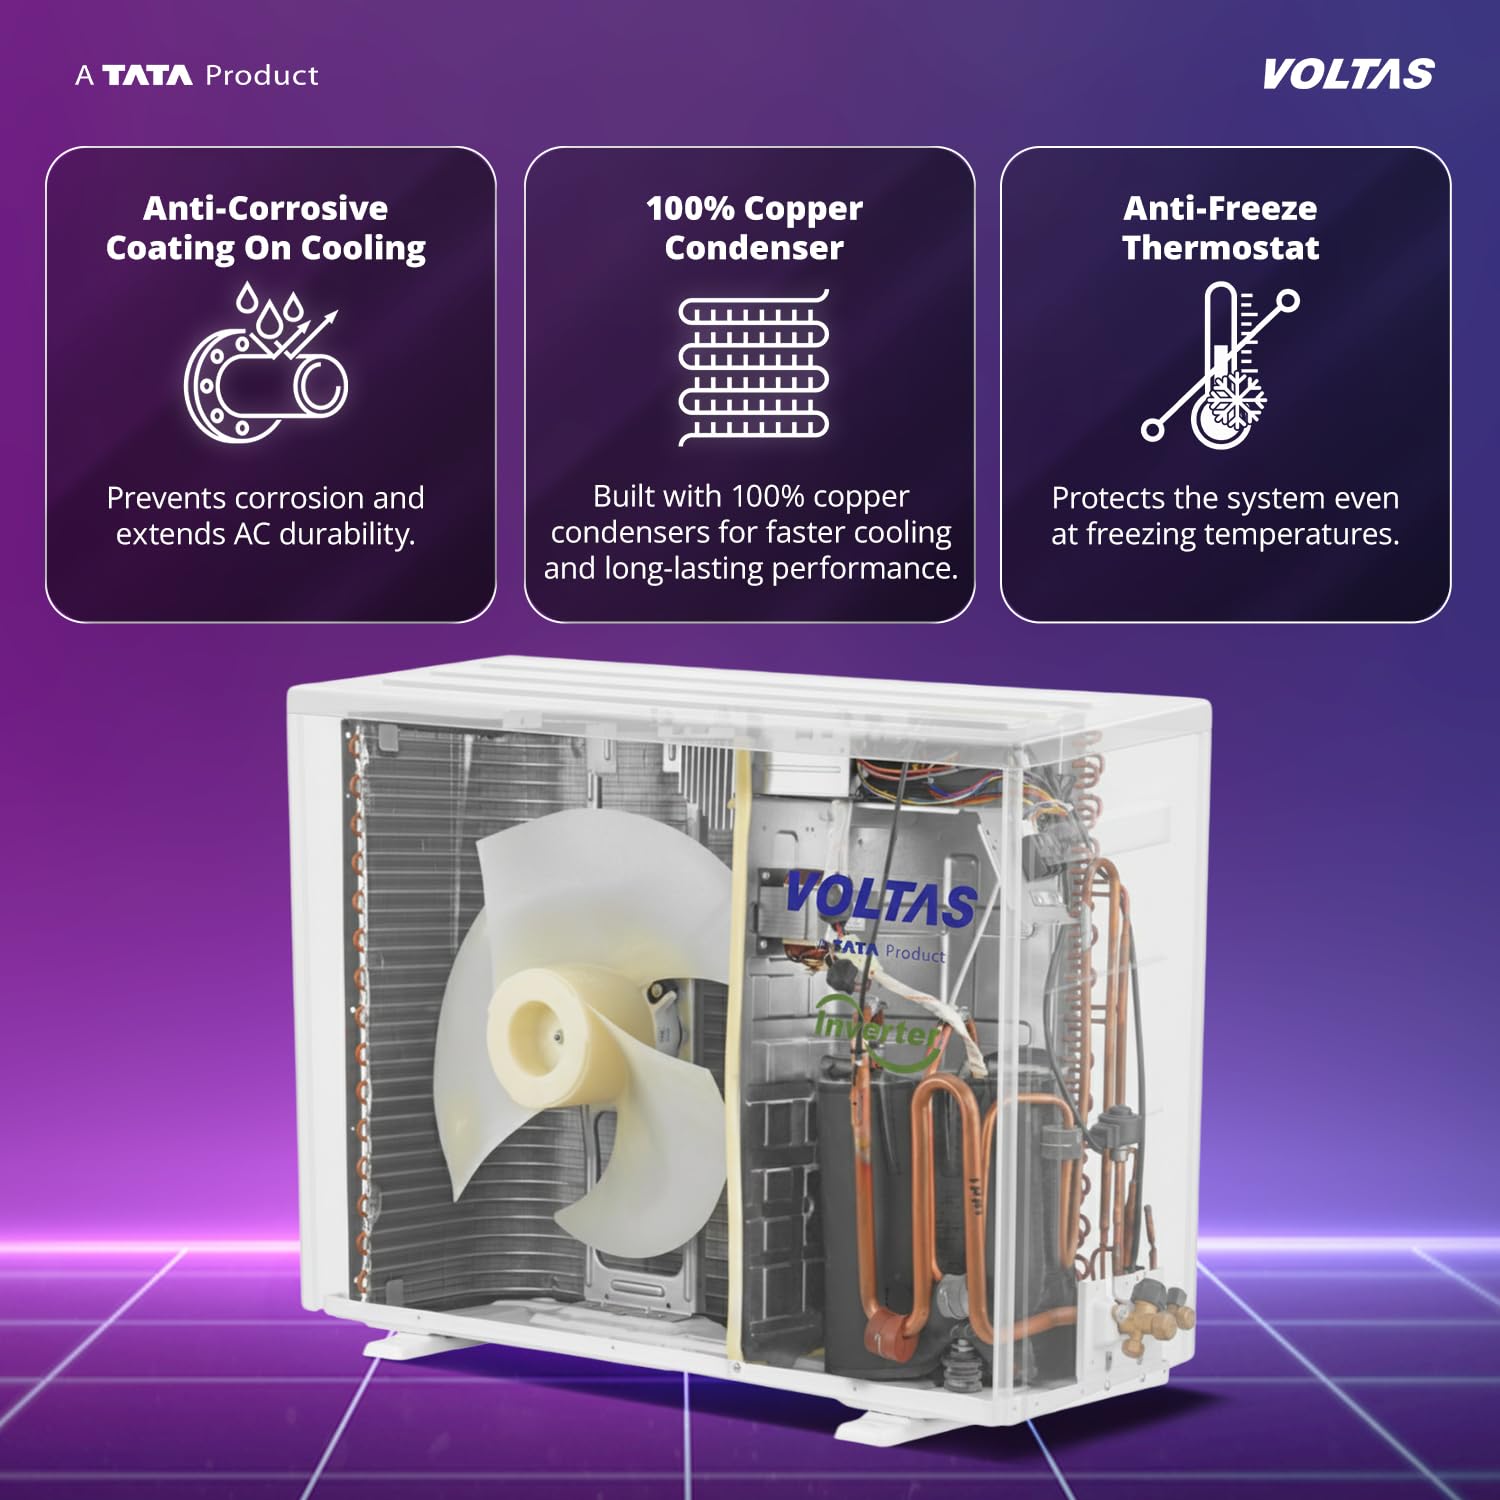
Figure 5.1: Remote Control Layout. The remote features an LCD display, Power (ON/OFF), Temperature controls, Auto/Cool/Dry/Fan modes, Fan Speed Adjustment, V Swing/H Swing, Timer ON/OFF, Temp Display/Settings, Anti Freeze, and SST (Sleep Set/Sleep Mode) buttons.
The remote control allows you to manage all functions of your AC. Insert the two AAA batteries provided into the remote control before first use.
- Power (ON/OFF): Press to turn the unit on or off.
- Temperature Controls: Use '+' and '-' buttons to adjust the desired temperature.
- Mode Button: Cycle through operating modes: Auto, Cool, Dry, Fan.
- Fan Speed: Adjust the fan speed (Low, Medium, High, Auto).
- Swing Buttons (V Swing / H Swing): Control the vertical and horizontal airflow direction.
- Timer ON/OFF: Set a timer for the unit to turn on or off automatically.
- Sleep Mode (SST): Activates the sleep function for comfortable night-time operation.
5.2 Cooling Modes and Features
Your Voltas AC offers various modes and intelligent features for enhanced comfort and energy efficiency.
5.2.1 6-in-1 Convertible Cooling Modes

Figure 5.2: 6-in-1 Convertible Cooling Modes. These modes allow you to adjust the cooling capacity based on the number of occupants or specific needs, ranging from energy-saving for one person to advanced cooling for large rooms.
The AC features 6 convertible cooling modes, allowing you to adjust the cooling capacity based on your needs and room occupancy. These modes can be selected via the remote control to optimize energy consumption and comfort.
- Mode 1: Mid cooling for energy savings.
- Mode 2: Gentle cooling for up to 2 people.
- Mode 3: Moderate cooling for up to 3 people.
- Mode 4: Accelerated cooling for up to 5 people.
- Mode 5: Turbo Fast cooling for more than 5 people.
- Mode 6: Advanced cooling for large rooms.
5.2.2 AI Adaptive Cooling

Figure 5.3: AI Adaptive Cooling Mode. This feature intelligently adjusts cooling based on ambient conditions and user activity, such as during workouts, sleep, or gaming, to maintain optimal comfort.
The AI Adaptive Cooling mode intelligently adjusts the cooling performance based on real-time conditions and user preferences, ensuring optimal comfort and energy efficiency.
5.2.3 Geo-fencing Technology

Figure 5.4: Geo-fencing Technology. This feature allows the AC to automatically switch to standby or pre-cool based on your proximity to your home, managed via a smartphone application.
Utilize geo-fencing to automatically control your AC based on your location. The unit can switch to standby when you leave a defined area and begin pre-cooling before you arrive home, saving energy and ensuring comfort.
5.2.4 Sleep Mode

Figure 5.5: Sleep Mode. This mode adjusts the temperature gradually throughout the night to provide a comfortable and energy-efficient sleeping environment.
The Sleep Mode automatically adjusts the temperature to provide a comfortable sleeping environment while conserving energy.
5.2.5 4-Way Air Swing
Figure 5.6: 4-Way Air Swing. This feature ensures uniform cooling throughout the room by directing airflow both horizontally and vertically.
The 4-way air swing function ensures uniform cooling distribution across the entire room by automatically adjusting the horizontal and vertical louvers.
5.2.6 Inverter Compressor
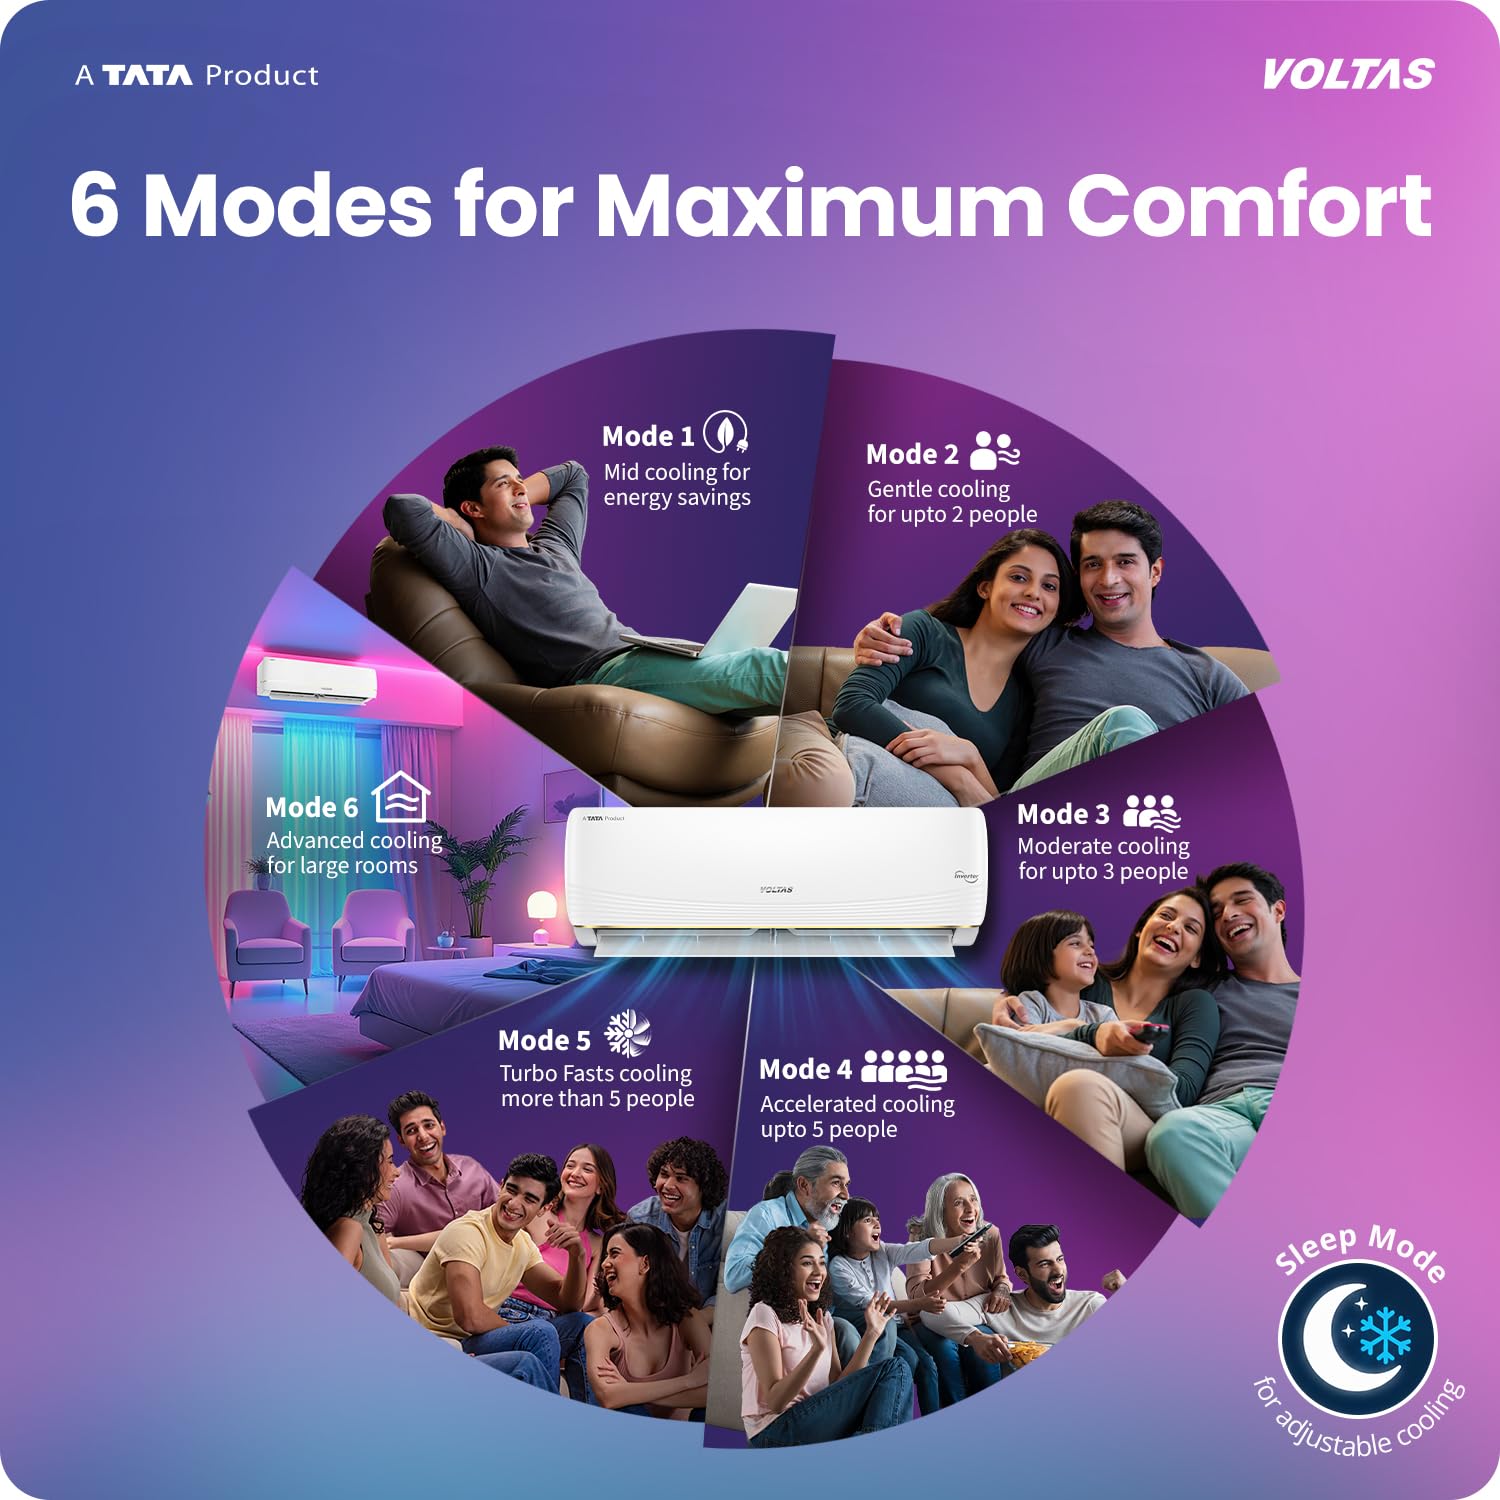
Figure 5.7: Inverter Compressor Technology. This technology provides higher cooling performance and lower electricity bills by adjusting compressor speed according to heat load.
The inverter compressor adjusts its speed based on the heat load, providing precise temperature control, higher energy efficiency, and quieter operation.
5.2.7 AI Energy Manager

Figure 5.8: AI Energy Manager. This feature helps save power and alerts users to excess energy consumption, contributing to lower electricity bills.
The AI Energy Manager monitors and optimizes power consumption, providing alerts for excessive usage to help you save on electricity bills.
5.2.8 Ice Wash Technology

Figure 5.9: Ice Wash Technology. This feature provides deep coil cleaning for fresh air every day.
Ice Wash Technology performs a deep cleaning of the indoor unit's coil, ensuring fresh and clean air output.
5.2.9 Anti Dust Filter with Anti Microbial Coating
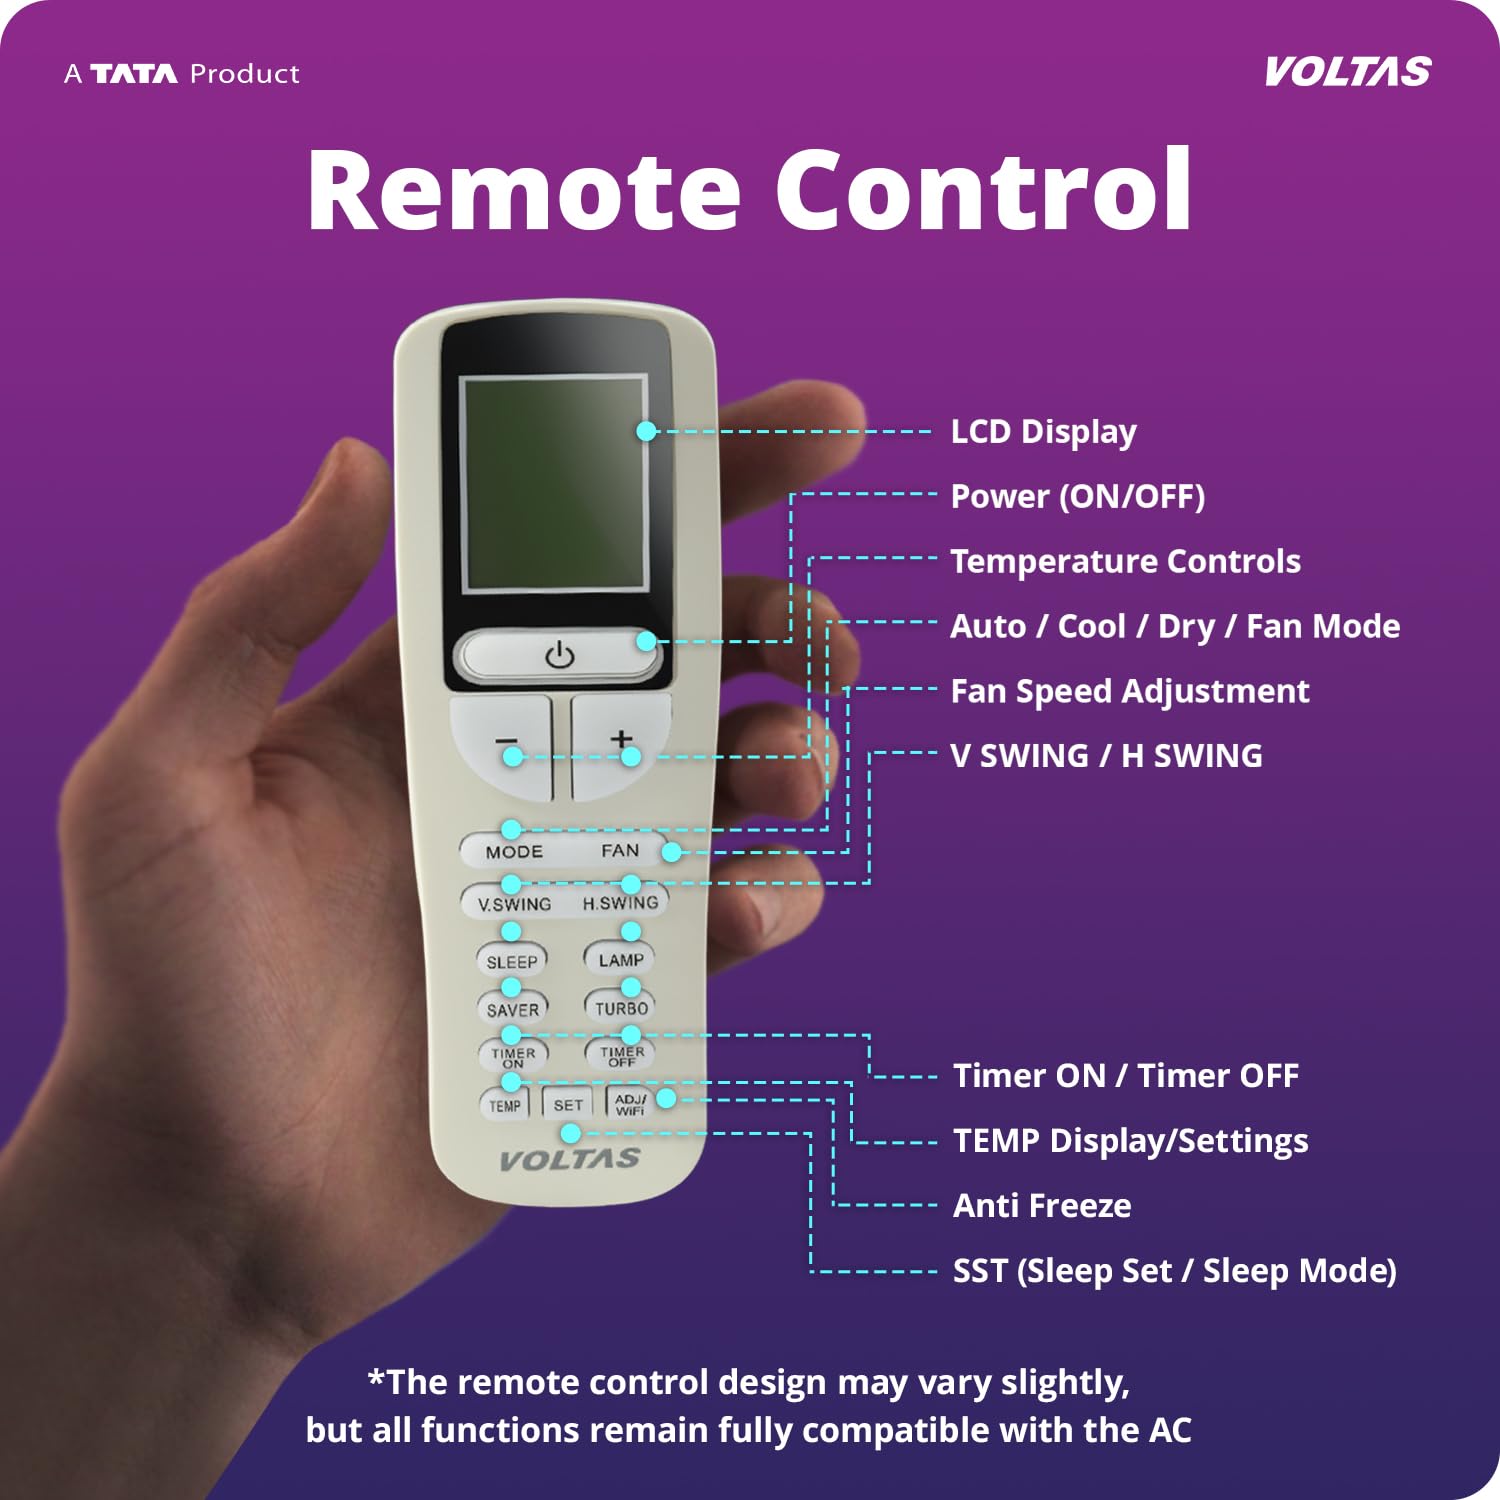
Figure 5.10: Anti Dust Filter with Anti Microbial Coating. This filter provides a protective barrier against dust and germs, ensuring cleaner air.
The advanced anti-dust filter with an anti-microbial coating helps remove dust particles and inhibits the growth of microbes, providing cleaner and healthier air.
5.2.10 Anti-Freeze Thermostat

Figure 5.11: Anti-Freeze Thermostat. This component protects the AC system from damage by preventing freezing at low temperatures.
The anti-freeze thermostat protects the system by preventing the indoor coil from freezing, ensuring continuous and safe operation.
5.2.11 Copper Condenser
Figure 5.12: 100% Copper Condenser. The copper condenser ensures superior heat transfer and enhanced durability.
The 100% copper condenser coil ensures efficient heat exchange, better cooling performance, and enhanced durability due to its corrosion-resistant properties.
5.2.12 Anti-Corrosive Coating
Figure 5.13: Anti-Corrosive Coating. This coating prevents corrosion on the cooling fins, extending the lifespan of the AC unit.
An anti-corrosive coating on the cooling coils protects against rust and corrosion, extending the lifespan and maintaining the efficiency of the unit.
5.2.13 Memory Restart
Figure 5.14: Memory Restart. This function automatically restores the previous settings after a power outage.
In case of a power outage, the Memory Restart function automatically resumes operation with the previously set parameters once power is restored.
5.2.14 Wide Operating Voltage Range

Figure 5.15: Wide Range Voltage Operation. This feature ensures stable performance even with fluctuating voltage, eliminating the need for an external stabilizer.
The unit is designed to operate stably across a wide voltage range, reducing the need for an external voltage stabilizer.
6. Maintenance
Regular maintenance ensures optimal performance and extends the lifespan of your AC unit. Always disconnect power before performing any maintenance.
6.1 Filter Cleaning
Figure 6.1: Filter Clean Indicator. This indicator alerts you when the air filter requires cleaning, ensuring efficient operation and air quality.
The AC is equipped with a filter clean indicator that alerts you when the air filter needs cleaning. A dirty filter can reduce cooling efficiency and air quality.
- Open the front panel of the indoor unit.
- Remove the air filters.
- Clean the filters using a vacuum cleaner or wash them with lukewarm water and mild detergent.
- Allow filters to dry completely before reinstalling.
- Close the front panel.
Clean filters every two weeks or as indicated by the filter clean indicator.
6.2 General Cleaning
- Wipe the indoor unit's exterior with a soft, damp cloth. Do not use harsh chemicals or abrasives.
- Ensure the outdoor unit's coils are free from dust, leaves, and other debris.
6.3 Seasonal Maintenance
Before and after the cooling season, it is advisable to have a qualified technician perform a thorough check-up of the unit, including refrigerant levels, electrical connections, and drainage system.
7. Troubleshooting
Before contacting customer support, refer to the following table for common issues and their solutions.
| Problem | Possible Cause | Solution |
|---|---|---|
| Unit does not turn on | No power supply; Remote control batteries dead; Circuit breaker tripped. | Check power connection; Replace remote batteries; Reset circuit breaker. |
| Insufficient cooling | Dirty air filter; Obstruction in outdoor unit; Doors/windows open; Temperature setting too high. | Clean air filter; Remove obstructions; Close doors/windows; Lower temperature setting. |
| Unusual noise | Loose parts; Unit not level; Obstruction in fan. | Check for loose parts; Ensure unit is level; Remove any obstructions. If noise persists, contact service. |
| Water leakage from indoor unit | Clogged drain pipe; Improper installation. | Check and clear drain pipe; Contact installer for inspection. |
| Remote control not working | Dead batteries; Obstruction between remote and unit; Remote sensor blocked. | Replace batteries; Ensure clear line of sight; Clean remote sensor area. |
If the problem persists after attempting these solutions, please contact Voltas Customer Support.
8. Specifications
| Feature | Detail |
|---|---|
| Brand | Voltas |
| Model Name | VERTIS AI ZEST GOLD |
| Model Number | SAC 183INV VERTIS AI ZEST GOLD |
| Capacity | 1.5 Tons |
| Cooling Power | 5.1 Kilowatts |
| Energy Rating | 3 Star (BEE) |
| Annual Energy Consumption | 918.84 kWh/year |
| ISEER Value | 4.33 |
| Refrigerant | R-32 |
| Compressor Type | Inverter (Variable Speed) |
| Condenser Coil | Copper |
| Noise Level (Indoor) | 46 Decibels |
| Power Source | Corded Electric |
| Voltage | 230 Volts |
| Wattage | 5100 Watts |
| Indoor Unit Dimensions (DxWxH) | 23.8D x 92W x 31H Centimeters |
| Outdoor Unit Dimensions (DxWxH) | 29.5D x 83.5W x 55.5H Centimeters |
| Item Weight (Indoor Unit) | 10.5 Kilograms |
| Control Method | Remote Control |
| Special Features | 6 Adjustable Cooling Modes, Hidden Display, Wide Operating Range, LCD Remote, Long Air Throw, Anti Dust Filter, Anti Freeze Thermostat, Sleep Mode, Gas Leak Detection, Memory Restart, Geofencing, AI Adaptive Cooling, 4-way Air Swing, Cool, Dry, Fan, Speed Mode. |

Figure 8.1: Energy Efficiency Label. This label indicates the 3-star rating, ISEER value of 4.33, and annual energy consumption of 918.84 units per year for the Voltas 183INV VERTIS AI ZEST GOLD model.
9. Warranty Information
Your Voltas AC comes with the following warranty:
- Product Warranty: 1 Year Comprehensive Warranty on the Product.
- Compressor Warranty: 10 Years Warranty on Inverter Compressor.
- PCB Warranty: 5 Years Warranty on PCB.
Warranty claims require the Amazon Invoice as proof of purchase. For detailed terms and conditions, please refer to the official Voltas website or contact customer support.

Figure 9.1: Warranty Information. This image highlights the 5-year comprehensive warranty, which includes gas charging and labor for call & compressor replacements, valid until 31st May 2026. All inverter ACs come with a 10-year compressor warranty.
10. Customer Support
For any queries, service requests, or technical assistance, please contact Voltas Customer Support:
- Email: vcare@voltas.com
- Phone: +919650694555 / 1860-599-4555
Voltas provides 24x7 customer support across 18000+ pin codes and 100% of Tier 1 cities.

Figure 10.1: Customer Support Information. This image provides contact details for Voltas customer support, including email (vcare@voltas.com) and phone numbers (+919650694555 / 1860-599-4555), highlighting 24x7 service availability.

