
1. Introduction
Thank you for choosing the SURPASS Steel Rolling Door Opener, Model SUP-V-2. This manual provides essential information for the safe installation, operation, and maintenance of your new garage door opener. Please read these instructions thoroughly before beginning installation or operation to ensure proper function and to prevent injury or damage.
This opener is designed for use with steel roll-up doors or transparent roll-up doors, offering quiet and smooth operation with advanced safety features.
2. Safety Information
WARNING: Failure to follow these safety instructions may result in serious injury or death.
- Always disconnect power to the opener before performing any maintenance or adjustments.
- Keep children and pets away from the garage door area, especially when the door is in motion.
- Do not allow children to operate the door opener controls or play with remote controls.
- Ensure the door is balanced and in good working condition before installing the opener. A poorly balanced door can cause severe injury.
- The opener features a Safety Obstacle Reverse system. If an obstruction is detected while closing, the door will automatically stop and reverse. Test this feature monthly.
- Consider connecting an optional photo beam sensor for enhanced safety, especially in high-traffic areas.
- Familiarize yourself with the Manual Release Handle for emergency operation during power outages.
- Install wall controls out of reach of small children and away from all moving parts of the door.
3. Product Features
- Ultra-Quiet Operation: Operates at approximately 50-55 decibels, ensuring minimal noise disturbance.
- Soft Start and Stop: Provides smooth and gradual door movement, reducing wear and tear.
- Electronic Limits: Precise control over door travel limits.
- Automatic LED Light: Illuminates the garage area when the door is in use.
- Safety Obstacle Reverse System: Automatically stops and reverses the door upon detecting an obstruction.
- Emergency Connection: Compatible with battery backup systems for operation during power outages.
- Rolling Code Technology: Enhances security by changing the access code each time the remote is used.
- High Lifting Capacity: Capable of lifting doors up to 16.4 feet in height and a maximum weight of 84 lbs (800N lifting force).
- Quick Opening Speed: Achieves opening speeds of 6-8 inches per second.
- Multiple Control Options: Includes remote control, button control on the unit, and support for an optional wall button.

Figure 1: Key features of the SURPASS Rolling Door Opener.
4. Specifications
| Specification | Detail |
|---|---|
| Model Number | SUP-V-2 |
| Brand | SURPASS |
| Material | Metal |
| Color/Finish | Black Steel |
| Installation Type | Screw-In |
| Recommended Use | Garage, Shop, Factory, Warehouse |
| Max Door Height | 16.4 ft |
| Max Lifting Weight | 84 lbs (800N) |
| Opening Speed | 6-8 inches/second |
| Noise Level | Approximately 50-55 dB |
| Power | 100W (DC Power, 3/4HP equivalent) |
| Remote Control Range | Up to 197 inches (approx. 16.4 ft) |
| Dimensions (Approx.) | Length: 16.1 in, Width: 11.4 in, Height: 7.1 in |
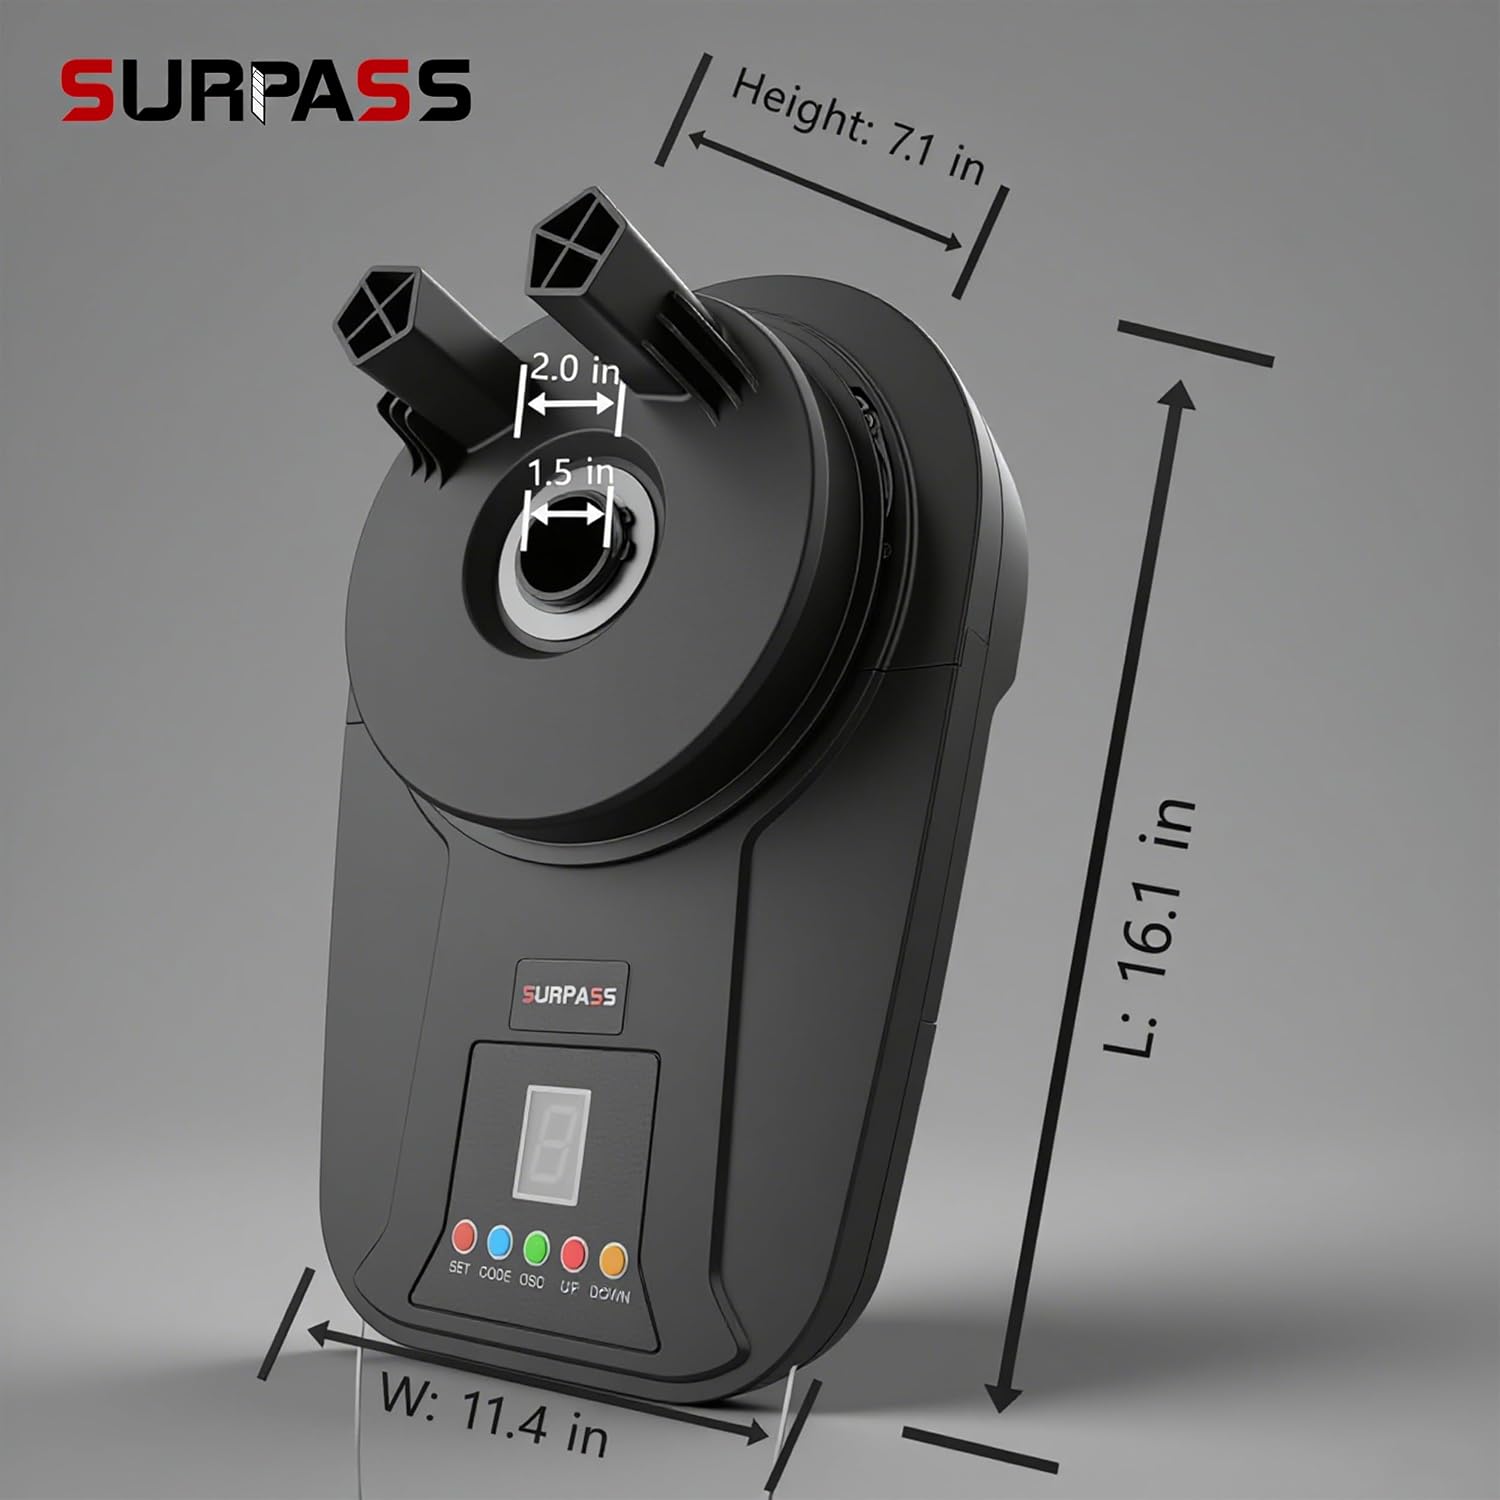
Figure 2: Product Dimensions.
5. Setup and Installation
Before installation, ensure you have all necessary tools and that your garage door is in good working order and properly balanced. Refer to the detailed instructions included in your package for specific steps and diagrams.
5.1 Pre-Installation Checks
- Verify the door operates smoothly manually.
- Check for any obstructions in the door's path.
- Ensure adequate side distance for opener mounting.

Figure 3: Installation overview and side distance requirements.
5.2 Mounting the Opener
- Position the opener on the door shaft according to the provided diagrams.
- Secure the opener using the screw-in installation method.
- Wheel Hole Modification: If your roll-up door wheel hole does not match the opener's shaft, use the included paper mold to cut the correct hole shape.

Figure 4: Wheel hole modification guide.
5.3 Electrical Connection
Connect the opener to a suitable power source. Ensure all connections are secure and comply with local electrical codes. If connecting a battery backup system or photo beam, follow their respective installation instructions.
6. Operating Instructions
6.1 Setting Limits
The opener uses electronic limits to define the door's fully open and fully closed positions. Refer to the detailed programming section in your package for instructions on how to set these limits using the 'SET', 'UP', and 'DOWN' buttons on the opener unit.
6.2 Remote Control Pairing
To pair your remote control with the opener, press the 'CODE' button on the opener unit, then press the desired button on your remote control. The opener's indicator light will confirm successful pairing. Repeat for additional remotes.
6.3 Normal Operation
- Remote Control: Press the designated button on your remote to open or close the door.
- Button Control: Use the 'UP' and 'DOWN' buttons on the opener unit to operate the door.
- Automatic LED Light: The integrated LED light will activate during door operation and remain on for a short period after the door stops.

Figure 5: Control options: Remote, Button, and Manual Operation.
6.4 Manual Operation (Emergency Release)
In case of a power outage or opener malfunction, you can operate the door manually. Locate the red puller cord attached to the opener. Pull the red cord firmly to disengage the opener from the door, allowing you to open or close the door by hand. To re-engage, push the door up or down until it reconnects with the opener mechanism.
7. Maintenance
Regular maintenance ensures the longevity and safe operation of your SURPASS door opener.
- Monthly: Test the safety obstacle reverse system. Place a 2x4 piece of wood flat on the floor in the door's path. The door should reverse upon contact. If it does not, adjust the force settings or consult troubleshooting.
- Quarterly: Inspect the door's moving parts (rollers, hinges, cables, springs) for wear or damage. Lubricate as recommended by your door manufacturer.
- Annually: Check all mounting hardware for tightness. Ensure electrical connections are secure.
- Keep the opener unit clean and free from dust and debris.
8. Troubleshooting
If you encounter issues with your opener, refer to the following common problems and solutions:
| Problem | Possible Cause | Solution |
|---|---|---|
| Opener does not respond to remote/buttons. | No power; remote battery dead; remote not paired; safety sensor obstructed. | Check power supply; replace remote battery; re-pair remote; clear safety sensor path. |
| Door reverses unexpectedly or does not close fully. | Obstruction in door path; safety sensor misaligned/dirty; force limits set too low. | Remove obstruction; clean/align safety sensors; adjust force limits (refer to full manual). |
| Door opens/closes partially. | Travel limits incorrectly set. | Reset and reprogram the electronic travel limits. |
| Excessive noise during operation. | Door components need lubrication; loose hardware. | Lubricate door parts; tighten all mounting hardware. |
For more detailed troubleshooting or issues not listed here, please refer to the complete manual provided with your product or contact customer support.
9. Warranty and Support
Your SURPASS Steel Rolling Door Opener is covered by a manufacturer's warranty. Please refer to the warranty card included in your product packaging for specific terms and conditions, including warranty duration and coverage details.
For technical assistance, replacement parts, or warranty claims, please contact SURPASS customer support through the contact information provided in your product documentation or on the official SURPASS website.