
1. Introduction
Thank you for choosing the Patiowell 8x8 FT Outdoor Storage Shed. This manual provides essential information for the safe assembly, operation, and maintenance of your new storage shed. Please read all instructions carefully before beginning assembly and retain this manual for future reference. This metal storage shed is designed to provide a spacious and secure solution for organizing your gardening tools, lawn equipment, and other outdoor items, featuring a durable metal structure, sloping roof for drainage, and breathable vents for air circulation.
2. Safety Information
Your safety and the safety of others are very important. Please observe all safety warnings and instructions provided in this manual.
- Always wear appropriate safety gear, including gloves, during assembly to prevent cuts from sharp edges.
- Ensure the assembly area is clear of obstructions and on a level, stable surface.
- Do not attempt to assemble the shed during strong winds or adverse weather conditions.
- Keep children and pets away from the assembly area.
- Periodically check all fasteners to ensure they remain tight and secure.
- Be aware that due to lighting conditions during photography or variations in computer display settings, there may be slight differences in the product's color compared to the images shown. This is a normal occurrence and does not affect the product's quality or functionality.
3. Parts List
Before assembly, verify that all components listed in the packing list are present and undamaged. Each component is clearly labeled with a part number. If any parts are missing or damaged, please contact customer support.
- Metal Panels (Walls, Roof)
- Frame Components (Beams, Supports)
- Door Panels and Hinges
- Lockable Metal Latch
- Corner Protection Caps
- Screw Protection Caps
- Screws, Nuts, and Washers
- Tool Kit (for assembly)
- Installation and Usage Manual
4. Setup & Assembly
Assembly typically requires two adults and can take several hours. Follow the detailed step-by-step instructions provided in the included assembly manual. Ensure you have a level foundation for optimal stability and durability.
4.1 Preparation
- Unpack and Identify Parts: Carefully unpack all components. Refer to the parts list and ensure all pieces are present and undamaged. Some panels may be slightly bent; gently straighten them if necessary, wearing gloves.
- Prepare the Foundation: Select a level and stable area for the shed. A concrete slab or a well-prepared gravel base is recommended for long-term stability and to prevent moisture issues.
- Gather Tools: The shed includes a basic tool kit. You may also need a rubber mallet, a measuring tape, and a step ladder.
4.2 Assembly Steps
- Assemble the Base Frame: Begin by assembling the base frame components. Ensure all holes align correctly before tightening screws. Proper alignment at this stage is crucial for the entire structure.
- Attach Wall Panels: Secure the wall panels to the base frame. Pay attention to the orientation of each panel as indicated in the manual.
- Install Door Frame and Doors: Assemble the door frame and attach the door panels. Ensure the hinges are properly aligned for smooth operation. Install the lockable metal latch.
- Construct the Roof Frame: Assemble the roof support beams and attach them to the top of the wall panels.
- Install Roof Panels: Carefully place and secure the roof panels. The sloping design facilitates water drainage.
- Add Finishing Touches: Install corner protection caps and screw protection caps for enhanced durability and safety.
Important: Some holes may require slight adjustment for perfect alignment. Do not overtighten screws, especially with a power drill, as this can strip the threads. Hand tightening is recommended for most fasteners.

Image: Shed interior with doors open, demonstrating ample storage capacity.
5. Operation
Your Patiowell storage shed is designed for straightforward use.
- Door Operation: The shed features a single hinged door. To open, disengage the lockable metal latch and pull the door outwards. To close, push the door firmly shut and engage the latch.
- Security: Utilize the integrated lockable metal latch to secure your stored items. A padlock (not included) can be added for additional security.
- Ventilation: The shed is equipped with breathable vents to promote air circulation and reduce condensation inside. Ensure these vents are not blocked by stored items.

Image: Details of the lockable latch and protective caps.
6. Maintenance
Regular maintenance will extend the life and appearance of your storage shed.
- Cleaning: Clean the exterior of the shed periodically with mild soap and water. Avoid abrasive cleaners or harsh chemicals that could damage the metal finish.
- Drainage: Ensure the sloping roof remains clear of debris (leaves, snow) to allow for proper water drainage.
- Ventilation: Regularly check that the vents are clear and unobstructed to maintain good air circulation.
- Fasteners: Periodically inspect all screws and bolts for tightness. Retighten as necessary to maintain structural integrity.
- Rust Prevention: While the shed is designed to be weather-resistant, inspect for any signs of rust, especially in areas where the coating might be scratched. Touch up with rust-inhibiting paint if needed.

Image: Shed's all-weather features and air vents.
7. Troubleshooting
| Problem | Possible Cause | Solution |
|---|---|---|
| Panels are bent or damaged upon arrival. | Shipping damage. | Gently straighten bent panels with gloved hands. If damage is severe, contact customer support for replacement parts. |
| Holes do not align during assembly. | Slight manufacturing variations or improper initial alignment. | Ensure the base frame is perfectly level and square. Loosen adjacent screws, adjust the panel slightly, and then retighten. Do not force screws. |
| Screws do not bite or strip easily. | Overtightening or incorrect screw size. | Use a hand screwdriver instead of a power drill. Ensure you are using the correct screw for the designated hole. If a screw strips, try a slightly larger screw or use a nut and bolt combination if possible. |
| Water leakage inside the shed. | Gaps in panels, improper roof installation, or blocked drainage. | Check all panel overlaps and roof seams for proper sealing. Ensure roof panels are securely fastened. Clear any debris from the roof and around the base. Consider applying silicone sealant to critical seams if leakage persists. |
| Door does not close or latch properly. | Misaligned door frame or hinges. | Adjust the door hinges or the door frame until the door closes smoothly and the latch aligns. Ensure the shed is on a level surface, as an uneven base can cause door misalignment. |
8. Specifications
| Feature | Detail |
|---|---|
| Brand | Patiowell |
| Model Number | PS25-1022-BN-3 |
| Color | Brown |
| Material | Metal (Steel) |
| Product Dimensions (D x W x H) | 89.3"D x 90.9"W x 75.9"H (Approx. 7.44 ft D x 7.57 ft W x 6.32 ft H) |
| Door Height | 75.9 inches |
| Style | Modern |
| Door Style | Single Hinged |
| Water Resistance Level | Water Resistant |
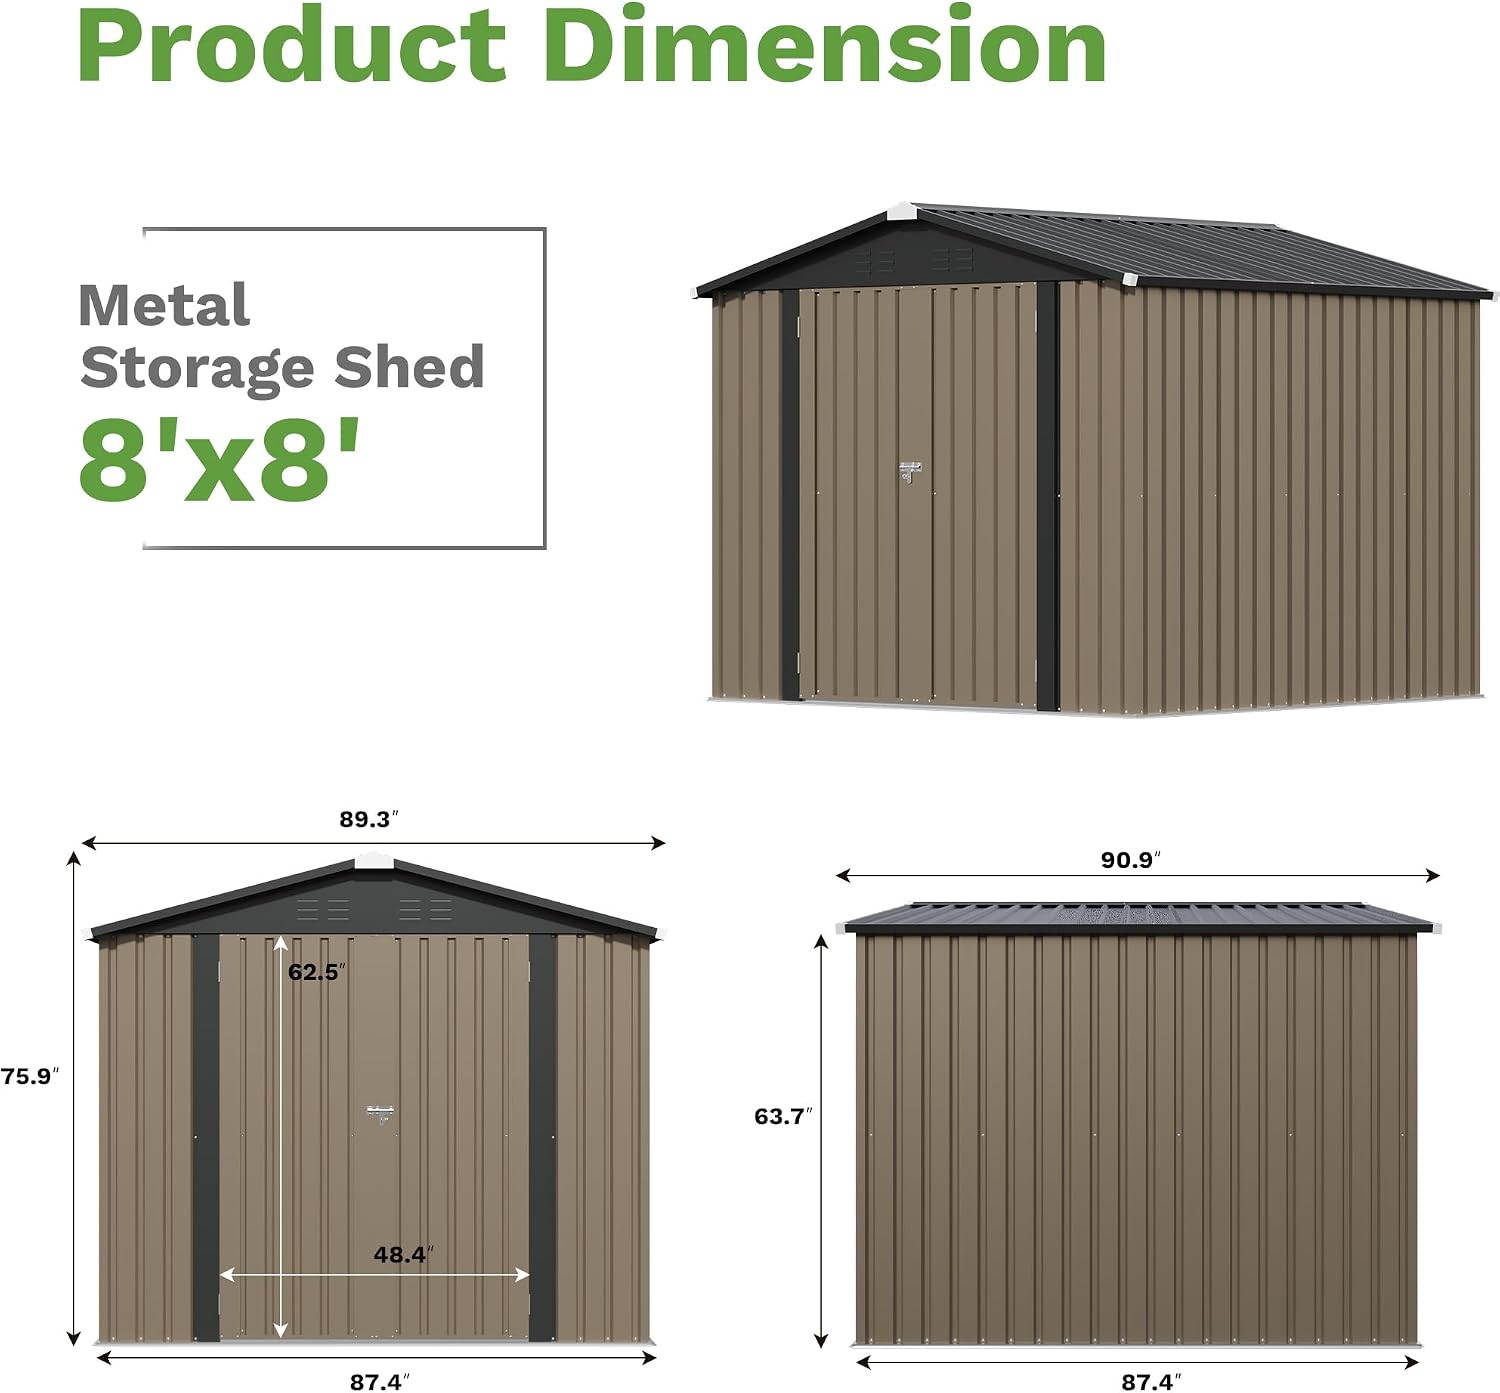
Image: Product dimension diagram showing height, width, and depth measurements.
9. Customer Support
Patiowell is committed to customer satisfaction. If you have any questions, require assistance with assembly, or need replacement parts, please do not hesitate to contact our dedicated customer support team. Every component comes with clear part number labels, and a detailed step-by-step assembly manual is provided for hassle-free setup.
For support, please refer to the contact information provided with your purchase documentation or visit the official Patiowell website.


