
1. Product Overview
The CAT DX1010.1 is an 18V Li-ion cordless brushless impact drill designed for professional drilling and screwdriving applications. It features advanced brushless motor technology, providing enhanced power, extended runtime, and a longer service life compared to brushed motors. This tool is part of the CAT 1 FOR ALL battery system, allowing its 18V Li-ion battery to be used across various compatible CAT cordless products.
Key features include a robust two-speed gearbox, 50Nm maximum torque, and CAT impact technology for efficient drilling in various materials, including concrete. The drill offers electronic speed adjustment, 20+1+1 torque settings for precise control, and a 13mm keyless metal chuck for quick bit changes. For user convenience, it includes an integrated LED work light, a battery charge level indicator, and comes with two 2.0Ah batteries and a 60-minute fast charger for continuous operation.
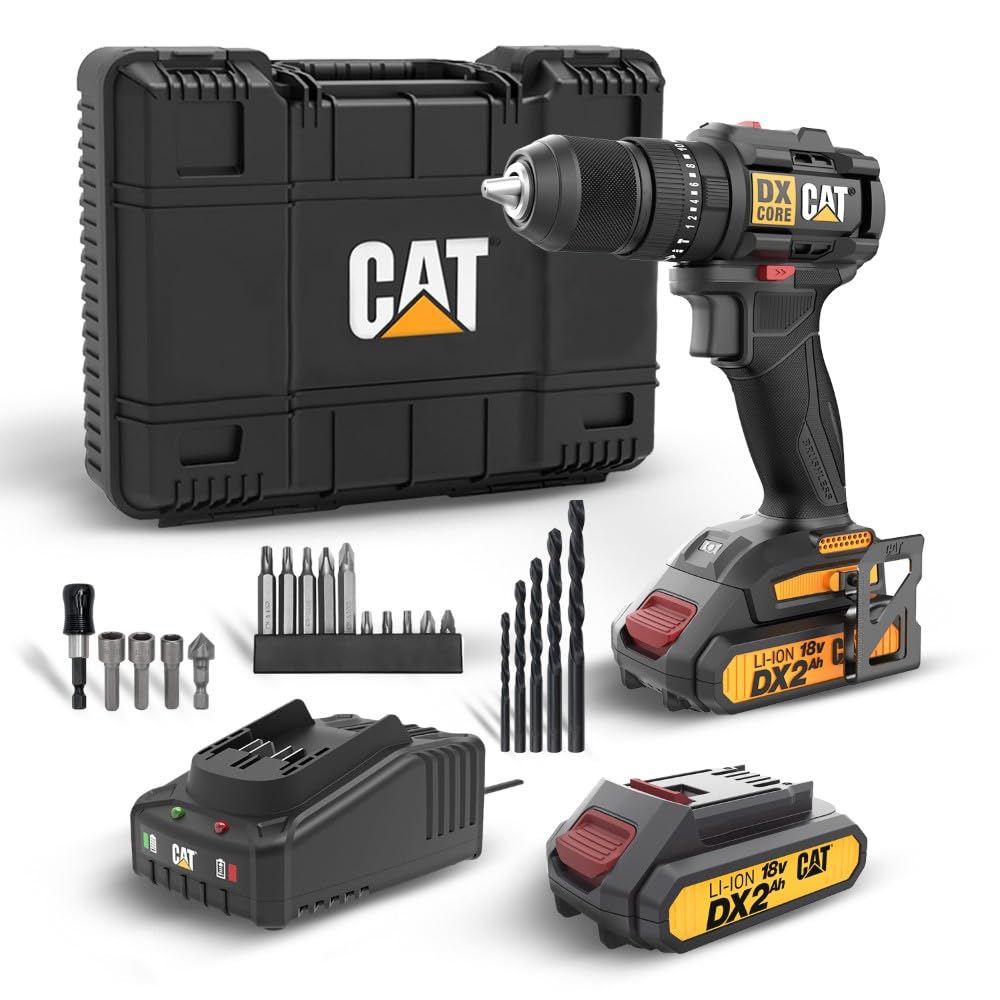
Image 1.1: The CAT DX1010.1 Cordless Brushless Impact Drill shown with its 18V Li-ion battery and the 20-piece drilling and screwdriving accessory set.
2. General Safety Instructions
Always observe basic safety precautions when using electric tools to reduce the risk of fire, electric shock, and personal injury. Keep this instruction manual for future reference.
2.1 Work Area Safety
- Keep the work area clean and well-lit. Cluttered or dark areas invite accidents.
- Do not operate power tools in explosive atmospheres, such as in the presence of flammable liquids, gases, or dust. Power tools create sparks which may ignite the dust or fumes.
- Keep children and bystanders away while operating a power tool. Distractions can cause you to lose control.
2.2 Electrical Safety
- Power tool plugs must match the outlet. Never modify the plug in any way.
- Avoid body contact with earthed or grounded surfaces such as pipes, radiators, ranges, and refrigerators. There is an increased risk of electric shock if your body is earthed or grounded.
- Do not expose power tools to rain or wet conditions. Water entering a power tool will increase the risk of electric shock.
2.3 Personal Safety
- Always wear eye protection. Use safety glasses, goggles, or a face shield.
- Wear hearing protection when operating power tools for extended periods.
- Dress properly. Do not wear loose clothing or jewelry. Keep your hair and clothing away from moving parts.
- Stay alert, watch what you are doing, and use common sense when operating a power tool.
2.4 Power Tool Use and Care
- Do not force the power tool. Use the correct power tool for your application.
- Disconnect the battery pack from the power tool before making any adjustments, changing accessories, or storing power tools.
- Store idle power tools out of the reach of children and do not allow persons unfamiliar with the power tool or these instructions to operate the power tool.
- Maintain power tools and accessories. Check for misalignment or binding of moving parts, breakage of parts, and any other condition that may affect the power tool’s operation.
2.5 Battery Tool Use and Care
- Recharge only with the charger specified by the manufacturer. A charger that is suitable for one type of battery pack may create a risk of fire when used with another battery pack.
- Use power tools only with specifically designated battery packs. Use of any other battery packs may create a risk of injury and fire.
- When the battery pack is not in use, keep it away from other metal objects, like paper clips, coins, keys, nails, screws or other small metal objects, that can make a connection from one terminal to another. Shorting the battery terminals together may cause burns or a fire.
- Under abusive conditions, liquid may be ejected from the battery; avoid contact. If contact accidentally occurs, flush with water. If liquid contacts eyes, additionally seek medical help. Liquid ejected from the battery may cause irritation or burns.
3. Setup
3.1 Charging the Battery
- Ensure the battery charger is connected to a suitable power outlet.
- Slide the 18V Li-ion battery pack into the charger until it clicks into place.
- The charger's indicator light will show the charging status. A full charge typically takes 60 minutes.
- Once fully charged, remove the battery from the charger.
The battery features an LED charge level indicator. Press the button on the battery to check the remaining power.
3.2 Installing and Removing the Battery
- To install: Align the battery pack with the base of the drill handle and slide it in until it locks securely.
- To remove: Press the battery release button (usually located on the side of the battery) and slide the battery pack out.
3.3 Attaching and Removing Drill Bits/Accessories
The DX1010.1 features a 13mm keyless metal chuck for easy bit changes.
- To attach: Rotate the chuck collar counter-clockwise until the jaws are open wide enough to insert the bit.
- Insert the drill bit or accessory fully into the chuck.
- Rotate the chuck collar clockwise to tighten the jaws firmly around the bit. Ensure the bit is centered and secure.
- To remove: Rotate the chuck collar counter-clockwise to loosen the jaws and pull the bit out.

Image 3.1: The CAT DX1010.1 drill in use, demonstrating drilling into wood. Ensure the bit is securely fastened in the chuck before operation.
4. Operation
4.1 Power On/Off and Variable Speed Trigger
The drill is activated by pressing the trigger switch. The speed is variable; pressing the trigger further increases the speed. Release the trigger to turn off the drill.
4.2 Forward/Reverse Rotation
A switch located above the trigger controls the direction of rotation. Push the switch to the left for forward rotation (drilling/screwing in) and to the right for reverse rotation (removing screws). Position the switch in the center to lock the trigger and prevent accidental startup.
4.3 Gear Selection (2-Speed Gearbox)
The DX1010.1 features a two-speed gearbox for optimal performance across different applications.
- Gear 1 (Low Speed, High Torque): Ideal for heavy-duty screwdriving and drilling large diameter holes in wood or metal. (0-450 rpm)
- Gear 2 (High Speed, Low Torque): Suitable for fast drilling in lighter materials and general screwdriving. (0-1900 rpm)
To change gears, slide the gear selector switch located on top of the drill. Ensure the drill is stopped before changing gears to prevent damage.
4.4 Torque Adjustment and Mode Selection
The torque adjustment collar allows you to set the desired torque level for screwdriving and select between drilling and impact drilling modes.
- Torque Settings (1-20): For screwdriving, rotate the collar to the desired torque setting. The drill will stop driving once the set torque is reached, preventing overtightening or damage to the screw/material. Start with a lower setting and increase as needed.
- Drill Mode (Drill Bit Symbol): For general drilling in wood, metal, and plastic without impact.
- Impact Drill Mode (Hammer Symbol): For drilling into masonry, concrete, and other hard materials where impact action is required.

Image 4.1: The CAT DX1010.1 in impact drill mode, demonstrating its capability to drill into concrete. Always select the appropriate mode and wear safety gear.
4.5 Integrated LED Work Light
The integrated LED light illuminates the work area when the trigger is pressed. It remains on for approximately 20 seconds after the trigger is released, providing continued visibility in dimly lit spaces.
4.6 CAT Active Battery Protection Technology
This technology protects the battery and motor from damage during extreme overload or bit jamming. If activated, the drill will automatically stop, and the LED light will flash. Release the trigger and press it again to resume operation.

Image 4.2: The CAT DX1010.1 being used for screwdriving. The torque settings allow for precise control to prevent damage to materials or fasteners.
5. Maintenance
Regular maintenance ensures the longevity and optimal performance of your CAT DX1010.1 drill.
5.1 Cleaning
- Always disconnect the battery pack before cleaning.
- Use a soft, damp cloth to wipe down the exterior of the tool. Do not use harsh chemicals or abrasive cleaners.
- Keep the ventilation openings clear of dust and debris to prevent overheating. Use compressed air if necessary.
- Clean the chuck jaws regularly to ensure proper grip on bits.
5.2 Battery Care and Storage
- Store batteries in a cool, dry place, away from direct sunlight and extreme temperatures.
- Do not store batteries in a discharged state for extended periods. Recharge them periodically if not in use.
- The CAT 18V Li-ion battery retains its charge for up to 4 times longer than ordinary batteries when not in use.
- If the battery is damaged, do not attempt to repair it. Contact authorized service personnel.
5.3 General Storage
Store the drill and its accessories in the provided carrying case to protect them from dust, moisture, and physical damage. Keep the tool out of reach of children.
6. Troubleshooting
This section addresses common issues you might encounter with your CAT DX1010.1 drill.
| Problem | Possible Cause | Solution |
|---|---|---|
| Drill does not start | Battery discharged Battery not properly inserted Forward/Reverse switch in center (locked) position Tool malfunction | Charge the battery Reinsert battery until it clicks Move switch to forward or reverse position Contact customer support |
| Reduced power or performance | Battery low Incorrect gear selection Incorrect torque setting Overload protection activated | Recharge battery Select appropriate gear (Gear 1 for high torque) Adjust torque collar to a higher setting or drill mode Release trigger, wait, then resume operation |
| Bit slips in chuck | Chuck not tightened sufficiently Bit shank is dirty or damaged | Tighten chuck collar firmly Clean or replace the bit |
| Battery not charging | Charger not plugged in Battery or charger is faulty Battery too hot/cold | Check power connection Contact customer support Allow battery to reach room temperature |
If you encounter a problem not listed here or if the suggested solutions do not resolve the issue, please contact CAT customer support.
7. Technical Specifications
| Feature | Specification |
|---|---|
| Model Number | DX1010.1 |
| Power | 18V Li-ion |
| Battery Capacity | 2.0Ah (36Wh) |
| Max. Torque | 50Nm |
| No-load Speed (Gear 1) | 0-450 rpm |
| No-load Speed (Gear 2) | 0-1900 rpm |
| Impact Rate (Gear 1) | 0-7600 bpm |
| Impact Rate (Gear 2) | 0-32000 bpm |
| Max. Drilling Capacity (Concrete) | 13mm |
| Max. Drilling Capacity (Metal) | 13mm |
| Max. Drilling Capacity (Wood) | 35mm |
| Chuck Capacity | 13mm |
| Weight (Tool only) | 1.32 Kg |
| Dimensions (L x W x H) | 33U x 13G x 40Y cm (Product Dimensions) |
| Standard Equipment | 20-piece Drilling/Screwdriving Accessory Set, 2x CAT 18V 2.0Ah Battery, 60-minute Battery Charger, Belt Clip, Carrying Case |
8. Warranty and Support
CAT products are manufactured to high-quality standards and are guaranteed against manufacturing defects. The specific warranty period and terms may vary by region and retailer. Please refer to the warranty card included with your product or contact your point of purchase for detailed warranty information.
8.1 Customer Support
For technical assistance, spare parts, or service inquiries, please contact CAT customer support. Contact details can typically be found on the CAT official website or on the product packaging.
When contacting support, please have your product model number (DX1010.1) and purchase date available.


