
1. Product Overview
The Jocisland 10 x 18-Ft Wooden Greenhouse is designed to provide an optimal environment for plant growth and can also serve as a versatile outdoor space. Constructed with a sturdy wood frame and high-quality sunboard panels, it offers durability, excellent ventilation, and protection against various weather conditions.
Key Features:
- Sturdy Wood Frame: Built with premium wood and metal hardware for enhanced durability and stability against wind and weight.
- Quick Assembly: Features pre-assembled walls, doors, and windows for a streamlined setup process.
- Spacious Interior: Offers a 5.45ft (166cm) wall height and 7.68ft (234cm) peak height, providing ample space for gardening and movement.
- Excellent Ventilation: Equipped with 2 adjustable windows and 2 doors to regulate temperature and humidity effectively.
- Sunboard Material: High-quality polycarbonate panels provide heat insulation and UV protection, safeguarding plants from harmful rays.

2. Safety Information
Read all instructions carefully before assembly and use. Failure to follow these instructions may result in injury or damage to the product.
- Always wear appropriate safety gear, including gloves and eye protection, during assembly.
- Ensure the assembly area is clear of obstructions and children.
- Do not attempt to assemble the greenhouse alone. A minimum of two people is recommended for safe and efficient assembly.
- Verify that all components are present and undamaged before beginning assembly. Do not use damaged parts.
- Securely anchor the greenhouse to a level and stable foundation to prevent wind damage.
- Do not hang heavy objects from the greenhouse frame.
- Regularly inspect the greenhouse for any signs of wear, damage, or loose connections.
3. Setup and Assembly
The Jocisland Wooden Greenhouse features a sub-module design with pre-assembled panels, doors, and windows to simplify the installation process. It is recommended to have at least two people for assembly, and a ladder may be required for reaching higher sections.
3.1 Preparation
- Site Selection: Choose a level, stable area for installation. A proper foundation is crucial for the greenhouse's stability.
- Unpacking: Open all boxes and lay out all components. Verify against the parts list (not provided in this manual, refer to your packaging).
- Organize Hardware: Sort screws and other hardware into labeled containers for easy access during assembly.
- Seal Roof Panels: Before assembly, apply a clear sealant around the seams of the roof panels to prevent water leakage. Allow adequate drying time.

3.2 Assembly Steps
- Align Boards: Simply align the pre-drilled holes of the boards to be joined.
- Secure with Screws: Use the provided hardware to screw the components together, ensuring a firm connection. Use a piece of cardboard between screws and polycarbonate panels if using a battery-operated screwdriver to prevent damage.
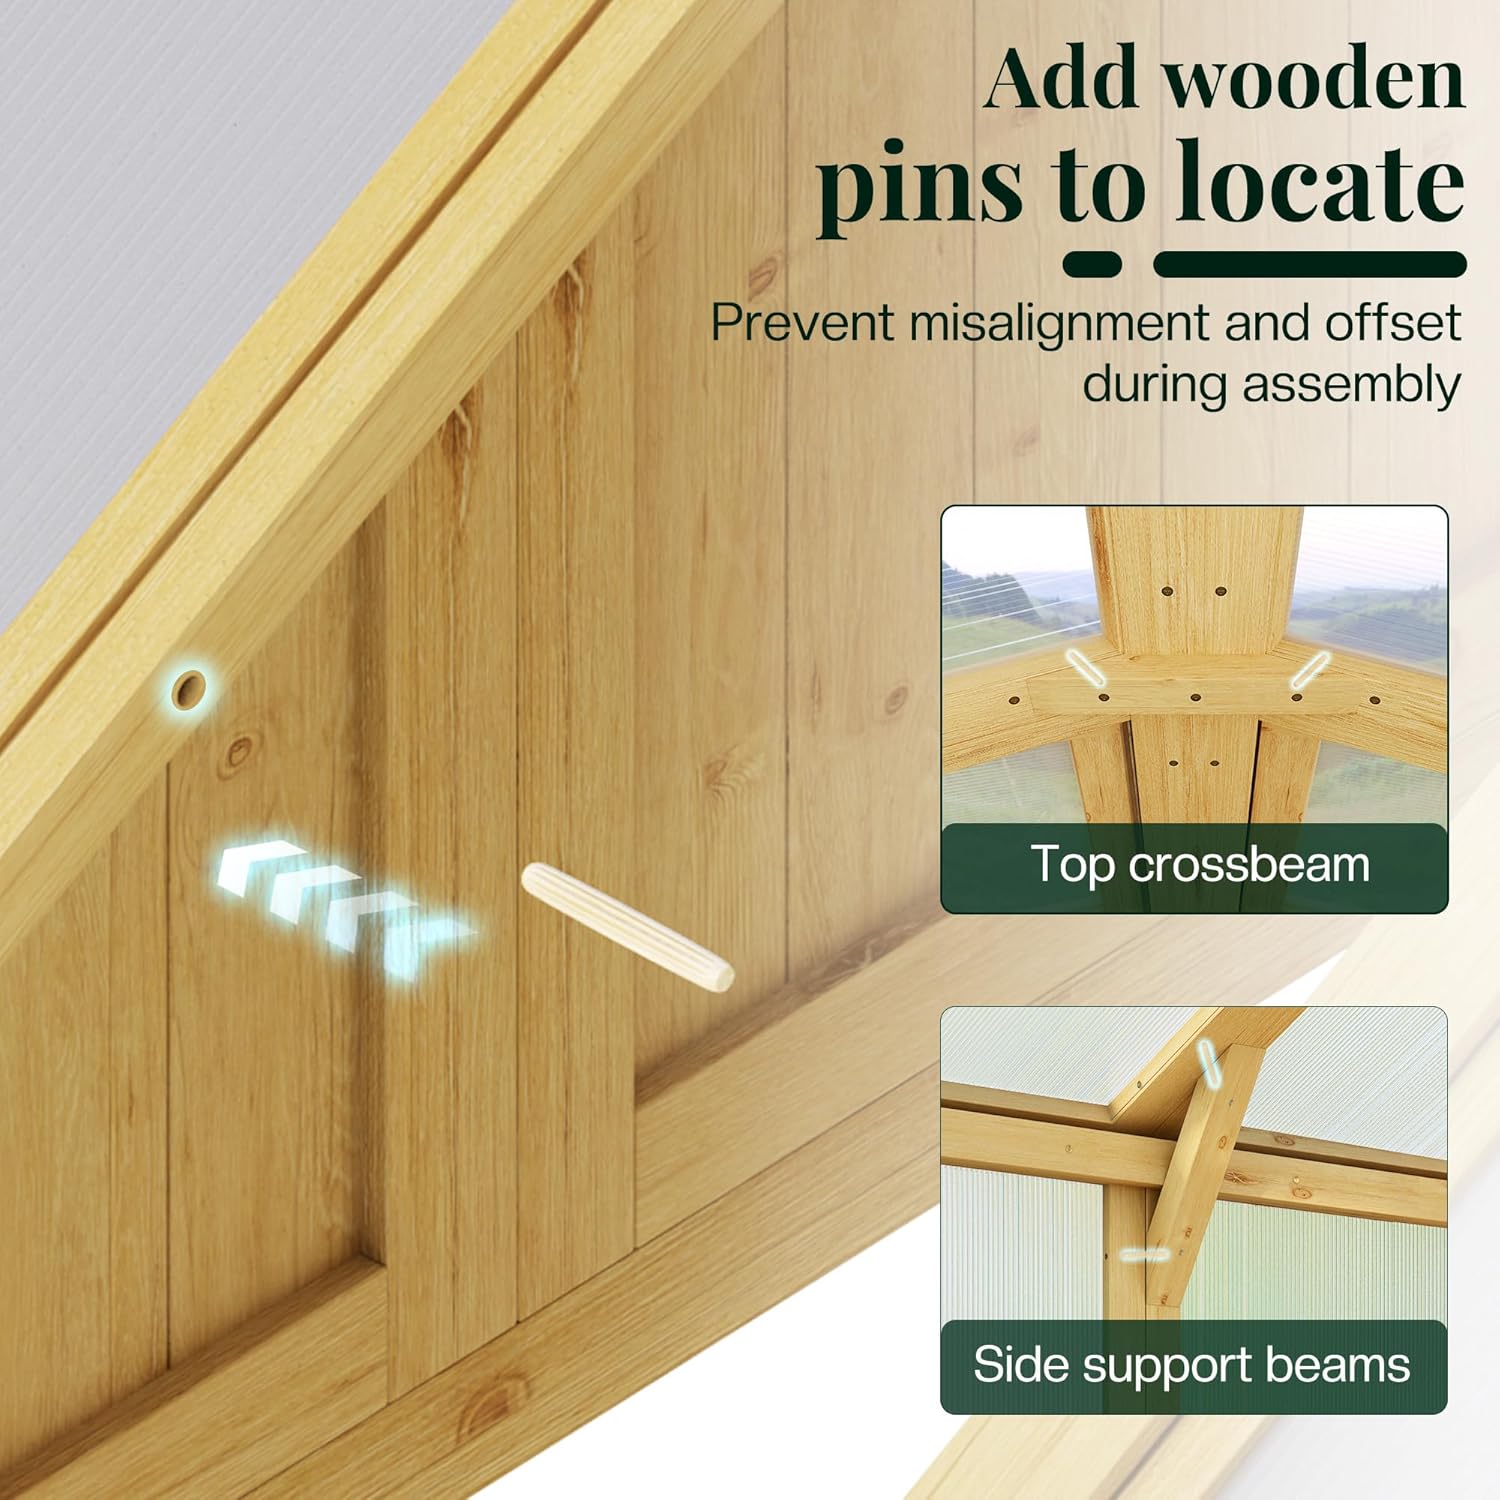
- Add Wooden Pins: Insert wooden pins into designated holes to prevent misalignment and offset during assembly, particularly for top crossbeams and side support beams.
- Seal Gaps: After assembly, fill any remaining gaps between boards and panels with glass glue or sealant to ensure waterproofing.
- Install Doors and Windows: Attach the pre-assembled doors and adjustable windows according to the specific instructions in your detailed manual.
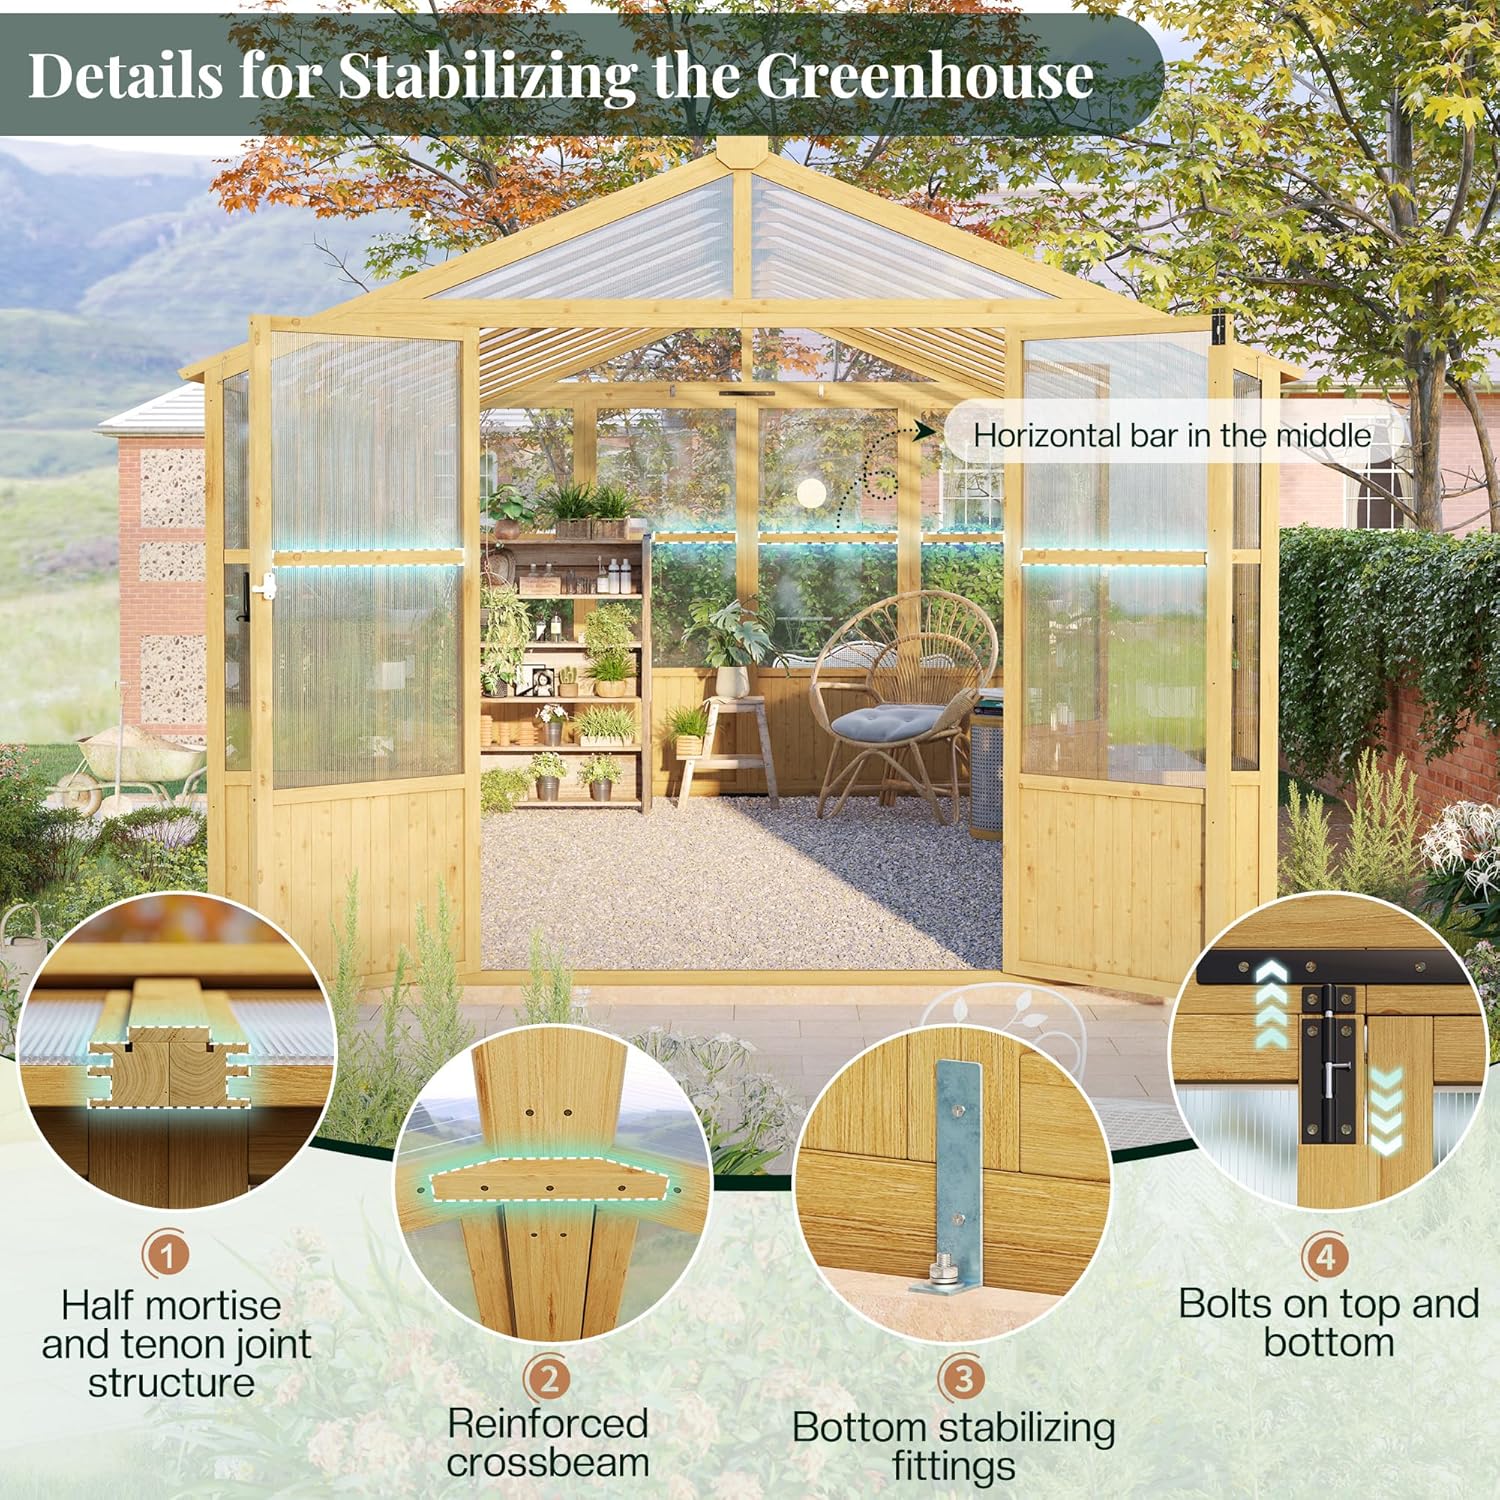
- Stabilize the Structure: Utilize the half mortise and tenon joint structure, reinforced crossbeams, bottom stabilizing fittings, and top/bottom bolts for enhanced stability. Ensure the plastic flap over windows is completely on the outside to prevent leaks.

4. Operating the Greenhouse
Proper operation ensures optimal plant health and extends the lifespan of your greenhouse.
4.1 Ventilation
The greenhouse is equipped with 2 adjustable ventilation windows. Open these windows to control internal temperature and humidity, ensuring adequate airflow for your plants. Close them during colder periods or adverse weather.

4.2 Door Operation
The greenhouse features two doors with both inside and outside locking mechanisms. Ensure doors are securely closed during strong winds or cold weather. The design allows for easy access, including for trolleys.

4.3 Weather Considerations
The greenhouse is designed for all-weather use, offering resistance to wind (60-74 mph), a snow load capacity of 1650 lbs, waterproofing, and UV protection from its sunboard panels. However, during extreme weather conditions, additional precautions may be necessary.

5. Maintenance
Regular maintenance will ensure the longevity and optimal performance of your Jocisland Wooden Greenhouse.
- Cleaning: Periodically clean the sunboard panels with mild soap and water to maintain light transmission. Avoid abrasive cleaners.
- Wood Care: The wood frame is lacquered and corrosion-resistant. Inspect the wood annually for any signs of wear or damage. Reapply a wood sealant or stain as needed to protect against moisture and UV degradation.
- Hardware Check: Regularly inspect all screws, bolts, and connections to ensure they are tight. Tighten any loose hardware to maintain structural integrity.
- Sealant Inspection: Check all sealed gaps, especially around roof panels and windows, for any signs of cracking or deterioration. Reapply sealant as necessary to prevent leaks.
- Ventilation Mechanism: Ensure the adjustable windows operate smoothly. Lubricate hinges if they become stiff.

6. Troubleshooting
This section addresses common issues that may arise during assembly or use.
- Misalignment During Assembly: If panels or beams do not align correctly, re-check that all wooden pins are properly seated and that components are oriented as per the instructions. Disassemble and reassemble the affected section carefully.
- Roof Panel Gaps/Leaks: Ensure all roof panels are correctly seated and that the plastic flaps over the windows are on the outside. Apply additional glass glue or silicone sealant to any visible gaps or seams.
- Flimsy Structure: Verify that all hardware is securely tightened. Ensure the greenhouse is anchored to a solid, level foundation. Check that all reinforcement beams and stabilizing fittings are correctly installed.
- Ridge Beam Support: If the ridge beam appears unstable, ensure its connection points are fully secured. Consider adding additional support if the greenhouse is in an area with heavy snow loads, ensuring any modifications do not compromise the structure.
- Difficulty with Window Operation: Check for obstructions in the window tracks or hinges. Clean any debris and apply a silicone-based lubricant if necessary.
7. Specifications
| Feature | Specification |
|---|---|
| Brand | Jocisland |
| Model Number | YPG215 |
| Size | 10x18 Ft |
| Product Dimensions (L x W x H) | 18"L x 10"W x 8"H (Approx. 18.08 ft L x 9.51 ft W x 7.94 ft H) |
| Item Weight | 388 pounds |
| Frame Material | Cedar Wood |
| Cover Material | Polycarbonate (PC) Sunboard |
| Number of Doors | 2 |
| Number of Vents | 2 (Adjustable Windows) |
| Indoor/Outdoor Usage | Outdoor |
| Wind Resistance | 60-74 mph |
| Snow Load Capacity | 1650 lbs |

8. Warranty and Support
Specific warranty details for the Jocisland 10 x 18-Ft Wooden Greenhouse (Model YPG215) are not provided in this manual. For warranty information, product support, or to report any issues, please contact the seller, Sendornet, directly through your purchase platform or their official contact channels.
Always retain your proof of purchase for any warranty claims.