
1. Introduction
Thank you for choosing the Garvee Pool Handrail. This manual provides essential information for the safe and effective installation, operation, and maintenance of your new pool handrail. Designed for inground pools, this 304 stainless steel handrail offers enhanced safety and ease of access with a load capacity of up to 375 lbs. Please read this manual thoroughly before installation and retain it for future reference.
2. Safety Information
WARNING: Failure to follow these safety instructions could result in injury or property damage.
- Ensure the handrail is securely installed on a solid, stable surface capable of supporting the maximum load capacity.
- Regularly inspect the handrail for any signs of wear, corrosion, or loose fasteners. Tighten all screws and bolts as needed.
- Do not exceed the maximum load capacity of 375 lbs (170.1 kg).
- Keep children away from the installation area during setup.
- Always use appropriate safety gear during installation, including eye protection.
- The non-slip grip cover is designed to enhance safety; ensure it is properly positioned and maintained.
3. Package Contents
Verify that all components listed below are present in your package. If any parts are missing or damaged, please contact Garvee customer support.

Image: Complete set of accessories for the Garvee Pool Handrail, including the handrail, hammer drill, wrench, anchors, mounting screws, nut covers, and self-tapping screws.
- Garvee Pool Handrail (1 unit)
- Hammer Drill (1 unit)
- Wrench (1 unit)
- Anchors (4 units)
- Mounting Screws (6 units)
- Nut Covers (4 units)
- Self-tapping Screws (4 units)
- Non-slip Grip Cover (pre-installed or separate)
4. Setup and Installation
The Garvee Pool Handrail is designed for straightforward installation. Follow these steps carefully to ensure a secure and stable setup.

Image: Visual guide showing the four main steps for installing the pool handrail: Measure Distance, Mark and Drill, Insert Anchors, and Tighten Screws.
- Measure Distance: Determine the optimal placement for the handrail on your pool deck. Ensure sufficient space for entry and exit, and that the handrail bases are on a flat, stable surface. Mark the positions for drilling.
- Mark and Drill: Using the marked positions, drill holes into the pool deck. Ensure the drill bit size matches the anchors provided.
- Insert Anchors: Place the anchors into the drilled holes. Ensure they are flush with the surface of the deck.
- Tighten Screws: Position the handrail bases over the anchors. Secure the handrail to the deck using the provided mounting screws and wrench. Ensure all screws are tightened firmly to prevent any movement.

Image: Close-up view of the handrail's high stability base, highlighting its 4-inch width and 0.16-inch (4mm) thickness, ensuring robust support.
The handrail features a high stability base, 4 inches wide and 0.16 inches (4mm) thick, designed for secure mounting. Pre-drilled holes facilitate quick assembly on various deck surfaces.
5. Operation
The Garvee Pool Handrail is designed to provide a secure grip for entering and exiting inground pools. Its non-slip grip cover ensures safety even when wet.

Image: A person demonstrating the safe use of the Garvee Pool Handrail while entering an inground pool, highlighting the secure grip provided by the blue cover.
- Always use the handrail for support when stepping into or out of the pool.
- Grasp the handrail firmly with both hands for maximum stability.
- Avoid sudden movements or excessive force on the handrail.

Image: The Garvee Pool Handrail with its blue non-skid, detachable, weather-proof, and comfortable grip cover, installed beside an inground pool.
6. Maintenance
Proper maintenance will extend the life and ensure the continued safety of your Garvee Pool Handrail.
- Cleaning: Clean the stainless steel surface regularly with a mild soap and water solution. Avoid abrasive cleaners or harsh chemicals that could damage the finish. Rinse thoroughly with fresh water.
- Inspection: Periodically check all mounting hardware (screws, anchors) for tightness. Re-tighten if necessary. Inspect the handrail for any signs of corrosion, cracks, or damage.
- Grip Cover: The non-slip grip cover is detachable for cleaning. Ensure it is securely re-attached after cleaning to maintain its non-slip properties.
- Winterization: In colder climates, consider removing the handrail during winter months to prevent damage from freezing water or ice, or ensure it is properly covered and protected.
7. Troubleshooting
If you encounter any issues with your Garvee Pool Handrail, refer to the following common problems and solutions:
- Handrail feels loose: Check all mounting screws and anchors. Tighten any loose fasteners. Ensure the deck surface is stable and not compromised.
- Corrosion or rust spots: While made of 304 stainless steel, prolonged exposure to harsh chemicals or saltwater without proper cleaning can lead to surface discoloration. Clean immediately with a stainless steel cleaner and rinse thoroughly.
- Grip cover slipping: Ensure the grip cover is properly seated and not damaged. If it continues to slip, it may need to be adjusted or replaced.
For issues not covered here, please contact Garvee customer support.
8. Specifications
Detailed technical specifications for the Garvee Pool Handrail:
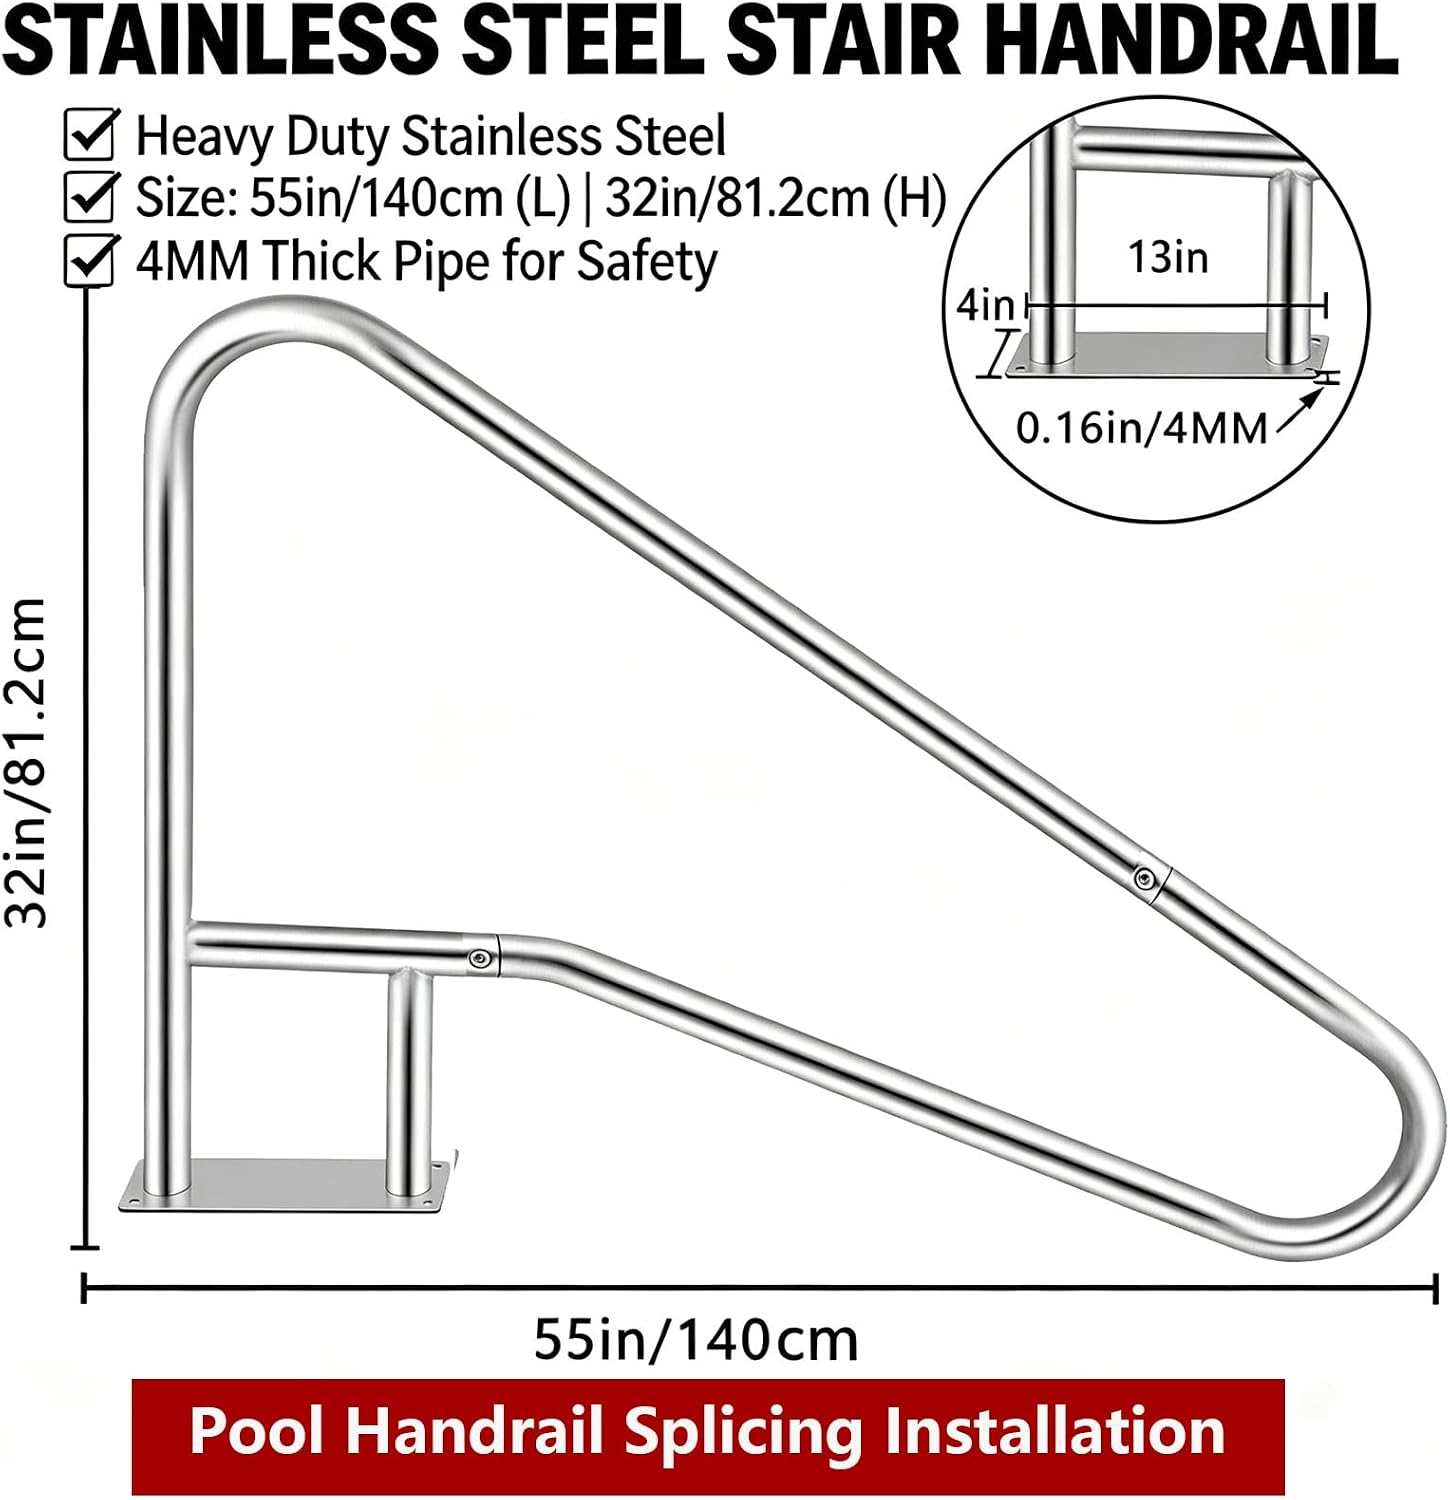
Image: Diagram showing the overall dimensions of the Garvee Pool Handrail: 55 inches (140 cm) in length and 32 inches (81.2 cm) in height, with a 4mm thick pipe for safety.
| Feature | Specification |
|---|---|
| Model Number | 1SZMbhW4cMET4w1037079QQwZT1H |
| Material | 304 Stainless Steel |
| Dimensions (L x W x H) | 55" x 32" (139.7 cm x 81.2 cm) |
| Pipe Thickness | 0.16 inches (4 mm) |
| Load Capacity | Up to 375 lbs (170.1 kg) |
| Item Weight | 17.7 Pounds (8.03 kg) |
| Color | Blue (Grip Cover) |
| Included Components | Pool Handrail, Installation Accessories |
9. Warranty and Support
Garvee is committed to providing high-quality products. For warranty information, technical support, or to inquire about replacement parts, please refer to the warranty card included with your purchase or visit the official Garvee website. Please have your model number and purchase date available when contacting support.