
Introduction
Thank you for choosing the KEIKI Full Size Metal Loft Bed. This manual provides essential information for the safe assembly, operation, and maintenance of your new loft bed. Please read all instructions carefully before beginning assembly and retain this manual for future reference.
Important Safety Information:
- Always follow assembly instructions precisely.
- Ensure all fasteners are securely tightened before use. Periodically check and re-tighten as necessary.
- Do not allow children under 6 years of age on the upper bunk.
- Use only a mattress that is 74-75 inches long and 53-54 inches wide, with a maximum thickness of 6 inches.
- The maximum weight capacity for the upper bunk is 250 lbs.
- Always use the provided ladder/staircase for access to the upper bunk.
Package Contents
Before assembly, verify that all components are present and undamaged. If any parts are missing or damaged, do not proceed with assembly. Contact customer support for assistance.
Expected Components:
- Metal bed frame sections
- L-shaped desk components
- Staircase with integrated storage
- Wardrobe section with hanging rod
- USB charging station unit
- Slats for mattress support
- Hardware pack (screws, bolts, washers, nuts, Allen wrench)
- Assembly instructions (this manual)
Tools Required (not included):
- Phillips head screwdriver
- Rubber mallet (optional, for gentle tapping)
Setup and Assembly Instructions
Assembly typically requires two adults. Clear a spacious area for assembly and lay out all parts on a soft, clean surface to prevent scratches.
- Unpack and Identify Parts: Carefully remove all components from the packaging. Refer to the parts list and diagrams (if provided separately) to identify each piece.
- Assemble the Main Bed Frame: Begin by connecting the main vertical and horizontal metal frame sections. Do not fully tighten screws until all sections are loosely assembled.
- Attach the L-Shaped Desk: Secure the desk frame and desktop panels to the main bed frame according to the diagrams. Ensure the desk is level and stable.
- Install the Staircase and Wardrobe: Assemble the staircase structure, including the integrated shelving. Attach the wardrobe section and hanging rod. Connect this unit securely to the main bed frame.
- Install Slats: Place and secure the metal slats onto the bed frame. Ensure they are evenly spaced and firmly attached to provide adequate mattress support.
- Install USB Charging Station: Integrate the USB charging station into its designated slot on the desk or frame. Connect the power cable to a wall outlet.
- Final Tightening: Once all components are in place and aligned, systematically tighten all screws and bolts using the provided Allen wrench and your screwdriver. Do not overtighten.
- Placement: Position the assembled loft bed in its desired location, ensuring it is stable and level.

Image: Fully assembled KEIKI Full Size Metal Loft Bed, showcasing the bed, L-shaped desk, and integrated staircase with storage.
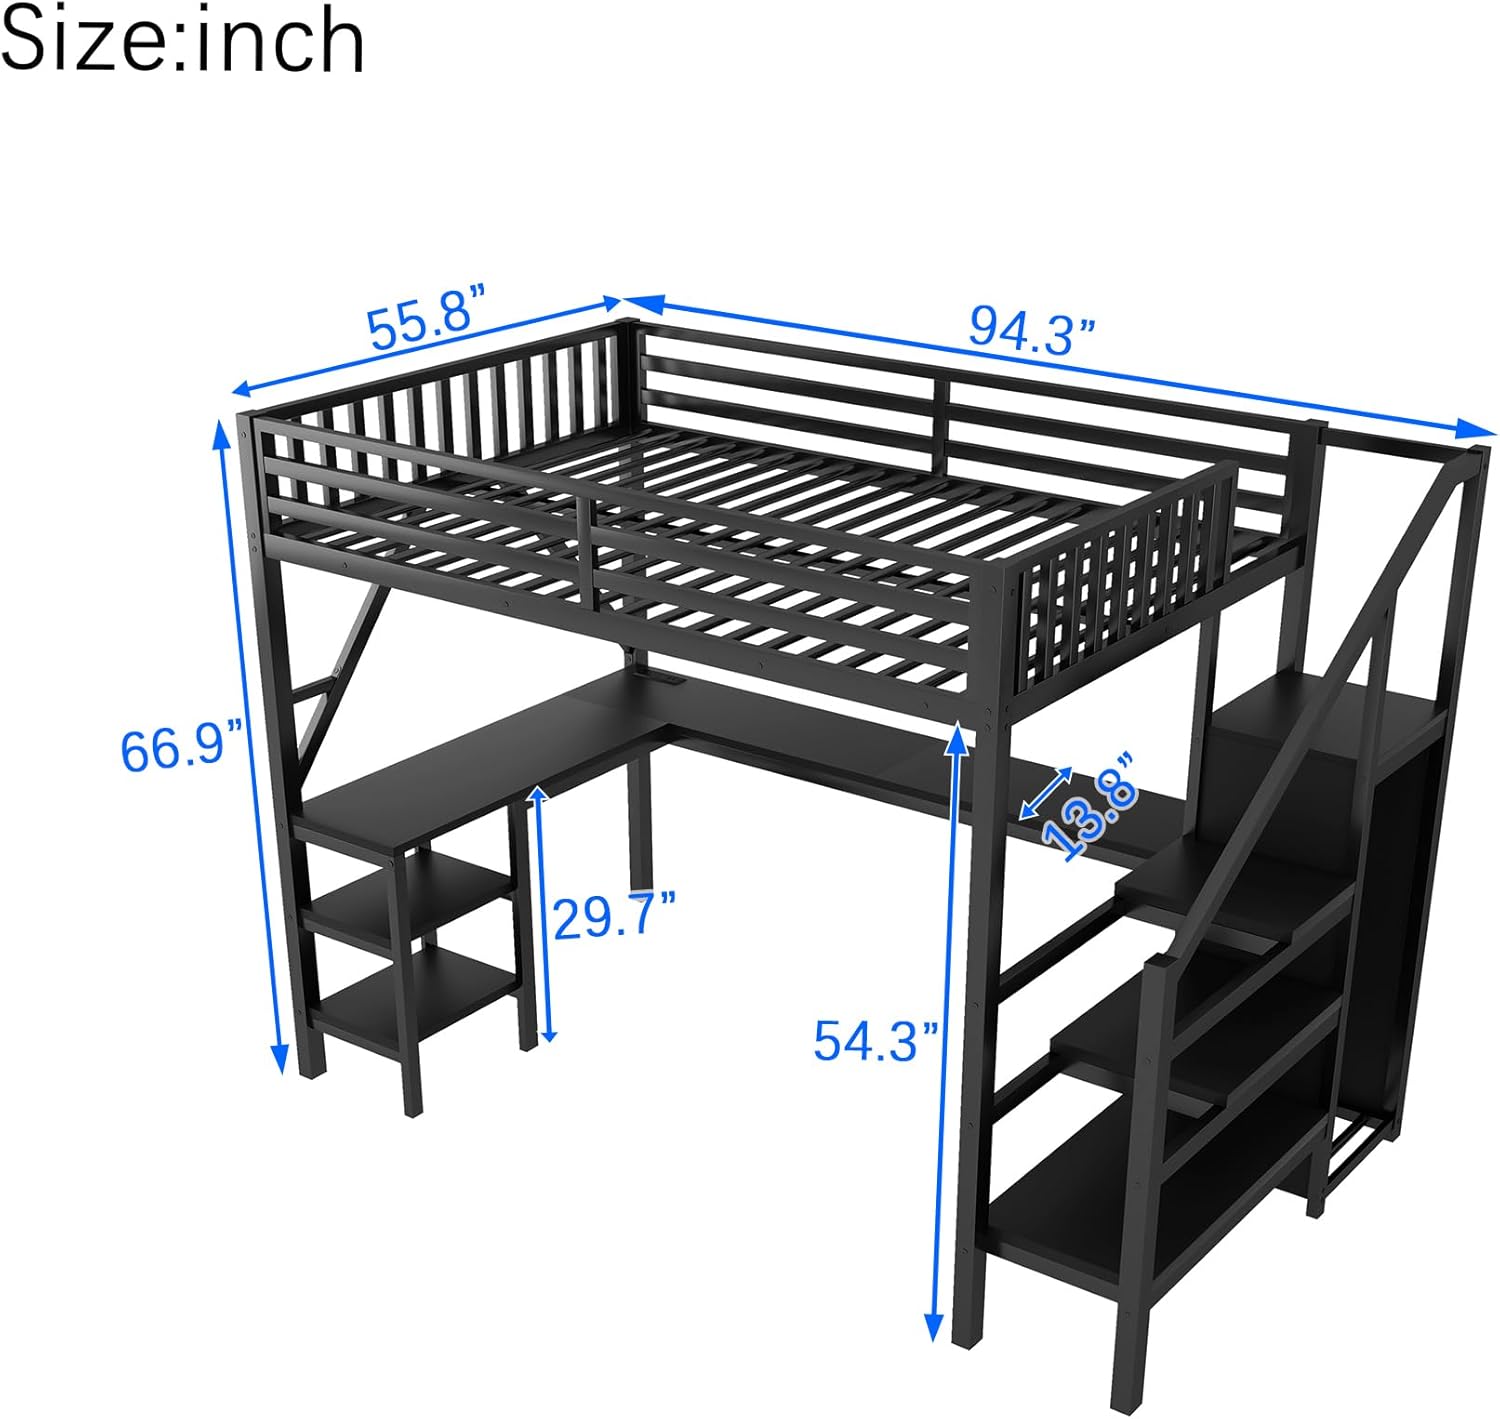
Image: Detailed dimensions of the KEIKI Full Size Metal Loft Bed, including length, width, height, and under-bed clearance.
Operating Instructions
This loft bed is designed for multi-functional use, providing a sleeping area, workspace, and storage solutions.
- Bed Usage: Place a full-size mattress (not included) directly on the metal slats. Ensure the mattress fits snugly within the guardrails.
- Desk Usage: The L-shaped desk provides a spacious surface for studying, working, or creative activities. Utilize the two shelves beneath the desk for additional organization.
- Staircase and Storage: Use the staircase for safe access to the upper bunk. The steps double as open shelving for books, decor, or frequently used items.
- Wardrobe: The built-in wardrobe beneath the staircase includes a hanging rod for clothes and an adjustable lower divider for organized storage.
- USB Charging Station: Plug the bed's power cord into a standard wall outlet. Use the integrated USB ports to charge compatible electronic devices such as phones and tablets.

Image: A close-up view of the integrated USB charging station and power outlets on the desk surface, highlighting its convenience.

Image: A detailed view of the integrated wardrobe with a hanging rod and the storage shelves built into the staircase, showing organizational possibilities.
Maintenance
Proper maintenance will ensure the longevity and safety of your loft bed.
- Cleaning: Wipe down metal surfaces with a soft, damp cloth. For stubborn marks, use a mild, non-abrasive cleaner. Avoid harsh chemicals or abrasive materials that could damage the finish.
- Fastener Check: Periodically (e.g., every 3-6 months) inspect all bolts, screws, and connections. Re-tighten any loose fasteners to maintain structural integrity and prevent wobbling.
- USB Port Care: Keep the USB ports free of dust and debris. Do not force plugs into the ports.
- Weight Distribution: Distribute weight evenly on the bed and desk surfaces. Avoid placing excessive weight on any single point.
Troubleshooting
If you encounter issues with your loft bed, refer to the following common problems and solutions:
- Bed is Wobbly:
Solution: Check all assembly bolts and screws. Re-tighten any that are loose. Ensure the bed is placed on a level surface. - USB Charging Station Not Working:
Solution: Verify that the bed's power cord is securely plugged into a functional wall outlet. Check the connection of the USB unit to the bed frame. Try a different device or USB cable to rule out device-specific issues. - Parts Do Not Align During Assembly:
Solution: Loosen all previously tightened fasteners. Re-align the parts and then gradually tighten all connections. Sometimes, slight adjustments are needed before final tightening. - Squeaking Noises:
Solution: Squeaking often indicates loose connections. Re-tighten all bolts and screws. Applying a small amount of lubricant (e.g., silicone spray) to metal-on-metal contact points can also help.
If the problem persists after attempting these solutions, please contact KEIKI customer support.
Specifications
| Model Number | LH04672 |
| Size | Full |
| Material | Metal |
| Product Dimensions (L x W x H) | 94.3" x 55.8" x 66.9" |
| Item Weight | 103 pounds |
| Style | Modern |
| Special Feature | No Box Spring Needed |
| Included Components | Slat |
| Compatible Mattress Size | Full |
| Storage Options | Wardrobe, Shelving, Under-bed Clearance |
Warranty Information
KEIKI products are manufactured to high-quality standards. This product is covered by a manufacturer's warranty against defects in materials and workmanship. The specific terms and duration of the warranty may vary. Please retain your proof of purchase.
For detailed warranty information or to make a claim, please contact KEIKI customer support or refer to the warranty card included with your purchase, if applicable.
Support
If you have any questions, require assistance with assembly, or need to report missing/damaged parts, please contact KEIKI customer support.
Contact Information:
- Refer to your purchase documentation for specific contact details.
- Visit the official KEIKI website for support resources.
- For online purchases, contact the retailer's customer service.