Introduction
The beday Automatic Plant Waterer (Model IC-206S) is designed to provide precise and automated hydration for up to 15 potted plants. This system features a programmable water timer and smart humidity detection, ensuring your plants receive optimal care whether you are at home or away. This manual provides detailed instructions for setup, operation, maintenance, and troubleshooting to help you maximize the benefits of your new watering system.
Product Components
Before beginning installation, please ensure all components are present:
- Watering System Unit (Controller) x1
- Tube (33 feet) x1
- Type-C Cable x1
- T-joints x15
- Droppers x15
- Filter x1
- Anti-Siphon Components x1
- User Manual x1
Setup Instructions
Follow these steps to set up your automatic plant watering system:
- Charge the Unit: Connect the watering system unit to a power source using the provided Type-C cable. Ensure the unit is fully charged before initial use. The built-in 2200mAh battery allows for continuous operation for 25-30 days on a full charge.
- Prepare Water Source: Place a bucket or container of water near your plants. This will serve as the water reservoir for the system.
- Install Anti-Siphon Component: Insert the anti-siphon component into the water outlet of the main unit. This prevents continuous water flow due to siphoning.
- Position the Unit: It is crucial to place the main watering unit and the anti-siphon accessory above the water level of your reservoir. Failure to do so can result in continuous siphoning and potential flooding.
- Connect Tubing:
- Connect one end of the 33-foot tube to the anti-siphon component on the main unit.
- Cut the tube to desired lengths to reach each plant. Use the T-joints to create branches for multiple plants.
- Attach a dropper to the end of each tube segment that will go into a plant pot.
- Place the filter at the end of the main tube that will be submerged in your water reservoir.
- Arrange Droppers: Position the droppers in the soil of each potted plant, ensuring they are securely placed to deliver water effectively.


Operating Instructions
The beday Automatic Plant Waterer offers two primary watering modes: Timed Watering and Smart Humidity Detection. It also includes a manual watering option.
1. Timed Automatic Watering
This mode allows you to set specific watering times, durations, and intervals.
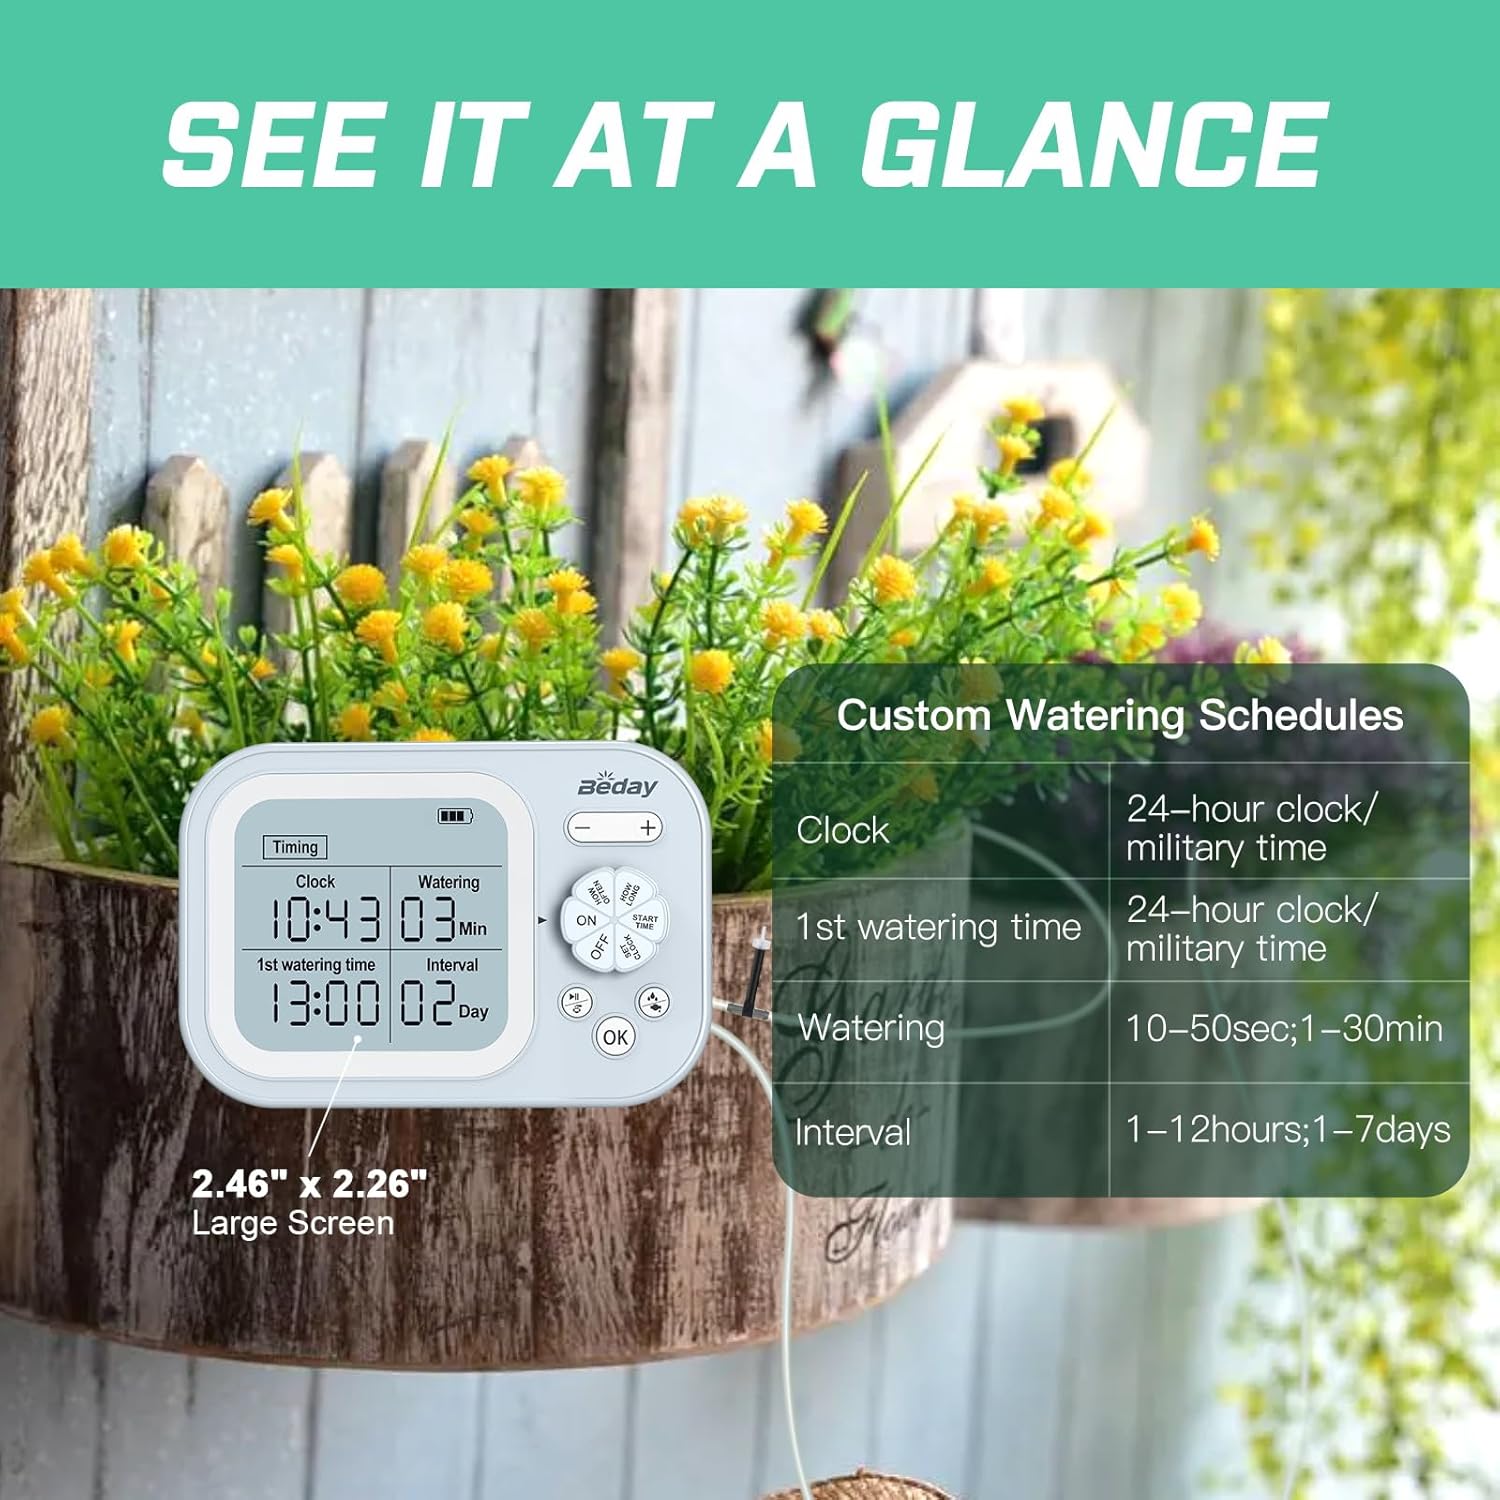
- Set Current Time: Use the control dial and buttons to set the current time (24-hour format).
- Set First Watering Time: Program the desired start time for the first watering cycle.
- Set Watering Duration: Specify how long the system should water during each cycle (e.g., 10 seconds to 30 minutes).
- Set Watering Interval: Choose the frequency of watering (e.g., 1-12 hours or 1-7 days).
- Activate: Turn the dial to the 'ON' position to start the timed watering schedule.

2. Smart Humidity Detection Watering
This intelligent mode automatically adjusts watering based on soil humidity levels.
- Connect Humidity Sensor: Ensure the humidity sensor is properly connected to the main unit and inserted into the soil of a representative plant.
- Set First Watering Time and Interval: Program the desired start time for humidity detection and the interval for re-checking humidity.
- Activate: Switch the unit to 'Humidity' mode. The system will detect humidity at the set interval. If humidity is below 30%, it will initiate watering until it reaches 70%. If the soil is still moist (above 30%), watering will be skipped for that cycle and re-tested in the next cycle.

3. Manual Watering
For immediate watering, you can manually activate the system. Refer to the unit's interface for the manual watering button or setting.
Maintenance
Regular maintenance ensures optimal performance and longevity of your watering system:
- Clean Filter: Periodically check and clean the filter at the end of the main tube to prevent blockages and ensure consistent water flow.
- Inspect Tubing and Droppers: Regularly inspect all tubing and droppers for kinks, blockages, or damage. Ensure droppers are securely placed in plant pots.
- Recharge Battery: Monitor the battery indicator on the unit and recharge as needed using the Type-C cable.
- Clean Unit: Wipe the main unit with a soft, damp cloth. Do not submerge the unit in water.
- Water Reservoir: Ensure your water reservoir is kept clean and refilled as necessary.
Troubleshooting
If you encounter issues with your beday Automatic Plant Waterer, refer to the following common problems and solutions:
| Problem | Possible Cause | Solution |
|---|---|---|
| No water dispensed or insufficient water |
|
|
| Continuous water flow / Flooding |
|
|
| Inconsistent water distribution among plants |
|
|
| Humidity detection mode not working as expected |
|
|
Specifications
- Model Number: IC-206S
- Brand: beday
- Power Source: 1 Lithium Ion battery (included), USB rechargeable
- Battery Capacity: 2200mAh
- Hose Length: 33 Feet
- Maximum Plants Supported: 15
- Special Features: Automatic Watering, Digital Timer, Leak Resistant, Programmable, Rechargeable Battery, Smart Humidity Detection
- Item Weight: 1.48 pounds (0.67 Kilograms)
- Package Dimensions: 8.35 x 7.13 x 2.24 inches
Warranty and Support
This product comes with a standard return policy of 30 days for refund or replacement. For any questions, technical assistance, or support regarding your beday Automatic Plant Waterer, please reach out to our customer service team. We are committed to assisting you with any inquiries you may have.
Contact information can typically be found on the product packaging or the official beday website.


