
1. Safety Information
Please read this manual carefully before installation and operation. Keep it for future reference.
- Professional Installation Recommended: Due to the complexity of car audio systems, professional installation is highly recommended to avoid damage to the vehicle or the product.
- Vehicle Compatibility: This car radio is designed for Toyota Corolla models from 2009 to 2013. It is not compatible with cars equipped with J.B.L/B.O.S.E premium audio systems or large screens. If your car has a clock above the air vent, it may not be retained when using this product.
- Electrical Safety: Ensure the vehicle's power is disconnected before installation to prevent electrical shorts or damage.
- Driving Safety: Do not operate the device in a way that distracts you from driving. Always prioritize road safety.
- Temperature: Avoid exposing the device to extreme temperatures or direct sunlight for prolonged periods.
2. Package Contents
Verify that all items are present in the package:
- Leadfan 13.1" 2K Car Radio Unit
- Backup Camera
- Full Set of Wiring Harness
- Frame Accessories
- GPS Antenna
- Microphone (MIC)
- USB Cables (x2)
- RCA Cable
- Manual
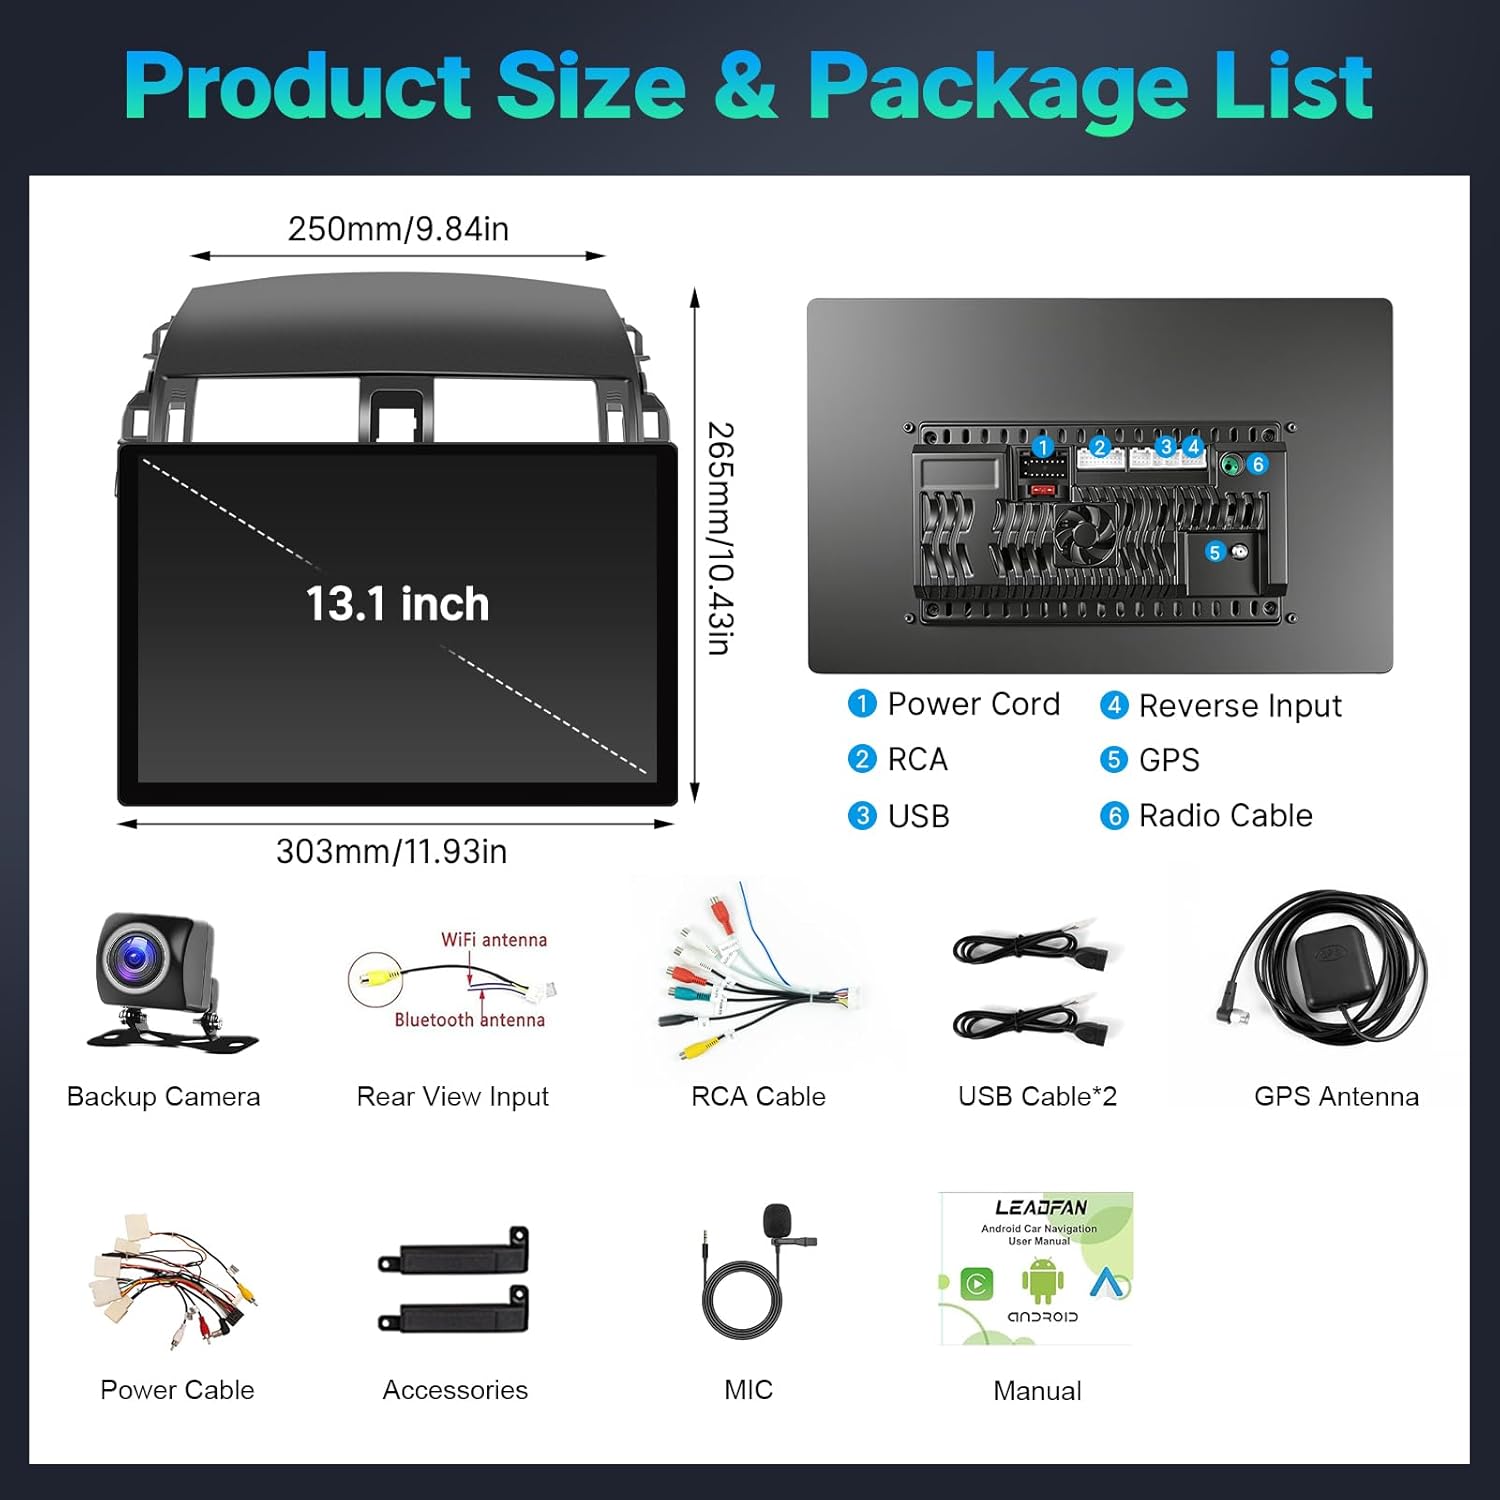
Image: Detailed view of all components included in the product package, such as the main unit, various cables, backup camera, GPS antenna, and microphone.
3. Specifications
| Brand | Leadfan |
| Model Number | SW380A-13.1-1 |
| Compatible Vehicles | Toyota Corolla 2009-2013 |
| Screen Size | 13.1 Inches |
| Display Type | 2K Touch Screen (Capacitive) |
| Operating System | Android 13 |
| Memory | 4GB RAM + 64GB ROM |
| Connectivity | Bluetooth 5.1, USB, Wi-Fi (5G) |
| Navigation | GPS (Offline/Online Maps) |
| Control Method | Touch, Voice |
| Special Features | Wireless CarPlay, Android Auto, MirrorLink, FM Radio, AHD Backup Camera, Steering Wheel Control (SWC), Split Screen, EQ/DSP |
4. Setup & Installation
Professional installation is highly recommended. Ensure the vehicle's power is disconnected before starting.
4.1. Installation Steps
- Remove Decorative Panels: Carefully remove the long decorative panels from the dashboard using a pry tool.
- Remove Air Conditioning Outlet: Detach the air conditioning outlet from the dashboard.
- Remove Fixing Screws: Unscrew the screws holding the original car radio in place.
- Take Out Original Player: Gently pull out the original car radio unit.
- Disconnect Plugs: Disconnect all plugs and wiring harnesses from the back of the original player.
- Remove Decorative Frame from AC Outlet: If necessary, remove the decorative frame from the air conditioner outlet.
- Remove Clips: Carefully remove any clips from the original components that need to be transferred to the new player.
- Install Clips onto New Player: Attach the removed clips onto the new Leadfan car radio unit.
- Install AC Vent to New Player: Install the air conditioning vent into the new player's frame.
- Connect Wiring Harness: Connect the new wiring harness plugs to the corresponding sockets on the back of the new player. Ensure all necessary connections (power, USB, RCA, GPS antenna, microphone, backup camera) are made.
- Restore Time Display Screen: Reinstall the time display screen component.
- Install New Player: Carefully install the new player into the center console.
- Attach Decorative Frame: Attach the long decorative frame to the new player first, then install it together onto the center console.
Video: A detailed DIY installation guide for Toyota Corolla 2008-2013, demonstrating the removal of original components and installation of the new head unit.
4.2. Wiring Diagram

Image: A comprehensive wiring diagram illustrating connections for the car stereo, backup camera, power cords, RCA cables, USB, GPS, and radio cables.
5. Operating Instructions
5.1. Basic Operations & Screen Calibration
The device features touch-sensitive side buttons for common functions. These buttons may require calibration for optimal response.
- Side Button Learning: Navigate to Settings > Car Settings > Factory Settings. Enter the password (six zeros: 000000). Select Touch Learning. Follow the on-screen prompts to tap each function (Power, Home, Back, Volume+, Volume-) on the screen and then press the corresponding physical button on the unit.
- Screen Calibration: In Touch Learning, tap