
1. Introduction
This manual provides detailed instructions for the installation, operation, and maintenance of your OFAPLFKUR K9FH Smart Lock. This advanced smart lock offers multiple unlocking methods including palm vein recognition, fingerprint scanning, password entry, and remote dynamic password generation via the Tuya smart home platform. Please read this manual thoroughly before installation and use to ensure proper function and safety.
2. Safety Information
- Do not expose the lock to direct sunlight or rain for extended periods.
- Avoid using corrosive substances or sharp objects on the lock surface.
- Ensure correct battery polarity when installing or replacing batteries.
- Keep emergency keys in a secure location outside the property.
- Do not attempt to disassemble or repair the lock yourself. Contact qualified personnel for service.
- Regularly check the lock for any signs of damage or wear.
3. Product Overview
The OFAPLFKUR K9FH Smart Lock consists of a front panel, a rear panel, and optional door handles. Familiarize yourself with the components before proceeding with installation.

Image 3.1: K9FH Smart Lock Components. This diagram illustrates the key parts of the smart lock. The front panel features the palm vein recognition area, password keyboard, and keyhole. The rear panel includes the battery compartment, interior reset button, switch button, and manual knob. The Type-C emergency interface is located on the front panel for temporary power.
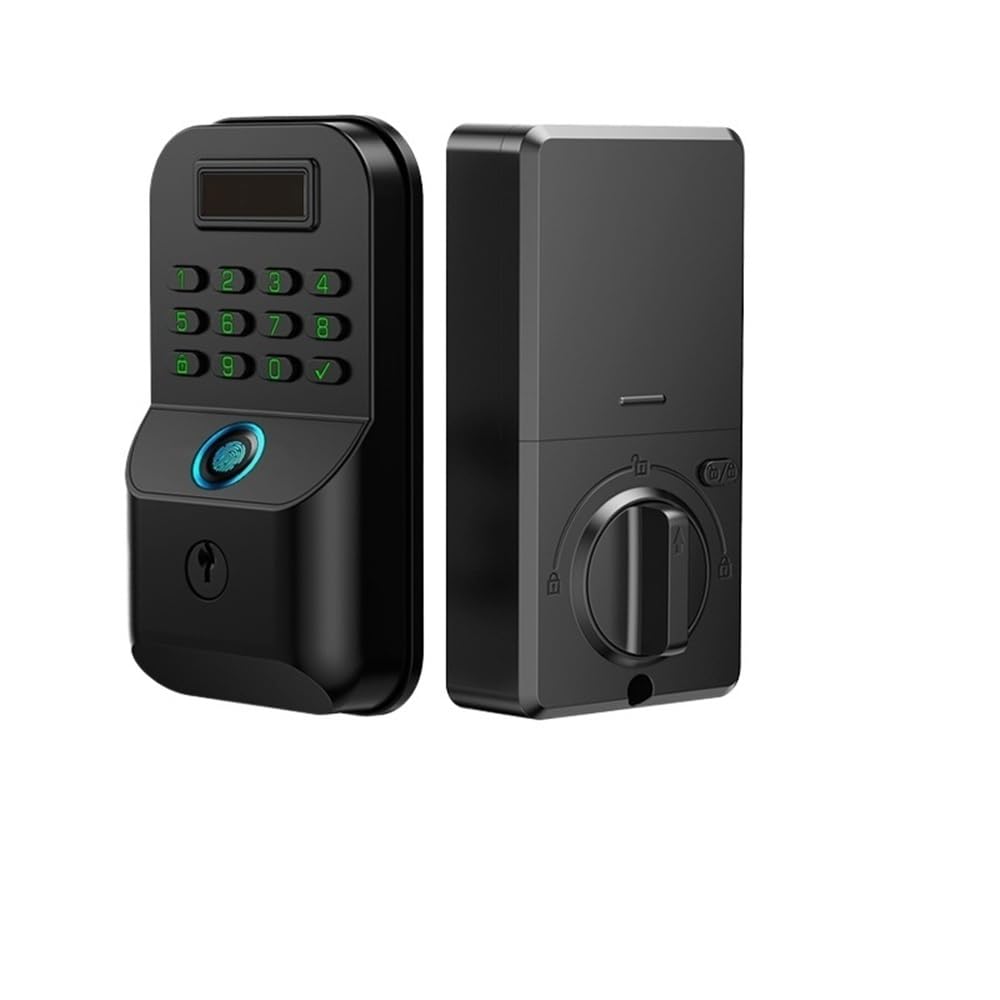
Image 3.2: K9FH Smart Lock Front Panel. This image displays the front of the smart lock, highlighting the numeric keypad, the palm vein/fingerprint recognition area at the top, and the traditional keyhole at the bottom. A USB-C cable is shown connecting to the emergency power port, indicating its function for temporary power supply.

Image 3.3: Optional Door Handles. This image shows the aluminum alloy front and rear door handles that can be integrated with the K9FH Smart Lock system, providing a complete door entry solution.
Key Components:
- Palm Vein Recognition Area: For biometric palm vein unlocking.
- Fingerprint Recognition Area: For biometric fingerprint unlocking.
- Password Keyboard: Numeric keypad for PIN code entry.
- Keyhole: For emergency mechanical key access.
- Type-C Emergency Interface: For temporary power supply using a USB-C cable if batteries are depleted.
- Battery Compartment: Houses the dry cell batteries.
- Interior Reset Button: Used for resetting the lock to factory settings.
- Manual Knob: For manual locking/unlocking from the inside.
4. Setup & Installation
The K9FH Smart Lock is designed for drilling installation and is suitable for door thicknesses between 28mm and 50mm. It can be installed on various door types including steel, wooden, glass, brass, and stainless steel doors. Ensure you have the necessary tools before beginning installation.
4.1 Pre-installation Checklist:
- Verify door thickness is within 28-50mm.
- Confirm door type compatibility.
- Gather tools: drill, screwdriver, measuring tape, pencil.
- Ensure all included components (lock body, screws, keys, cards) are present.
4.2 Installation Steps:
- Prepare the Door: Mark and drill holes according to the provided template for the lock body and mounting screws.
- Install Mortise Lock Body: Insert the mortise lock body into the prepared door edge. Secure it with screws.
- Install Front Panel: Route the cable from the front panel through the door. Align the front panel with the drilled holes and secure it.
- Install Rear Panel: Connect the cable from the front panel to the rear panel. Align the rear panel and secure it to the door using the provided screws. Ensure the manual knob operates smoothly.
- Install Batteries: Open the battery compartment on the rear panel and insert the required dry cell batteries, observing correct polarity.
- Test Operation: After installation, test all locking and unlocking functions using the mechanical key and the manual knob before configuring electronic access methods.
4.3 Initial Setup (Tuya Platform):
The K9FH Smart Lock integrates with the Tuya smart home platform via Bluetooth connectivity. Download the Tuya Smart app and follow the in-app instructions to add your device. This will enable remote dynamic password generation and other smart features.
- Download the "Tuya Smart" app from your device's app store.
- Create an account or log in.
- Follow the app's instructions to add a new device, selecting "Lock" or "Smart Lock".
- Ensure Bluetooth is enabled on your smartphone during the pairing process.
5. Operating Instructions
The K9FH Smart Lock offers multiple ways to unlock your door. Ensure the lock is powered and properly configured before use.
5.1 Unlocking Methods:
- Palm Vein Recognition:
- Place your palm flat over the palm vein recognition area.
- Hold steady until the lock verifies your palm pattern.
- The lock will unlock upon successful recognition.
- Fingerprint Unlock:
- Place your registered finger firmly on the fingerprint sensor.
- Hold until the lock verifies your fingerprint.
- The lock will unlock upon successful recognition.
- Password Unlock:
- Enter your registered PIN code on the password keyboard.
- Press the '#' or '✓' key to confirm.
- The lock will unlock if the password is correct.
- Remote Dynamic Password Unlock:
- Open the Tuya Smart app on your smartphone.
- Navigate to your K9FH Smart Lock device.
- Generate a dynamic password.
- Enter the generated dynamic password on the lock's keyboard within the specified time frame.
- Press the '#' or '✓' key to confirm.
- Mechanical Key Unlock:
- Insert the emergency mechanical key into the keyhole.
- Turn the key to unlock the door.
- Card Unlock:
- Present the registered RFID card to the card reader area (usually near the keypad).
- The lock will unlock upon successful card recognition.
5.2 Locking the Door:
- Automatic Locking: The lock can be configured to automatically lock after a set period once the door is closed.
- Manual Locking (Exterior): Press the '#' key on the keypad for a few seconds to manually lock from the outside.
- Manual Locking (Interior): Turn the manual knob on the interior panel to lock the door.
6. Maintenance
Proper maintenance ensures the longevity and reliable operation of your K9FH Smart Lock.
6.1 Battery Replacement:
- The lock uses dry cell batteries. When the battery level is low, the lock will provide an audible or visual warning.
- To replace, open the battery compartment on the interior rear panel.
- Remove old batteries and insert new ones, ensuring correct polarity (+/-).
- Close the battery compartment.
6.2 Cleaning:
- Wipe the lock surface with a soft, dry cloth.
- Do not use abrasive cleaners, solvents, or harsh chemicals, as these can damage the finish and electronic components.
- Keep the palm vein/fingerprint recognition area clean and free of dirt or smudges for optimal performance.
7. Troubleshooting
If you encounter issues with your K9FH Smart Lock, refer to the following common problems and solutions:
| Problem | Possible Cause | Solution |
|---|---|---|
| Lock does not respond. | Dead batteries. | Replace batteries. Use the Type-C emergency interface for temporary power if needed. |
| Fingerprint/Palm Vein not recognized. | Sensor is dirty; unregistered biometric data; improper placement. | Clean the sensor. Ensure your biometric data is registered. Place your finger/palm correctly and firmly. Try re-registering if issues persist. |
| Password not accepted. | Incorrect password entered; password not registered. | Verify the password. Ensure the password is registered. Try resetting the password via the app. |
| Remote unlock not working. | No internet connection for gateway; Bluetooth disconnected; app issue. | Ensure your gateway (if used) has internet access. Check Bluetooth connection. Restart the Tuya Smart app. |
| Lock is jammed or difficult to operate. | Misalignment during installation; debris in the mechanism. | Check door alignment and ensure no obstructions. If persistent, professional re-installation may be required. |
8. Specifications
| Feature | Detail |
|---|---|
| Brand | OFAPLFKUR |
| Model Number | K9FH |
| Unlocking Methods | Palm Vein, Fingerprint, Password, Remote Dynamic Password, Mechanical Key, Card |
| Material | Aluminium Alloy (Front Panel), ABS (Rear Panel) |
| Connectivity | Bluetooth (Tuya Smart Home Platform) |
| Power Source | Dry Battery |
| Emergency Power | Type-C USB Interface |
| Fit Door Thickness | 28-50mm |
| Installation Method | Drilling installation |
| Handle Direction | Direction Reversible |
| Included Components | Key, Card, Lock body, Screw package |