
Introduction
Thank you for choosing the INTERGREAT 10-12 Rifle Gun Safe. This manual provides essential information for the safe and effective use, installation, and maintenance of your new gun safe. Please read these instructions carefully before operating the safe and retain them for future reference. Proper use ensures the security of your firearms and valuables.
Important Safety Information
- Always store firearms unloaded and locked in the safe.
- Keep ammunition stored separately from firearms, ideally in a separate locked compartment or safe.
- Ensure the safe is securely mounted to prevent unauthorized removal or tipping.
- Keep emergency keys and external power supply outside the safe, in a secure location known only to trusted individuals.
- Do not share your digital password with unauthorized persons.
- Keep children away from the safe and ensure they cannot access its contents.
- Regularly check the safe's locking mechanism and batteries to ensure proper function.
Package Contents
Verify that all components are present before beginning installation:
- 1 x INTERGREAT 10-12 Rifle Gun Safe
- 1 x Handgun Bag
- 2 x Bullet Bags
- 4 x Expansion Bolts (for mounting)
- 4 x Pistol Pockets
- 2 x Emergency Keys
- 1 x Emergency Power Supply
- 1 x Instruction Manual
Specifications

Image: Product dimensions and included accessories.
| Brand | INTERGREAT |
| Model | 10-12 Rifle Gun Safe |
| Color | White |
| Product Dimensions | 15.2"D x 21"W x 55.2"H |
| Rifle Capacity | Up to 10-12 rifles |
| Material | High-density cold-rolled steel plate |
| Lock Type | Keypad with Emergency Key |
| Special Features | Anti-Theft, Fixed partition, Alarm System, Adjustable Shelf, Pistol Pockets |
| Mounting Type | Floor Mount, Wall Mount |
Setup Instructions
1. Unpacking and Initial Inspection
Carefully remove the safe from its packaging. Inspect the safe for any signs of damage during transit. Report any damage to customer service immediately.
2. Battery Installation
The keypad requires batteries to operate. Locate the battery compartment, typically on the inside of the door or behind the keypad. Insert the required number of fresh alkaline batteries (usually AA or AAA, not included) according to the polarity markings. Close the compartment securely.
3. Setting Your Digital Password
- With the safe door open, locate the reset button on the inside of the door, usually near the battery compartment.
- Press the reset button. The safe will emit a beep, and an indicator light on the keypad will illuminate.
- Enter your desired 3-8 digit password on the keypad.
- Press the '#' key to confirm. The safe will beep again, indicating the new password has been set.
- Test the new password with the door open to ensure it works correctly before closing the safe.
4. Mounting the Safe (Anti-Tip Design)
For maximum security and to prevent tipping, it is highly recommended to mount the safe to a wall or floor using the provided expansion bolts.

Image: Visual guide for securing the safe with expansion bolts.
- Measure Location: Identify the pre-drilled mounting holes at the bottom and back of the safe. Mark their corresponding locations on the wall or floor where the safe will be placed.
- Drill Holes: Using an appropriate drill bit for your wall/floor material, drill pilot holes at the marked locations.
- Insert Anchors: Carefully press the expansion anchors into the drilled holes.
- Position Safe: Align the safe's mounting holes with the installed anchors.
- Secure Safe: Insert the expansion bolts through the safe's holes and into the anchors. Tighten them securely using a wrench until the safe is firmly fixed.
Operating Instructions
1. Accessing the Safe
The INTERGREAT gun safe offers multiple ways to access its contents:

Image: Illustration of the three access methods for the safe.
- Digital Password + Knob: Enter your personalized 3-8 digit password, then turn the knob clockwise to open the door.
- Override Key + Knob: In case of battery failure or forgotten password, insert the emergency key into the keyhole, turn it, and simultaneously turn the knob to open the door. Important: Do not store emergency keys inside the safe.
- External Power Box: If batteries are depleted and emergency keys are not readily available, connect the external power supply to the designated port on the keypad. This will temporarily power the keypad, allowing you to enter your digital password.
2. Alarm System
The safe is equipped with an alarm system for enhanced security:

Image: Details of the safe's vibration alarm and alarm buzzer.
- Vibration Alarm: Press the '#' key to activate the alert state. If the safe detects significant vibration or tampering, the system will trigger an alarm.
- Alarm Buzzer (Incorrect Entry): If an incorrect password is entered three consecutive times, the alarm will sound for one minute. To silence the alarm, enter the correct password.
3. Internal Storage Features
The safe is designed with versatile storage options:
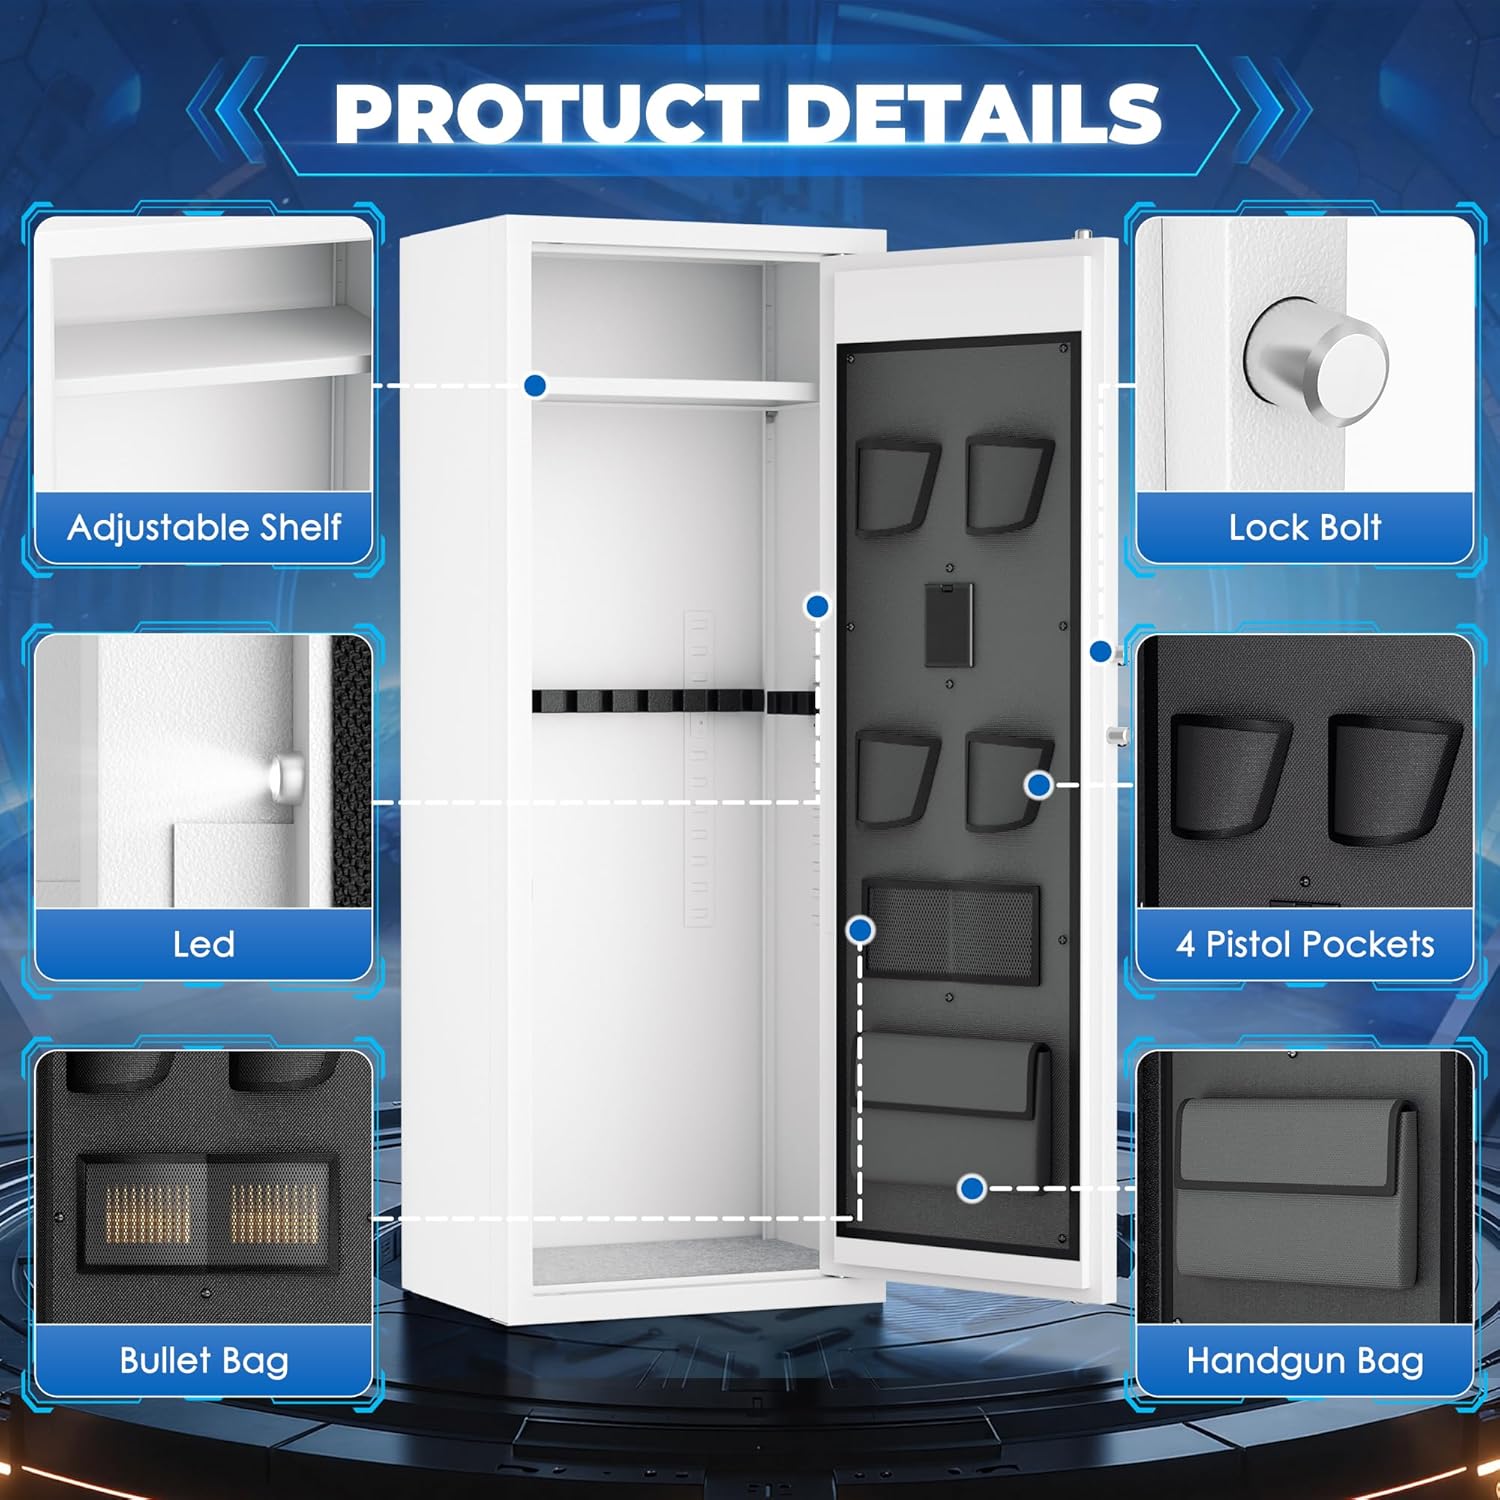
Image: Close-up view of the safe's interior, highlighting storage components.
- Adjustable Shelf: The top shelf can be adjusted to different heights or removed to accommodate various items. It has a load-bearing capacity of 120 pounds.
- Fixed Gun Racks: Three fixed gun racks are provided for secure storage of rifles.
- Pistol Pockets: Four pistol storage pockets are located on the inside of the door for easy access and organization of handguns.
- Handgun and Bullet Bags: Utilize the included handgun and bullet bags for additional organized storage of smaller items and ammunition.
Maintenance
- Cleaning: Wipe the exterior and interior surfaces with a soft, damp cloth. Avoid abrasive cleaners or solvents that could damage the finish or electronic components.
- Battery Replacement: Replace batteries annually or when the low battery indicator appears. Always use new, high-quality alkaline batteries.
- Lock Mechanism: Periodically check the locking bolts and hinges for smooth operation. Do not lubricate the keypad or lock cylinder unless specifically instructed by customer support.
- Security Check: Regularly ensure the mounting bolts are tight and the safe remains securely fixed to its location.
Troubleshooting
| Problem | Possible Cause | Solution |
|---|---|---|
| Keypad not responding / Safe not opening with password | Dead batteries; Incorrect password entered; Keypad malfunction. | Replace batteries; Use emergency key; Use external power supply; Re-enter correct password; Contact customer support. |
| Alarm sounds unexpectedly | Vibration alarm activated; Incorrect password entered multiple times. | Enter correct password to disarm; Check if safe was disturbed. |
| Door does not close or latch properly | Obstruction in door frame; Misaligned locking bolts. | Check for obstructions; Gently adjust door alignment; Contact customer support if issue persists. |
| Emergency key not working | Key not fully inserted; Lock cylinder jammed. | Ensure key is fully inserted and turned correctly; Do not force the key; Contact customer support. |
Warranty and Customer Support
INTERGREAT is committed to providing high-quality products and excellent customer service. If you encounter any issues with assembly, operation, or product defects, please do not hesitate to contact our professional after-sales team.
Our customer support is available 24 hours a day to provide satisfactory solutions and ensure your problem is handled properly. Please refer to your purchase documentation for specific warranty details and contact information.