
1. Safety Information
Read and understand all instructions before assembling, installing, or using the JOYTUTUS Hitch EBike Rack. Failure to follow these instructions may result in property damage, personal injury, or death.
- Weight Capacity: Do not exceed the maximum load capacity of 200 LBS (90.7 kg) for two e-bikes. Ensure the combined weight of your bikes does not exceed this limit.
- Hitch Receiver: This rack is designed for a 2-inch (5 cm) hitch receiver only. Verify your vehicle's hitch receiver size before installation.
- Vehicle Compatibility: Ensure your vehicle's hitch and frame can safely support the weight of the rack plus two e-bikes. Consult your vehicle's owner's manual for hitch capacity.
- Secure Attachment: Always ensure the rack is securely attached to the vehicle's hitch receiver and all bikes are firmly secured to the rack before driving. Regularly check all fasteners and straps for tightness.
- Clearance: Be aware of the increased length and width of your vehicle when the rack is installed, especially when backing up, turning, or parking.
- Visibility: Ensure the rack and bikes do not obstruct your vehicle's taillights, brake lights, or license plate. Use auxiliary lighting if necessary.
- Driving Conditions: Drive cautiously, especially over bumps, rough terrain, or when making sharp turns. Reduce speed when carrying bikes.
- Maintenance: Regularly inspect the rack for any signs of wear, damage, or corrosion. Replace worn or damaged parts immediately.
- Children: Keep children away from the rack during installation, loading, and unloading to prevent injury.
2. Package Contents
Verify that all components are present before beginning assembly.
- Main Rack Frame Assembly
- Hitch Receiver Bar
- Wheel Cradles with Straps (4-point secure hold system)
- Locking Pole (for bike stability)
- Ramp for E-Bike Loading
- Anti-Wobble Hitch Mechanism (Patented 3-Side Expansion Design)
- Dual Anti-Theft Locks (Pole Lock and Hitch Lock)
- Assembly Hardware (bolts, nuts, washers)
- Instruction Manual
3. Setup & Installation
Follow these steps to assemble and install your JOYTUTUS Hitch EBike Rack.
3.1 Assembly
Refer to the included assembly diagram for specific part identification. Ensure all bolts are tightened securely during assembly.
Video: The Installation of JOYTUTUS Hitch EBike Rack. This video demonstrates the step-by-step assembly process of the bike rack.
- Unpack all components and lay them out.
- Attach the main rack frame to the hitch receiver bar using the provided hardware.
- Install the wheel cradles onto the rack frame. Ensure they are oriented correctly for bike placement.
- Assemble the locking pole and attach it to the designated position on the rack.
- Attach the ramp hanging parts as shown in the assembly instructions.
3.2 Attaching to Vehicle
The rack is designed for vehicles with a 2-inch hitch receiver.

Image: Hitch Receiver Compatibility. This image illustrates the 2-inch hitch receiver and various vehicle types compatible with the rack.
- Slide the hitch receiver bar into your vehicle's 2-inch hitch receiver.
- Insert the locking tightening bolt through the hitch receiver and the rack's receiver bar.
- Tighten the center bolt of the patented 3-side anti-wobble hitch mechanism. This pushes three rigid blocks outward, securing the hitch receiver tightly and reducing sway.
- Install the hitch lock to secure the entire rack to your vehicle.
- Note: If your SUV has a rear spare tire, a hitch extender (not included) may be required for proper installation and clearance.

Image: Patented 3-Side Anti-Wobble Hitch. This diagram details the components of the anti-wobble hitch, including the 3-side expansion blocks and locking tightening bolt, which ensure a secure connection to the vehicle.
4. Operating Instructions
Proper operation ensures the safety of your bikes and vehicle.
4.1 Loading E-Bikes
Video: JOYTUTUS Hitch EBike Rack with Ramp. This video demonstrates the easy ramp loading feature and other operational aspects of the bike rack.
- Deploy the Ramp: Attach the loading ramp to the designated slot on the rack.
- Roll Bikes On: Carefully roll each e-bike up the ramp and into its respective wheel cradle. The ramp facilitates easy loading of heavy e-bikes without lifting.
- Bike Orientation: Mount the two e-bikes with front wheels facing opposite directions. Adjust pedal positions to prevent interference, especially for large or fat-tire e-bikes.
- Secure Wheel Cradles: Position the bike wheels firmly within the cradles. The rack accommodates tire widths up to 5 inches and wheel sizes from 20 to 29 inches, with a maximum wheelbase of 51 inches.
- Strap Wheels: Use the heavy-duty tire straps to secure both wheels of each bike to the wheel cradles.
- Engage Locking Pole: Position the locking pole against the bike frame and secure it to prevent twisting and tipping.
- Apply Clamp Straps: Use the clamp straps to further secure the bike frames to the rack.

Image: Easy Ramp Loading. This image shows an individual effortlessly rolling an e-bike onto the rack using the integrated ramp.

Image: 4-Point Secure Hold System. This image illustrates the four key points of contact and security for bikes on the rack, including wheel cradles, straps, and the locking pole.
4.2 Unloading E-Bikes
- Release the clamp straps first, then the tire straps.
- Carefully roll the e-bikes down the ramp.
4.3 Tilt and Fold Functions
The rack features independent tilt and fold handles for convenience.
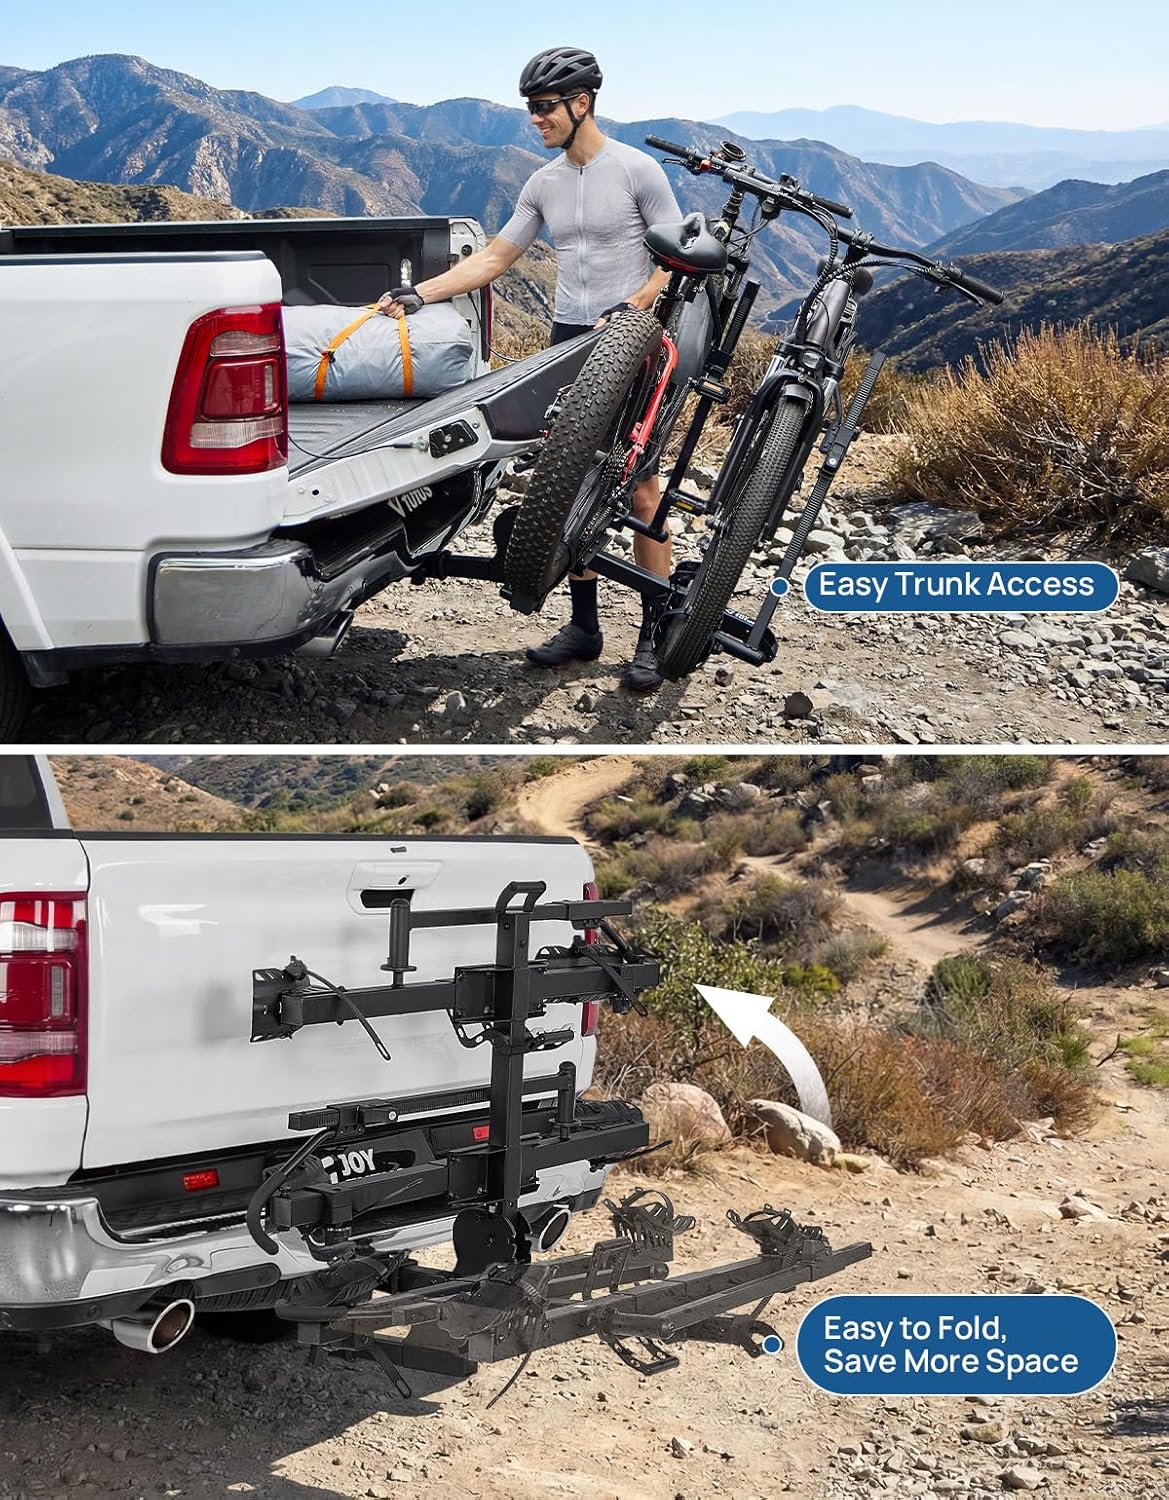
Image: Smart Tilt & Fold Handles. This image demonstrates the rack's ability to tilt for trunk access and fold for compact storage.
- Tilt Handle: Use the tilt handle to lower the rack away from your vehicle, allowing access to your trunk or cargo area even with bikes loaded. No pins or tools are required.
- Fold Handle: Use the fold handle to collapse the rack flat against your vehicle for compact storage when not in use or when driving without bikes.
4.4 Dual Anti-Theft Lock System
The rack includes two independent locks for enhanced security.
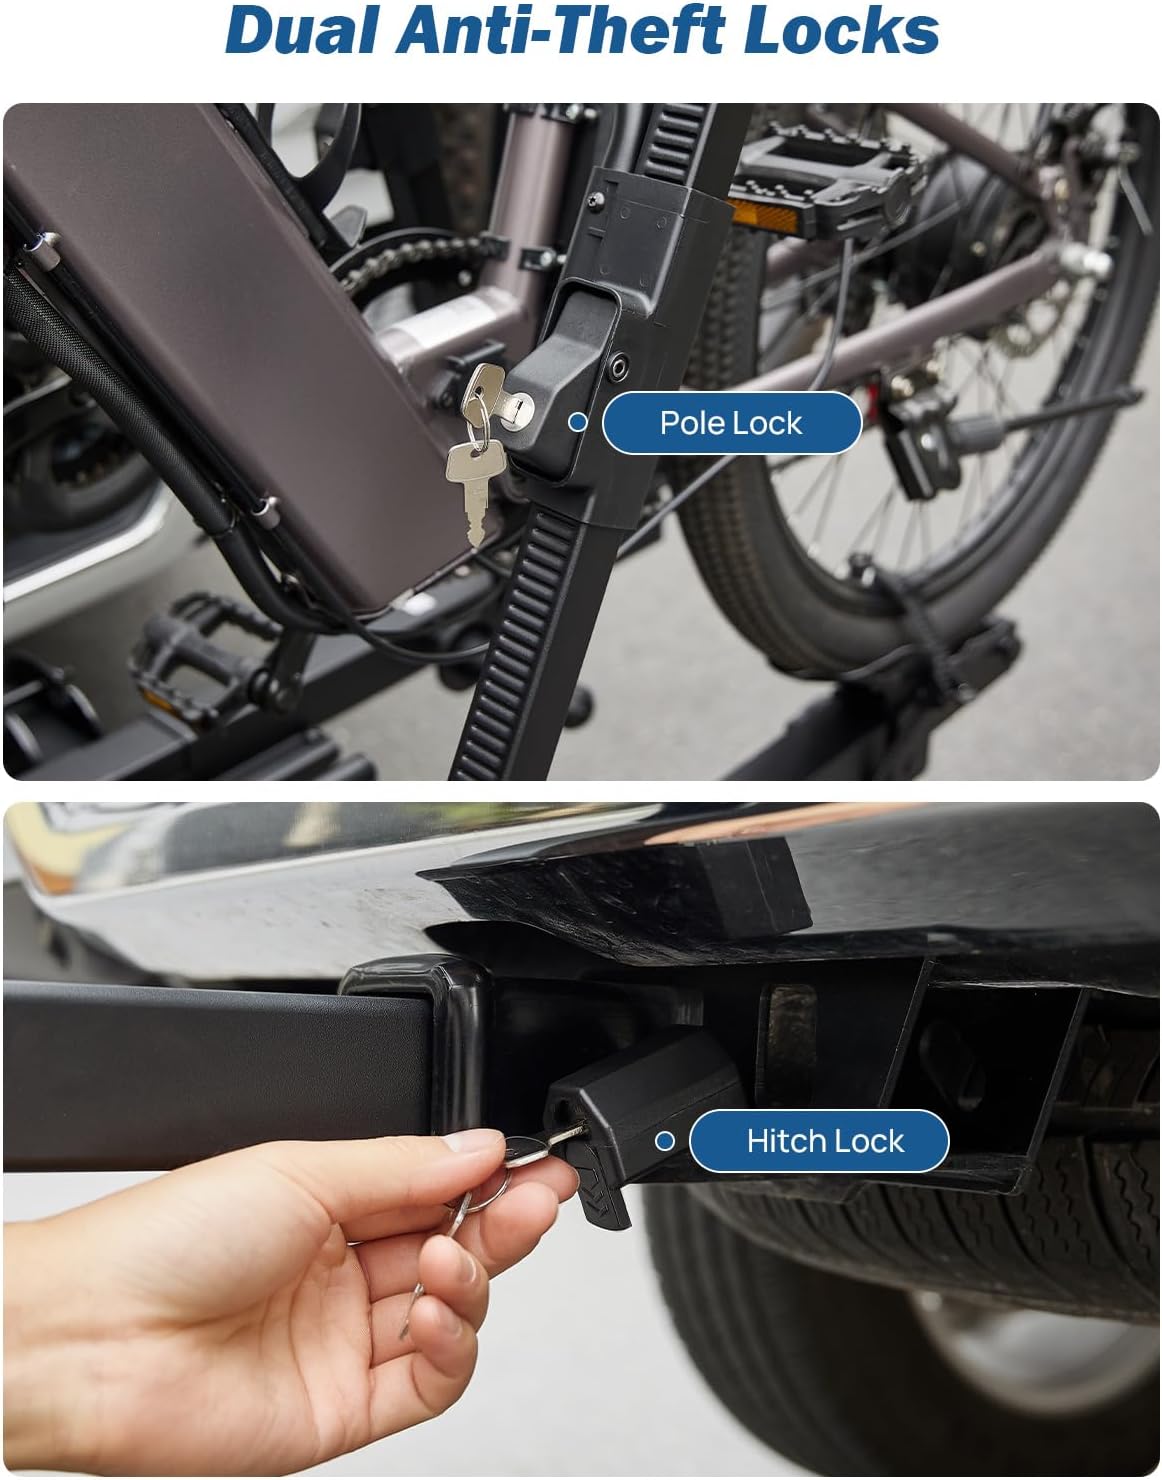
Image: Dual Anti-Theft Locks. This image displays both the pole lock, which secures the bikes, and the hitch lock, which secures the entire rack to the vehicle.
- Pole Lock: Use the integrated pole lock to secure your bikes to the rack, deterring theft.
- Hitch Lock: Use the hitch lock to secure the entire rack to your vehicle's hitch receiver, preventing unauthorized removal of the rack itself.
5. Maintenance
Regular maintenance ensures the longevity and safe operation of your bike rack.
- Inspection: Before each use, inspect all parts of the rack for signs of wear, damage, loose fasteners, or corrosion. Pay close attention to welds, straps, and moving joints.
- Cleaning: Clean the rack regularly with mild soap and water, especially after exposure to road salt, dirt, or harsh weather conditions. Rinse thoroughly and dry.
- Lubrication: Periodically lubricate moving parts, such as the tilt and fold mechanisms, to ensure smooth operation.
- Corrosion Protection: Apply a rust inhibitor to exposed metal parts, especially at rotating arms and hitch connections, to prevent corrosion.
- Storage: When not in use, store the rack in a dry, protected area to minimize exposure to elements.
- Strap Replacement: Replace any worn, frayed, or damaged straps immediately.
6. Troubleshooting
This section addresses common issues you might encounter.
- Rack Wobbles in Hitch:
- Ensure the patented 3-side anti-wobble hitch mechanism's center bolt is fully tightened. This expands the blocks to secure the rack firmly within the 2-inch receiver.
- Verify that the hitch receiver is clean and free of debris.
- Bikes Wobble on Rack:
- Confirm that all four tire straps are securely fastened.
- Ensure the locking pole is properly engaged and tightened against the bike frames.
- Adjust the clamp straps for a snug fit around the bike frames.
- Ensure bikes are positioned with front wheels facing opposite directions and pedals adjusted to prevent contact.
- Difficulty Installing Shims (if applicable):
- If shims are provided for upright bars and are difficult to install, ensure proper alignment. If excessive force is required, contact customer support for guidance.
- Ramp Clip Difficult to Hook/Unhook:
- Ensure the ramp is correctly aligned with the attachment points. If the clip remains stiff, apply a small amount of lubricant.
- Lever Arm/Component Fell Off:
- Immediately stop driving and safely retrieve any detached components. Inspect the rack for damage. Re-secure the component if possible, ensuring all fasteners are present and tightened. If damage occurred or the component cannot be re-secured, discontinue use and contact customer support.
7. Specifications
| Model Number | A1317-05362-BK |
| Brand | JOYTUTUS |
| Load Capacity | 200 Pounds (90.7 kg) for 2 E-Bikes |
| Hitch Receiver Size | 2 inches (5 cm) |
| Max Tire Width | 5 inches (12.7 cm) |
| Wheel Sizes Supported | 20 - 29 inches |
| Max Wheelbase | 51 inches (129.5 cm) |
| Foldable | Yes |
| Tilting Feature | Yes (for trunk access) |
| Anti-Wobble System | Patented 3-Side Expansion Design |
| Security Features | Dual Anti-Theft Locks (Pole Lock, Hitch Lock) |
| Included Components | Anti Sway Cradle, Loading Ramp |
Video: Hitch Ebike Rack Lab Test. This video demonstrates the rigorous testing performed on the rack to ensure its load capacity and durability.
8. Warranty & Support
8.1 Manufacturer's Warranty
The JOYTUTUS Hitch EBike Rack (Model A1317-05362-BK) comes with a 1-year manufacturer's warranty from the date of purchase. This warranty covers defects in materials and workmanship under normal use. It does not cover damage resulting from misuse, accidents, modifications, or improper installation.
Please retain your proof of purchase for warranty claims.
8.2 Customer Support
For any questions, assistance with assembly, operation, or warranty claims, please contact JOYTUTUS customer support. Refer to the contact information provided with your product packaging or visit the official JOYTUTUS website for the most current support details.
When contacting support, please have your model number (A1317-05362-BK) and purchase date readily available.