
Introduction
Thank you for choosing the YISSVIC 4000V Electric Mosquito Swatter. This device is designed to effectively eliminate flying insects such as mosquitoes, moths, and fruit flies, offering both manual and automatic operation modes. It features a powerful 4000V grid, a built-in UV light for attraction, an 1800mAh rechargeable battery, USB-C charging, and a convenient charging base with integrated night light functions. Please read this manual thoroughly before use to ensure safe and optimal performance.
Safety Instructions
WARNING: High Voltage. Keep out of reach of children.
- Do not touch the electric grid when the swatter is active or charging.
- This device is not a toy. Adult supervision is required when used by or near children.
- Do not use the swatter near flammable gases, liquids, or explosive materials.
- Do not use in the rain or wet conditions, as the device is not waterproof.
- Do not insert metal objects into the grid.
- Avoid using the device while charging in manual mode to prevent accidental contact with the grid.
- Store the device in a dry place when not in use.
- If the device is damaged, do not attempt to repair it yourself. Contact customer support.
Product Components
- Electric Mosquito Swatter (x2)
- Charging Base (x2)
- USB-C Charging Cable (x2)
- User Manual
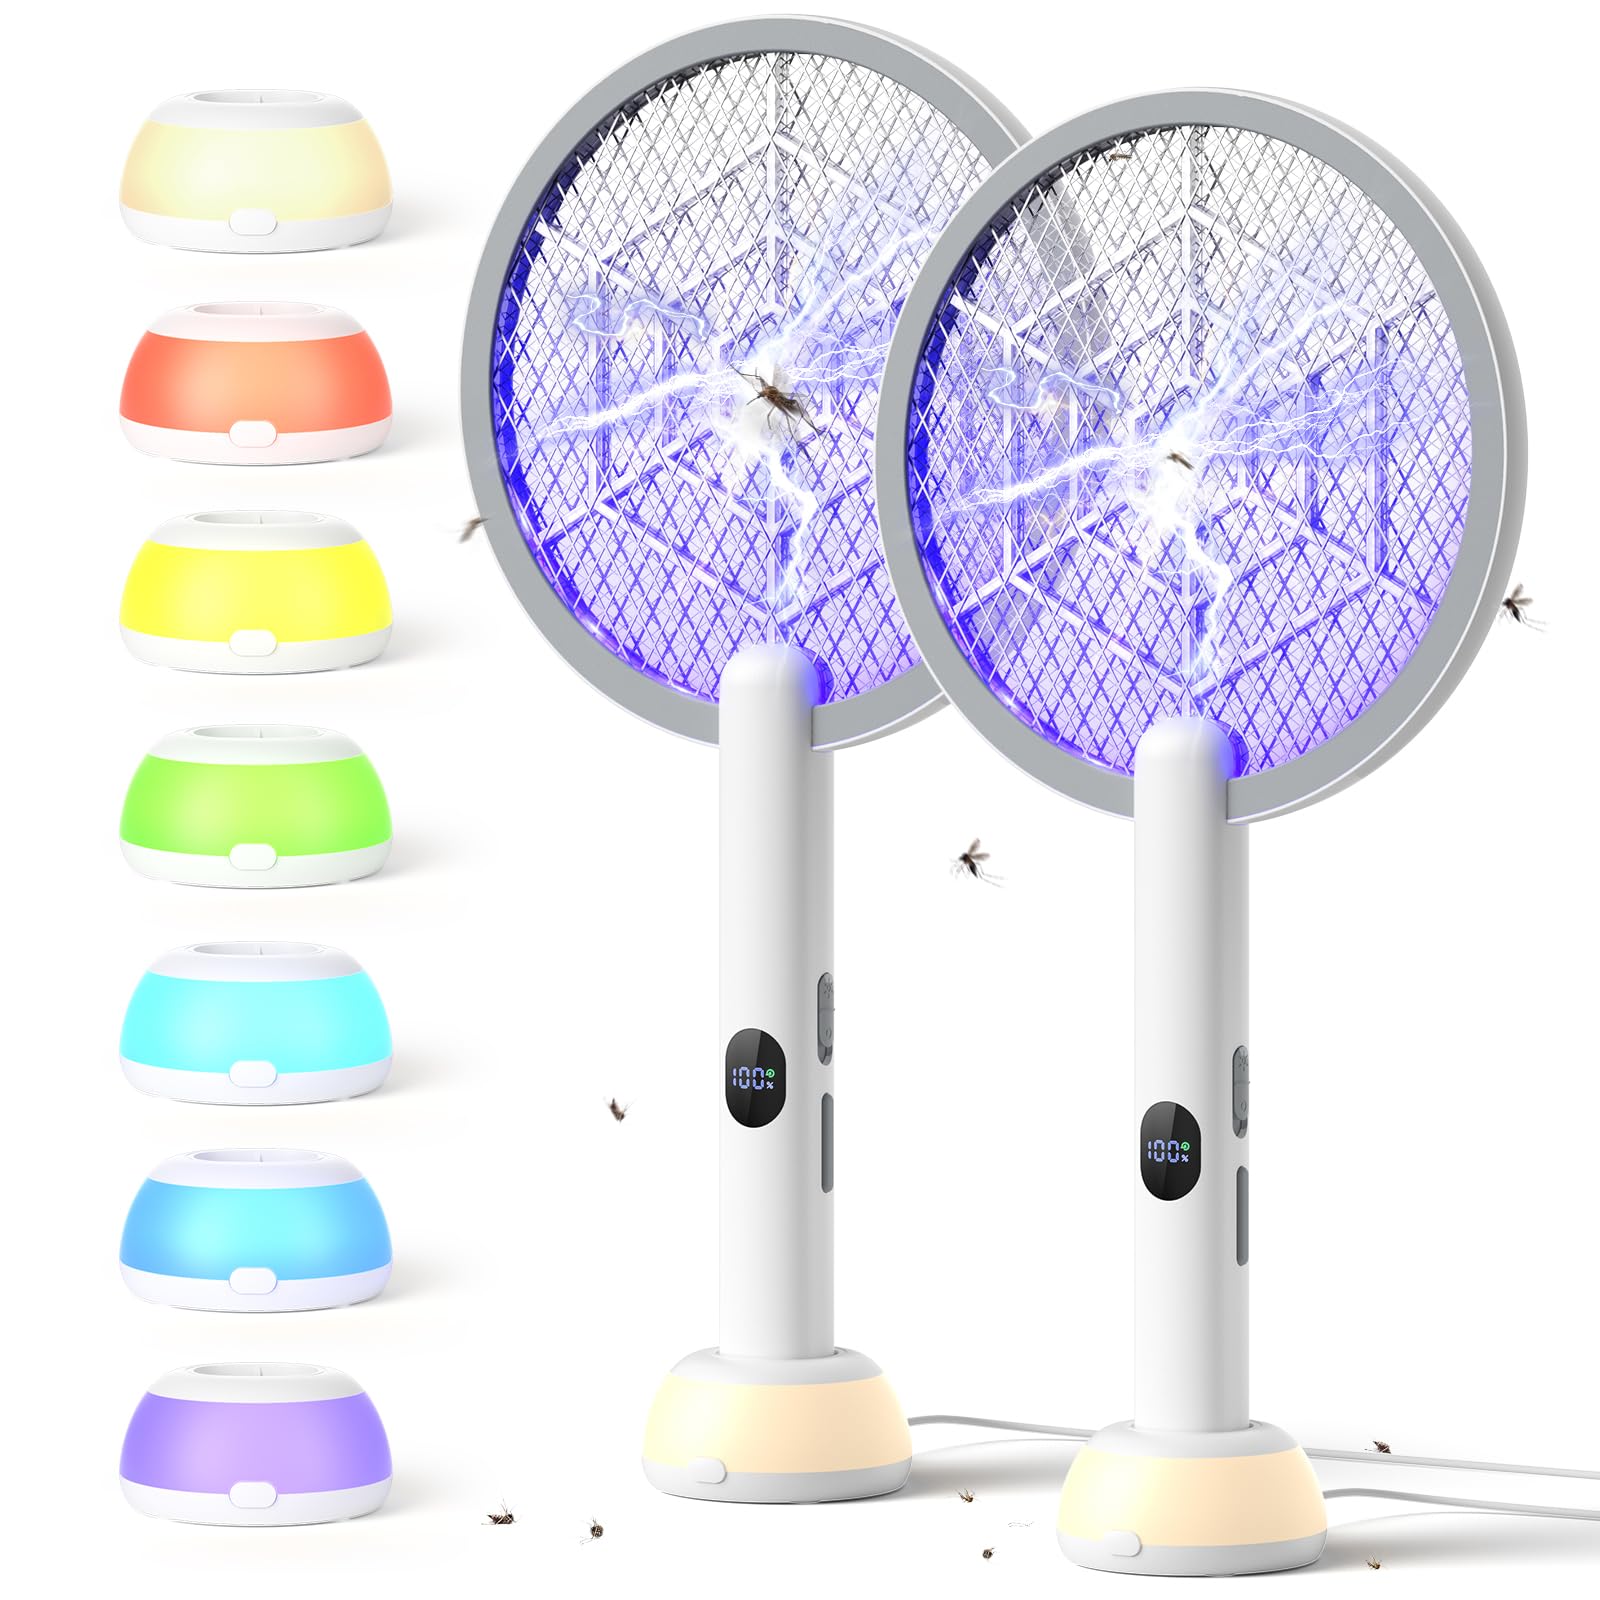
Image: The YISSVIC Electric Mosquito Swatter shown with its charging base and USB-C cable.
Setup
- Unpack: Carefully remove all components from the packaging.
- Initial Charge: Before first use, fully charge the swatter. Connect the USB-C cable to the swatter's handle or place it on the charging base, then connect the cable to a 5V/1A USB power adapter (not included) or a power bank. The LED battery indicator will show the charging progress.
- Placement (Auto-ZAP Mode): If using the Auto-ZAP mode, place the charging base on a flat, stable surface in an area where insects are present, away from direct sunlight or strong drafts. Ensure the base is connected to a power source for the night light function and continuous operation.

Image: Illustration of the two charging methods: directly via USB-C cable to the handle, or by placing the swatter on its charging base.
Operating Instructions
1. Manual Mode
- Activate: Slide the power switch on the handle to the 'Manual' position (usually indicated by a single light icon).
- Engage: Press and hold the electric discharge button (often a lightning bolt icon) on the handle. The indicator light will illuminate, signifying the grid is active.
- Swat: Swing the swatter towards flying insects. Upon contact, a spark and sound will indicate successful elimination.
- Deactivate: Release the electric discharge button to turn off the grid. Slide the power switch to 'OFF' when not in use.
2. Auto-ZAP Mode (with UV Light)
This mode is ideal for hands-free insect attraction and elimination.
- Connect: Ensure the swatter is placed on its charging base and the base is connected to a power source.
- Activate: Slide the power switch on the handle to the 'Auto-ZAP' position (usually indicated by a UV light icon). The UV light will turn on, attracting insects to the electrified grid.
- Operation: The swatter will remain electrified, eliminating insects that fly into the grid.
- Deactivate: Slide the power switch to 'OFF' when not in use.

Image: The swatter demonstrating its two modes: manual use for direct swatting and auto-zap mode when placed on the charging base, attracting insects with UV light.

Image: A close-up view of a mosquito being instantly eliminated by the 4000V high-tension grid of the swatter.
3. Night Light Function
The charging base features two night light modes. This function is only available when the base is connected to a power source.
- Warm Light: Single-click the touch sensor on the charging base to activate or deactivate the warm ambient light.
- Multi-color Light: Double-click the touch sensor on the charging base to activate or deactivate the multi-color ambient light.

Image: The charging base illustrating its two night light modes: a warm light activated by a single click and a multi-color ambient light activated by a double click.
Charging
The swatter is equipped with an 1800mAh rechargeable battery, providing up to 4 hours of use and fully recharging in approximately 3 hours.
- Battery Indicator: The LED display on the handle shows the current battery percentage. Recharge immediately when the battery level drops below 10%.
- Charging Methods:
- Place the swatter on the charging base.
- Connect the USB-C cable directly to the charging port on the swatter's handle.
- Power Source: Use a 5V/1A USB power adapter (not included) or a power bank for charging. Avoid using fast charging adapters.

Image: A transparent view of the swatter's handle, highlighting the 1800mAh long-lasting rechargeable battery and USB-C charging port.

Image: The swatter on its charging base, showing the digital LED battery level display indicating 100% charge.
Maintenance
- Cleaning: Ensure the swatter is turned off and unplugged before cleaning. Use a dry brush or cloth to gently remove dead insects from the grid. Do not use water or wet cloths, as this can damage the electronic components.
- Storage: Store the swatter in a cool, dry place, away from direct sunlight and moisture.
- Battery Care: For optimal battery life, avoid completely draining the battery frequently. If storing for an extended period, charge the battery to about 50% and recharge every 3 months.
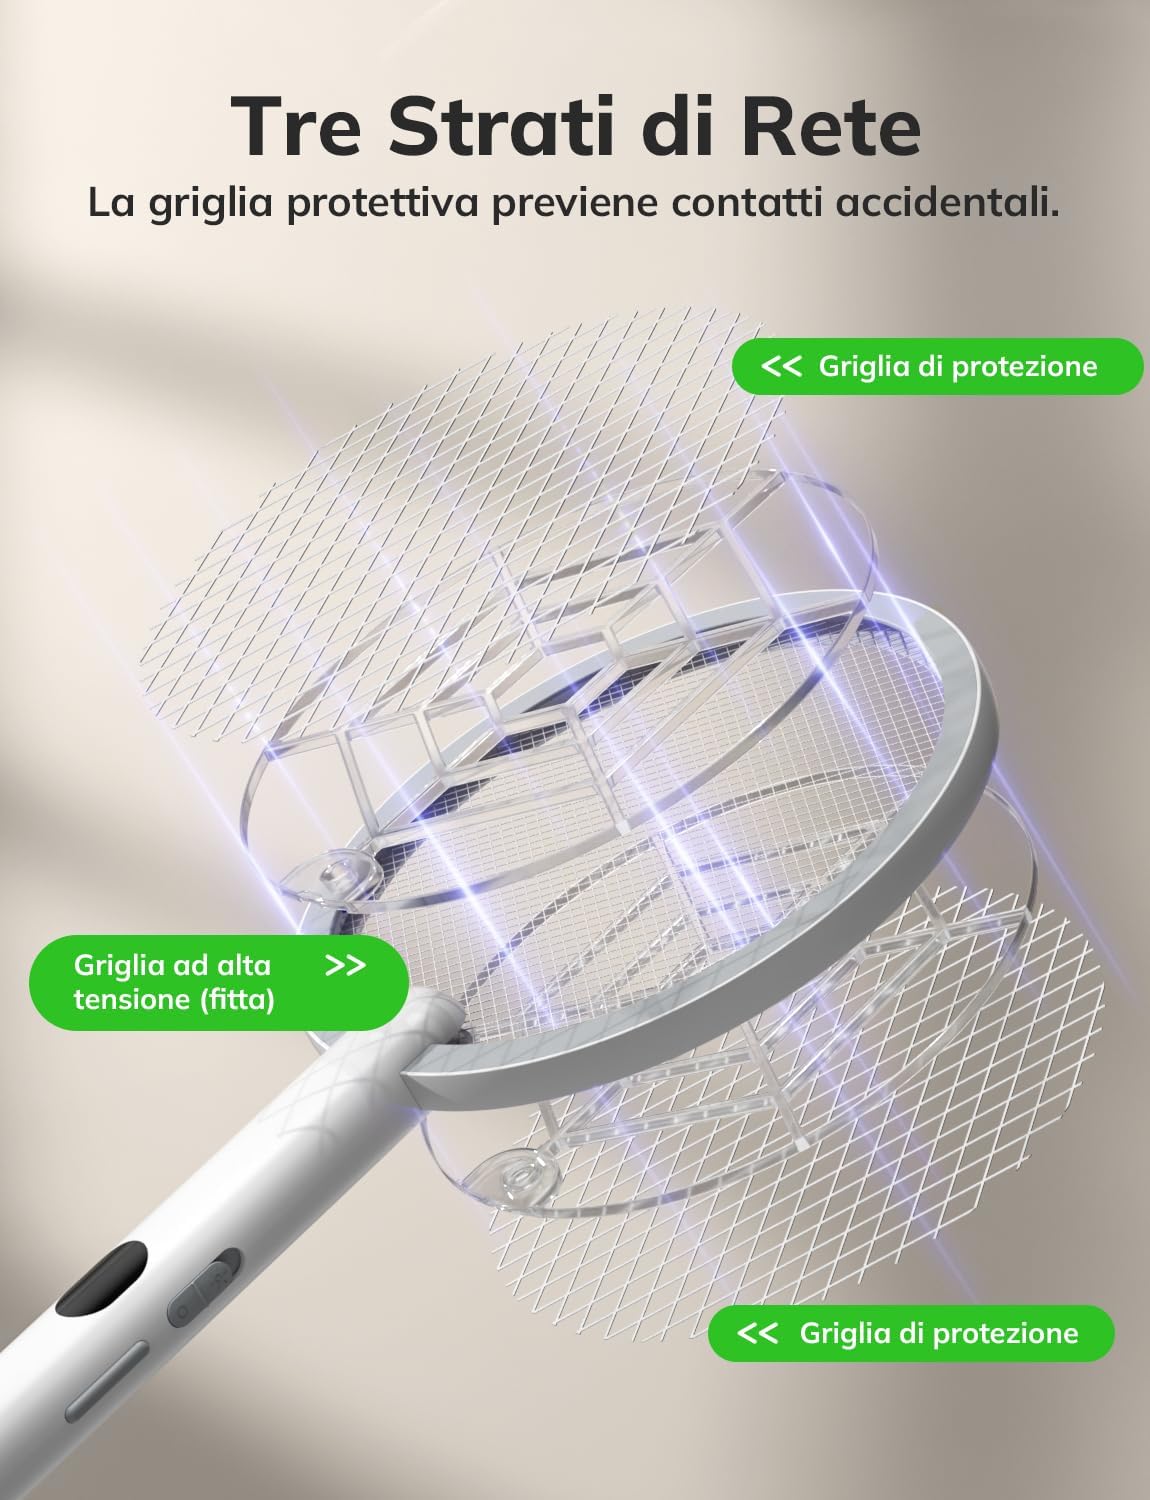
Image: A detailed view of the swatter's three-layer grid design, featuring two outer protective grids and an inner high-tension grid to prevent accidental contact.
Troubleshooting
| Problem | Possible Cause | Solution |
|---|---|---|
| Swatter not activating / no spark. | Battery is low or depleted. Power switch is off. Electric discharge button not pressed. | Charge the swatter fully. Ensure the power switch is in the 'Manual' or 'Auto-ZAP' position. Press and hold the electric discharge button in manual mode. |
| UV light not turning on in Auto-ZAP mode. | Swatter not on charging base or base not connected to power. Power switch not in 'Auto-ZAP' position. | Place swatter on charging base and ensure base is powered. Slide power switch to 'Auto-ZAP'. |
| Night light not working. | Charging base not connected to power. | Ensure the charging base is connected to a power source. |
| Ineffective insect elimination. | Grid is dirty with dead insects. Battery is low. | Clean the grid with a dry brush. Recharge the swatter. |
Specifications
- Model Number: WD-9013
- Output Voltage: 4000V
- Battery Capacity: 1800mAh Lithium-ion (included)
- Charging Time: Approximately 3 hours
- Operating Time: Up to 4 hours (manual mode)
- Charging Input: USB-C, 5V/1A (adapter not included)
- Product Dimensions: 46.4 x 23 cm (swatter), 4.2 cm (base height)
- Weight: 1.05 kg
- Features: 2-in-1 (Manual/Auto-ZAP), UV Light, Night Light (Warm/Multi-color)

Image: Detailed measurements of the electric mosquito swatter (46.4 cm length, 23.0 cm width) and its charging base (4.2 cm height).
Warranty and Support
For warranty information or technical support, please refer to the documentation provided with your purchase or contact YISSVIC customer service directly through their official website or the retailer where the product was purchased. Please have your model number (WD-9013) and purchase date available when contacting support.


