
1. Product Overview
The Restmo 48-inch Tripod Sprinkler is designed for efficient and versatile watering of lawns, gardens, and agricultural areas. It features a durable all-metal construction and an adjustable tripod for flexible height and coverage.
Key Features:
- All-Metal Durability: Constructed from heavy-duty zinc alloy for resistance to rust and various weather conditions.
- Adjustable Height Tripod: Tripod height can be adjusted from 21 inches to 48 inches.
- 360° Custom Spray Pattern: Allows for full circle or partial circle rotation.
- Precise Spray Distance Control: Adjustable dial for varying spray ranges.
- Versatile Irrigation: Compatible with standard 3/4-inch hoses and water pressures from 20–80 PSI.
2. Setup Instructions
Follow these steps to set up your Restmo Tripod Sprinkler:
- Unpack Components: Carefully remove all parts from the packaging. Ensure you have the tripod base and the impact sprinkler head.
- Assemble Tripod: Extend the tripod legs. The legs feature quick-lock mechanisms for secure positioning.
- Adjust Tripod Height: Loosen the quick-lock clamps on each leg to adjust the tripod to your desired height, ranging from 21 to 48 inches. Securely fasten the clamps once the height is set. This allows watering over obstacles like fences or shrubs.
- Attach Sprinkler Head: Screw the impact sprinkler head onto the top of the tripod stand. Ensure it is hand-tightened to prevent leaks.
- Connect Water Hose: Connect a standard 3/4-inch garden hose to the inlet connection at the base of the tripod. Ensure the filter washer is in place to prevent debris from entering the sprinkler system.

Image: The tripod sprinkler shown at its three adjustable heights: 21 inches, 37 inches, and 48 inches.

Image: The tripod sprinkler positioned to water over a tall hedge, demonstrating its elevated reach.

Image: A collage of three images illustrating the sprinkler's adjustable heights for various watering needs in a garden setting.

Image: Detailed view of the tripod leg locks for height adjustment, the filter washer at the hose connection point, and the adjustable knob on the sprinkler head.
3. Operating Instructions
The Restmo Tripod Sprinkler offers various adjustments for precise watering:
Adjusting Spray Distance:
Use the marked dial on top of the sprinkler head to control the spray range. Turn the dial towards MAX for wide-area coverage, or towards MIN for gentle, targeted watering.
Adjusting Spray Pattern (Arc Rotation):
The sprinkler head can be set for full 360° rotation or a partial circle pattern. To set a partial circle:
- Lift Trip Pin: For full 360° head rotation, ensure the trip pin is lifted.
- Rotate Friction Collars: To set a partial arc, rotate the friction collars to define the desired start and end points of the spray. The trip pin will move between these collars, causing the sprinkler to reverse direction at the set limits.
Modifying Water Spread:
The side diffuser pin can be adjusted to change the spread of the water stream. Screw the diffuser pin in front of the nozzle to interrupt water flow and create a finer, more diffused spray.
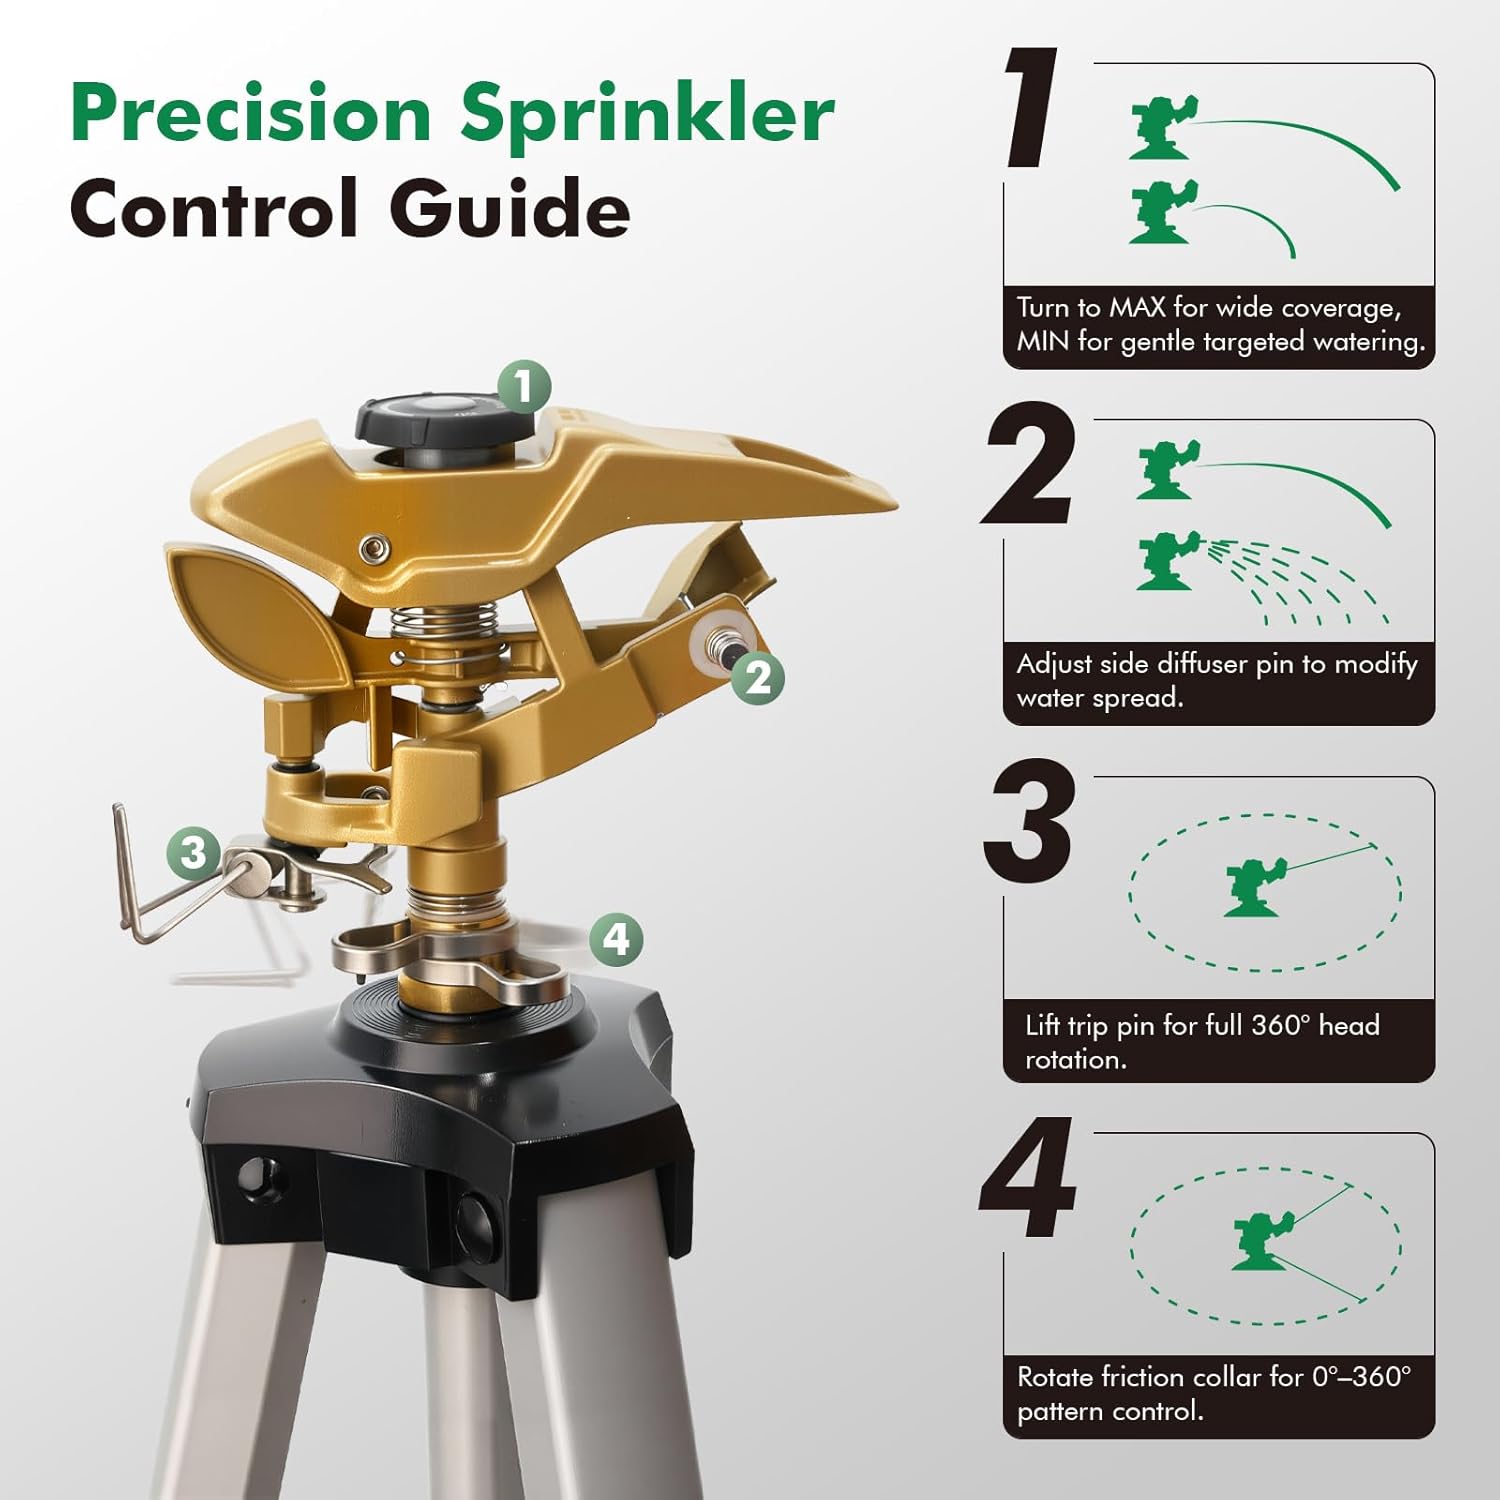
Image: A visual guide detailing the four steps for precision sprinkler control, including distance and pattern adjustments.

Image: The sprinkler head's MAX/MIN dial for spray distance control, with illustrative images of wide coverage and gentle targeted watering.

Image: An exploded view of the sprinkler head components, labeling the Spray Nozzle, Deflector Shield, Distance Control Knob, Trip Pin, Anti-Backsplash, and Friction Collar.
Instructional Videos:
Video: Demonstrates how to adjust the spray area of the sprinkler head.
Video: Shows how to adjust the spray distance for optimal coverage.
4. Maintenance
Regular maintenance ensures the longevity and optimal performance of your Restmo Tripod Sprinkler.
- Clean Filter Washer: Periodically check and clean the filter washer located at the hose connection point to prevent debris from clogging the sprinkler.
- Inspect for Obstructions: Ensure the sprinkler head's nozzle and moving parts are free from dirt, sand, or other obstructions that could affect its spray pattern or rotation.
- Storage: During off-season or prolonged periods of non-use, disconnect the sprinkler, drain any remaining water, and store it in a dry, protected area to prevent damage from freezing temperatures or corrosion.
5. Troubleshooting
If you encounter issues with your sprinkler, refer to the following common problems and solutions:
Sprinkler Head is Stuck or Not Rotating:
- Check Water Pressure: Ensure your water pressure is within the recommended range of 20-80 PSI. Insufficient pressure can prevent proper rotation.
- Inspect for Obstructions: Turn off the water supply and carefully inspect the sprinkler head for any debris (e.g., dirt, small stones) that might be jamming the rotating mechanism. Clean as necessary.
- Adjust Friction Collars: Ensure the friction collars are not set too tightly, which could impede rotation.
- Rinse System: Open and close the water faucet to maximum several times to help dislodge any internal blockages.
Instructional Video:
Video: Provides guidance on how to resolve a stuck sprinkler head problem.
6. Specifications
| Feature | Detail |
|---|---|
| Brand | Restmo |
| Model Number | O-LS-19-GN-2PK |
| Color | Silver |
| Material | Metal (Zinc Alloy) |
| Style | Impulse |
| Adjustable Height | 21 to 48 inches |
| Item Dimensions (L x W x H) | 23.5 x 9.2 x 4.9 inches |
| Inlet Connection Size | 0.75 inches |
| Maximum Pressure | 80 PSI |
| Number of Packs | 2 |
7. Warranty and Support
Information regarding product warranty and customer support was not provided in the available data. Please refer to the product packaging or the manufacturer's official website for details on warranty coverage and how to contact customer support.