
1. Introduction
The AUTOOL SVB208 Articulating Video Borescope is a precision inspection tool designed for accessing and visualizing confined, hard-to-reach areas. Its advanced features, including a 210° bidirectional articulating camera head and an ultra-thin probe, make it suitable for detailed inspections in automotive, industrial, and mechanical applications. This manual provides essential information for the safe and effective operation, maintenance, and troubleshooting of your device.

Figure 1.1: AUTOOL SVB208 Articulating Video Borescope overview, highlighting its 6.25mm probe, 210° bidirectional control, 1080P resolution, 4.3" IPS LCD, IP67 water resistance, and overheat auto shut-off.
2. Product Features
- 210° Bidirectional Articulating Camera Head: The flexible lens articulates 210° in two directions, allowing precise navigation and inspection of corners, bends, and blind spots without needing to reposition the probe.
- Ultra-Thin 6.25mm Probe: Equipped with a slim 6.25mm diameter probe, minimizing the need for disassembly and enabling access to narrow, curved, and enclosed spaces such as engine blocks, cylinders, pipes, and evaporators.
- 4.3" IPS Screen with 8x Digital Zoom: Features a high-quality 4.3-inch IPS screen for true-color, crisp imaging. The 8x digital zoom allows for detailed inspection of small components, cracks, or defects.
- IP67 Rated & Environmentally Rugged: The lens is IP67 waterproof and dustproof, designed to be oil-resistant and durable for reliable operation in challenging environments like humid engine bays, oily machinery, or wet pipes.
- Integrated 32GB Storage & 6-Adjustable LED Lights: Comes with a 32GB microSD card for capturing JPG images and AVI videos. The lens tip has 6 high-brightness LEDs with 3-level adjustable brightness for clear, well-lit views in dark areas.
- Over-Temperature Protection: A built-in temperature sensor automatically shuts down the camera when temperatures exceed 85°C, preventing heat damage and extending device lifespan.
- Magnetic Base Design: The device features a built-in magnetic base that securely attaches to metal surfaces, freeing your hands during inspections.
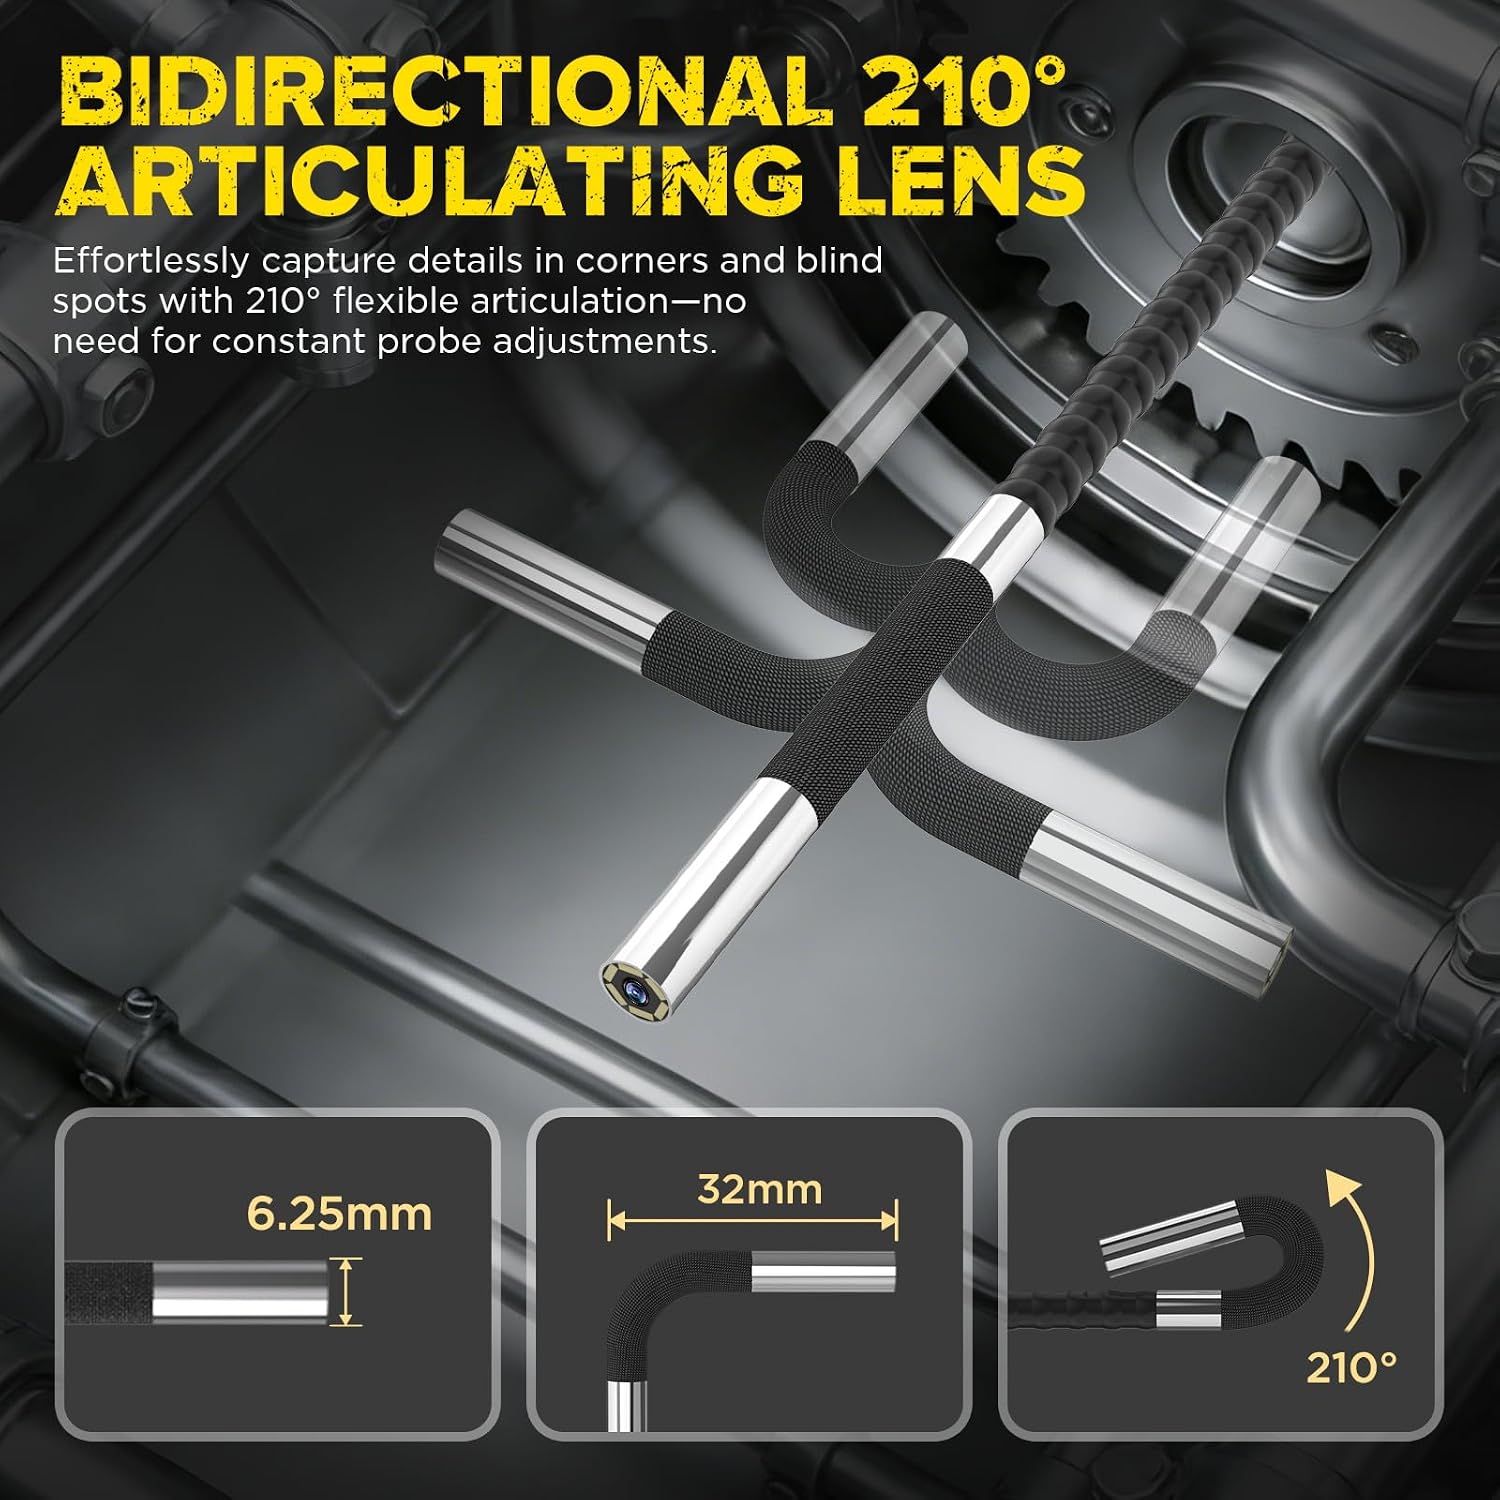
Figure 2.1: Illustration of the 210° bidirectional articulating lens, demonstrating its flexibility for inspecting various angles.

Figure 2.2: The 6.25mm ultra-thin probe designed for minimal invasiveness in tight inspection areas.

Figure 2.3: The IP67 rated lens demonstrating its resistance to water and oil, suitable for harsh environments.

Figure 2.4: The over-temperature protection feature, indicating automatic shutdown at 85°C to prevent damage.

Figure 2.5: The magnetic base design, allowing hands-free operation by securing the device to metal surfaces.
3. Setup
3.1 Unpacking and Initial Inspection
Carefully unpack all components from the product packaging. Verify that all items listed in the 'What's in the Box' section are present and undamaged. If any items are missing or damaged, contact customer support immediately.

Figure 3.1: Contents of the product packaging, including the borescope unit, carrying case, USB cable, and user manual.
3.2 Charging the Device
Before first use, fully charge the borescope. Connect the provided USB-C cable to the charging port (K) on the device and to a suitable USB power adapter (not included). The charging indicator will show the charging status. A full charge ensures optimal battery life during operation.
3.3 Inserting the MicroSD Card
The device comes with a 32GB microSD card pre-installed. If you need to replace or reinsert the card, locate the memory card slot (J) on the side of the device. Gently push the card into the slot until it clicks into place. Ensure the card is inserted correctly to enable photo and video capture.
3.4 Component Identification
Familiarize yourself with the main components and controls of the borescope:
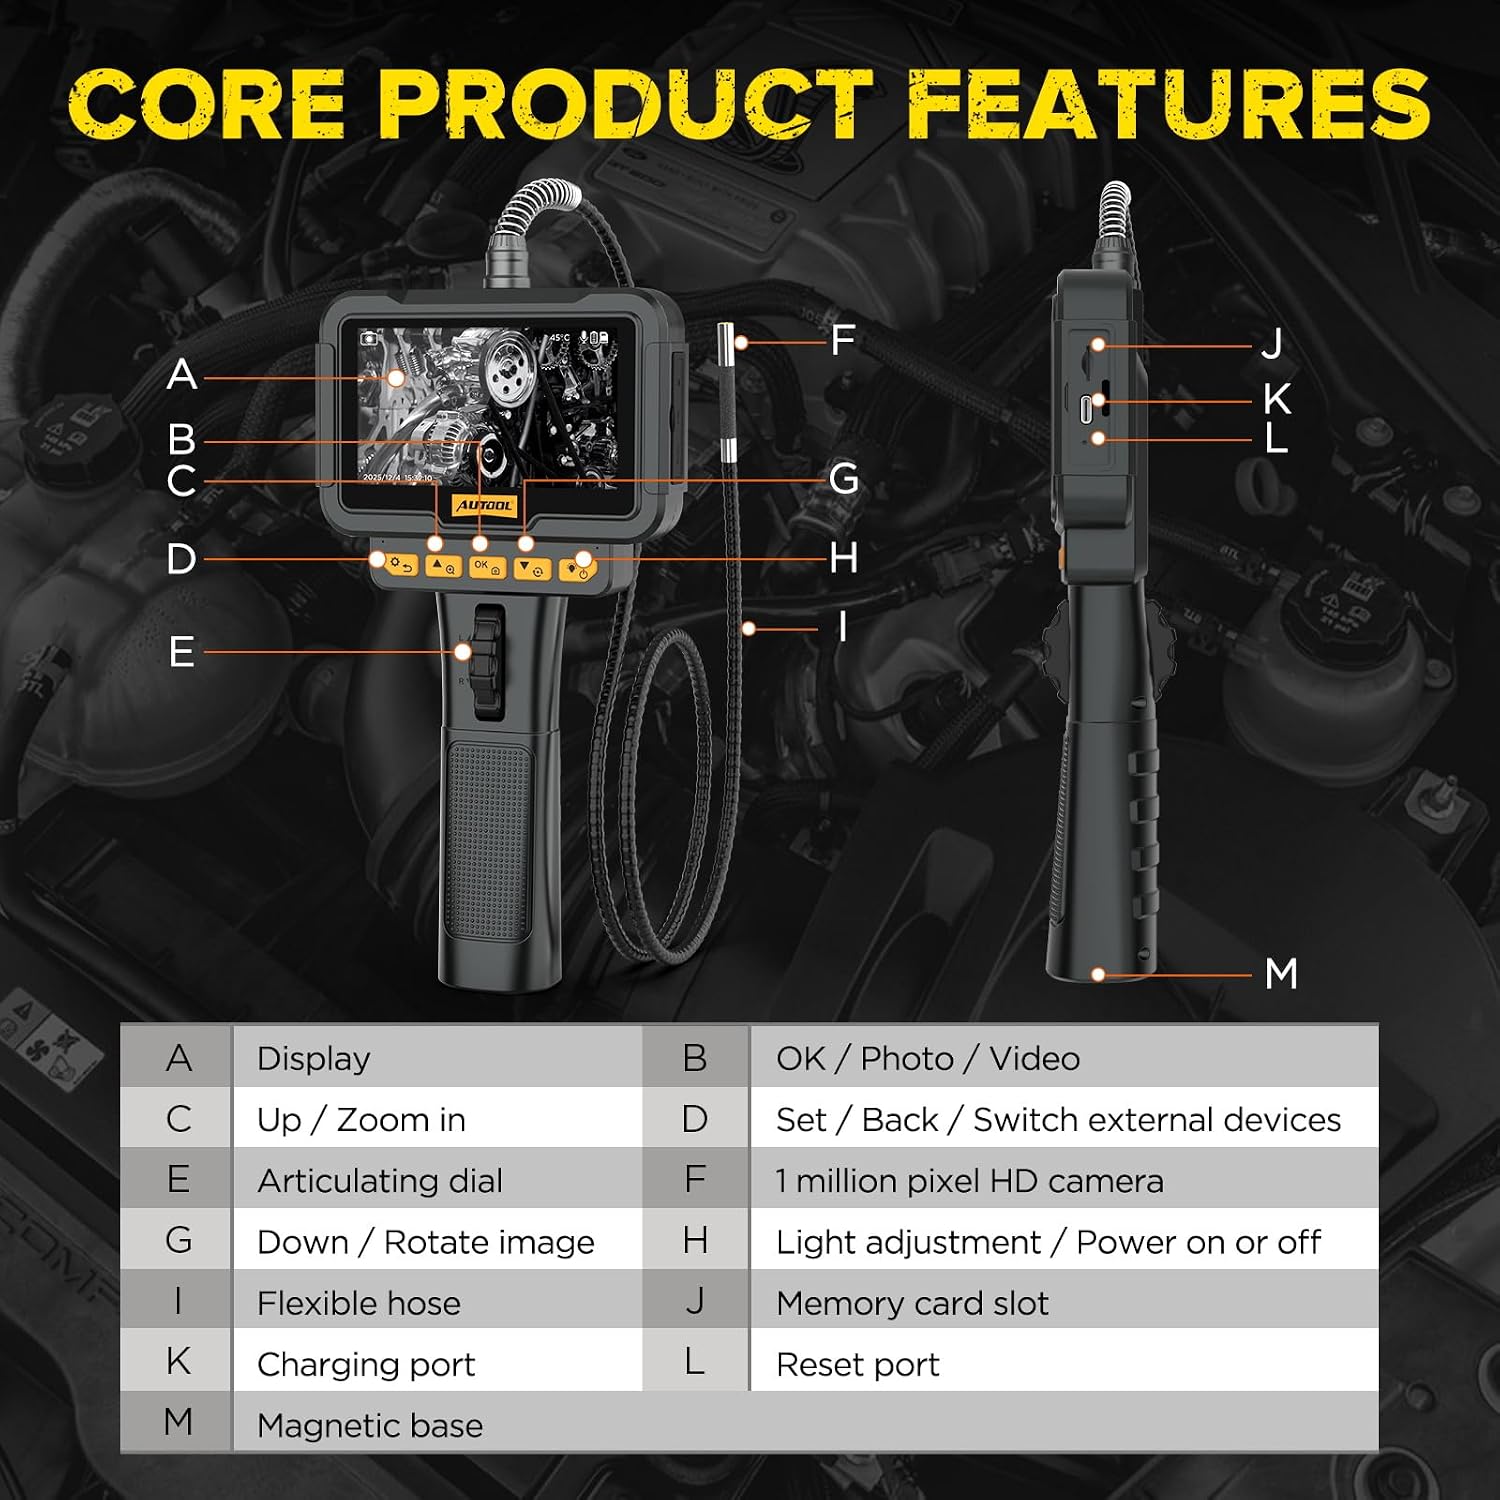
Figure 3.2: Core product features and labeled components of the AUTOOL SVB208 borescope.
- A: Display
- B: OK / Photo / Video Button
- C: Up / Zoom In Button
- D: Set / Back / Switch External Devices Button
- E: Articulating Dial
- F: 1 Million Pixel HD Camera
- G: Down / Rotate Image Button
- H: Light Adjustment / Power On or Off Button
- I: Flexible Hose
- J: Memory Card Slot
- K: Charging Port
- L: Reset Port
- M: Magnetic Base
4. Operating Instructions
4.1 Powering On/Off
To power on the device, press and hold the Power On/Off button (H) for a few seconds until the display (A) illuminates. To power off, press and hold the same button until the display turns off.
4.2 Adjusting LED Lights
The camera probe is equipped with 6 adjustable LED lights. While the device is on, short press the Light Adjustment button (H) to cycle through the 3 brightness levels or turn the lights off.
4.3 Using the Articulating Probe
The articulating dial (E) controls the 210° bidirectional movement of the camera head (F). Rotate the dial to precisely maneuver the probe tip to the desired angle for inspection. This allows you to view areas that would otherwise be obstructed.
4.4 Digital Zoom
To zoom in on the image, press the Up / Zoom In button (C). The device supports up to 8x digital zoom. Press the button repeatedly to increase the zoom level. To zoom out, use the corresponding function if available or cycle through zoom levels.
4.5 Capturing Photos and Videos
- To take a photo: In live view mode, short press the OK / Photo / Video button (B). A camera icon or flash indicator may appear on the screen to confirm the capture.
- To record a video: In live view mode, press and hold the OK / Photo / Video button (B) for a few seconds to start recording. A recording indicator (e.g., red dot or timer) will appear. Press and hold the button again to stop recording.
4.6 Viewing Captured Media
Access the playback mode through the device's menu (refer to the on-screen interface for navigation). You can browse through captured photos and videos stored on the microSD card. Use the Up/Down buttons (C/G) to navigate and the OK button (B) to select or play media.
5. Maintenance
5.1 Cleaning the Device
- Probe and Camera Lens: After each use, especially in oily or dirty environments, gently wipe the probe and camera lens (F) with a soft, damp cloth. For stubborn residue, a small amount of isopropyl alcohol can be used. Ensure no liquid enters the probe body.
- Display Screen: Clean the display (A) with a soft, lint-free cloth. Avoid abrasive materials or harsh chemicals that could scratch the screen.
- Main Unit: Wipe the main unit with a dry or slightly damp cloth. Do not immerse the main unit in water.
5.2 Storage
Store the borescope in its protective carrying case in a cool, dry place away from direct sunlight and extreme temperatures. Ensure the probe is coiled loosely and not sharply bent to prevent damage to the internal wiring.
5.3 Battery Care
To prolong battery life, avoid fully discharging the device frequently. If storing for an extended period, charge the battery to approximately 50% and recharge every few months.
6. Troubleshooting
- Device does not power on: Ensure the battery is charged. Connect the device to a charger and try again. If the issue persists, try pressing the Reset Port (L) with a thin pin.
- No image on screen: Check if the probe is securely connected. Ensure the device is powered on. If the screen is blank, the device might be in standby mode; press any button to wake it.
- Poor image quality: Clean the camera lens (F) as described in the Maintenance section. Adjust the LED light brightness (H). Ensure the focal distance is appropriate for the object being viewed.
- Articulation not working: Check for any physical obstructions preventing the probe from articulating. Ensure the articulating dial (E) is being rotated correctly. Avoid forcing the probe.
- Cannot capture photos/videos: Verify that a microSD card is properly inserted into the Memory Card Slot (J) and that it has sufficient free space. The card might be full or corrupted; try formatting it (this will erase all data) or using a different card.
- Device overheating: The device has built-in over-temperature protection and will shut down if it exceeds 85°C. Allow the device to cool down before resuming operation. Ensure adequate ventilation during use.
7. Specifications
| Model Name | SVB208 |
| Probe Diameter | 6.25mm |
| Articulation Angle | 210° Bidirectional |
| Display Screen | 4.3 Inches IPS LCD |
| Photo Sensor Resolution | 2 MP |
| Digital Zoom | 8x |
| Water Resistance Level | IP67 (Lens) |
| Storage Media | MicroSD Card (32GB included) |
| File Format (Photo) | JPG |
| File Format (Video) | AVI |
| Illumination | 6 Adjustable LED Lights |
| Over-Temperature Protection | Automatic shut-off at 85°C |
| Item Weight | 950 Grams |
| Item Dimensions (D x W x H) | 23D x 37W x 6.5H Centimeters |
8. What's in the Box
The AUTOOL SVB208 Articulating Video Borescope package typically includes:
- AUTOOL SVB208 Articulating Video Borescope Unit
- Protective Carrying Case
- USB-C Charging Cable
- User Manual
- 32GB MicroSD Card (pre-installed)
9. Warranty and Support
The AUTOOL SVB208 Articulating Video Borescope is backed by a 3-year service warranty. For technical support, warranty claims, or any inquiries regarding your device, please contact AUTOOL customer service through their official website or the retailer from whom the product was purchased. Please retain your proof of purchase for warranty validation.

