
1. Product Overview
The fishkeeper LED Aquarium Plant Light (Model FK097-24W) is designed to provide optimal lighting for aquatic plants and enhance the visual appeal of your fish tank. It features a 24/7 natural light simulation mode, a programmable timer, multiple weather modes, adjustable colors, and brightness levels, along with a power-off memory function.
This light is suitable for 18-24 inch fish tanks.
2. What's in the Box
- fishkeeper LED Aquarium Plant Light Unit
- Controller with LED Display
- Extendable Brackets
- Power Adapter
- User Manual
3. Specifications
| Specification | Value |
|---|---|
| Brand | fishkeeper |
| Model Number | FK097-24W |
| Light Source Type | LED |
| Wattage | 24 watts |
| Color | Full Spectrum |
| Material Type | Aluminum |
| Mounting Type | Edge/Side Mount |
| Control Method | Touch |
| Indoor/Outdoor Usage | Indoor |
| Is Waterproof | False |
4. Setup Instructions
4.1 Installing the Light
- Unpack all components and ensure they are intact.
- Attach the extendable brackets to both ends of the light unit. The brackets slide into the designated slots on the light fixture.
- Place the light unit on top of your aquarium, adjusting the extendable brackets to fit the tank's width securely. Ensure the light is centered for even illumination.
- Connect the power adapter to the light's controller, then plug the adapter into a suitable power outlet.

Figure 1: Installation of the extendable bracket and key design features.

Figure 2: Retractable bracket mechanism for secure tank placement.
5. Operating Instructions
5.1 Controller Function Overview
The light is controlled via an integrated LED display controller. Familiarize yourself with the buttons and their functions:

Figure 3: Controller button layout and functions.
- Power/Confirm Button: Press and hold to turn the light on/off. Press briefly to confirm settings.
- + Button: Press briefly to increase values or cycle through options.
- - Button: Press briefly to decrease values or cycle through options.
- Timer Button: Press and hold to enter or cancel timer settings. Press briefly to switch between hour and minute during timer setup.
- Local Time Button: Press and hold to access local time and clock settings. Press briefly to switch to minute setting during time adjustment.
- 24/7 Mode Button: Press briefly to preview light modes for each time point. Press and hold to enter 24/7 mode (syncs with controller's local time).
- Color Mode Button: Press briefly to select from 10 color modes.
- Brightness Button: Press briefly to select brightness level (10 levels available).
- Scene Mode Button: Press briefly to select a scene mode. Press and hold to exit.
5.2 Setting Local Time
- Press and hold the Local Time button to enter local time setting. The hour display will flash.
- Use the + or - buttons to adjust the hour.
- Briefly press the Local Time button to switch to minute setting. The minute display will flash.
- Use the + or - buttons to adjust the minute.
- Press the Power/Confirm button to save the local time.
Video: Instructions on how to set the local time on the controller.

Figure 4: Visual guide for local time setting.
5.3 Custom Timer Setting (On/Off Times)
Before setting custom timer, ensure the local time is correctly set.
- Press and hold the Timer button to enter timer setting. The 'ON' hour display will flash.
- Use the + or - buttons to set the desired 'ON' hour.
- Briefly press the Timer button to switch to 'ON' minute setting. The 'ON' minute display will flash.
- Use the + or - buttons to set the desired 'ON' minute.
- Briefly press the Timer button to switch to 'OFF' hour setting. The 'OFF' hour display will flash.
- Use the + or - buttons to set the desired 'OFF' hour.
- Briefly press the Timer button to switch to 'OFF' minute setting. The 'OFF' minute display will flash.
- Use the + or - buttons to set the desired 'OFF' minute.
- Press the Power/Confirm button to save the timer settings. The light will now operate according to these custom times daily.

Figure 5: Visual guide for custom time setting.
5.4 24/7 Mode Operation
The 24/7 mode simulates a natural daylight cycle, gradually changing light intensity and color throughout the day. The default cycle runs from 6:00 AM to 11:00 PM.
- To preview the 24/7 mode, briefly press the 24/7 Mode button.
- To activate the 24/7 mode, press and hold the 24/7 Mode button. The light will synchronize with the controller's local time and begin the natural cycle.
- To exit 24/7 mode, press any other button on the controller.
Note: In 24/7 mode, brightness and color cannot be manually adjusted.
Video: Demonstration of the 24/7 natural light simulation mode.
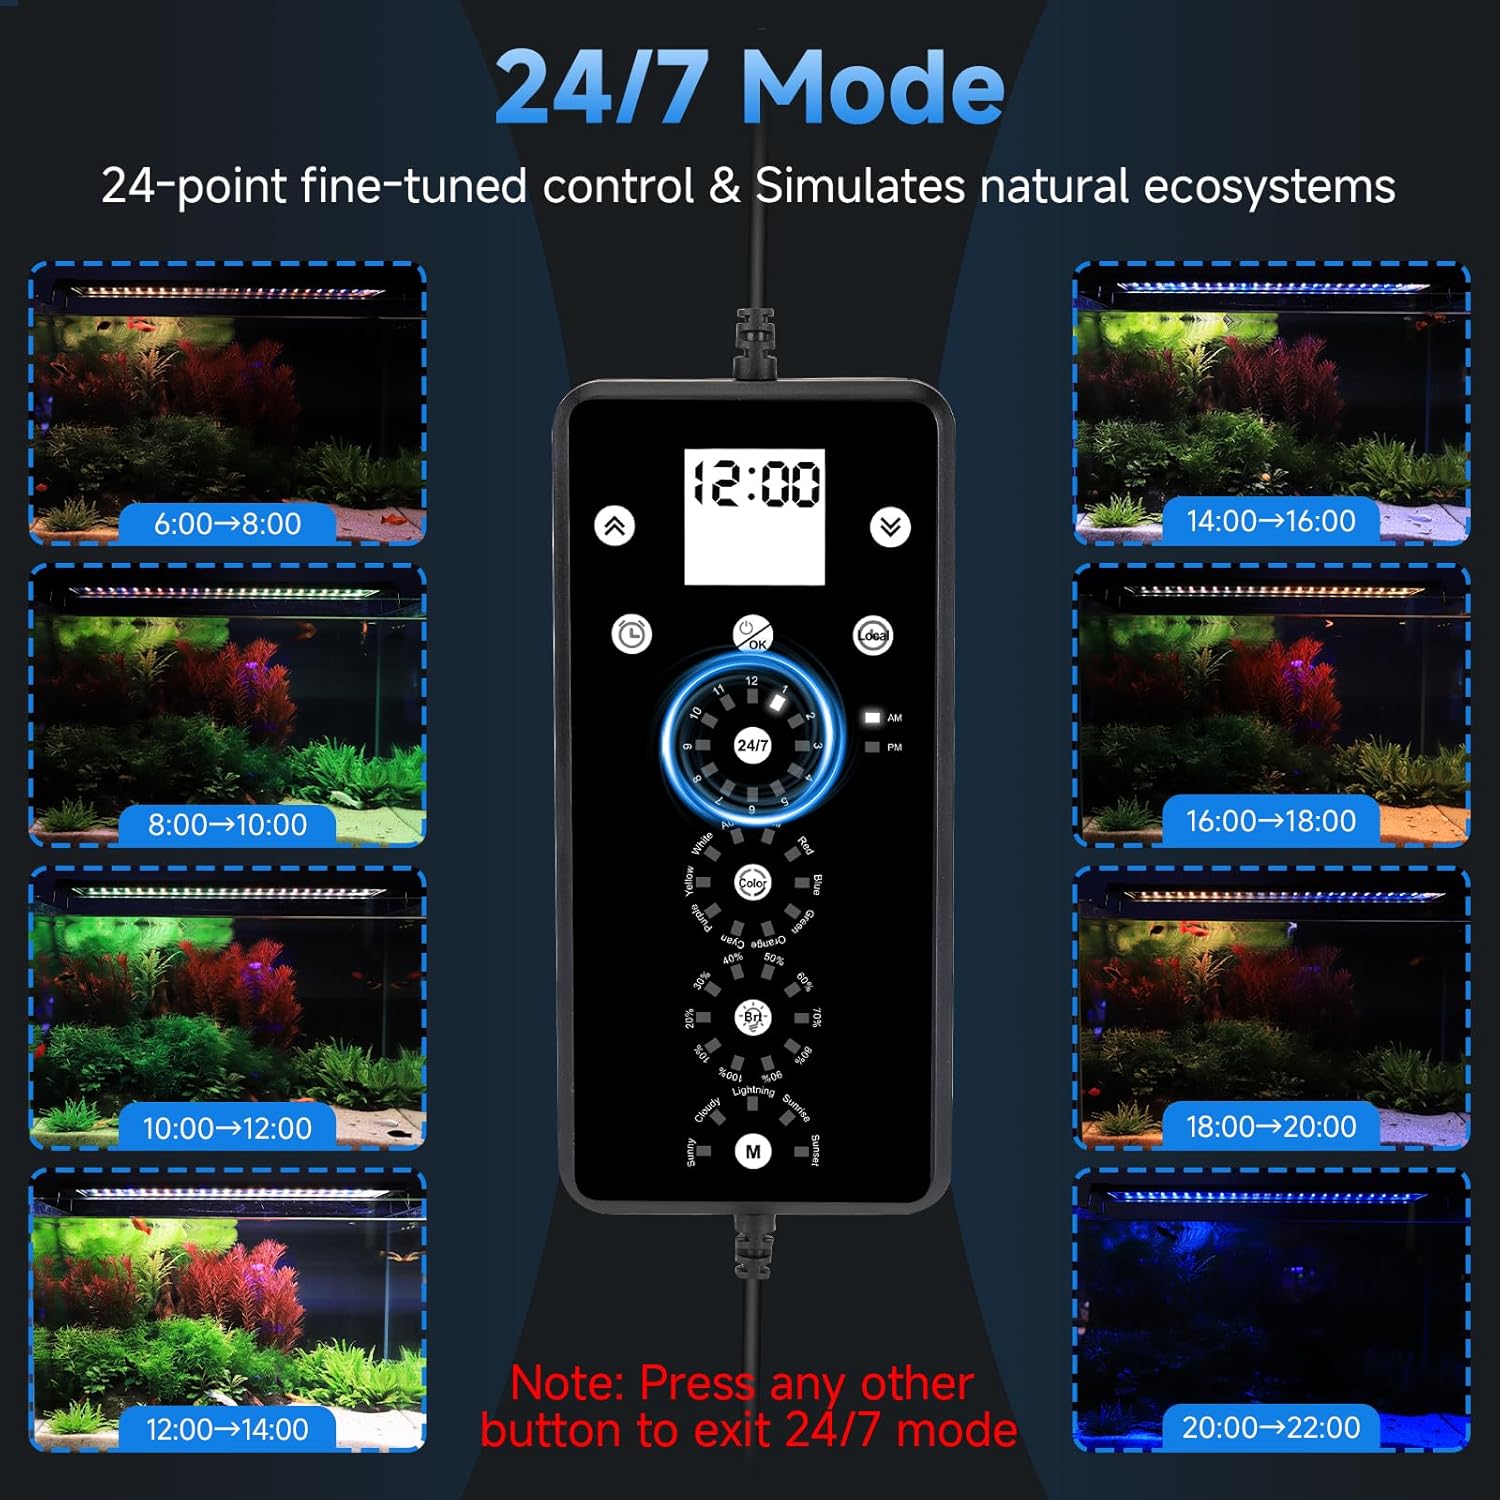
Figure 6: 24/7 mode light cycle stages.

Figure 7: Details of the 24/7 default mode.
5.5 Adjustable Color Modes
The light offers 8 single colors, 1 full spectrum light, and 1 auto-gradient mode.
- Press the Color Mode button repeatedly to cycle through the available color options.
- Select the desired color.
Note: Brightness cannot be adjusted in auto-gradient mode.
Video: Demonstration of adjustable color modes and brightness levels.

Figure 8: Available color modes and color cycle.

Figure 9: Overview of color options.
5.6 Brightness Adjustment
The light offers 10 brightness levels, from 10% to 100%.
- Press the Brightness button repeatedly to cycle through the 10 brightness levels.
- Select the desired brightness level.

Figure 10: Brightness levels from 10% to 100%.
5.7 Scene Modes
The light features 5 built-in weather modes: Sunny, Cloudy, Lightning, Sunrise, and Sunset. Each mode simulates its corresponding natural scene.
- Press the Scene Mode button briefly to cycle through the 5 scene modes.
- To exit a scene mode, press and hold the Scene Mode button, or briefly press the Color Mode or 24/7 Mode button.
By default, scenes run from 6:00 AM to 11:00 PM, with flexibility to customize both on and off times using the custom timer setting procedure.
Video: Overview of the 5 preset weather modes and programmable weather timer.

Figure 11: The 5 dynamic scene modes.

Figure 12: Customizable scene modes.
6. Maintenance
6.1 Power-Off Memory Function
The controller includes a built-in battery to retain local time and programmed settings during a power outage. When power is restored, no reprogramming is needed.
If the controller battery is depleted, the light will still function normally with a power adapter, but the memory function will be lost.
Battery Replacement Steps:
- Use a small screwdriver to open the battery cover on the back of the controller.
- Remove the old battery.
- Insert a new battery with the printed side facing up.
- Close the battery cover securely.

Figure 13: Battery replacement for memory function.

Figure 14: Power-off memory function and battery replacement guide.
6.2 Cleaning
Regularly clean the light fixture and controller to ensure optimal performance and longevity. Use a soft, damp cloth to wipe surfaces. Avoid using abrasive cleaners or submerging the controller in water.
7. Troubleshooting
- Light not turning on: Ensure the power adapter is securely connected to both the light controller and a working power outlet. Check if the power button on the controller has been pressed and held to turn the light on.
- Timer not working: Verify that the local time is set correctly. Re-enter the custom timer settings, ensuring all steps are followed and confirmed.
- Memory function lost after power outage: The controller's internal battery may be depleted. Replace the battery as described in Section 6.1.
- Light flickering or inconsistent: Check all connections. If the issue persists, contact customer support.
8. Warranty and Support
This fishkeeper product comes with a 2-year manufacturer's warranty.
For technical support, warranty claims, or any questions regarding your product, please refer to the contact information provided with your purchase or visit the official fishkeeper website.