
1. Product Overview
The YELLOW JACKET 2 Ton Extra Long Reach Floor Jack is designed for efficient and safe vehicle lifting in home workshops and professional garages. Its low-profile design allows access under vehicles with minimal ground clearance, while the extended reach chassis and dual-piston quick lift pump ensure rapid and precise lifting.
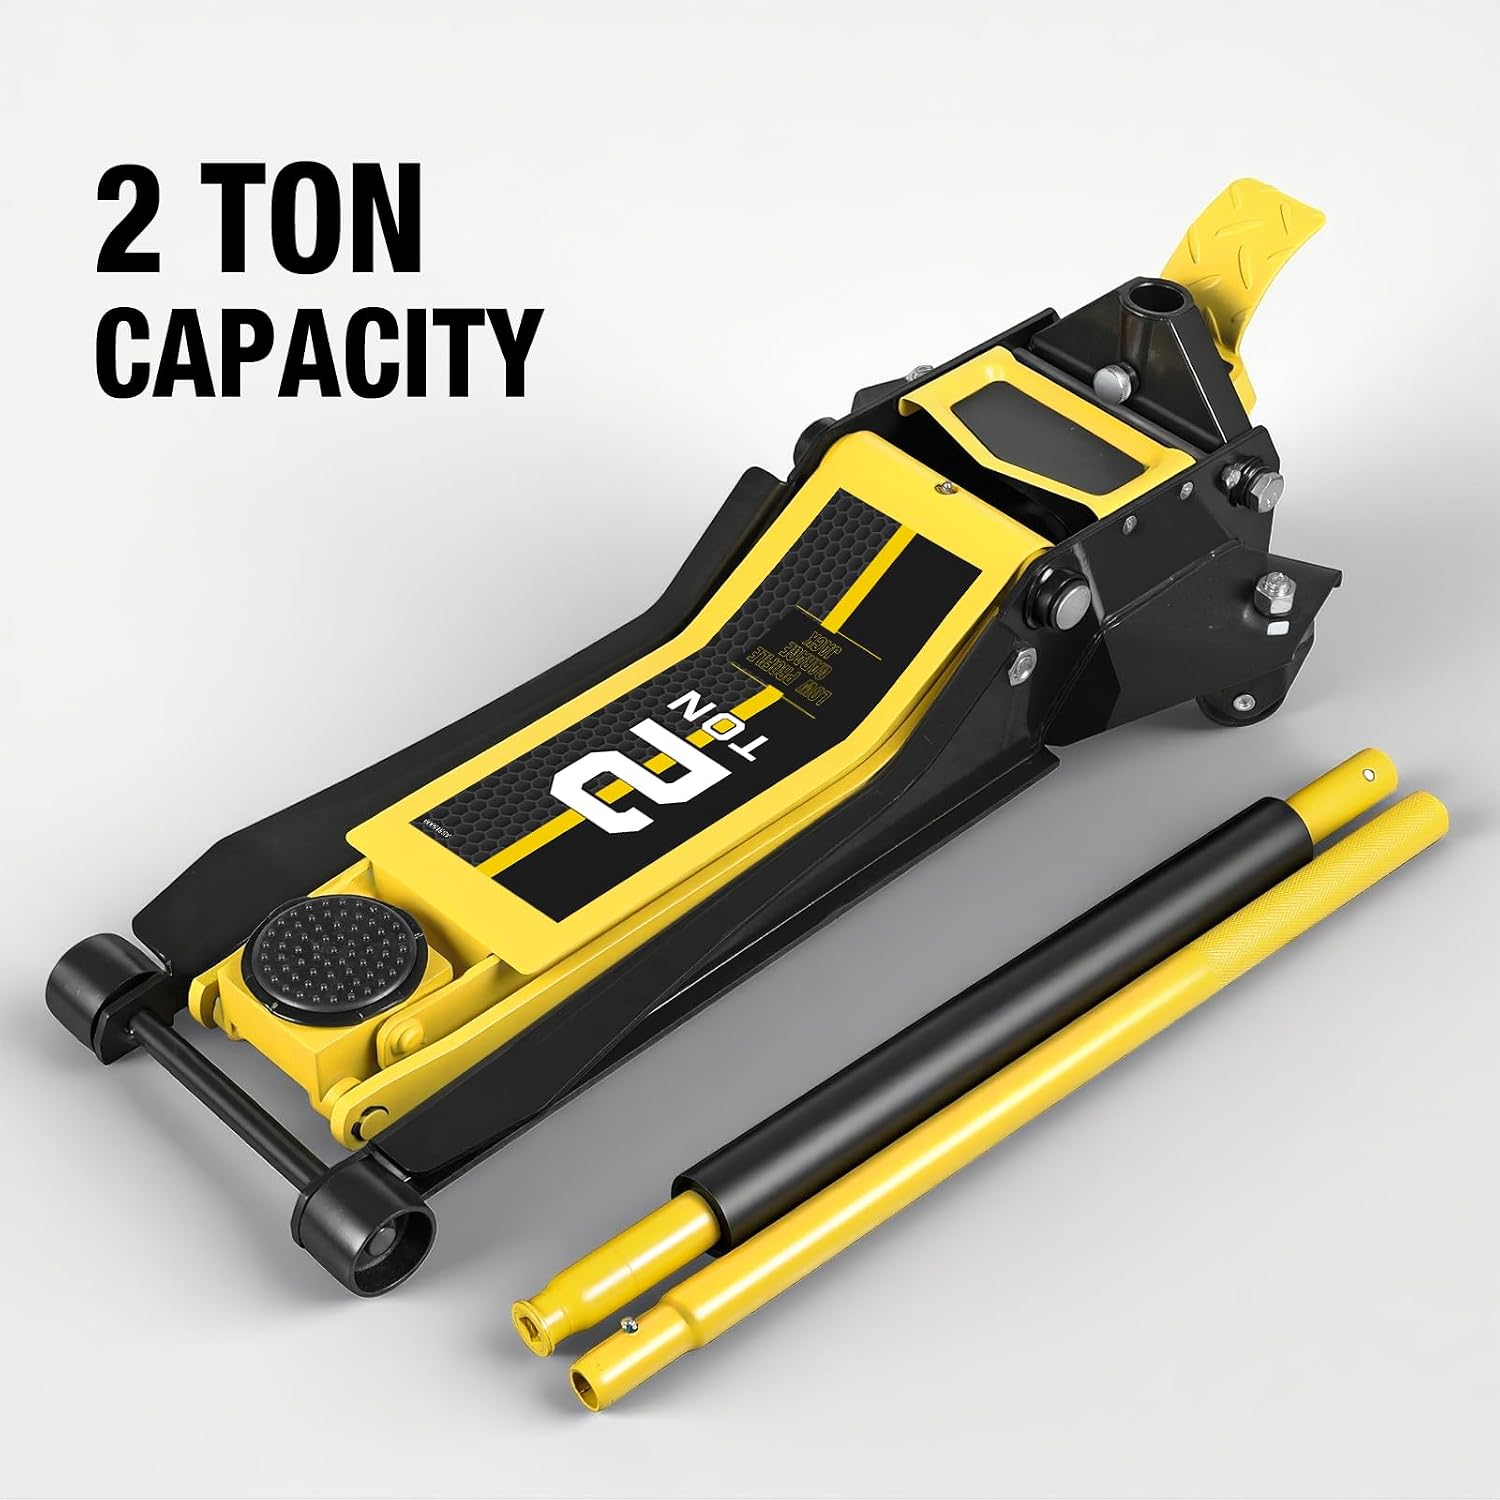
Figure 1: Overview of the YELLOW JACKET 2 Ton Floor Jack.
Key Features:
- 2 Ton Lifting Capacity: Minimum lift height of 2-3/4 inches for low-clearance vehicles.
- Versatile Extended Lift Range: Maximum lift height of 24 inches, suitable for various passenger vehicles.
- Enhanced Reach & Rapid Lifting: Extra-long steel chassis and dual pump pistons for quick and efficient lifting.
- Durable Heavy-Duty Build: Constructed with premium heavy-duty steel for reliability and long-lasting performance. Features a universal joint release mechanism for controlled load descent.
- Vehicle Surface Protection: Includes a high-quality rubber saddle and a foam-covered handle to prevent damage to the vehicle.
- Convenient Foot Pedal Operation: Integrated foot pedal for hands-free operation and efficient raising.

Figure 2: The jack's wide lift range, from 2-3/4 inches to 24 inches.
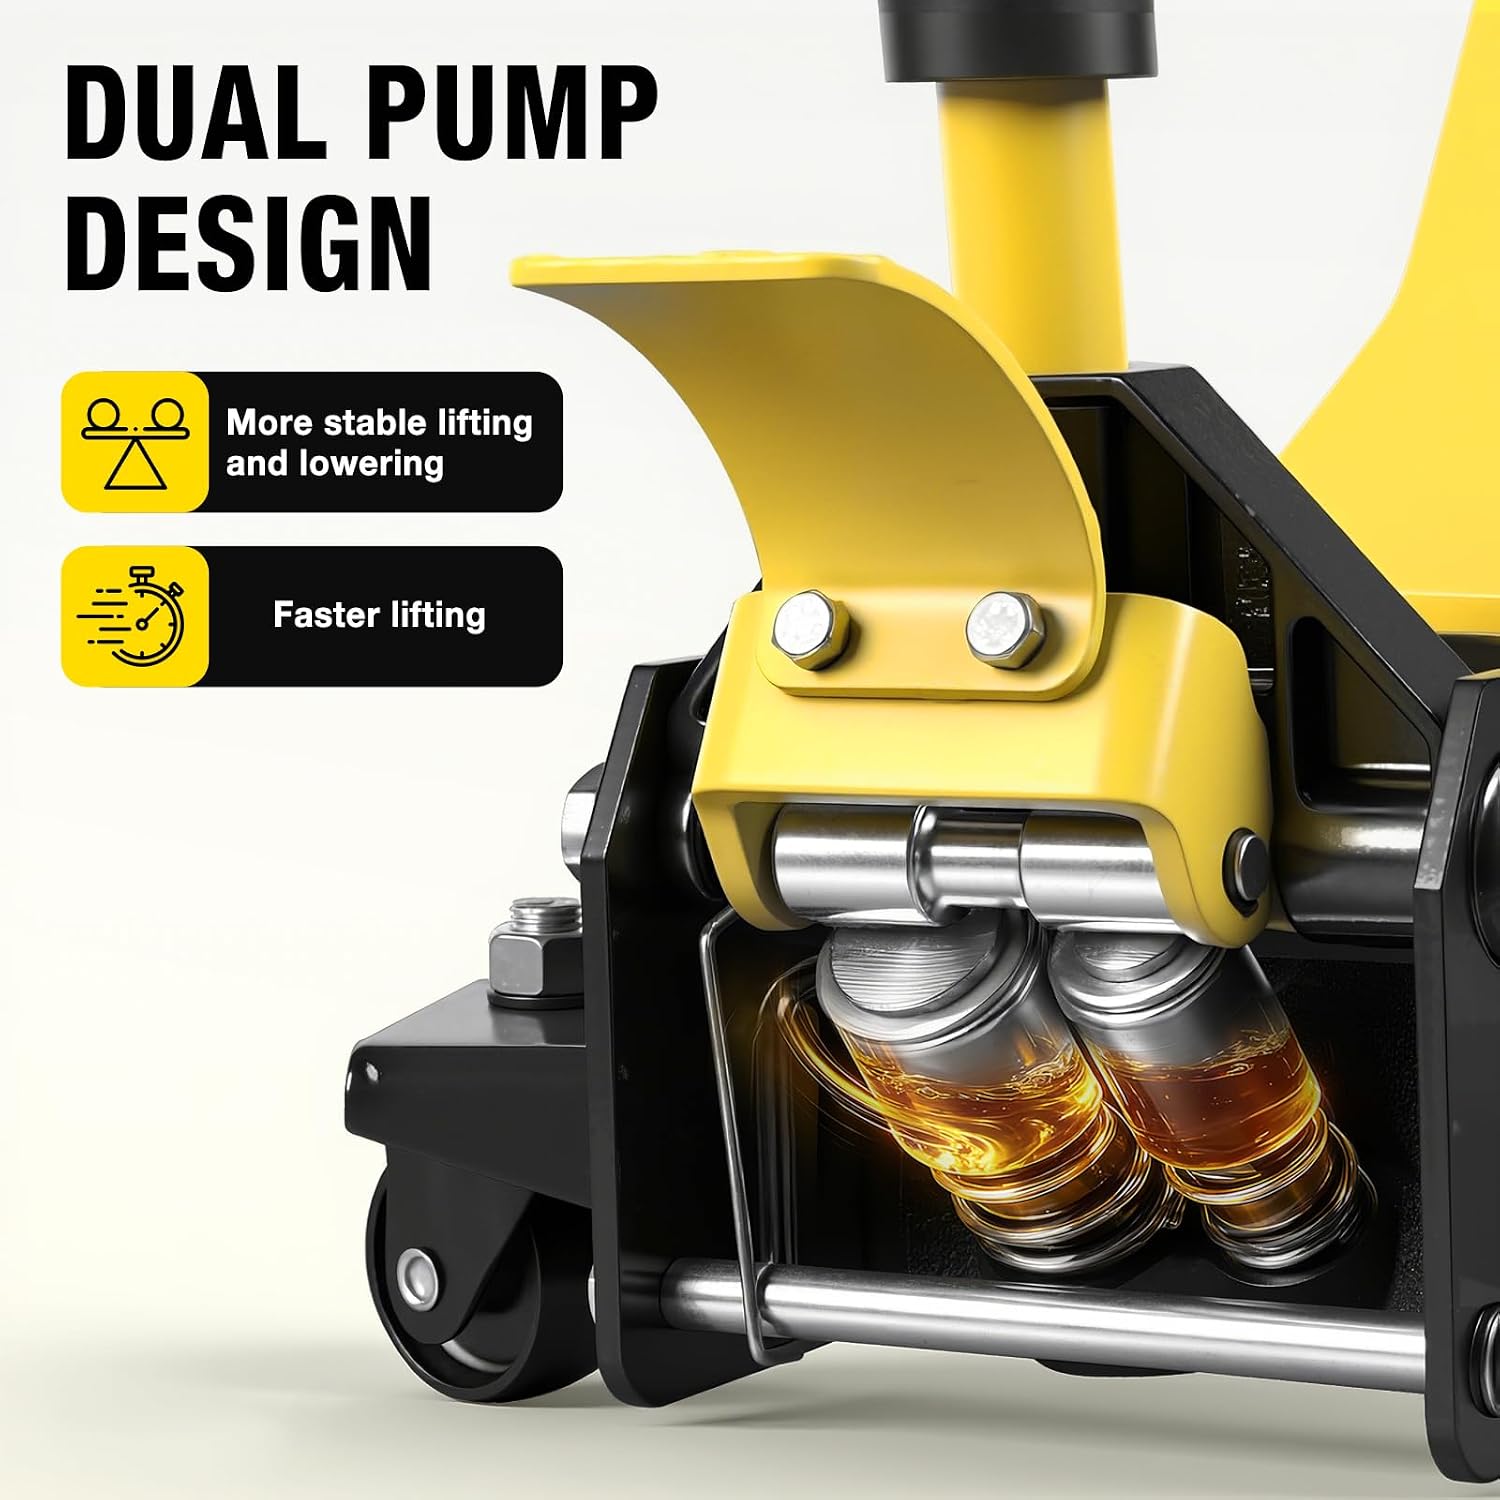
Figure 3: Detail of the dual pump design for stable and faster lifting.
2. Important Safety Information
Read and understand all instructions and warnings before using this product. Failure to follow these instructions may result in property damage, personal injury, or death.
- Always use on a hard, level surface. Avoid uneven or soft ground.
- Do not exceed the rated capacity of 2 tons (4000 lbs). Overloading can cause jack failure.
- Use jack stands. After lifting the vehicle, always support it with appropriately rated jack stands before working underneath. Never rely solely on the floor jack for support.
- Center the load. Ensure the saddle is centered on the vehicle's lifting point.
- Wear eye protection. Always wear ANSI-approved safety goggles during operation.
- Keep clear. Keep hands, feet, and other body parts clear of moving parts and the vehicle during lifting and lowering.
- Check for leaks. Inspect the jack for hydraulic fluid leaks before each use.
- Proper storage. Store the jack in a clean, dry place when not in use.
- Do not modify. Never modify the jack or its components.
3. Package Contents
Verify that all items are present and undamaged before proceeding with assembly or operation.
- Floor Jack Assembly
- Handle Assembly (multi-piece)
- Rubber Pad for Saddle
4. Setup and Initial Preparation
4.1 Handle Assembly
- Locate the handle pieces. The handle typically consists of two or more sections that connect.
- Assemble the handle sections by aligning the pins and holes, then securing them firmly.
- Insert the assembled handle into the handle receiver on the jack. Ensure it is fully seated and secured, often with a set screw or pin.

Figure 4: The handle assembly and overall dimensions of the jack.
4.2 Purging Air from the Hydraulic System (Bleeding)
Air can become trapped in the hydraulic system during shipping or storage, affecting performance. Purge the system before first use:
- Turn the handle counter-clockwise to open the release valve completely.
- Pump the handle rapidly 10-15 times without a load.
- Turn the handle clockwise to close the release valve.
- Test the jack by lifting it to its full height and then lowering it. Repeat if necessary until the jack operates smoothly.
Video 1: Demonstration of a similar floor jack's assembly and initial operation. This video shows the general process of handle attachment and basic lifting/lowering, which is applicable to the YELLOW JACKET floor jack.
5. Operating Instructions
5.1 Lifting a Vehicle
- Prepare the Vehicle: Park the vehicle on a hard, level surface. Engage the parking brake and block the wheels that will remain on the ground.
- Position the Jack: Locate the manufacturer-recommended lifting points on your vehicle. Slide the floor jack under the vehicle, ensuring the rubber saddle is centered on the lifting point. The low-profile design and extra-long reach facilitate this.
- Raise the Vehicle: Turn the handle clockwise to close the release valve. Pump the handle (or use the foot pedal) to raise the vehicle to the desired height. Pump steadily until the vehicle is lifted.
- Install Jack Stands: Immediately place appropriately rated jack stands under the vehicle's frame or designated support points. Lower the vehicle slowly onto the jack stands by gently turning the handle counter-clockwise. Ensure the vehicle is stable on the jack stands before proceeding with any work.

Figure 5: The low-profile jack positioned under a vehicle's lifting point.
5.2 Lowering a Vehicle
- Raise Slightly: If the vehicle is on jack stands, pump the jack handle a few times to lift the vehicle slightly off the jack stands.
- Remove Jack Stands: Carefully remove the jack stands from under the vehicle.
- Lower Vehicle: Slowly turn the handle counter-clockwise to open the release valve. The vehicle will begin to lower. Control the descent speed by adjusting how much you open the valve.
- Remove Jack: Once the vehicle is fully lowered and resting on its wheels, remove the floor jack.
6. Maintenance
Regular maintenance ensures the longevity and safe operation of your floor jack.
- Lubrication: Periodically lubricate all moving parts with light machine oil.
- Hydraulic Fluid: Check the hydraulic fluid level every three months. To check, lower the jack completely, remove the oil filler plug, and ensure the fluid is level with the bottom of the filler hole. Use only high-quality hydraulic jack oil.
- Cleaning: Keep the jack clean from dirt, grease, and corrosive materials.
- Inspection: Before each use, inspect the jack for any signs of damage, wear, or leaks. Do not use if damaged.
- Storage: Store the jack in a fully lowered position in a clean, dry area.
7. Troubleshooting
| Problem | Possible Cause | Solution |
|---|---|---|
| Jack will not lift load. | Release valve open; Air in system; Low hydraulic fluid; Overload. | Close release valve; Purge air from system (see Setup); Add hydraulic fluid; Reduce load (do not exceed 2 tons). |
| Jack lifts slowly or erratically. | Air in system; Low hydraulic fluid. | Purge air from system; Add hydraulic fluid. |
| Jack leaks hydraulic fluid. | Loose fittings; Damaged seals. | Tighten fittings; Contact customer support for seal replacement or service. |
| Jack will not lower. | Release valve stuck or obstructed. | Ensure release valve is fully open; Check for obstructions. |
8. Product Specifications
| Feature | Detail |
|---|---|
| Model Number | AS815009 |
| Brand | YELLOW JACKET |
| Load Capacity | 2 tons (4000 lbs) |
| Minimum Height | 2.75 Inches (70mm) |
| Maximum Height | 24 Inches (610mm) |
| Material | Alloy Steel |
| Vehicle Service Type | Car (Universal Fit) |
| Included Components | Floor jack, rubber pad |

Figure 6: Key components of the floor jack, including the rubber saddle and low-profile wheels.
9. Warranty and Customer Support
9.1 Manufacturer's Warranty
This YELLOW JACKET floor jack is covered by a 1-year manufacturer's warranty from the date of purchase. This warranty covers defects in materials and workmanship under normal use. It does not cover damage resulting from misuse, abuse, accident, alteration, or improper maintenance.
9.2 Customer Support
For technical assistance, warranty claims, or to order replacement parts, please contact YELLOW JACKET customer support:
- Website: Visit the YELLOW JACKET Store on Amazon
- Email: support@yellowjackettools.com (Example, actual email not provided)
- Phone: 1-800-XXX-XXXX (Example, actual phone not provided)
Please have your model number (AS815009) and date of purchase ready when contacting support.

