
SKKTKT 85113
SKKTKT Vanity Desk with LED Lights Mirror & Power Outlet - Model 85113 User Manual
Comprehensive instructions for assembly, operation, and maintenance.
Introduction
Thank you for choosing the SKKTKT Vanity Desk. This manual provides detailed instructions to ensure safe assembly, proper operation, and effective maintenance of your new vanity desk. Please read all instructions carefully before beginning assembly or use.
Safety Information
WARNING: This product requires assembly. Follow the instructions carefully to avoid injury. The intelligent sensor light technology may cause the lights to turn on unexpectedly when approached, which could startle users. Always ensure the area around the vanity is clear and free from obstructions to prevent accidents.
- Keep all small parts and packaging materials away from children and pets.
- Ensure all connections are secure before use.
- Do not overload drawers or shelves.
- Use only the provided power adapter for the LED lights and power outlets.
Setup and Assembly
The SKKTKT Vanity Desk is designed for quick and hassle-free setup. All necessary parts and step-by-step instructions are included in the packaging. For visual guidance, a specific installation video is available on the product listing page.
- Unpack Components: Carefully remove all parts from the packaging. Verify that all components listed in the parts list are present and undamaged.
- Organize Parts: Arrange parts in order of assembly to streamline the process.
- Assemble Base Structure: Follow the provided diagrams to assemble the main frame of the vanity desk.
- Install Drawers and Shelves: Insert drawers into their respective slots and secure adjustable shelves as desired.
- Attach Mirror Unit: Securely attach the tri-folding mirror unit to the main desk structure.
- Connect Electrical Components: Plug in the LED lights and power outlet module.
- Position and Secure: Place the vanity desk in its desired corner location. For enhanced stability, the top section must be mounted to the wall using appropriate hardware.
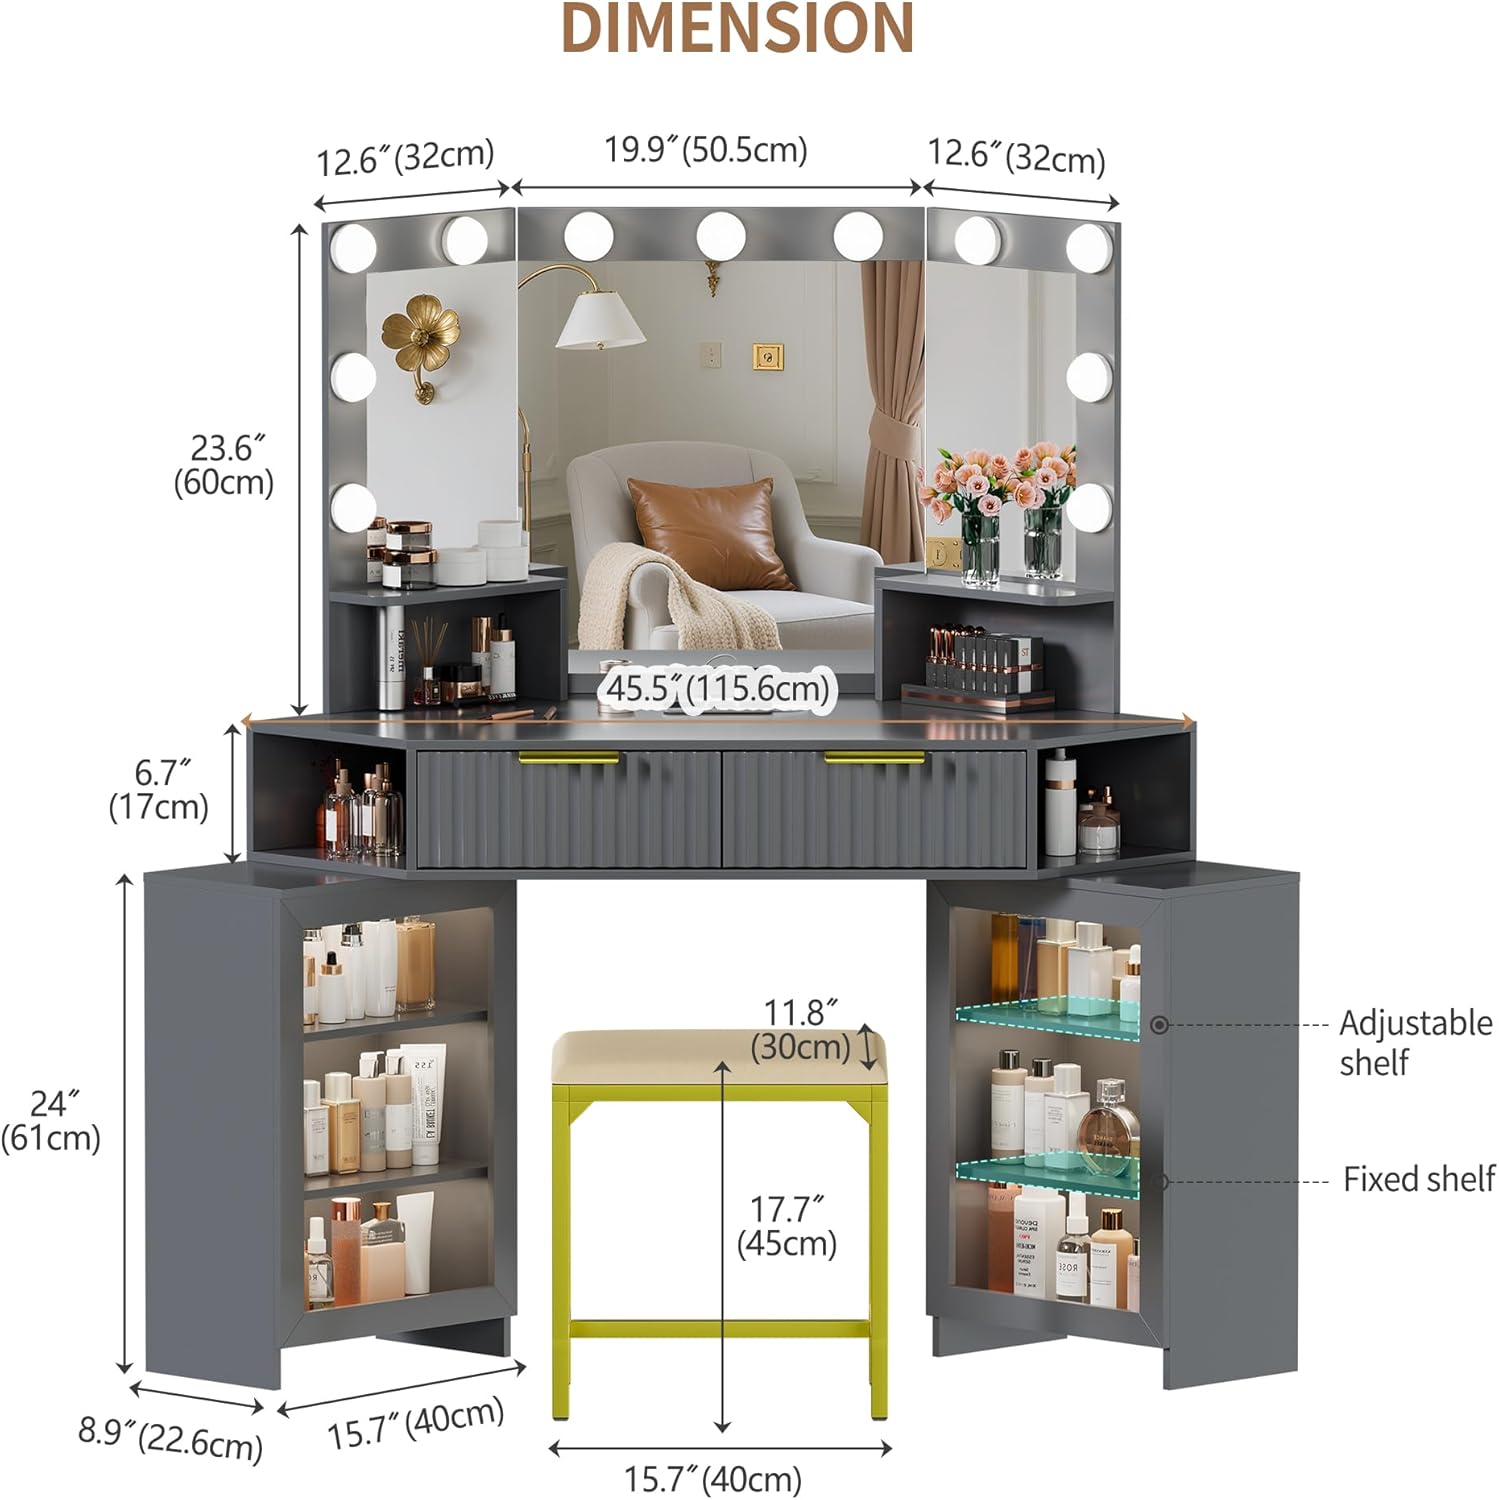
Figure 1: Product Dimensions and Component Layout. This image illustrates the overall dimensions of the vanity desk and its various sections, including the mirror, drawers, and side cabinets with shelves. The accompanying stool dimensions are also shown.

Figure 2: Fully Assembled Vanity Desk. This image displays the vanity desk in a typical corner setup, highlighting its storage capabilities with open drawers and side cabinets, and the illuminated tri-folding mirror.
Operating Instructions
LED Lights and Lighting Modes
The tri-folding mirror is equipped with built-in LED lights offering three lighting modes and adjustable brightness.
- Switching Modes: Tap the light button on the mirror frame to cycle through the 3 lighting modes (e.g., warm, natural, cool).
- Adjusting Brightness: Long press the light button to adjust the brightness level for the selected mode. Release when the desired brightness is achieved.
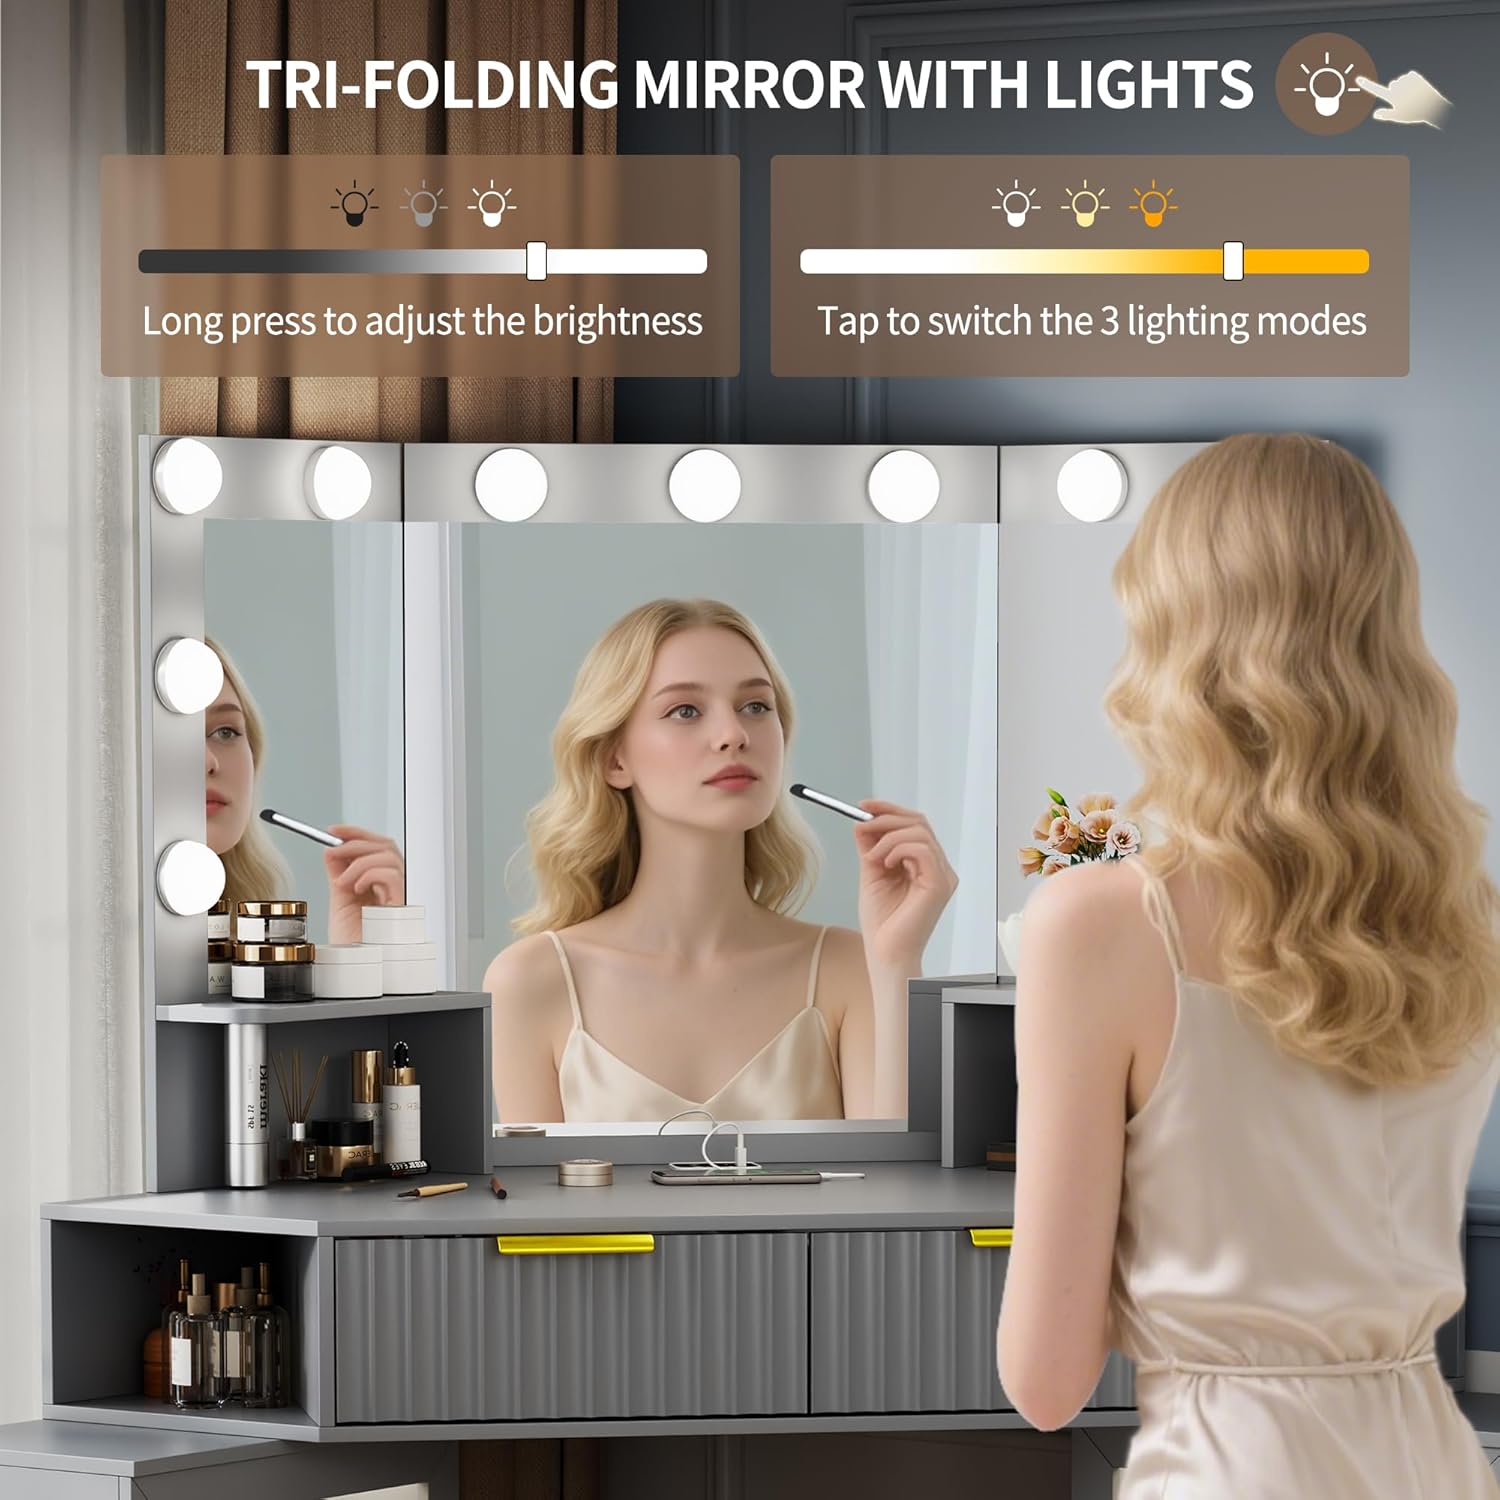
Figure 3: LED Light Controls. This image demonstrates how to operate the LED lights on the mirror, including tapping to switch between three lighting modes and long-pressing to adjust brightness.
Smart Module: Power Outlet and Sensor Light
The vanity desk includes a smart module with power sockets, USB, and Type-C ports, along with an intelligent sensor light function.
- Power Outlets: Use the two power sockets, USB port, and Type-C charger to power your electronic devices and beauty tools.
- Drawer and Cabinet Lights: A sensor switch on the socket activates lights within the drawers and cabinets.
- Human Sensor Function: Activate the human sensor function via the "Body" button on the smart module. When enabled, lights will automatically turn on when someone approaches within 1.5 meters and turn off a few seconds after they leave.

Figure 4: Smart Module Interface. This image details the smart module, showing the power outlets, USB and Type-C charging ports, and the "Body" and "Light" control buttons for the sensor and internal lighting features.
Storage Features
The vanity desk offers ample storage with drawers and adjustable partitions to keep your cosmetics and accessories organized.
- Drawers: Utilize the spacious drawers for storing various items. Some drawers may include a jewelry tray for delicate accessories.
- Adjustable Partitions: Customize the layout of the drawers and shelves using the adjustable partitions to fit items of different sizes.
- Extra Display Shelves: Use the open shelves on the desktop for frequently used items or decorative displays.

Figure 5: Drawer and Storage Details. This image highlights the internal organization of the drawers, including a jewelry tray, and showcases the design of the metal handles and extra display shelves.

Figure 6: Ample Storage Space. This image provides a visual representation of the vanity desk's storage capacity, with drawers and side cabinets filled with cosmetics and beauty products, illustrating the practical use of space.
Maintenance
To ensure the longevity and appearance of your SKKTKT Vanity Desk, follow these maintenance guidelines:
- Cleaning Surfaces: The product's surface finish makes cleaning easy. Use a soft, damp cloth to wipe away dust and cosmetic residue. Avoid abrasive cleaners or harsh chemicals that could damage the finish.
- Mirror Cleaning: Use a glass cleaner and a lint-free cloth for the mirror surfaces.
- Electrical Components: Ensure all electrical connections are dry and free from spills. Do not attempt to repair electrical components yourself.
- Regular Checks: Periodically check all screws and fasteners to ensure they remain tight. Tighten if necessary.
Troubleshooting
| Problem | Possible Cause | Solution |
|---|---|---|
| LED lights not turning on. | Power cable disconnected; light button not pressed; power outage. | Check if the power cable is securely plugged into the wall outlet and the vanity. Press the light button. Verify power supply. |
| Sensor light not activating. | Human sensor function is off; obstruction in sensor path; sensor malfunction. | Ensure the "Body" button on the smart module is activated. Clear any objects in front of the sensor. If the issue persists, contact support. |
| Power outlets not working. | Main power to the vanity is off; device not properly plugged in. | Check the main power connection to the vanity. Ensure devices are fully inserted into the outlets/ports. |
| Vanity feels unstable. | Not properly assembled; not secured to the wall. | Recheck all assembly connections and tighten screws. Ensure the vanity is mounted to the wall as recommended for stability, especially in corner setups. |
Specifications
- Model Number: 85113
- Brand: SKKTKT
- Frame Material: Wood
- Product Dimensions: 40"D x 50"W x 54.3"H (101.6 cm D x 127 cm W x 137.9 cm H)
- Item Weight: 91.4 pounds (41.46 kg)
- Assembly Required: Yes
- Lighting: LED with 3 modes and adjustable brightness
- Power Outlets: 2 AC sockets, 1 USB port, 1 Type-C port
- Special Features: Intelligent human sensor light, tri-folding mirror, ample storage with adjustable partitions.
Warranty and Support
For warranty information or technical support, please refer to the documentation included with your purchase or visit the official SKKTKT website. If you encounter any issues not covered in this manual, please contact SKKTKT customer service for assistance.
SKKTKT Customer Service: Visit the SKKTKT Store on Amazon
Ask a question about this manual
Ask about setup, troubleshooting, compatibility, parts, safety, or missing instructions. Manuals+ will review the question and use this page’s manual context to help answer it.