
1. Introduction and Overview
The GEYA GPS6-VA5 is an advanced adjustable over and under voltage protection device designed to safeguard electrical equipment from voltage fluctuations. It features a digital display for real-time monitoring of voltage and current, and offers customizable protection parameters. This device is suitable for various applications requiring reliable power protection.
This manual provides essential information for the safe and effective installation, operation, and maintenance of your GEYA GPS6-VA5 protection device.
2. Safety Information
Warning: Electrical installation and maintenance should only be performed by qualified personnel. Failure to follow these instructions may result in electric shock, fire, or serious injury.
- Always disconnect power to the circuit before installing, wiring, or servicing the device.
- Ensure all wiring connections are secure and comply with local electrical codes and standards.
- Do not operate the device if it appears damaged.
- Verify the voltage and current ratings of your system are compatible with this device.
3. Product Features
- Smart Digital Display: Clear LED display shows real-time voltage, current, and fault status for quick monitoring.
- Advanced Over & Under Voltage Protection: Equipped with factory default settings of 275V overvoltage and 175V undervoltage, ensuring device safety. These settings are adjustable.
- Current Monitoring: Displays current values, providing comprehensive electrical oversight.
- Adjustable Reset Time: Offers a factory default reset time of 30 seconds, adjustable from 2 to 900 seconds to suit specific application needs.
- Compact Design: Ultra-small size for efficient space utilization.
- DIN Rail Mounting: Designed for easy integration with 35mm DIN rail systems, simplifying installation.
4. Setup and Installation
The GEYA GPS6-VA5 is designed for 35mm DIN rail mounting. Ensure the mounting location is dry, well-ventilated, and free from excessive vibration or heat.
4.1 Mounting
Attach the device securely to a standard 35mm DIN rail. The device features a clip mechanism for easy installation and removal.

Image: Dimensions of the GEYA GPS6-VA5 device and an illustration of 35mm DIN rail mounting.
4.2 Wiring
Connect the device according to the wiring diagram provided. Ensure correct polarity and secure connections for both input (Line and Neutral) and output to the load.
- Connect the incoming Line (L) and Neutral (N) wires to the designated input terminals.
- Connect the load's Line (L) and Neutral (N) wires to the designated output terminals.
- Tighten all screw terminals firmly to prevent loose connections.
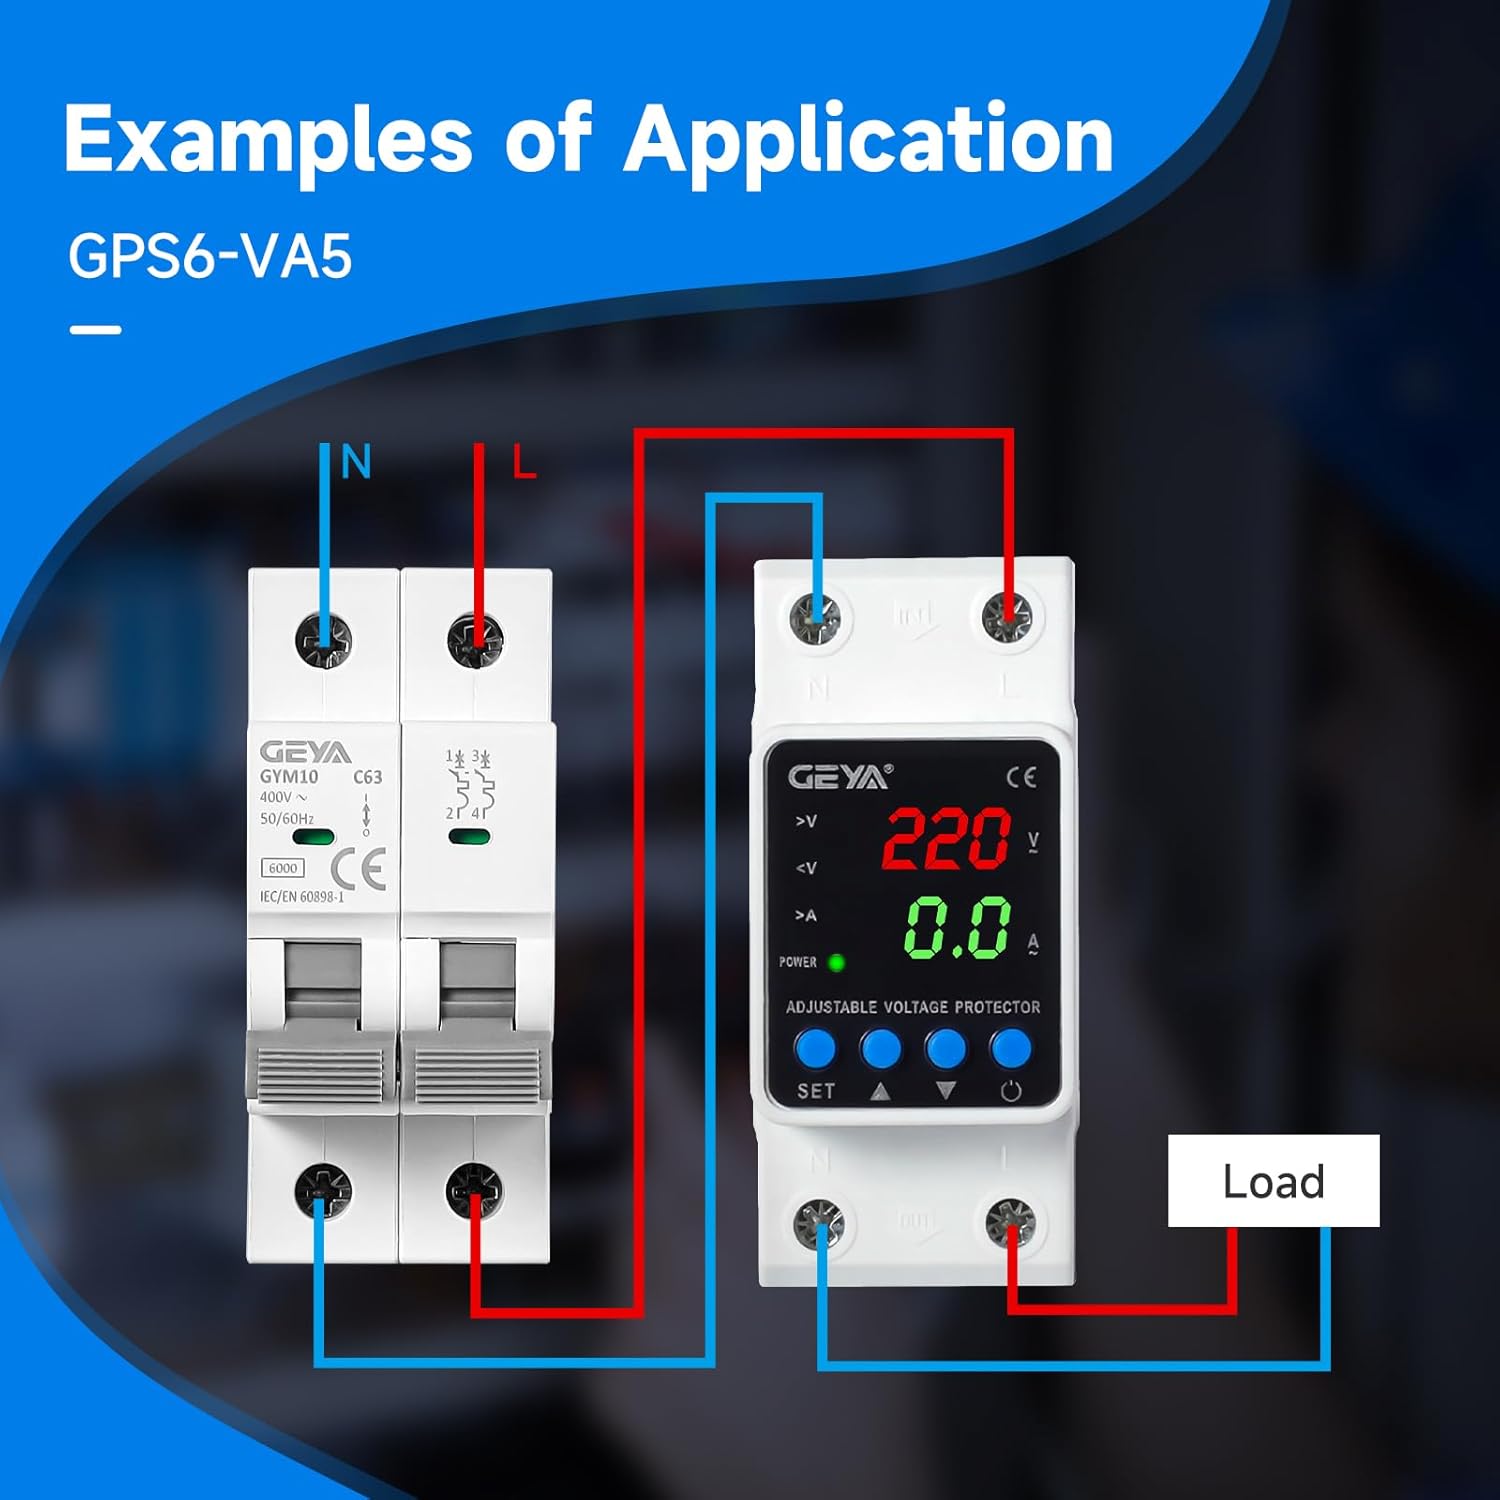
Image: Example wiring diagram showing connections for the GEYA GPS6-VA5 with an external circuit breaker and load.
5. Operating Instructions
Once installed and powered on, the device will display real-time voltage and current readings. The LED indicators provide status information.
5.1 Digital Display Overview
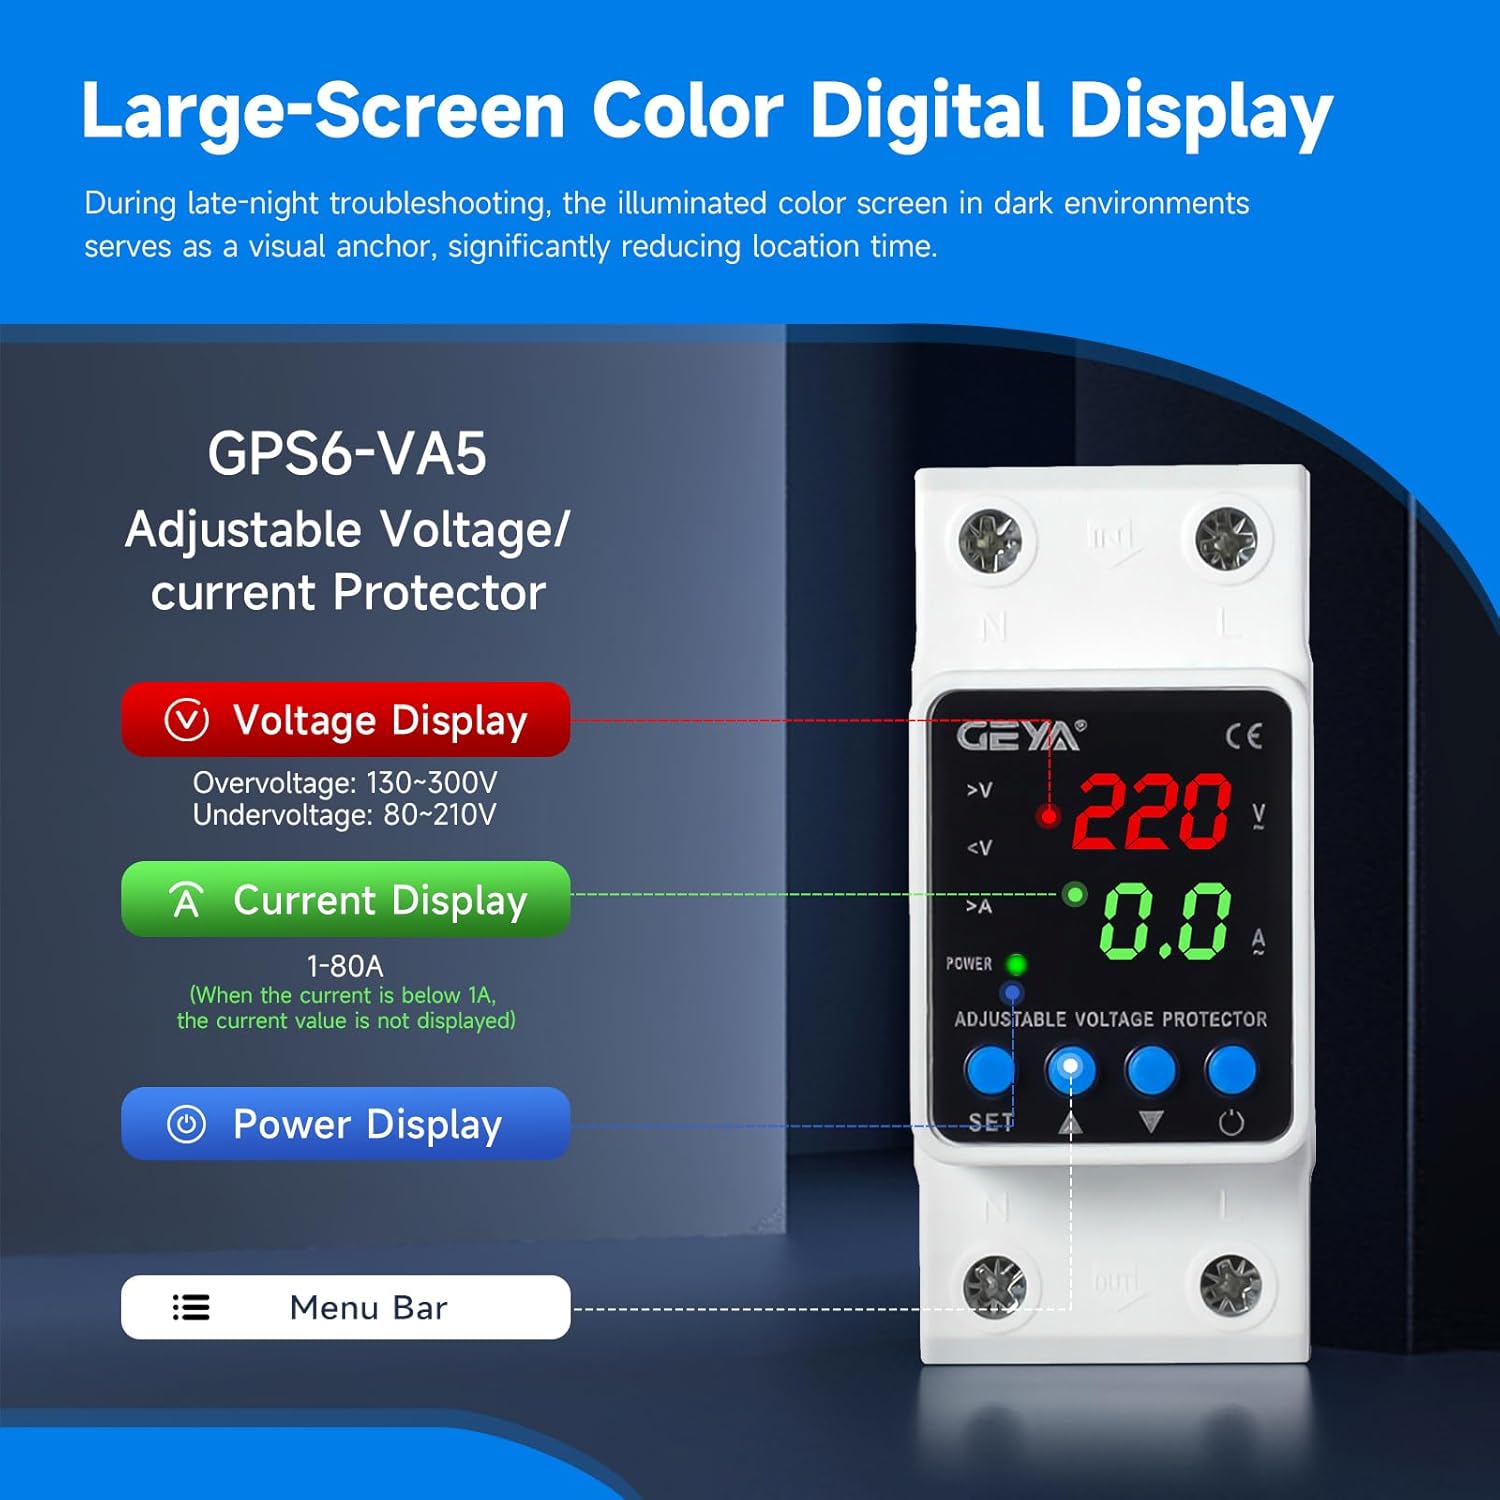
Image: Close-up of the GEYA GPS6-VA5 digital display, highlighting voltage, current, and power indicators, along with control buttons.
- Voltage Display: Shows the current voltage (V). Overvoltage range: 130-300V, Undervoltage range: 80-210V.
- Current Display: Shows the current (A) flowing through the device (1-80A). If current is below 1A, the value may not be displayed.
- Power Display: Indicates the power status.
- Indicators: LEDs for overvoltage (>V), undervoltage (<V), and overcurrent (>A) provide quick visual status.
5.2 Adjusting Settings
The device features 'SET', 'Up Arrow', and 'Down Arrow' buttons for adjusting protection parameters. Refer to the detailed instructions below for specific parameter adjustments.
- Press the 'SET' button to enter the setting mode.
- Use the 'Up Arrow' and 'Down Arrow' buttons to navigate through different parameters (e.g., overvoltage threshold, undervoltage threshold, reset time).
- Press 'SET' again to select a parameter, then use 'Up Arrow' and 'Down Arrow' to adjust its value.
- Press 'SET' to confirm the new value and move to the next parameter or exit setting mode.
Note: Factory default settings are 275V for overvoltage, 175V for undervoltage, and a 30-second reset time. These can be adjusted within the specified ranges.
6. Maintenance
The GEYA GPS6-VA5 is designed for minimal maintenance. Regular checks can help ensure its continued reliable operation.
- Cleaning: Periodically wipe the device with a soft, dry cloth to remove dust. Do not use abrasive cleaners or solvents.
- Connection Check: Annually inspect all wiring connections to ensure they remain tight and free from corrosion.
- Environmental Conditions: Ensure the operating environment remains within the specified temperature and humidity ranges.
- No User-Serviceable Parts: Do not attempt to open or repair the device. Refer any issues to qualified service personnel.
7. Troubleshooting
If you encounter issues with your GEYA GPS6-VA5 device, refer to the following common troubleshooting steps:
- No Display/No Power:
- Check the main power supply to the device.
- Verify all input wiring connections are secure.
- Device Not Tripping on Fault:
- Confirm that the overvoltage/undervoltage thresholds are set correctly and within the expected range for your application.
- Ensure the fault condition (e.g., voltage outside set limits) is present and sustained long enough to trigger the trip delay.
- Device Tripping Unexpectedly:
- Check the actual line voltage and current to ensure they are within normal operating parameters.
- Review the set overvoltage, undervoltage, and overcurrent thresholds. Adjust if necessary.
- Inspect for intermittent power fluctuations in your electrical system.
- Incorrect Readings:
- Ensure wiring is correct and connections are tight.
- Compare readings with a calibrated multimeter if possible.
If the problem persists after attempting these steps, contact GEYA customer support or a qualified electrician.
8. Specifications
| Parameter | Value |
|---|---|
| Brand Name | GEYA |
| Model Number | GPS6-VA5-2P-40A-220V |
| Rated Supply Voltage | AC220V (L-N) |
| Rated Frequency | 50/60Hz |
| Current Rating | 40 Amps |
| Coil Voltage | 220 Volts (AC) |
| Minimum Switching Voltage | 130 Volts (AC) |
| Operation Mode | Automatic |
| Mounting Type | DIN Rail Mount |
| Connector Type | Screw |
| Contact Material | Silver |
| Contact Type | Normally Open |
| Reset Time | 2-900s (Factory default: 30s) |
| Certification | CE |
9. Warranty and Support
For warranty information or technical support, please contact GEYA customer service. Keep your purchase receipt as proof of purchase.
For further assistance, visit the official GEYA website or contact your local distributor.


