
1. Introduction
This manual provides detailed instructions for setting up and operating your tenlamp G10+Boom Arm-MIC Podcast Equipment Bundle. This comprehensive kit is designed for high-quality audio production, suitable for podcasting, live streaming, gaming, and recording on various platforms.
2. Package Contents
The tenlamp G10+Boom Arm-MIC Podcast Equipment Bundle includes the following components:
- G10 Sound Board Audio Mixer
- 3.5mm Condenser Microphone
- Boom Arm with Desk Clamp
- Pop Filter
- Shock Mount
- 3.5mm TRS Headphone
- 3.5mm TRRS Audio Cable
- USB OTG Cable (with various adapters)
- USB-C to USB-A Cable
- User Manual

Figure 2.1: Included Components and Dimensions
3. Setup and Connections
Follow these steps to set up your podcast equipment bundle and connect it to your devices.
3.1 Microphone Assembly
Attach the condenser microphone to the shock mount, then secure the shock mount to the boom arm. Position the pop filter in front of the microphone. Secure the boom arm to your desk using the clamp.
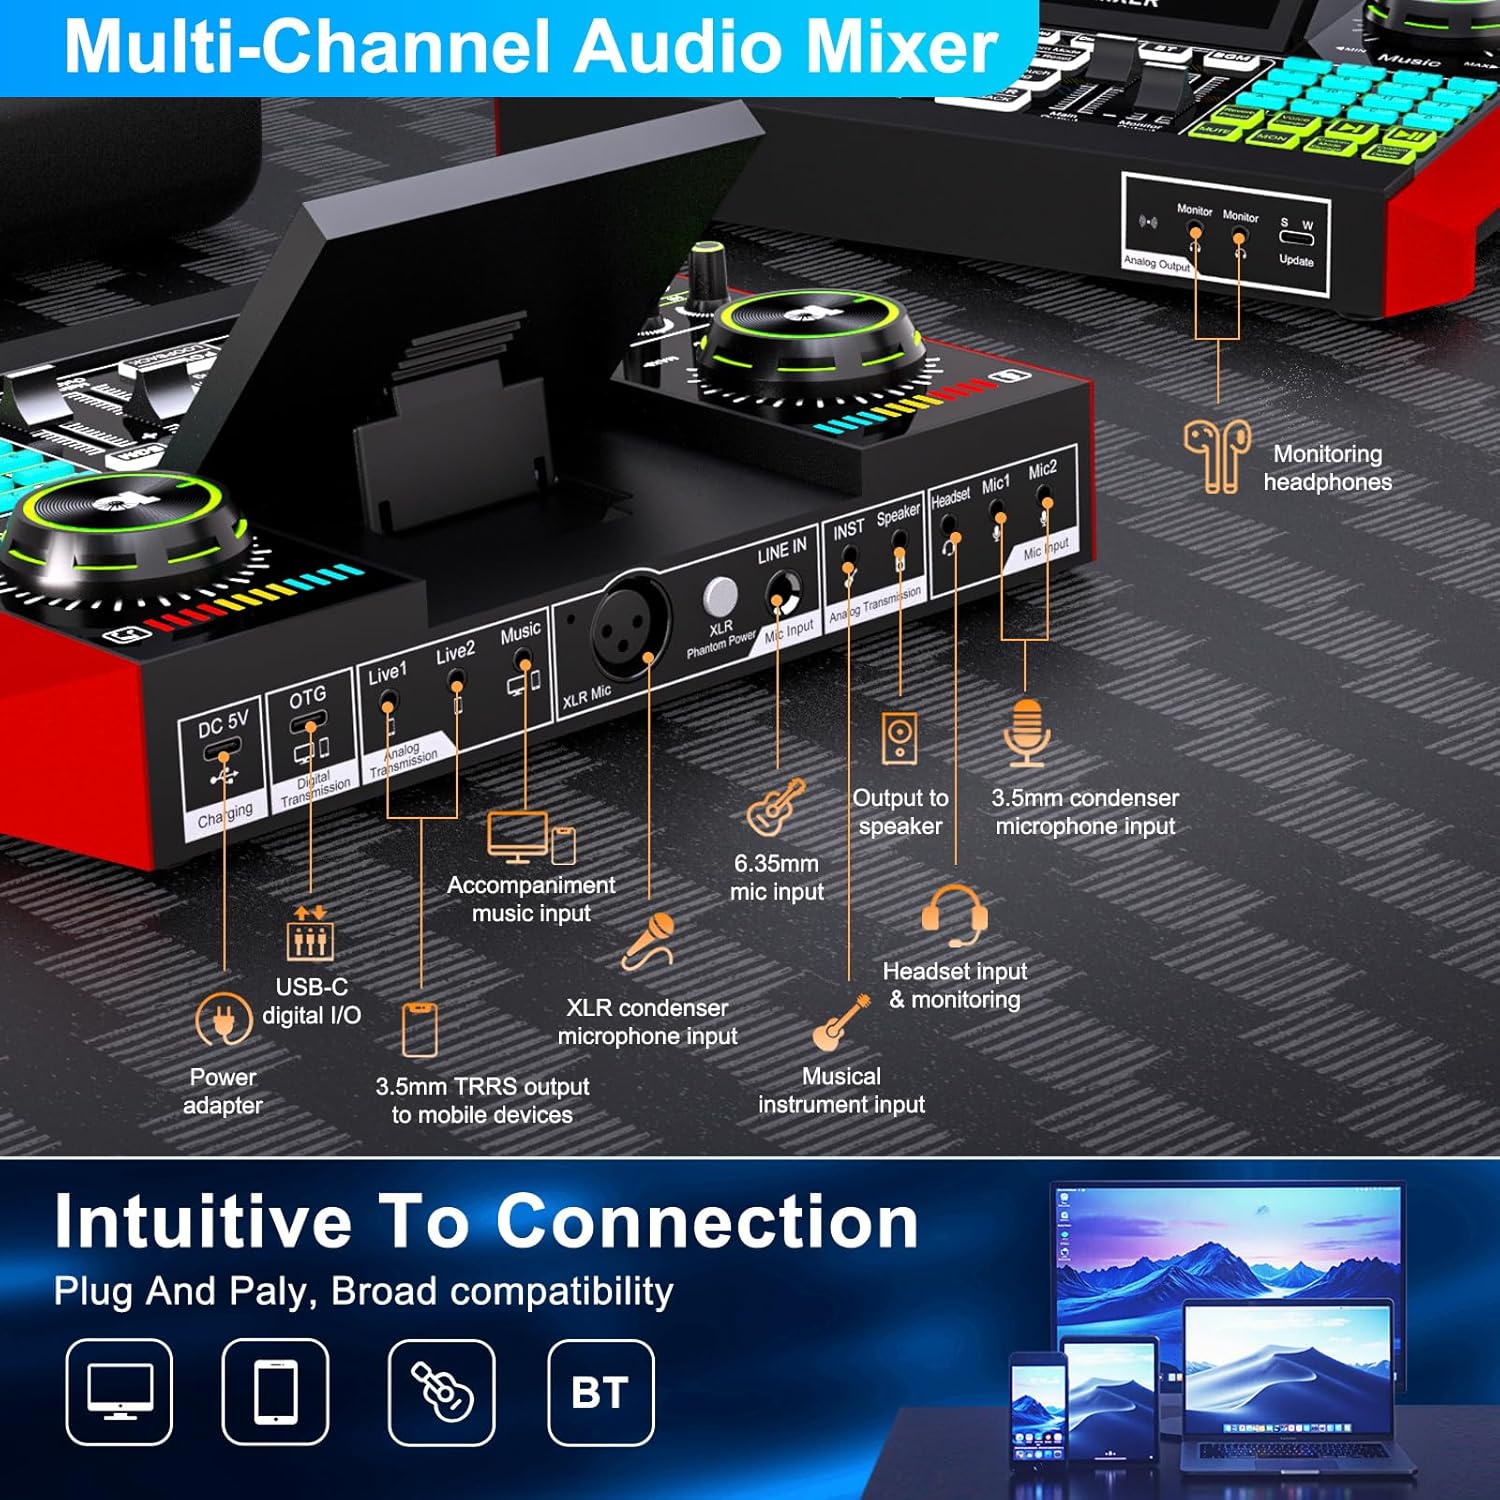
Figure 3.1: G10 Mixer Rear Panel Connections
3.2 Connecting to a Mobile Phone for Live Streaming/Recording
There are two primary methods for connecting your G10 mixer to a mobile phone:
Method 1: Using the OTG Cable (Recommended for iPhone/Android Type-C)
- Plug your headphones into the Monitor port on the front of the G10 mixer.
- Connect the microphone to the Mic1 port on the G10 mixer.
- Take the provided USB OTG braided cable. Plug the single-ended side (USB-C with 'OTG' label) into the OTG port of the G10 mixer.
- Plug the 2-in-1 side of the OTG cable into your phone. Ensure you select the correct adapter for your phone model (Lightning for iPhone, USB-C for Android Type-C).
- Important: For iPhone, ensure the audio mixer model (G10 MIXER) is displayed as connected. For Android, a headphone icon should appear. Do not enable Bluetooth on your phone when using the OTG cable.
Method 2: Using a 3.5mm Audio Cable (for phones with 3.5mm port)
- Plug your headphones into the Monitor port on the front of the G10 mixer.
- Connect the microphone to the Mic1 port on the G10 mixer.
- Take a 3.5mm audio cable (with connectors on both ends). Plug one end into the Live1 or Live2 port of the G10 mixer.
- Plug the other end of the 3.5mm audio cable into your phone's 3.5mm port.
- A headphone icon on your phone indicates a successful connection.
For a visual guide on connecting to mobile phones, please refer to the video below:
Video 3.1: How to connect mobile live streaming/content creation
3.3 Connecting to Play Music (Mobile Phone or Computer)
You can connect a separate device to the G10 mixer to play background music during your stream or recording.
Method 1: Mobile Phone via Bluetooth (Recommended)
- On your music-playing phone, enable Bluetooth.
- Search for and connect to G10 MIXER in your phone's Bluetooth settings.
- Ensure the phone's volume is turned up and not muted.
Method 2: Mobile Phone or Computer via 3.5mm Audio Cable
- Take a 3.5mm audio cable. Plug one end into the Music port of the G10 mixer.
- Plug the other end into the 3.5mm headphone port of your music-playing phone or computer.
- Note: Do not connect the music source to the Live1 or Live2 ports.
For a visual guide on connecting music sources, please refer to the video below:
Video 3.2: One device to stream, one for accompaniment/Content creation
4. Operating Instructions
The G10 mixer offers a range of controls for customizing your audio output.
4.1 Basic Controls
- Mic Knob: Adjusts the microphone input volume.
- Music Knob: Adjusts the background music volume.
- High/Mid/Low Tones: Fine-tune the microphone's tonal characteristics.
- Reverb Depth/Length: Control the intensity and duration of reverb effects.
- Main Output/Monitor Output: Adjust output levels for your audience and your monitoring headphones.
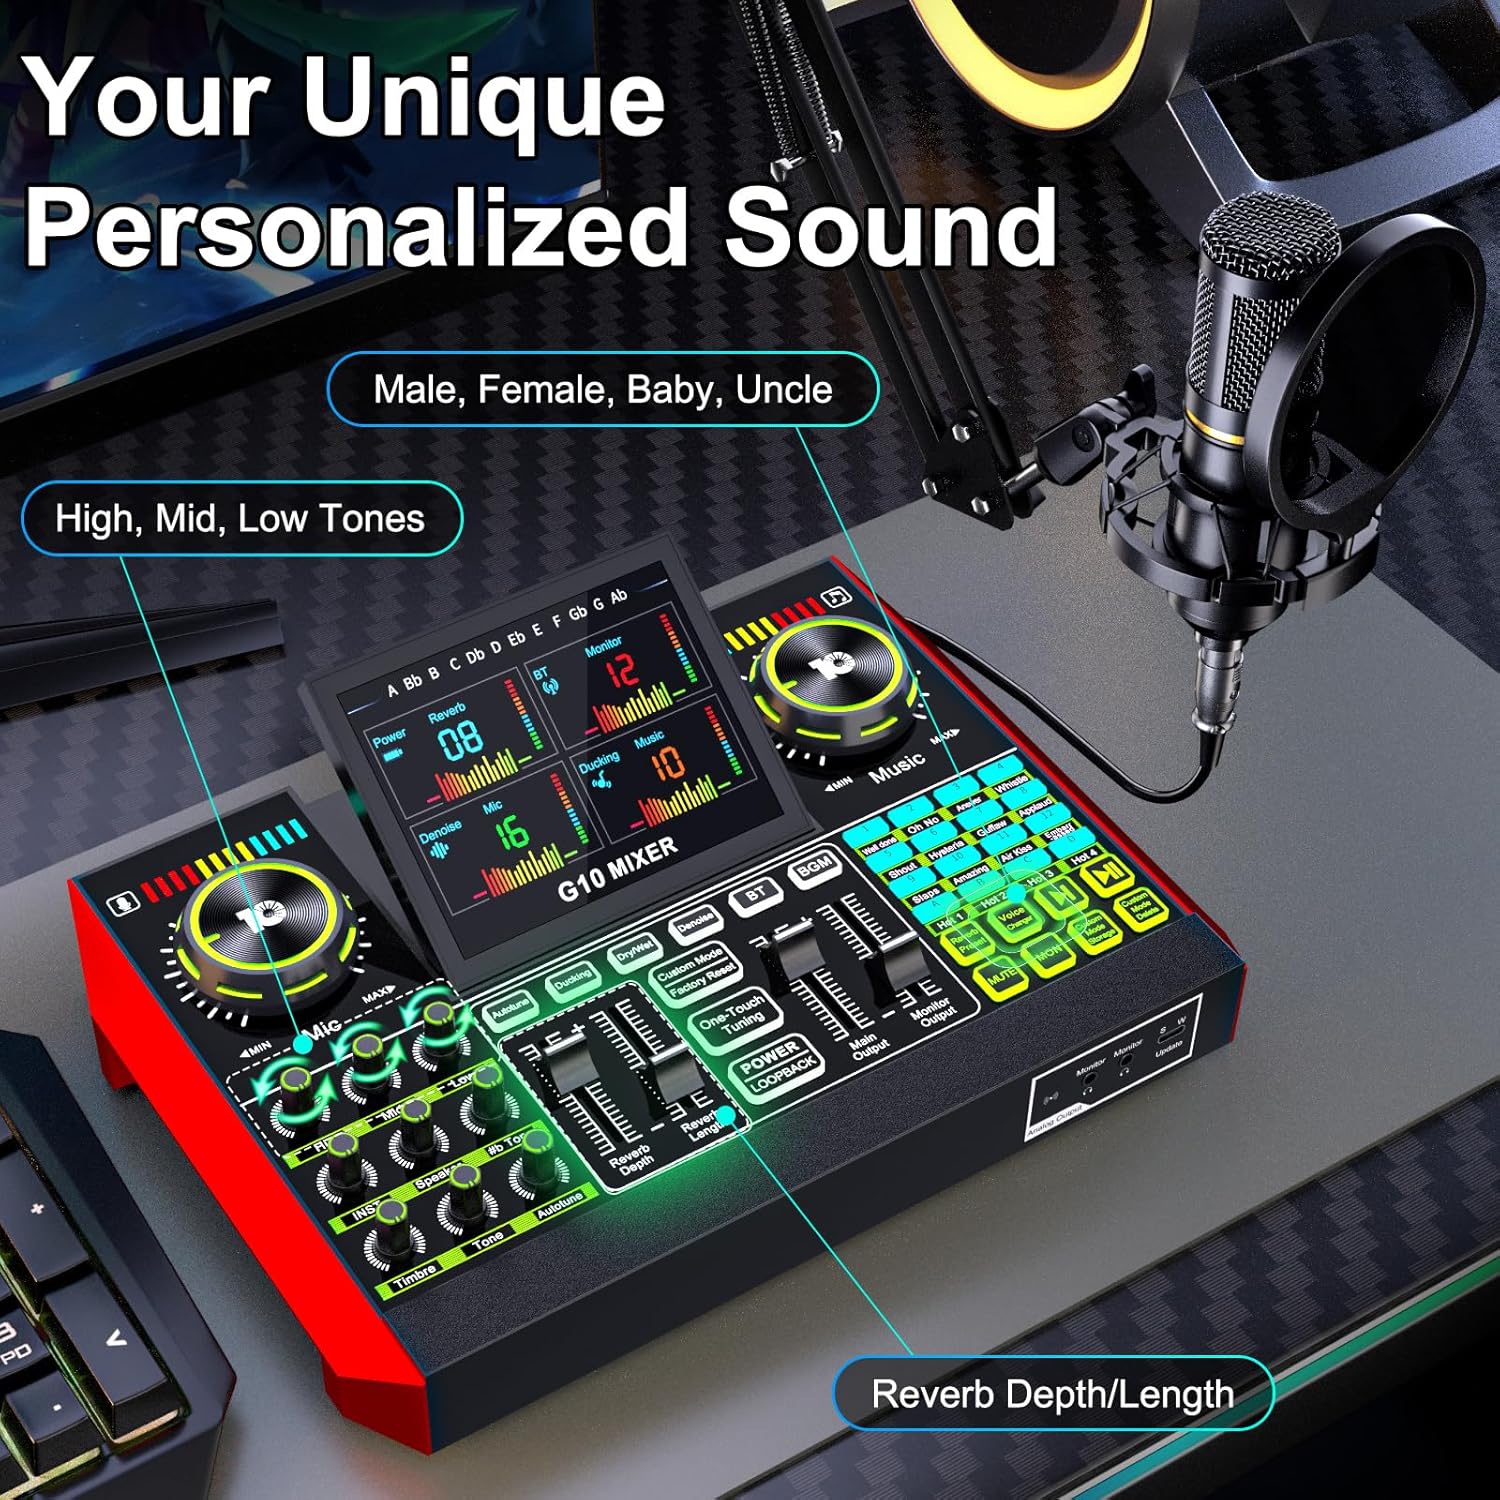
Figure 4.1: G10 Mixer Controls for Personalized Sound
4.2 Special Features
- Voice Changer: Transform your voice into various modes (female, deep, baby, magical) for creative content.
- Denoise: Intelligently filters out background noise for clearer audio.
- Ducking: Automatically reduces background sound when you speak, amplifying your voice.
- Interactive Sound Effects: Access 16 built-in sound effects (e.g., applause, laughter) to enhance engagement.
- Reverb Modes: Choose from 5 preset reverb modes (Original, KTV, Chat, Livestream, MC) for professional audio effects.
- Follow Singing (BGM) Mode: Allows you to hear the original track while singing, but your audience only hears the instrumental and your voice.
- Custom Mode Storage: Save your preferred sound settings for quick recall.
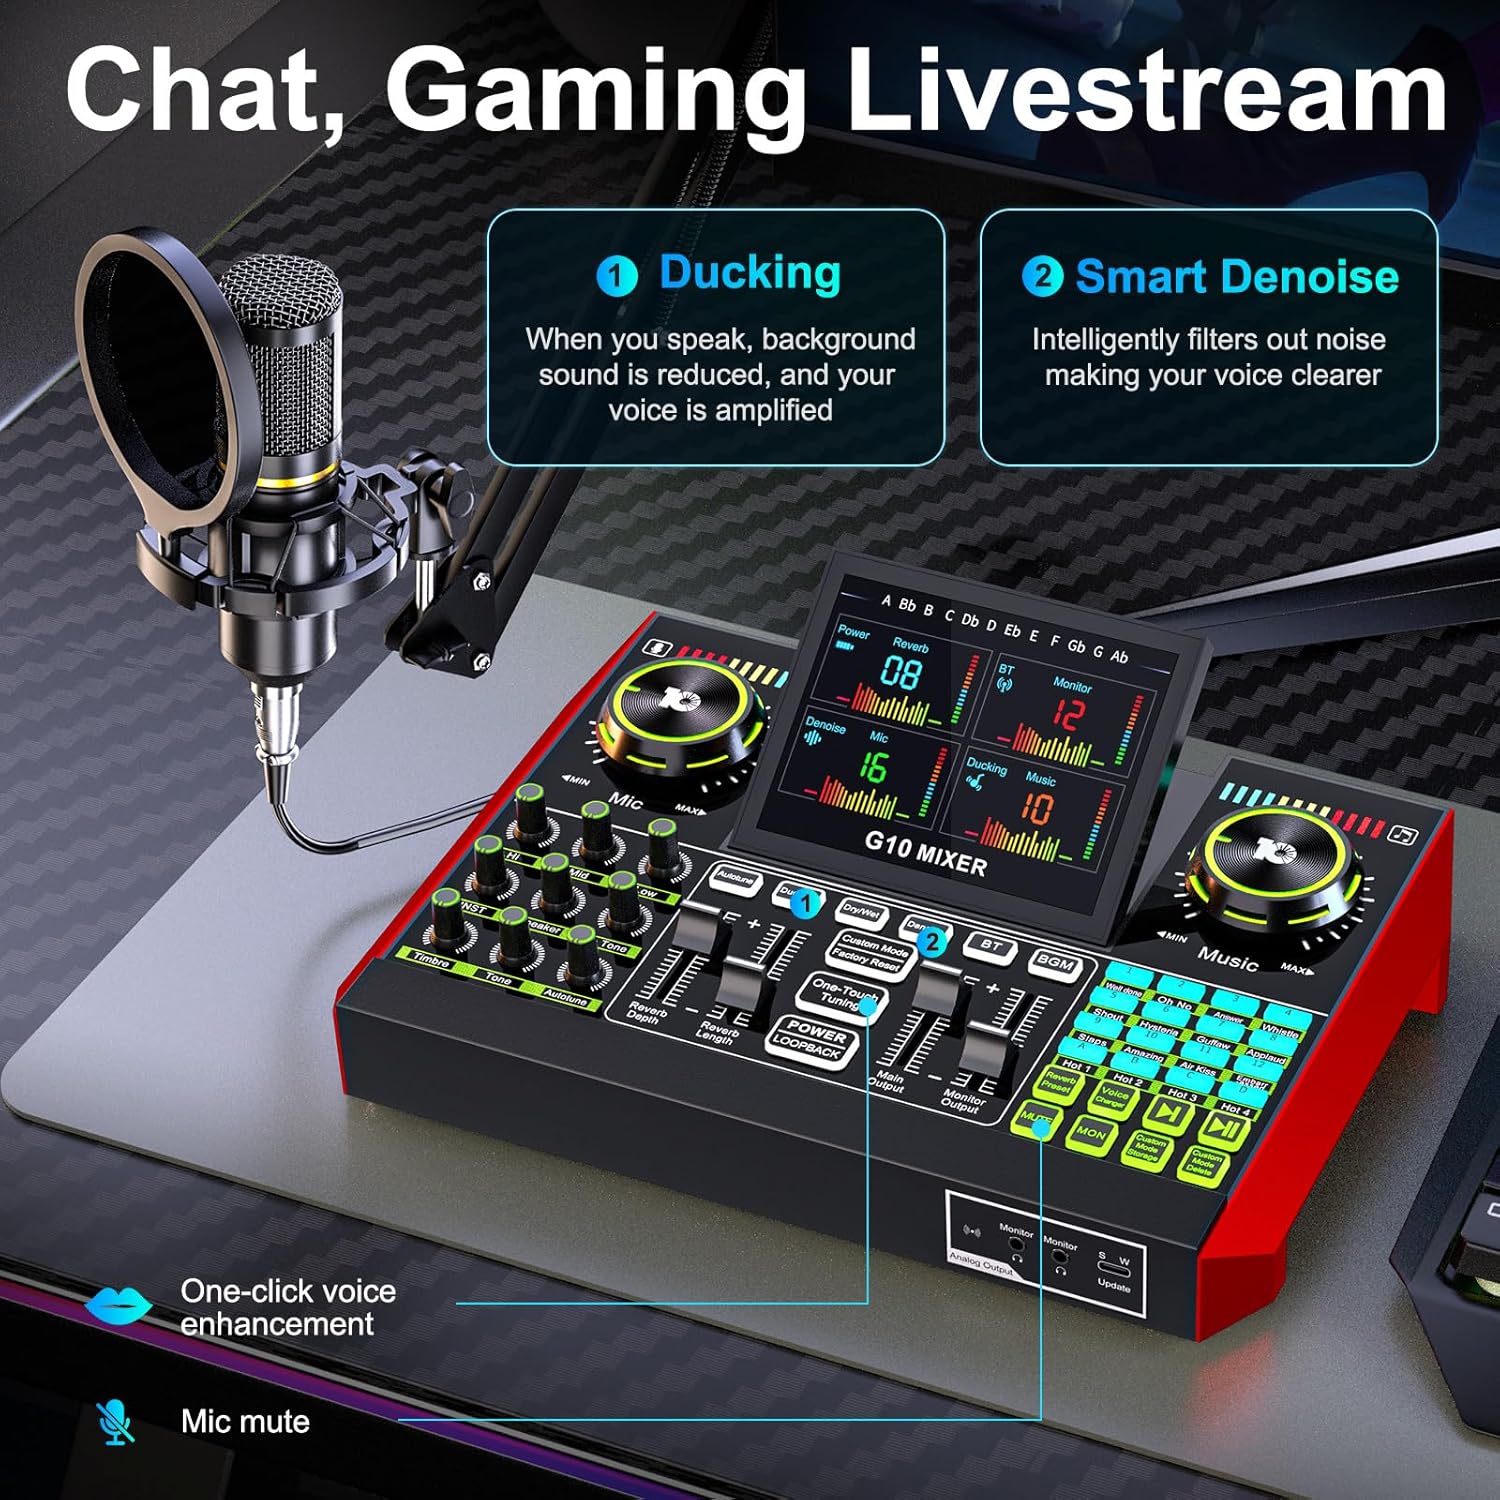
Figure 4.2: Chat, Gaming Livestream Features (Ducking, Denoise)

Figure 4.3: Singing Livestream Features (Follow Singing, Remove Vocal)

Figure 4.4: 16 Preset Interactive Effects
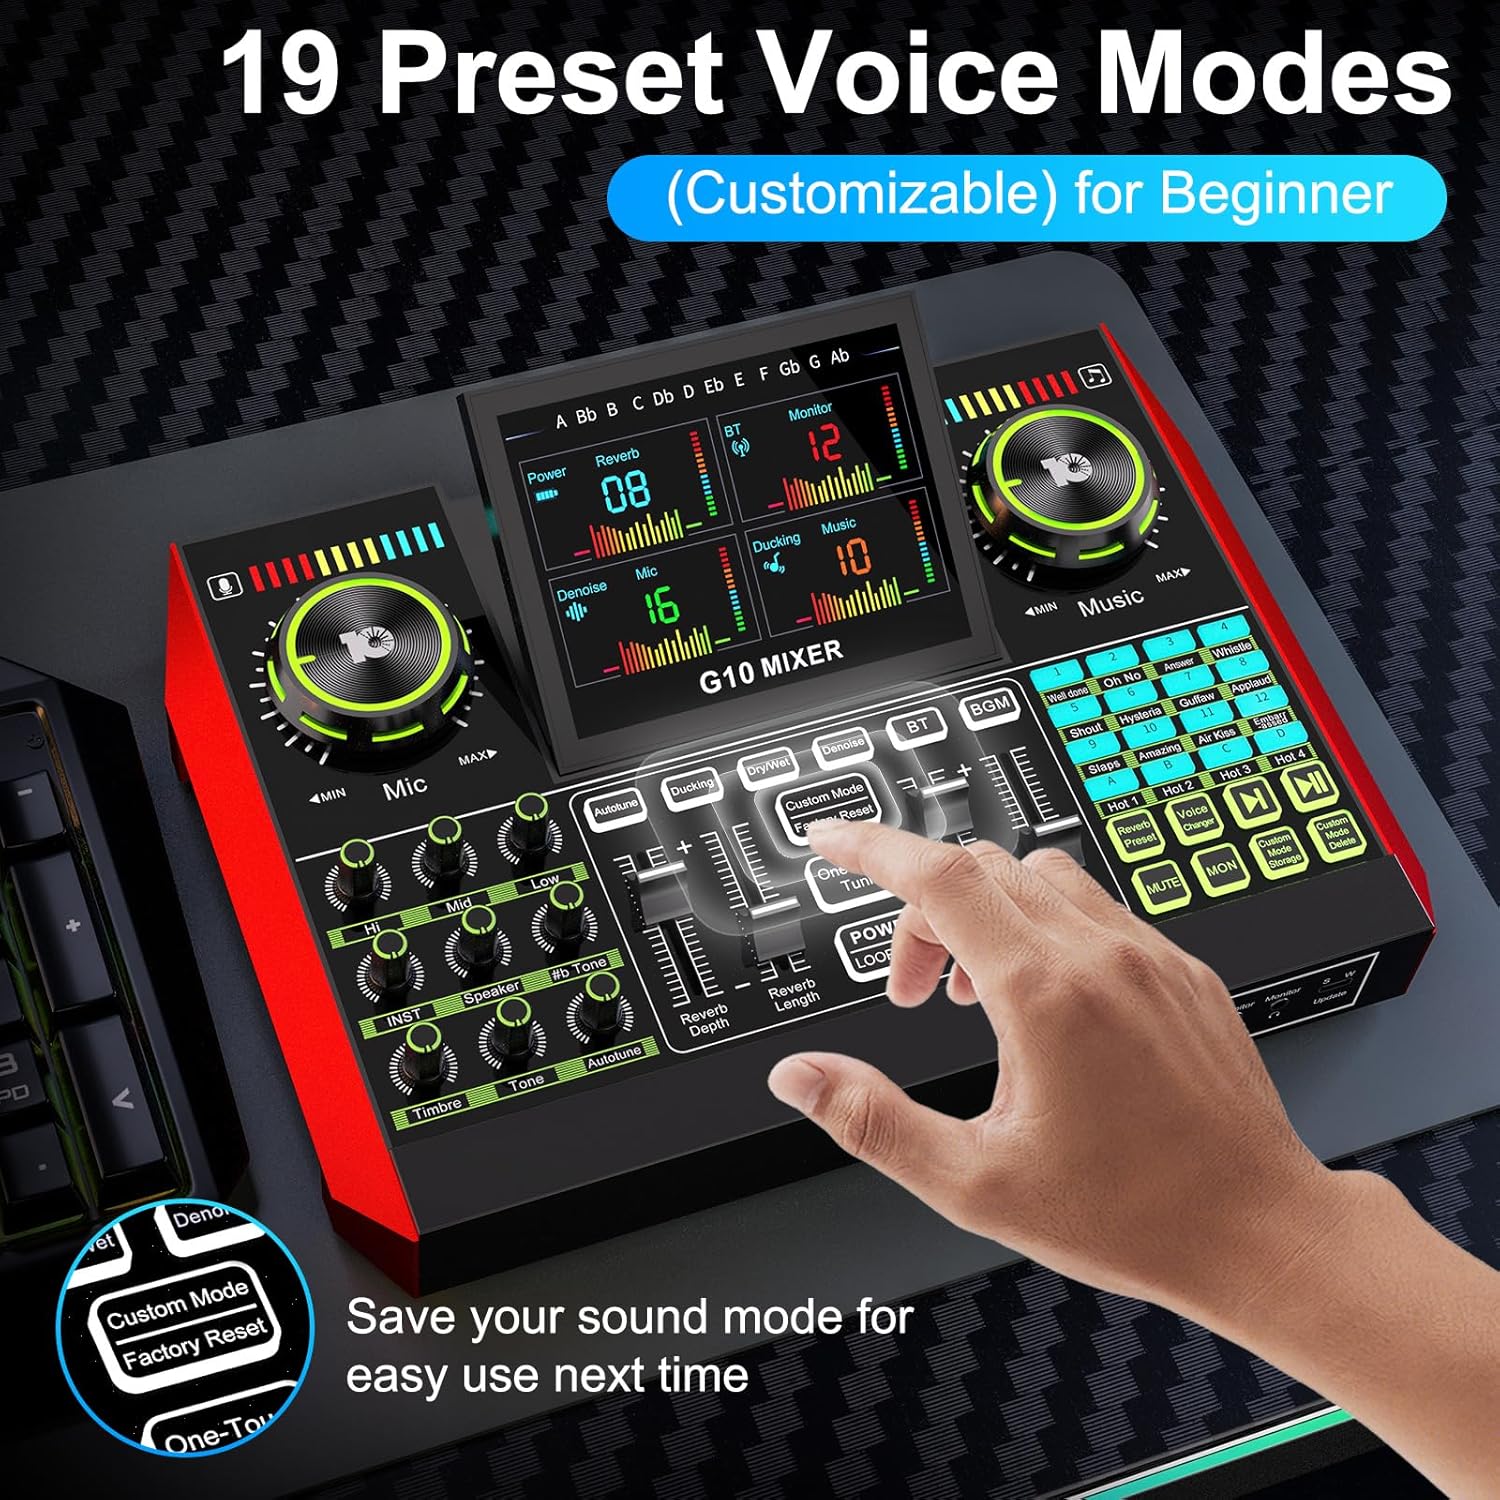
Figure 4.5: 19 Preset Voice Modes and Custom Mode Storage
For a general product introduction and overview of controls, please refer to the video below:
Video 4.1: Podcast equipment bundle introduction
5. Troubleshooting
If you encounter issues, please refer to the following common solutions:
- No Sound/Low Volume: Ensure all cables are securely connected. Check the volume knobs on the G10 mixer (Mic, Music, Main Output, Monitor Output) and on your connected devices (phone/PC). Verify that your phone's Bluetooth is off if using an OTG cable, or that the correct audio output is selected on your computer.
- Poor Audio Quality/Noise: Ensure the microphone is correctly positioned and the pop filter is used. Check for loose connections. Adjust the Denoise feature on the G10 mixer. Avoid placing the mixer near strong electromagnetic interference.
- Connection Issues: If using an OTG cable, ensure the single-ended side is plugged into the mixer and the 2-in-1 side into the phone. Do not reverse these connections. For Bluetooth, ensure the correct device ('G10 MIXER') is selected and paired.
- Mixer Not Powering On: Ensure the mixer is fully charged or connected to a power source. The G10 mixer has a built-in battery for portable use.
6. Specifications
| Manufacturer | tenlamp |
| Model Name | G10+Boom Arm-MIC |
| Item Weight | 4.44 pounds |
| Product Dimensions | 10.9 x 2.28 x 7.67 inches |
| Batteries | 1 12V Lithium Ion battery required (included) |
| Voltage | 5 Volts |
| Connectivity Technology | Auxiliary, Bluetooth, USB |
| Connector Type | 3.5mm / 6.35mm / XLR Jack, USB Type-C |
| Special Features | Echo Control, Mute Function, Noise Reduction, Volume Control |
| Power Source | Battery Powered |
| Number of Channels | 2 |
7. Maintenance
To ensure the longevity and optimal performance of your tenlamp G10+Boom Arm-MIC Podcast Equipment Bundle, follow these maintenance guidelines:
- Cleaning: Use a soft, dry cloth to wipe down the mixer and microphone. Avoid using liquid cleaners or abrasive materials, as they can damage the components.
- Storage: When not in use, store the equipment in a cool, dry place away from direct sunlight and extreme temperatures. Disassemble the boom arm and microphone if storing for extended periods to prevent strain on components.
- Cable Care: Avoid bending or crimping cables sharply. Store cables neatly to prevent tangling and damage.
- Battery Care: For the built-in battery, avoid fully discharging it frequently. Charge the device regularly, even if not in constant use, to maintain battery health.
8. Warranty and Support
tenlamp provides comprehensive support for its products:
- Customer Service: 7/24 customer service support is available for any inquiries or issues.
- Technical Support: Lifetime technical support is provided to assist with setup, operation, and troubleshooting.
- Replacement Policy: A 365-day replacement policy is offered for eligible products.
For further assistance, please refer to the contact information provided with your purchase or visit the official tenlamp website.


