
1. Product Overview
The Geloo 10 Gang Rocker Switch Panel is a versatile control unit designed for 12V and 24V DC electrical systems. It integrates multiple functions into a single panel, making it suitable for various vehicles and marine applications.
Key Features:
- 10 Rocker Switches: Control up to 10 different electrical circuits.
- Dual USB Ports: Provides 5V 2.1A output for charging mobile devices.
- LED Voltage Display: Monitors the system's voltage in real-time.
- Cigarette Lighter Socket: Offers a standard 12V power outlet.
- 10 Circuit Breakers: Each switch is protected by an automatic circuit breaker against overcurrent, overload, overheating, and short circuits.
- IP65 Waterproof Rating: Designed with a splash-proof front panel for protection against water ingress.
- Blue LED Indicators: Each switch features a blue LED for clear visibility in low-light conditions.
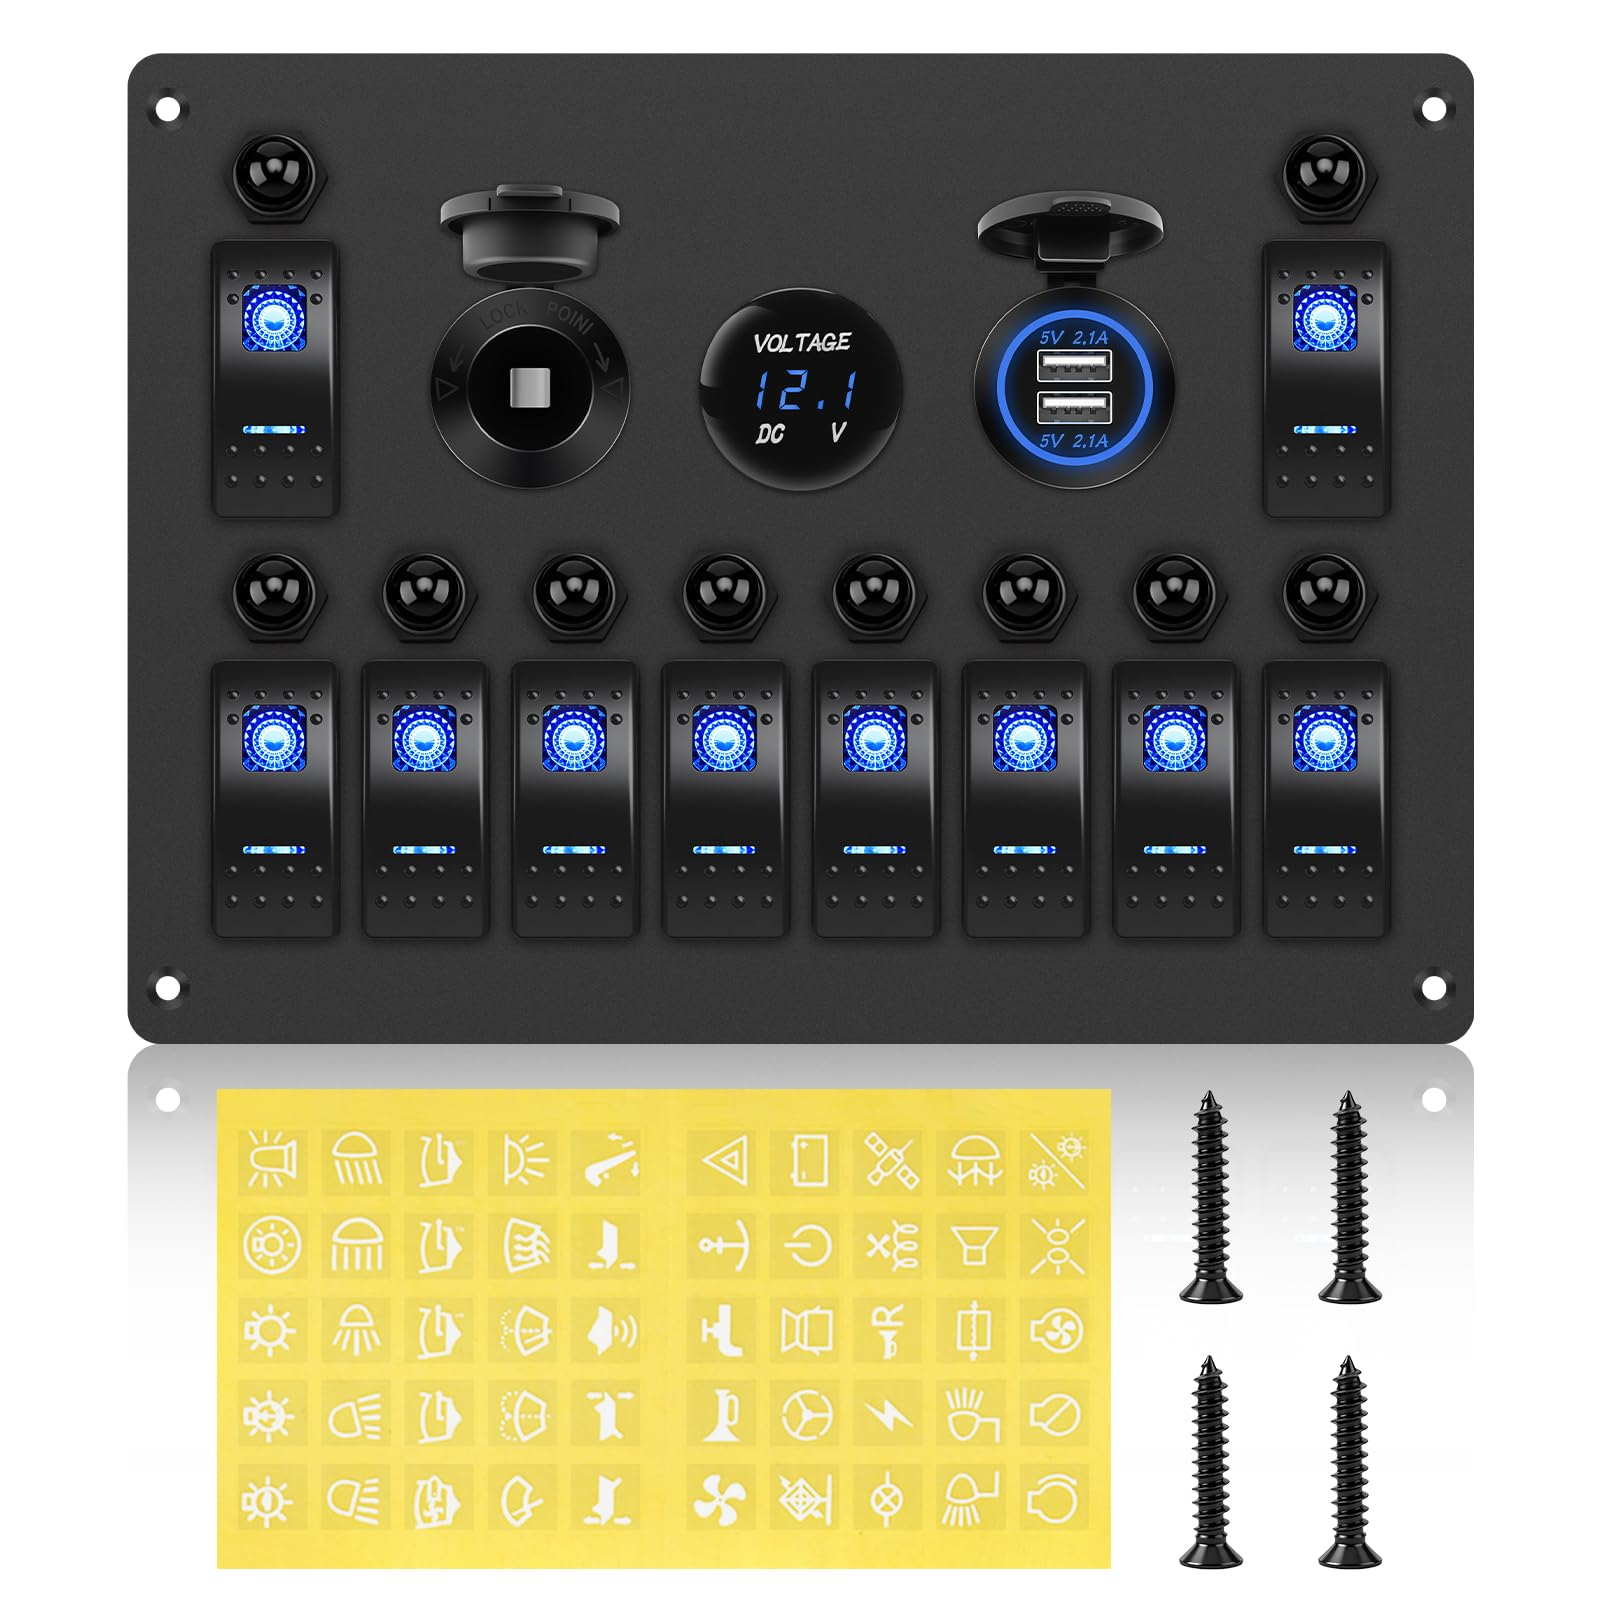
Image 1.1: The Geloo 10 Gang Rocker Switch Panel, showcasing its integrated components including rocker switches, USB ports, voltmeter, and cigarette lighter socket.

Image 1.2: The 10 Gang Multifunction Control Panel installed on a boat dashboard, demonstrating its application in marine environments.
2. Package Contents
Verify that all items are present and undamaged upon opening the package.
- 1 x Geloo 10-Way Rocker Switch Panel
- 4 x Mounting Screws
- 1 x DIY Sticker Sheet (for switch labeling)

Image 2.1: The package contents, including the switch panel, mounting screws, and a sheet of DIY stickers for customization.
3. Installation Guide
Proper installation is crucial for the safe and effective operation of the switch panel. It is recommended to have this product installed by a qualified professional if you are not familiar with vehicle electrical systems.
3.1 Safety Precautions
- Disconnect the vehicle's battery before starting any electrical work.
- Ensure the mounting location is dry and free from obstructions.
- Use appropriate personal protective equipment (PPE) such as safety glasses and gloves.
- Verify the voltage and current ratings of your accessories do not exceed the panel's specifications.
3.2 Mounting the Panel
- Choose a flat, secure surface for mounting the switch panel.
- Mark the drilling points using the panel as a template.
- Drill pilot holes for the mounting screws.
- Secure the panel using the provided mounting screws.
3.3 Wiring Instructions
The panel is pre-wired for ease of installation. Refer to the wiring diagram below for connections.
- Connect the main positive (+) wire from your power source (e.g., battery) to the panel's main positive input.
- Connect the main negative (-) wire from your power source to the panel's main negative input.
- Connect the positive (+) wires of your electrical accessories to the corresponding output terminals of each rocker switch.
- Ensure all connections are secure and properly insulated.

Image 3.1: Detailed wiring diagram showing positive and negative connections for instruments and equipment.
3.4 Easy Disconnection Terminals
The panel features improved terminals for easy disconnection. To separate a connected terminal from a switch, press down on the clip and gently pull the terminal away.

Image 3.2: Visual guide demonstrating how to easily disconnect terminals from the rocker switches by pressing the clip.
4. Operating Instructions
4.1 Rocker Switches
Each rocker switch controls a connected electrical appliance. Press the top part of the switch to turn the appliance ON, and the bottom part to turn it OFF. The blue LED indicator on each switch illuminates when the switch is in the ON position.
4.2 USB Charger
The dual USB ports provide 5V 2.1A output for charging compatible electronic devices. Connect your device's USB cable to either port to begin charging.

Image 4.1: The dual USB socket, providing 5V 2.1A output for charging devices.
4.3 Voltmeter
The integrated LED voltmeter displays the current system voltage. This allows for real-time monitoring of your battery's status. A normal voltage range for a 12V system is typically 12V-13.5V when the vehicle is off, and 13.5V-14.5V when the engine is running. If the voltage drops below 12V, check your battery.

Image 4.2: The digital LED voltmeter displaying the current system voltage.
4.4 Cigarette Lighter Socket
The 12V cigarette lighter socket provides a power source for compatible accessories. Ensure the accessory's power requirements do not exceed the socket's rating.

Image 4.3: The universal 12V cigarette lighter socket, made from durable, fire-resistant plastic.
4.5 Circuit Breaker Operation
Each switch is equipped with an automatic circuit breaker. In case of an overcurrent or short circuit, the breaker will trip to protect the connected appliance and the panel. To reset a tripped breaker, press the button on the breaker back into its normal position after resolving the fault.

Image 4.4: Illustration of the circuit breaker's overload protection mechanism and how to reset it from a tripped state to normal operation.
5. Maintenance
Regular maintenance ensures the longevity and reliable performance of your switch panel.
- Cleaning: Wipe the panel surface with a soft, damp cloth. Avoid abrasive cleaners or solvents that could damage the finish or electronic components.
- Inspection: Periodically check all wiring connections for tightness and signs of corrosion. Ensure the rubber gaskets around the ports are intact to maintain the IP65 waterproof rating.
- Switch Functionality: Test each switch periodically to ensure proper operation and illumination of the LED indicators.

Image 5.1: The IP65 waterproof design of the panel, showing its resistance to water splashes, which is important for maintenance and longevity.
6. Troubleshooting
If you encounter issues with your Geloo switch panel, refer to the following common troubleshooting steps:
- No Power to Panel: Check the main power connections from the battery. Ensure the battery is charged and the main fuse (if external) is not blown.
- Switch Not Working: Verify the individual circuit breaker for that switch has not tripped. Check the wiring connection to the appliance.
- USB Ports Not Charging: Ensure the panel has power. Try a different USB cable or device to rule out external issues.
- Voltmeter Not Displaying: Check the main power connection to the panel. If the panel has power but the voltmeter is blank, contact support.
- Circuit Breaker Trips Repeatedly: This indicates an overload or short circuit in the connected appliance or its wiring. Disconnect the appliance and inspect its wiring for faults. Do not bypass the circuit breaker.
7. Specifications
| Feature | Specification |
|---|---|
| Model Number | SPA245 |
| Operating Voltage | 12V / 24V DC |
| Rated Current | 20 Amperes (per circuit) |
| Switch Type | Rocker (On-Off) |
| Number of Circuits | 10 |
| USB Output | 5V 2.1A (Dual Ports) |
| Cigarette Lighter Socket | 12V |
| Material | ABS Plastic |
| International Protection Rating | IP65 |
| Dimensions (LxWxH) | 20 x 8.9 x 17.5 cm (7.87 x 3.5 x 6.89 inches) |
| Mounting Type | Panel Mount |
| Compatible Vehicle Types | Car, Truck, RV, Boat, Yacht |

Image 7.1: Product dimensions of the Geloo 10 Gang Rocker Switch Panel.
8. Warranty and Support
Geloo products are manufactured to high-quality standards. For warranty information or technical support, please refer to the contact details provided with your purchase or visit the official Geloo website. Keep your purchase receipt for warranty claims.